Image I Chose
The image I chose is a painting named “The Death of Julius Caesar”. The painting depicts the assassination of Julius Caesar by his close friend Brutus and a group of senators, where he was stabbed 23 times to death.

Source: https://pixabay.com/vectors/julius-caesar-assassination-painting-4877717/
Building Circuit & Writing the Code

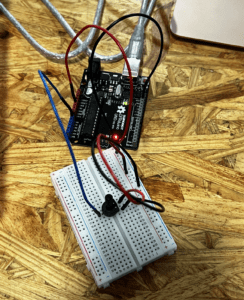
I picked potentiometer as the physical controller to modify the way I want the image to be displayed. Since the jump wires and the potentiometer are the only components needed, the building process of the circuit went fast and smoothly. After I built the circuit, I wrote the code in Arduino, set the pinMode of the potentiometer, and modified the remaining part of the code by using “SendMultipleValues” example as a basis.
Since the painting is about the assassination and the end of Julius Caesar’s life, I want the image to slowly be tinted with red and then fade into the dark. To do that in the Processing, I used the tint() function and set the variables using the serial values, where the red component of the variable will be larger than green and blue. Then I tested the code with size(640, 400) to see if it works. The coding process went smoothly before I changed the size to have a better presentation of the image. After I got the effects that I want, I tried to change the size into fullScreen(). However, with fullScreen(), the image didn’t transform directly with the same pace as I twisted the potentiometer, and the response of the Processing had a long delay. In other words, the image didn’t have any changes when I twisted the potentiometer until I waited for thirty seconds. Therefore, I changed the size back to (640, 400), where everything worked perfectly.
Arduino Code
#include "SerialRecord.h"

SerialRecord writer(1);

void setup() {
Serial.begin(9600);
pinMode(A0, INPUT);
}

void loop() {

  int sensorValue = analogRead(A0);
  writer[0] =sensorValue;
  writer.send();
  // This delay slows down the loop. This can make it easier to debug the
  // program.
  delay(10);
}
Processing Code
import processing.serial.*;
import osteele.processing.SerialRecord.*;

Serial serialPort;
SerialRecord serialRecord;
PImage photo;

void setup() {
  size(640, 400);
  photo =loadImage("cc.png");
  //image source:https://pixabay.com/vectors/julius-caesar-assassination-painting-4877717/


  String serialPortName = SerialUtils.findArduinoPort();
  serialPort = new Serial(this, serialPortName, 9600);
  serialRecord = new SerialRecord(this, serialPort, 1);
}

void draw() {
  serialRecord.read();
  int value = serialRecord.get();
  background(#B98FFF);
  tint(value, value/4, value/4);
  image(photo, 0, 0, width, height);


}
Result: