Task#1: Test the NeoPixel
Step 1:

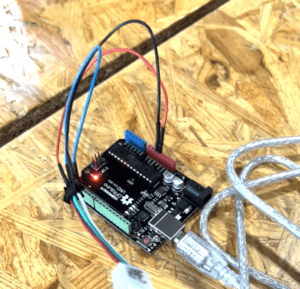
I built the circuit by connecting the NeoPixel strips to the Arduino with 3 jumper cables.
Step 2:
Since I have downloaded the FastLED library in the class, I skipped this step and moves directly to step 3.
Step 3:
I tested the NeoPixels to make sure that they are working correctly. To do so, I tried it out with the example FastLED/Blink. After I run the code, the first LED on the NeoPixel strip started blinking, which means that my NeoPixel is working properly.
Task#2: Use your computer to light up NeoPixels
Step 1:
I have installed the SerialRecord library in the class before the recitation session, so I skipped this step and move on to Step 2.
Step 2:
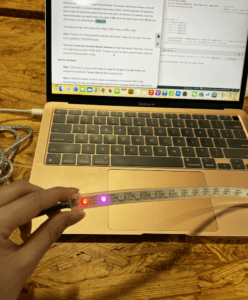
This step of testing the Serial Monitor went fast and smoothly for me. I programmed my Arduino using the code we had in the class, where I just copy and paste it from the link provided in the Recitation page. Then, I inputted the serial values(CSV) of 1,255,0,100 in my Serial Monitor by clicking CMD + Enter. The first value indicate the pixel number, the second represents the content of red, then green, and last blue. The result indicated that my Serial Monitor is working.
This is what I got after I upload the code (the second pixel lighted purple):

Step 3:
I programmed the processing sketch using the code we had in class and closed all the Serial Monitor windows I opened so that I won’t run into an error of “PORT BUSY”. I ran the code, however I got into unsatisfied link error stating that the program “couldn’t load library library jssc”. Fortunately, under the help of Prof. Rudi, I was able to light up the NeoPixel with the code. We downloaded another library file and replaced the old library with it, it made the code work. A tiny rectangle window with a. black background appeared on the screen. When I clicked a random point in the window, a color block showed up at the place I clicked and the same color lighted up on my NeoPixel at a similar position.
Task#3: Add Music!
Step 1:
I downloaded the sketch given on the recitation page and a music named “Siren”. Then, I replaced the beat.aiff with Siren.mp3.
Step 2:
I modified the sketch by merging the code form the Processing sketch from Task#2 into my current sketch. It created a visualization on the screen and on the NeoPixel strip at the same time when the music is played.
Step 3 & 4:
For step 3 and step 4, I added a light effect for the song I have chosen with the ‘for’ loop and map() functions to let NeoPixel to change color base on the volume of the music. To do so, I assigned a color content each for the g and b values, and the r value will change between the range 0 to 255 according to the volume of the music. This way, the colors that will light up on my NeoPixel will be different shades of blue, pink, and purple.
Final Code
import processing.sound.*;
import processing.serial.*;
import osteele.processing.SerialRecord.*;

Serial serialPort;
SerialRecord serialRecord;

int W;         //width of the tiles
int NUM = 60;  //amount of pixels
int[] r = new int[NUM]; //red of each tile
int[] g = new int[NUM]; //red of each tile
int[] b = new int[NUM];


SoundFile sample;
Amplitude analysis;

void setup() {
  size(640, 480);

  // load and play a sound file in a loop
  sample = new SoundFile(this, "Siren.mp3");
  sample.loop();

  // create the Amplitude analysis object
  analysis = new Amplitude(this);
  // analyze the playing sound file
  analysis.input(sample);

   String serialPortName = SerialUtils.findArduinoPort();
  serialPort = new Serial(this, serialPortName, 9600);
  serialRecord = new SerialRecord(this, serialPort, 4);
  serialRecord.logToCanvas(false);
}

void draw() {
  println(analysis.analyze());
  background(255, 255, 194);
  noStroke();
  fill(255, 0, 150);

  // analyze the audio for its volume level
  float volume = analysis.analyze();

  // volume is a number between 0.0 and 1.0
  // map the volume value to a useful scale
  float diameter = map(volume, 0, 1, 0, width);
  // draw a circle based on the microphone amplitude (volume)
  circle(width/2, height/2, diameter);

  int NumLED= floor(map(volume, 0, 1, 0, 60));
  for(int n=0; n< NumLED; n++){


    r[n] = floor(map(volume, 0, 0.6, 0, 225));
    g[n] = floor(0);
    b[n] = floor(127);

    serialRecord.values[0] = n;     // which pixel we change (0-59)
    serialRecord.values[1] = r[n];  // how much red (0-255)
    serialRecord.values[2] = g[n];  // how much green (0-255)
    serialRecord.values[3] = b[n];  // how much blue (0-255)
    serialRecord.send();


  }


}