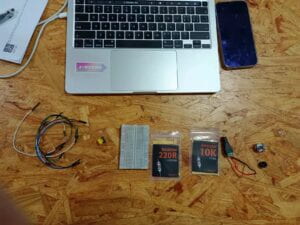
Components:

- 1 * Breadboard: provide a space to place each component and help to form a complete circuit
- 1 * Buzzer: make sounds
- 1 * Push-Button Switch: control the buzzer and LED2
- 1 * 220 ohm Resistor: limit the current to protect the LED
- 1 * 10K ohm Resistor: limit the current to protect the LED
- 1 * 10K ohm Variable Resistor (Potentiometer): control the luminance of LED1
- 2 * LED: produce light
- 1 * 5 volt power supply: switch the voltage to the proper degree
- 1 * Barrel Jack: connect the power with the circuit
- 1 * Multimeter: measure different values
- 1 * DIY Paddle Button: instead of the button, work as a switch
- Several Jumper Cables (M/M Wires): enable the flow of the current
Process:
- First, we connected the circuit shown in the first step. We installed a buzzer and a button and then connected them with the wires. It looked easy but when we really did it by ourselves when found it not like what we had thought. The wires could make us confused. At first, we thought we had connected all the things, but the buzzer just didn’t make any sound. After checking, we found we made it shout out carelessly.
- Then, we added a resistor and a LED(LED2) to the circuit. After pressing the button, LED2 will light at the same time as the buzzer rang.
- In step3, we added a potentiometer and another LED (LED1). LED1 is not controlled by the button, but by the potentiometer. At first, we didn’t know how to install the potentiometer, but professor Marcela taught us patiently.
- Additionally, we also made a DIY paddle button with professor Andy. We melted a metal solder and use it to fasten a cardboard on which we tape some copper tape and a wire. Then we stick two cardboard together, with paper time on the side without the metal tape, so if we put this combination on the table and press it to make metal tape contact, it would work as a paddle button.
- Finally, we change the press button to the DIY paddle button. So we can enjoy it!!
Questions
- What is the function of the resistor R1 ? (You can read about the reason why LEDs need resistors here)
A LED has its maximum voltage and current rating limit. If the voltage and the current rating exceed the limit, it will cause damage to the LED. So adding a resistor can limit the current and protect the LED.
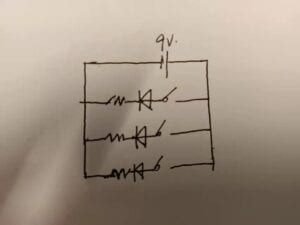
- Looking at the following circuit, draw its diagram by yourself.


- After reading The Art of Interactive Design, in what way do you think that the circuit you built today includes interactivity? Which degree of interactivity does it possess? Please explain your answer.
In this essay, the author metaphorically defines interaction as “a cyclic process in which two actors alternatively listen, think and speak”, and he regards conversation as the most common form of interaction. Interactivity, in my understanding, refers to the ability that something can participate in an interaction.
The interactivity of this circuit can be felt in the following process: when someone presses the button, the LED2 will light and the buzzer will make the sound as a response to the person’s action. In this process, there is a conversation between the person and the circuit. Thus there is interaction. Thus, I suppose it is interactive.
I think its interactivity is in a middle degree. It does have interaction with people, though interaction just contains simple movements and phenomenon ( sound and light). However, the morse idea improves its interestingness. People who play with it may still feel interested when they think and deliver or crack the code.
- How can Interaction Design and Physical Computing be used to create Interactive Art? You can reference Zack Lieberman’s video or any other artists that you know.
Interaction Design is a component of Interactive Art. And Physical Computing is a tool to make Interaction Design Interactive Art. Artists express their interaction design in an artistic form, while in the technology age they usually do it with the help of physical computing.
For example, in Zack’s project eyewriter, the installation can capture the movements of eyeballs and show their track. Capturing the movements and showing them out is an interaction design, but when it is linked with eyes creatively and used to help those who have difficulty speaking and moving, it becomes an interactive art to some degree. And all of these things become possible because of the software that he uses, which shows the importance of physical computing.
This is a good example of an in-depth documentation for the recitation exercise. To be clear, you answered all the prompts and you did it in an adequate manner. For this kind of performance, recitation posts get the full grading. Congrats!
It’s also worth saying that for the midterm, the way you recorded the process of building the circuit was not so extensive and that several technical details could have helped you to capture better how to build the circuit. The same goes to the encoding of Morse or soldering.