Part 1: Media controller
Code
Arduino
// IMA NYU Shanghai
// Interaction Lab
// For sending multiple values from Arduino to Processing


void setup() {
  Serial.begin(9600);
}

void loop() {
  // to send values to Processing assign the values you want to send
  //this is an example
  int sensor1 = analogRead(A0);
//  int sensor2 = analogRead(A1);
//  int sensor3 = analogRead(A2);

  // send the values keeping this format
  Serial.print(sensor1);
//  Serial.print(",");  // put comma between sensor values
//  Serial.print(sensor2);
//  Serial.print(",");  // put comma between sensor values
//  Serial.print(sensor3);
  Serial.println(); // add linefeed after sending the last sensor value

  // too fast communication might cause some latency in Processing
  // this delay resolves the issue.
  delay(100);

  // end of example sending values
}
Processing
// IMA NYU Shanghai
// Interaction Lab
// For receiving multiple values from Arduino to Processing

/*
 * Based on the readStringUntil() example by Tom Igoe
 * https://processing.org/reference/libraries/serial/Serial_readStringUntil_.html
 */

import processing.serial.*;
import processing.video.*;

int NUM_OF_VALUES_FROM_ARDUINO = 1;   /** YOU MUST CHANGE THIS ACCORDING TO YOUR PROJECT **/
int sensorValues[];      /** this array stores values from Arduino **/

String myString = null;
Serial myPort;
Movie myMovie;

void setup() {
  size(1280, 720);
 myMovie = new Movie(this, "shuimu.mp4");
  myMovie.play();
  setupSerial();
}

void draw() {
  getSerialData();
  printArray(sensorValues);
 if (myMovie.available()) {
    myMovie.read();
  }
  float m = map(sensorValues[0], 0, 1023, 0, 255);
  tint(m, 255, 255);
  image(myMovie, 0, 0);
}

  // use the values like this!
  // sensorValues[0]

  // add your code

  //


void setupSerial() {
  printArray(Serial.list());
  myPort = new Serial(this, Serial.list()[ 2 ], 9600);
  // WARNING!
  // You will definitely get an error here.
  // Change the PORT_INDEX to 0 and try running it again.
  // And then, check the list of the ports,
  // find the port "/dev/cu.usbmodem----" or "/dev/tty.usbmodem----"
  // and replace PORT_INDEX above with the index number of the port.

  myPort.clear();
  // Throw out the first reading,
  // in case we started reading in the middle of a string from the sender.
  myString = myPort.readStringUntil( 10 );  // 10 = '\n'  Linefeed in ASCII
  myString = null;

  sensorValues = new int[NUM_OF_VALUES_FROM_ARDUINO];
}

void getSerialData() {
  while (myPort.available() > 0) {
    myString = myPort.readStringUntil( 10 ); // 10 = '\n'  Linefeed in ASCII
    if (myString != null) {
      String[] serialInArray = split(trim(myString), ",");
      if (serialInArray.length == NUM_OF_VALUES_FROM_ARDUINO) {
        for (int i=0; i<serialInArray.length; i++) {
          sensorValues[i] = int(serialInArray[i]);
        }
      }
    }
  }
}
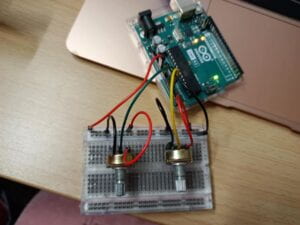
Making/writing details In this exercise, I wanted to use a potentiometer to make the control tint of the video. For the circuit, I only needed to build a simple circuit of potentiometer, which I found I could finished quite easily after the exercises in this semester. The code was based on the example of serial communication, movie_class, and movie_tint. The serial communication went well. However, one problem was that when I run the program I could only hear the sound but could not see any image. With the help of Skye I checked the code and found that I had two Mymovie.play(), one in the setup loop and one in the draw loop. I changed the former to Mymovie.read(), and it finally worked well.
Pat 2: Musical Instrument
Code
import processing.video.*;
String[] cameras = Capture.list();
Capture cam;

import processing.sound.*;
SinOsc sine;
Env env;
float attackTime = 0.001;
float sustainTime = 0.004;
float sustainLevel = 0.3;
float releaseTime = 0.4;

int s = 20;
float r, pr;
void setup() {
  size(640, 480);
  printArray(cameras);
  cam = new Capture(this, cameras[0]);
  cam.start();

  sine = new SinOsc(this);
  env  = new Env(this);
}

void draw() {
  if (cam.available()) {
    cam.read();
  }

   color c = cam.get(width/2, height/2);
  r = red(c);
    float difference = abs(r-pr);

  for (int x=0; x<width; x=x+s) {
    for (int y=0; y<height; y=y+s) {
        // get the pixel color
    color p = cam.get(x, y);
    // draw a circle with the color
     //int size = int( random(1, 20));
       fill(p);
       noStroke();
      rect(x, y, s, s);
    }
  }

if (difference>10) {
    sine.play();
    sine.freq(map(r, 0, 255, 100, 800));
    env.play(sine, attackTime, sustainTime, sustainLevel, releaseTime);
  }

  //image(cam, 0, 0);
  //sine.play();
    pr=r;
}
Making/Writing details: I wrote the code based on the capture example, but added the codes for pixels, SinOsc, Envelop, etc. Thanks to the earlier recitation exercise, I wrote the nested for loop successfully. But I did face two problems. The first one was that I did not know how to restore the previous variable values, so I did some research on Google and tried according to some examples. Luckily, I made it finally. Another problem was that since I used the capture example, it showed very clear images instead of pixels at first. After checking the code, I deleted the line “image(cam, 0, 0);”, and finally it worked well.
