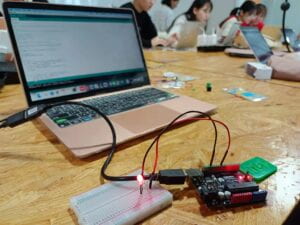
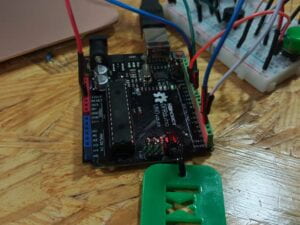
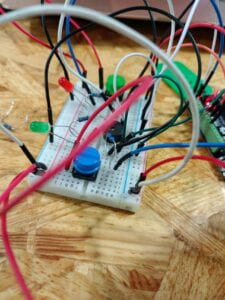
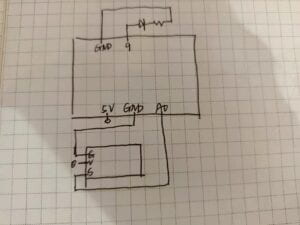
Monthly Archives: February 2022

Recitation 3: Sensors

Circuit

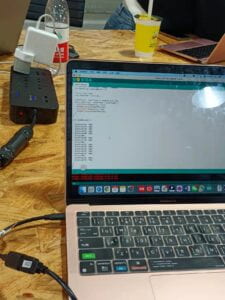
At first, we chose a force sensitive sensor as our input and a LED as our output. We successfully built the input, and with the help of AnalogReadSerial, we could see how the value changes because of the change of force.

Then we connected the output. In this process, we tried to map the input and set output. We found the information we wanted after the “SensorValue” and “Output” values.  The words and numbers in the bracket after “map” represents the input that we want the program to read (sensorValue), the lowest and highest values that the input could trigger the output (0, 1023),  and the lowest and the highest value of output (0,255). We change the number after “delay” and the lowest value of input so that we can observe how the input effect output more clearly.

This is the prototype of our circuit!! Based on this one, we tried some other sensors. Some of them had different ways to be connected to the circuit, and we found instructions in the links on the “recitation” page.

The ultrasonic ranger:

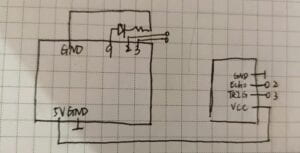
The Vibration sensor:

The diagram for this one is the same as the first one.

However, the effect of these sensors could not be observed as easily as the force sensitive sensor,  for we could not make ultrasonic and very fast vibrations.
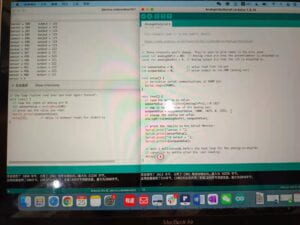
Our code:

/*
Analog input, analog output, serial output

Reads an analog input pin, maps the result to a range from 0 to 255, and uses
the result to set the pulse width modulation (PWM) of an output pin.
Also prints the results to the Serial Monitor.

The circuit:
– potentiometer connected to analog pin 0.
The Center pin of the potentiometer goes to the analog pin.
side pins of the potentiometer go to +5V and ground
– LED connected from digital pin 9 to ground through a 220-ohm resistor

created 29 Dec. 2008
modified 9 Apr 2012
by Tom Igoe

This example code is in the public domain.

https://www.arduino.cc/en/Tutorial/BuiltInExamples/AnalogInOutSerial
*/

// These constants won’t change. They’re used to give names to the pins used:
const int analogInPin = A0; // Analog input pin that the potentiometer is attached to
const int analogOutPin = 9; // Analog output pin that the LED is attached to

int sensorValue = 0; // value read from the pot
int outputValue = 0; // value output to the PWM (analog out)

void setup() {
// initialize serial communications at 9600 bps:
Serial.begin(9600);
}

void loop() {
// read the analog in value:
sensorValue = analogRead(analogInPin);
// map it to the range of the analog out:
outputValue = map(sensorValue, 0, 1023, 0, 255);
// change the analog out value:
analogWrite(analogOutPin, outputValue);

// print the results to the Serial Monitor:
Serial.print(“sensor = “);
Serial.print(sensorValue);
Serial.print(“\t output = “);
Serial.println(outputValue);

// wait 2 milliseconds before the next loop for the analog-to-digital
// converter to settle after the last reading:
delay(2);

Questions:

  • Question 1: What did you intend to assemble in the recitation exercise? If your sensor/actuator combination were to be used for pragmatic purposes, who would use it, why would they use it, and how could it be used?

we want to use force/ultrasonic/vibration to trigger the light. If our combinations are used pragmatically, maybe they can be used in some light system. For the force sensitive one, it can be used for some exhibition purpose. When people place something on the sensor, the LED will turn on and light the exhibits. For the ultrasonic one, I think it can be used in scientific research, to detect ultrasonically. For the vibration one, maybe it can be used to make night light, which can be put in hospital corridors or just people’s homes. For example, if someone gets up at night and wants to go to the bathroom, the sensor can detect the vibrations produced by the person’s steps and bring him/her light.

  • Question 2: Code is often compared to following a recipe or tutorial. Why do you think that is?

In my understanding, code is a kind of language to give instructions to a computer. Just as there are grammars in human language, it is also reasonable to have “grammars” in coding. It is a way to arrange different pieces of information and instructions, to make them recognizable.

  • Question 3: In The Language of New Media, Manovich describes the influence of computers on new media. In what ways do you believe the computer influences our human behaviors?

On one hand, the computer as a tool can change the way we learn and work. For example, people write things with computers and restore these things in them, which is easy to keep and read again. Moreover, since most of our computers can connect to the internet, it can make it more effective to get new knowledge or information, as well as enable people to communicate with each other more easily, through the ways such as emails, social media.

On the other hand, computers may have some negative influences. For example, since people rely more and more on social media, some people don’t know how to communicate with others properly in the real life. These may be things that are worth our reflecting on.


Recitation 2: Arduino Basics

Circuit Building process

  • circuit1:fade

We build the circuit according to the diagram. We start the circuit from D9 on the Arduino Uno, connecting a resistor and a LED, and finally connecting the whole circuit with the ground. Then, we copied the code and uploaded it successfully. Everything went well when we were at this step.

  • Circuit 2: toneMelody

This circuit was quite similar to the first one. The LED was replaced by a buzzer and the resistor was removed. However, since we weren’t sure if we would use the former one, my partner and I built the second one without removing the first one. So the picture may look a little complicated but actually it is not. 

Then, we opened another code on the computer and uploaded it. Nothing went wrong as well.

  • Circuit 3: Speed Game

This one became much more complicated and my partner and I did spend some time building it.

we signed up the Tinkercad account and opened the example and the example diagram and code, just as the instructions said.

When building the circuit, we tried to reduce the whole circuit to some simpler ones, so every time we started connecting the cable from the holes on the Arduino, making the electricity passing the component on the breadboard and going back to the negative electrode on the breadboard. 

However, though we had been really careful, we also made ignored some extremely important things. After finishing the works on the breadboard, we were so excited that we uploaded the code immediately, but only to find that the code could not be uploaded. After checking, we found we forgot to connect the negative electrode with the ground. So it even could not be a complete circuit. I think this is a simple but important lesson. Never should we forget to build out circuit a complete one.

After fixing it, we uploaded the code again. It succeed this time, but when we were about to play the game, there was only one button working. So we had to check the circuit again, and we found one of the buttons and the corresponding resistor were not in a line.


We reconnected them and uploaded the code one more time. Finally, it worked well and we could play with it!!!


Also, professor Andy helped us check our circuit once more. Thank him for his kindness and patience!!!


Questions

  • Question 1: Propose another kind of creative button you could use in Circuit 3 to make the game more interactive. Read and use some material from the Introduction Chapter (pages xvii to xxix) of Physical Computing to explain why this button would make this game more interactive.

I want to change the form of simply pressing the button to a more complicated, interesting action. Maybe there can be a mini basketball shooting machine, the player should put the ball into the baskets and get the score. The player that first get the assigned sore wins. 

The writer of this book breaks the process of physical computing down into 3 stages: input, output, and processing. When talking about input, he writes, “they are already happy with their ability to express themselves on a computer, either through the screen or through the speakers, but feel constrained by the input of a mouse and keyboard”. By changing the press button to a basketball shooting, the input becomes more complicated and challenging, people will take more work than just using their finger to press the button. Thus in my point of view, the game becomes more interactive.

  • Question 2: Why did we use a 10K resistor with each push button? (Read the short explanation about pull-down resistors here)

 “We can add in what’s called a pull-down resistor before the GND connection, which prevents short circuits when the switch is closed while still biasing the pin to 0V when the switch is open.” According to the explanation, the button is connected directly with the power supply and the GND, so a resistor is necessary to avoid a short circuit. As for why the value should be 10K, it is the recommended value, moreover, this proper value can allow much current passing at the same time ensure the short circuit would not happen.


The diagram for circuit3

The imaginary interactive artifact in 3 fictions

1.The Winter Market:

There is a machine that can capture the environments of someone’s imaginary world. They can be some memories of the past, imaginations of the future, some dreams that emerge when the person was sleeping, or entirely groundless fantasies. The machine can accept and show these imaginary images as they exist in someones’ mind. When showing, it can use some special technologies, such as holographic laser projection, and maybe the use of sound and wind and temperature control, to make the presentation quite immersive. For example, if I once went to Tibet and I really want to experience the unforgettable travel again, I could use the machine to make the landscape, the sunlight (not only light, but also warmth), the breeze on the plateau reappear again. 

However, this can also cause serious problems. As far as I’m concerned, if someone wants to read and show another world in another person’s mind with that person’s permission, it can be seen as a severe violation of that person’s privacy.

2. Newton’s Sleep

In the novel, since the environment on earth has been uninhabitable extremely elite people build themselves a spaceport called Spes and live there, abandoning those who are intellectually inferior. Rationalism cannot solve all the problems. I want to make an artifact that calls back people’s empathy and memorizes people on earth. People in Spes can enter their personal information into a program and the program can find out where their hometown is and show them how it currently looks like, how the life of people living there is, the number, names and ages of earth people living there, and if there was any social/relative relationship between the elite people and some of the earth people, or relationship between people in their families. Maybe there can be a little cube that enables the elite people to have an immersive experience of living on earth.

This artifact may only cause some emotional changes or some humanistic  thinking, it cannot solve the problem in a short time. Actually for me I cannot see how can the problem be solved easily. Also, I think it need to collect a mass of data. 

3.The Fish of Lijiang:

Aging looks fearful, either in our real society or in this fiction. I’m thinking about making an interactive artifact that attaches some humanistic care to the anxiety of aging. If we can change aging to some kind of art, it may not look as terrible as how it feels like. There can be a camera to capture people’s faces and extract the trace on someone’s face that shows age, such as wrinkles and age spots. After analyzing, the installation can draw a beautiful painting based on lines and spots captured, by making changes and/or adding other elements.

Maybe privacy is also an important point that we can consider when playing with this installation because it has to capture people’s facial information. Besides, I haven’t come up with other problems yet.


2.15 Recitation documentation

Components:


  • 1 * Breadboard: provide a space to place each component and help to form a complete circuit
  • 1 * Buzzer: make sounds
  • 1 * Push-Button Switch: control the buzzer and LED2
  • 1 * 220 ohm Resistor: limit the current to protect the LED
  • 1 * 10K ohm Resistor: limit the current to protect the LED
  • 1 * 10K ohm Variable Resistor (Potentiometer): control the luminance of LED1
  • 2 * LED: produce light
  • 1 * 5 volt power supply: switch the voltage to the proper degree
  • 1 * Barrel Jack: connect the power with the circuit
  • 1 * Multimeter: measure different values
  • 1 * DIY Paddle Button: instead of the button, work as a switch
  • Several Jumper Cables (M/M Wires): enable the flow of the current


Process:

  • First, we connected the circuit shown in the first step. We installed a buzzer and a button and then connected them with the wires. It looked easy but when we really did it by ourselves when found it not like what we had thought. The wires could make us confused.  At first, we thought we had connected all the things, but the buzzer just didn’t make any sound. After checking, we found we made it shout out carelessly.
  • Then, we added a resistor and a LED(LED2) to the circuit. After pressing the button, LED2 will light at the same time as the buzzer rang.
  • In step3, we added a potentiometer and another LED (LED1).  LED1 is not controlled by the button,  but by the potentiometer. At first, we didn’t know how to install the potentiometer, but professor Marcela taught us patiently.
  • Additionally, we also made a DIY paddle button with professor Andy. We melted a metal solder and use it to fasten a cardboard on which we tape some copper tape and a wire. Then we stick two cardboard together, with paper time on the side without the metal tape, so if we put this combination on the table and press it to make metal tape contact, it would work as a paddle button.


  • Finally, we change the press button to the DIY paddle button. So we can enjoy it!!


Questions

  • What is the function of the resistor R1 ? (You can read about the reason why LEDs need resistors here)

A LED has its maximum voltage and current rating limit. If the voltage and the current rating exceed the limit, it will cause damage to the LED. So adding a resistor can limit the current and protect the LED.

  • Looking at the following circuit, draw its diagram by yourself. 
  • After reading The Art of Interactive Design, in what way do you think that the circuit you built today includes interactivity? Which degree of interactivity does it possess? Please explain your answer. 

In this essay, the author metaphorically defines interaction as “a cyclic process in which two actors alternatively listen, think and speak”, and he regards conversation as the most common form of interaction. Interactivity, in my understanding, refers to the ability that something can participate in an interaction. 

The interactivity of this circuit can be felt in the following process: when someone presses the button, the LED2 will light and the buzzer will make the sound as a response to the person’s action. In this process, there is a conversation between the person and the circuit. Thus there is interaction. Thus, I suppose it is interactive.

I think its interactivity is in a middle degree. It does have interaction with people, though interaction just contains simple movements and phenomenon ( sound and light). However, the morse idea improves its interestingness. People who play with it may still feel interested when they think and deliver or crack the code.

  • How can Interaction Design and Physical Computing be used to create Interactive Art? You can reference Zack Lieberman’s video or any other artists that you know.

Interaction Design is a  component of Interactive Art. And Physical Computing is a tool to make Interaction Design Interactive Art. Artists express their interaction design in an artistic form, while in the technology age they usually do it with the help of physical computing. 

For example, in Zack’s project eyewriter, the installation can capture the movements of eyeballs and show their track. Capturing the movements and showing them out is an interaction design, but when it is linked with eyes creatively and used to help those who have difficulty speaking and moving, it becomes an interactive art to some degree. And all of these things become possible because of the software that he uses, which shows the importance of physical computing.


Definition of interaction

My definition of interaction:

In my understanding, interaction refers to the reciprocal actions that can lead to certain effects between the different subjects. One subject takes an action which makes some effects on the other (others), while this subject also receives an action from the other (others) which has some effects on this one. Usually, one action should be a response to another(others).


The project aligns with my  definition:

The light waves

https://www.manamana.net/video/detail?id=70417#!zh

This is a project is made for a music festival in Poland. There were 15 drums and a floating helium-filled sphere. The audience invited beat the drum together, which triggers the light and sound which feel like energy goes towards the sphere. The reciprocal actions happened between audiences and the installation. Actions are taken when the audience is beating the drum,  and the installation receives these actions and starts to light as a response.  The response of the installation itself is the evidence that influence is made by the audience on it, while the final effect, which enables the audience to receive the information about light and sound, makes an influence on the audience too.

The project does not align with my definition:

naked eye 3D animation in Chengdu Jinjiang 

https://www.manamana.net/video/detail?id=1539903#!zh

The naked eye 3D animation enables people to see the 3D effect without the help of external equipment such as 3D glasses.  I don’t consider it as an interactive project because the actions taken there are not reciprocal. On one hand, the observers look at the 3D screen but do not affect it. On the other hand, the screen just shows the images that have been set before, though the images can make some effects on the observer by conveying some information, it does not receive any action from them.