A. Project Title: Band Art
By Sophia and Stephanie
Instructor: Eric Parren
B. Conception and Design
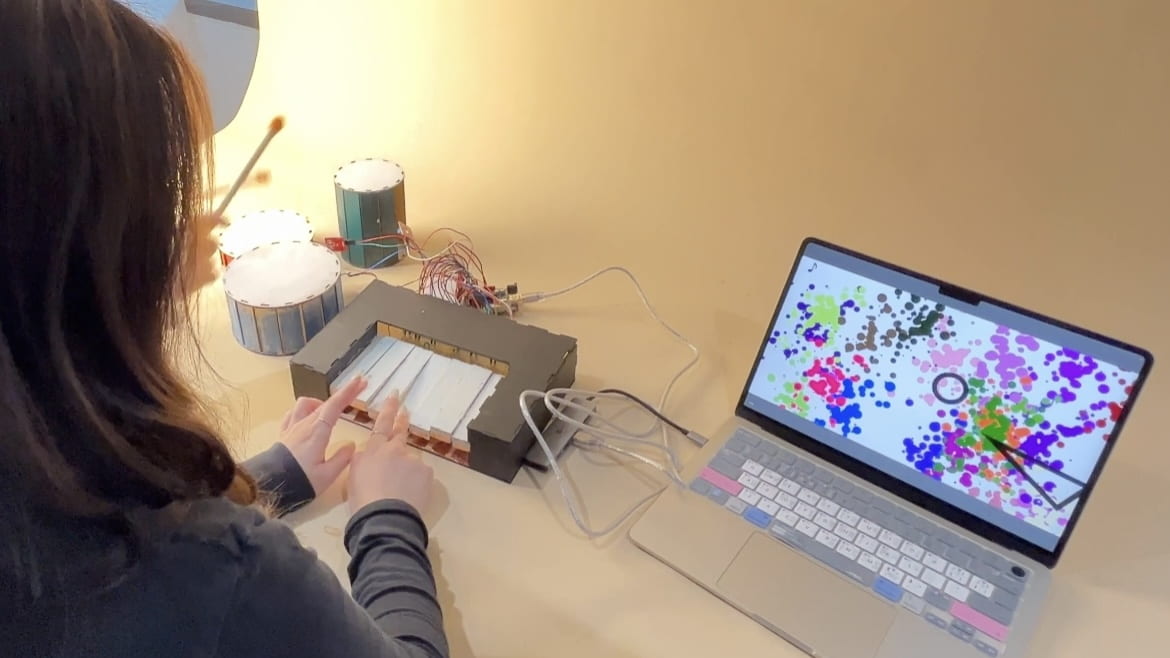
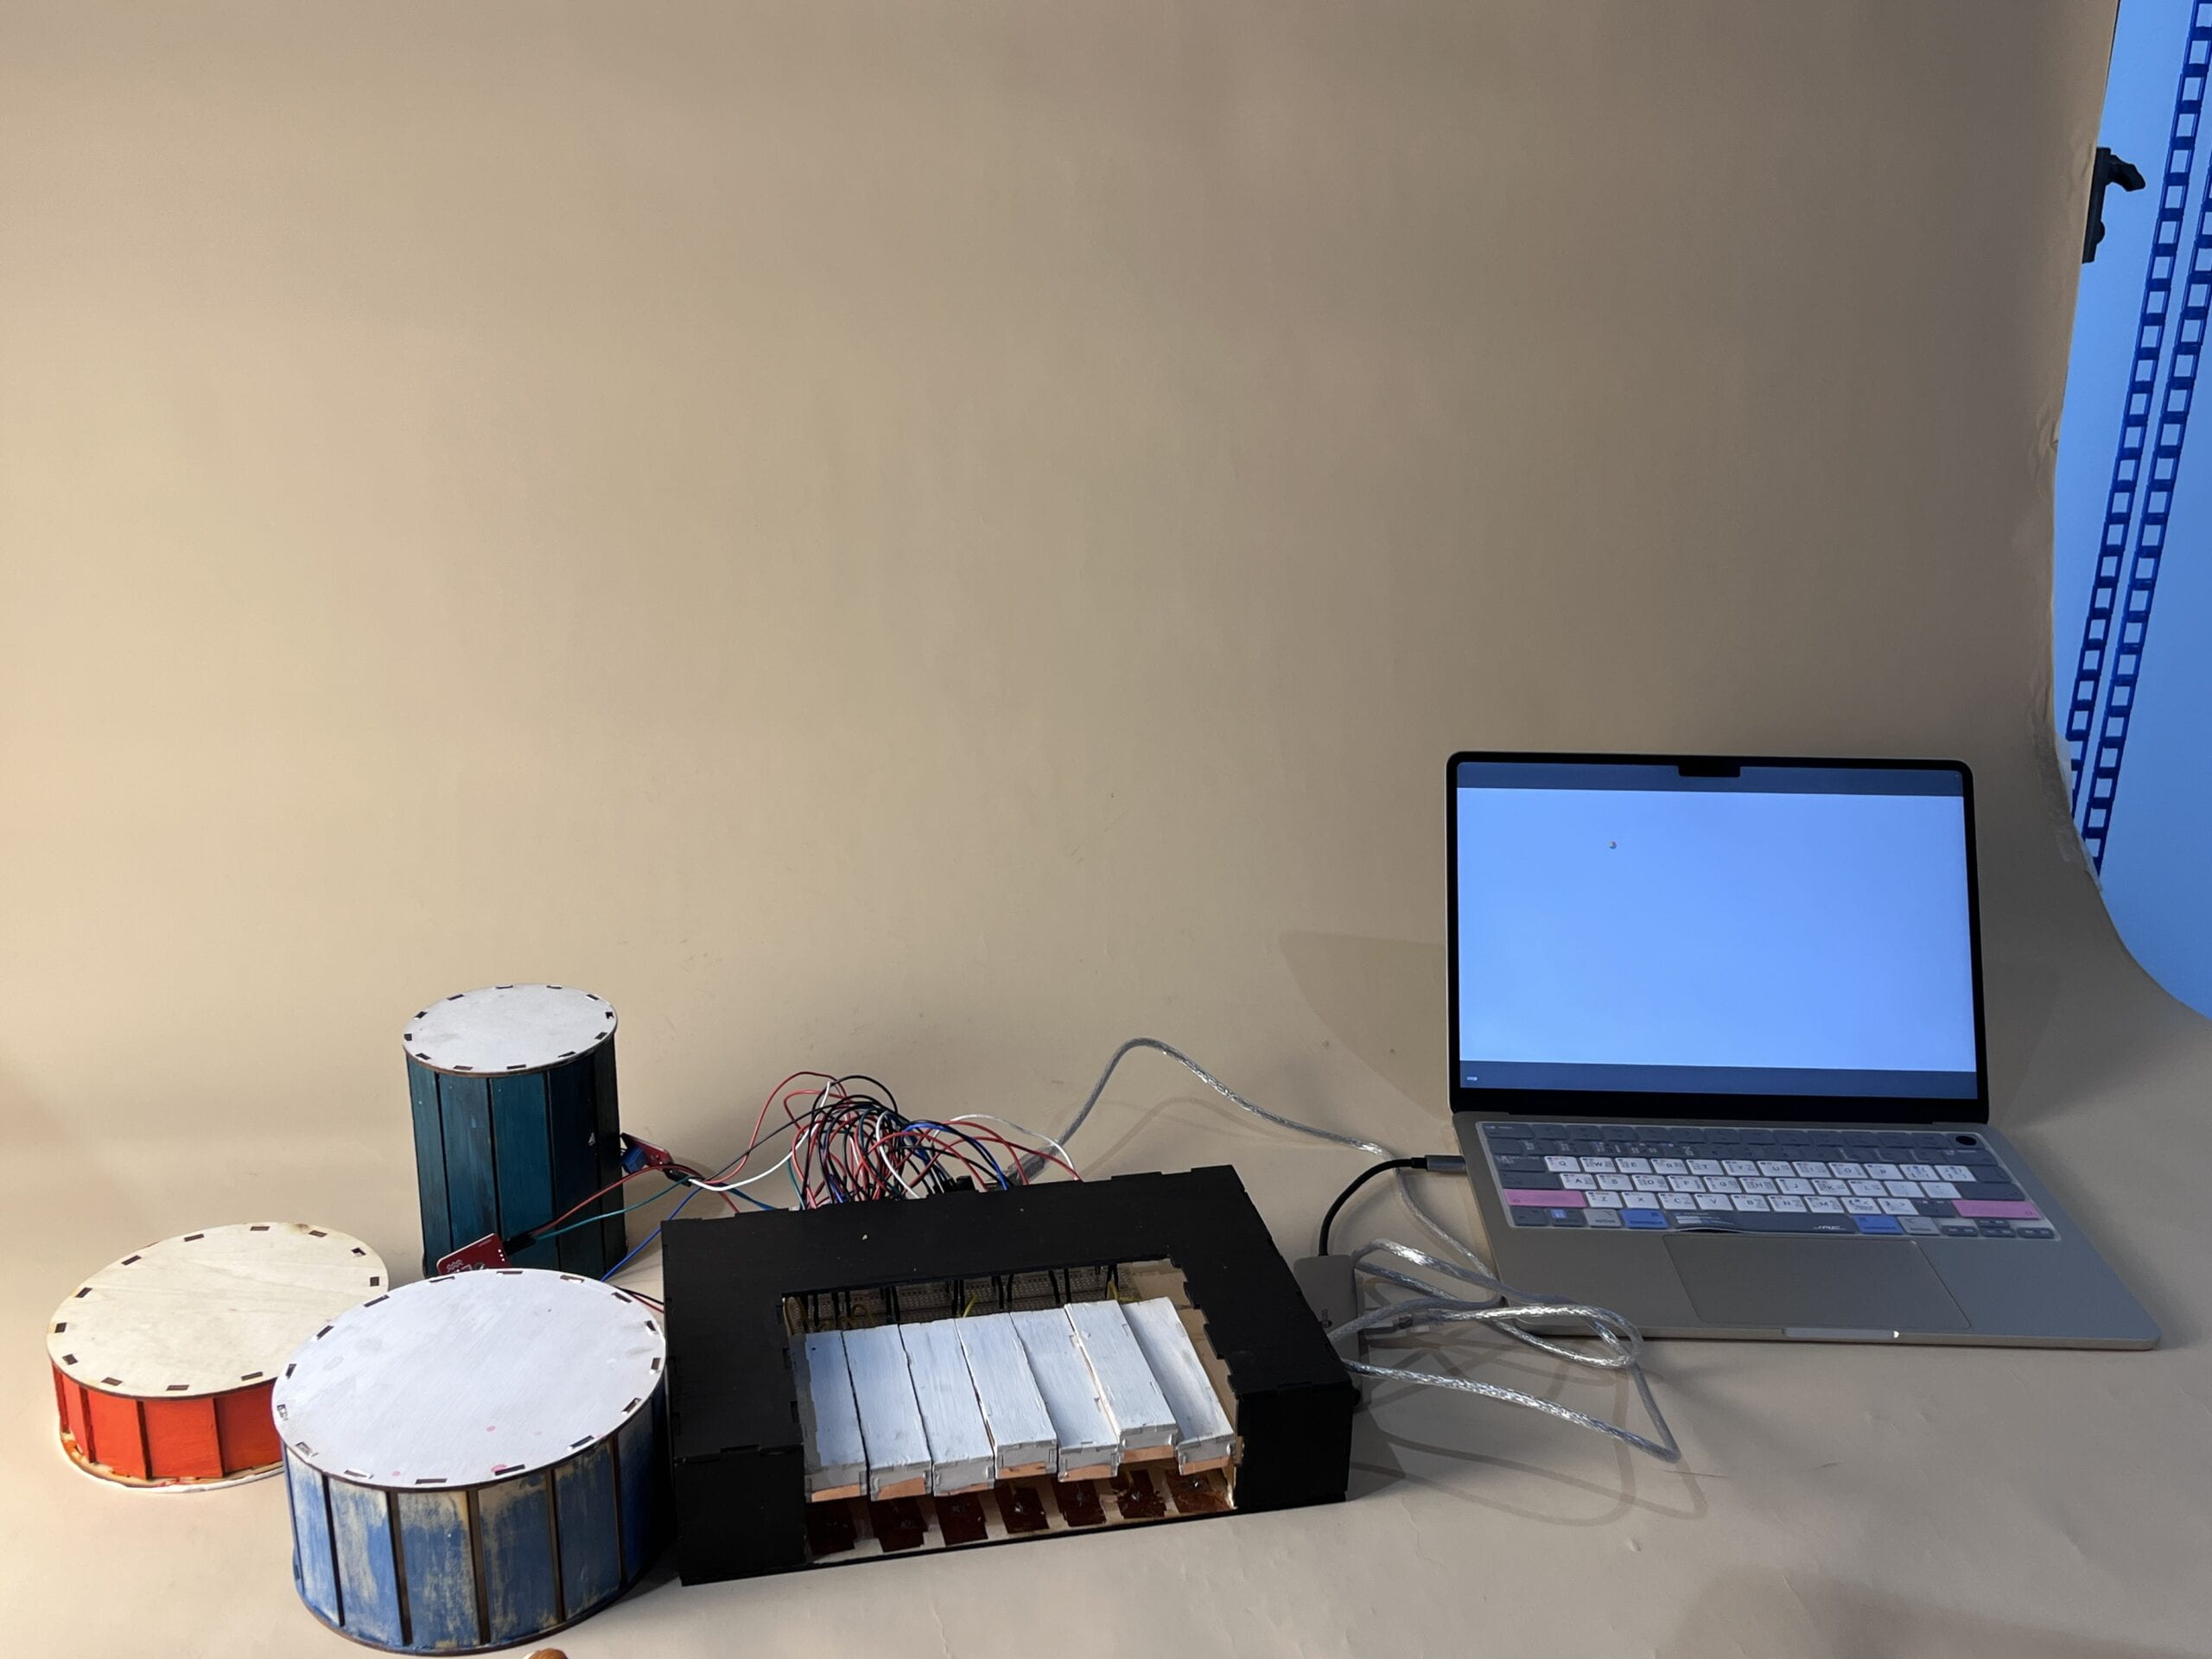
Considering that we’ll use Processing and Arduino and will make crafts for our final project, my partner and I started by brainstorming something that can be visualized on Processing while the users can play with interesting-constructed crafts with fun. So we came up with the idea for our project Band Art. By playing the instrument models, the users will be able to see animated patterns such as music notes and hear the sounds of piano and drums from the computer. This way, users are able to collaboratively or individually display their musical and artistic talents and see quite literally, their music “become art”. This is how we described our project in the proposal essay. When we put it into practice, we simplified the instruments to one piano and three drums only because adding the DJ board or Ukulele will be much work. We chose to rather focus on two instruments and leave more time to complete our codes. As we’ve mentioned in our preparatory research, explicit instructions are very important in engaging users. Thus, we made a piano and drums. They should be identified easily on how to interact with them. For pianos, the users can press the keys and for drums, users can use the drumsticks to hit them. Even though some of the users were trying to use the drumsticks to hit the piano, most of them understood how to operate our instruments and learned how to play them easily. Those who were trying to use drumsticks to hit the piano probably played individually so it’s hard for them to play the two instruments at the same time. However, this is a collaborative game, since it’s a band composed of two or more users. Our interaction between the users, crafts, and computer is straightforward. After starting to run processing, there will be several musical notes appear on the screen and they fall from top to bottom again and again. By pressing the keys (there are 7) of the piano, you can hear notes from “do” to “ti”. Meanwhile, you can see several notes appear on the screen at the same time once you press one or more keys. By hitting the drums, you can hear three different drum sounds according to which drum you hit. There will be random spray paints if the vibration sensor (sensing the drums) value is no more than 50 and there will be random triangles or circles on the screen if the value is above 50. The spray paints will stay on the screen once they are drawn, but the notes and the triangles as well as circles will only appear when you play certain instruments.
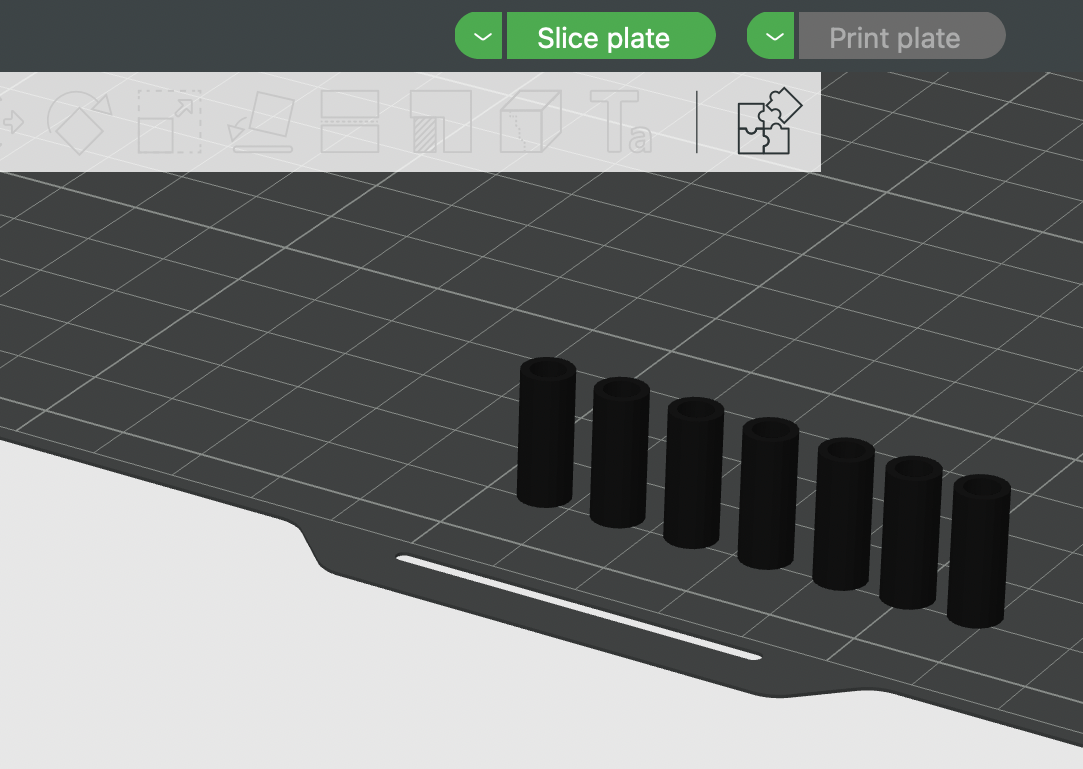
During our user testing, we found that the piano keys were hard for the users to press since they lack bouncing flexibility. You have to press very hard to hear the piano notes. Thus, we asked Professor Garcia about how to make the keys more flexible and easier to press. We followed his advice to use a stick to connect all the keys at the top of them. We 3D printed seven small tubes and stick them to the keys so that the metal stick can go through the tubes to connect the keys. The piano works quite well after the change. With the help of Kevin, the fellow for the interaction lab, we also figured out the animation of piano notes. Since we got the feedback about the loud sound of the drumsticks, we used some rubber bands to reduce the noise when users are playing drums with those drumsticks. We also added the “screenshot” function later.
C. Fabrication and Production
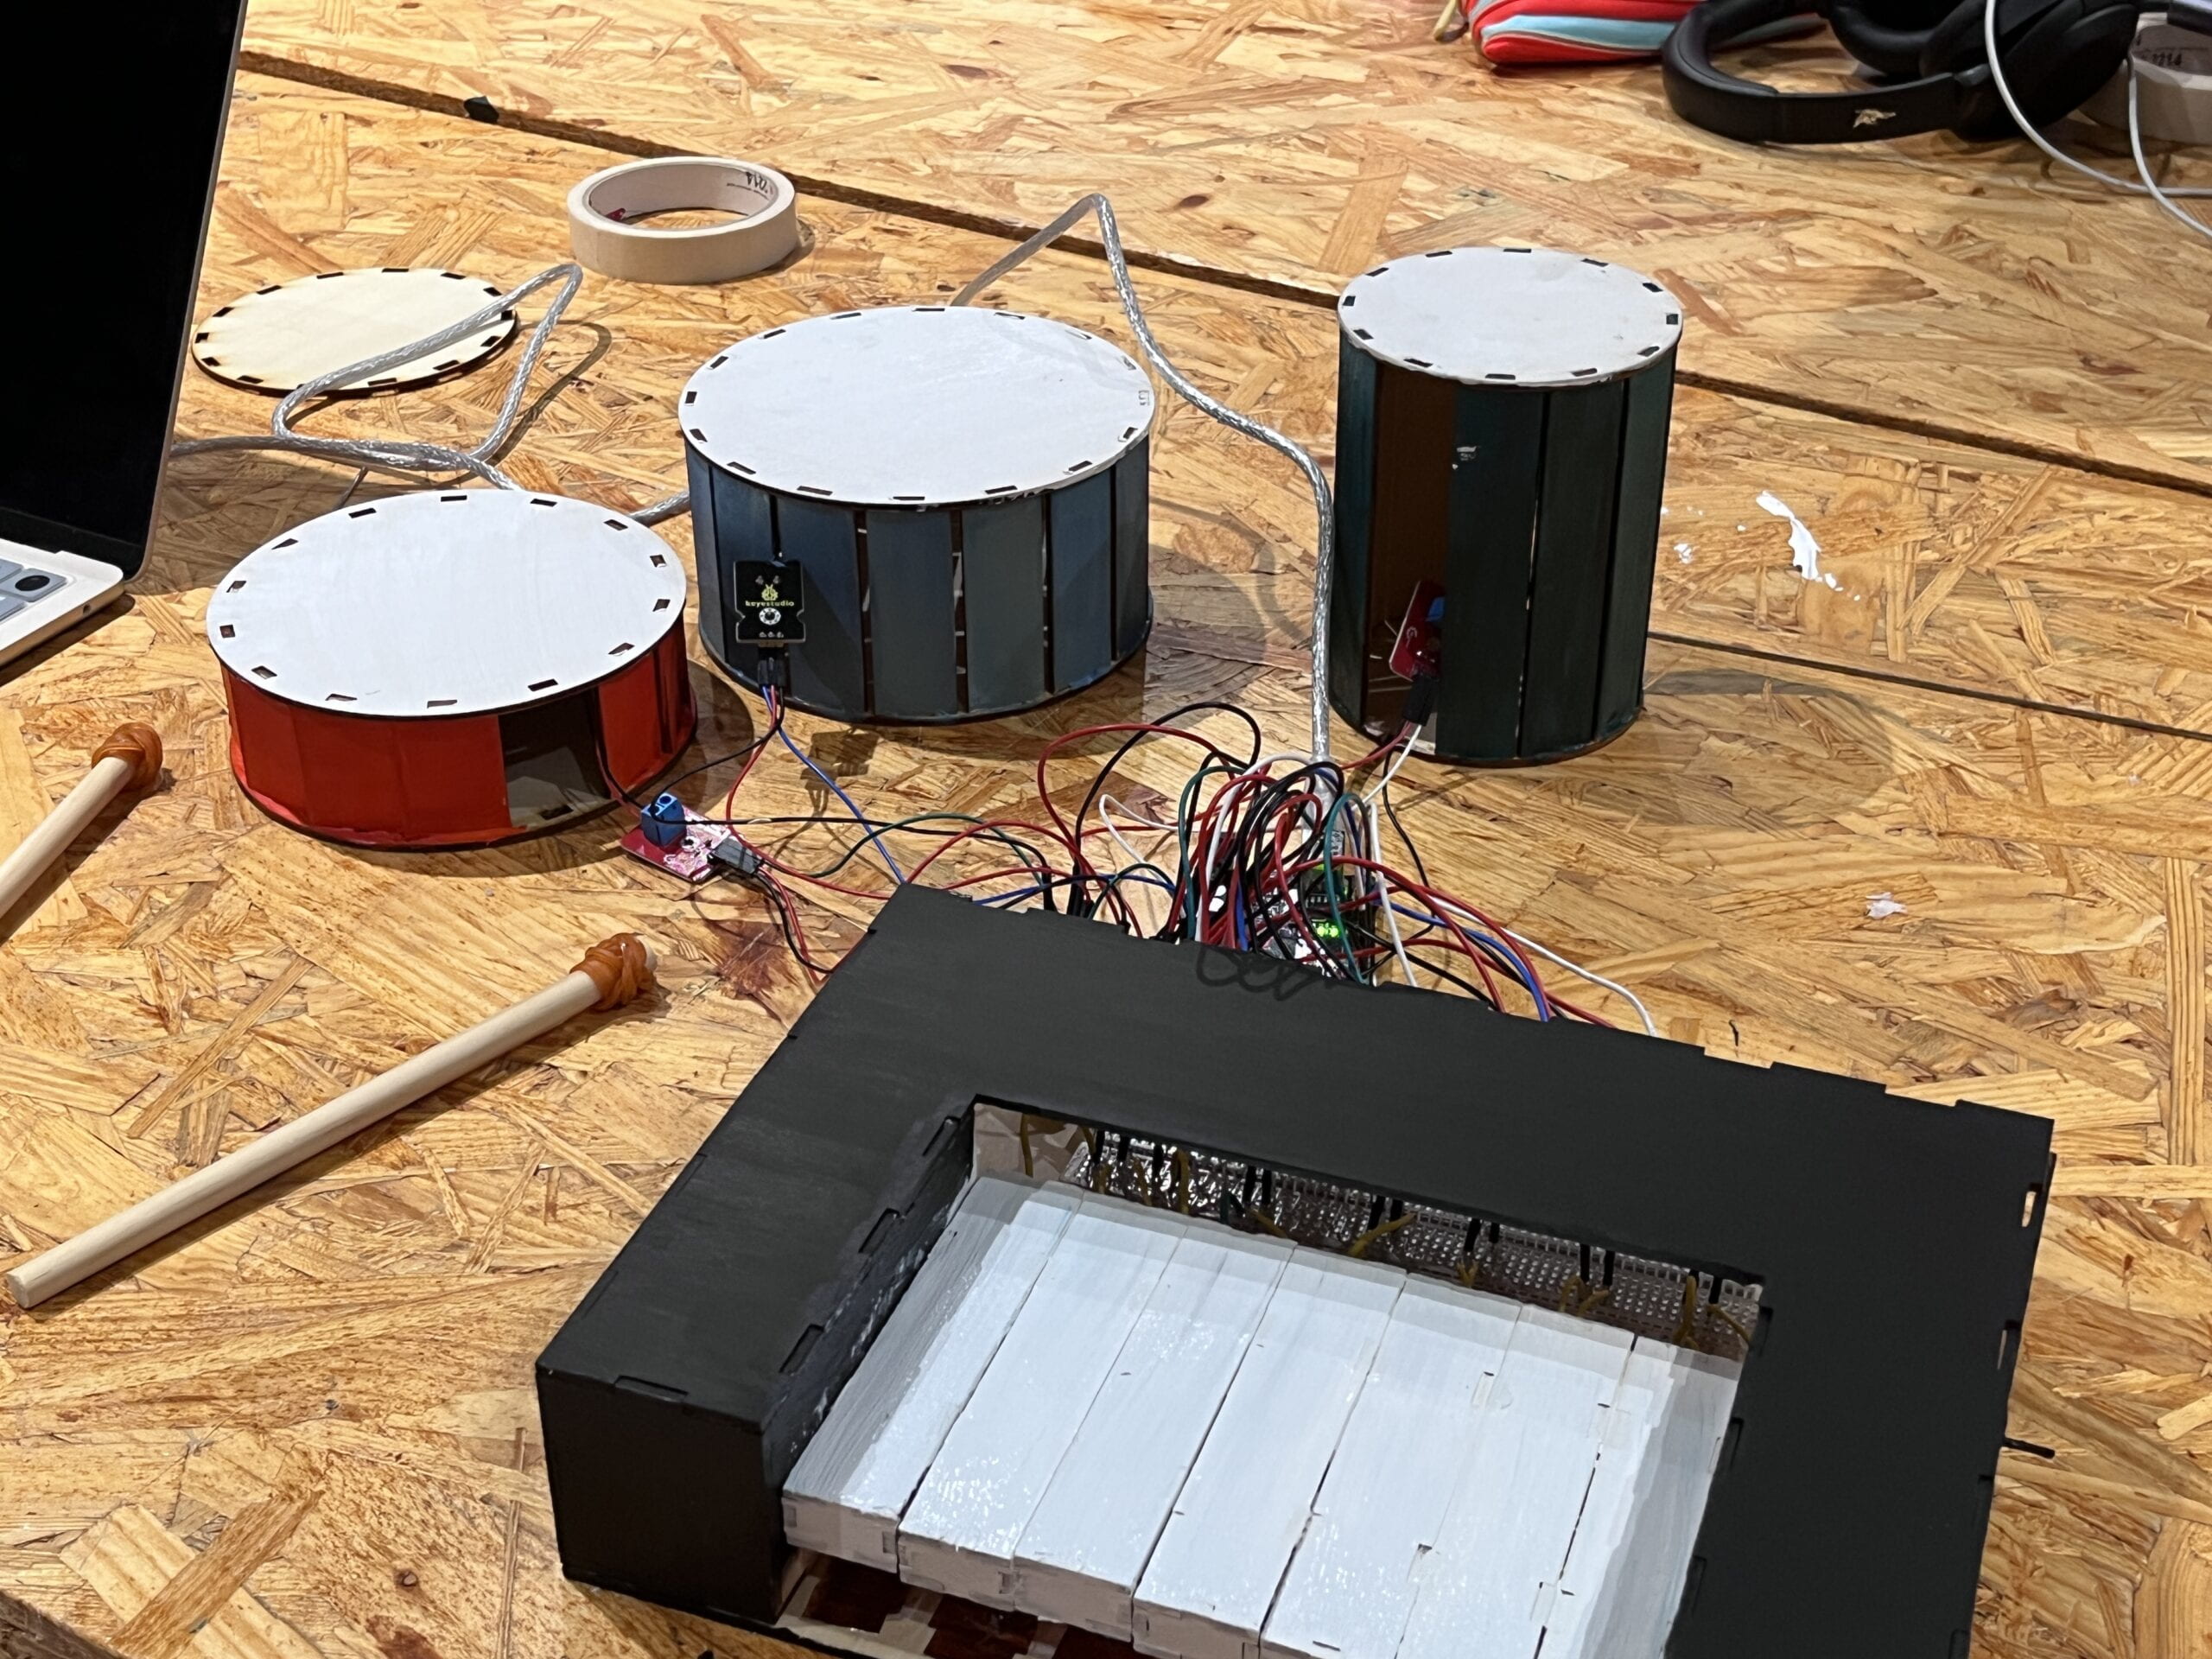
In terms of the drums, we followed our professor’s instruction of using the knock sensors (Piezo vibration sensor). They are effective in sensing how heavily people hit on the drums, and in this case much more sensitive than pressure sensors which I considered in the beginning. Instead of building our crafts with 3D printers, we used the laser cutter because it’s faster and we assume that the wood could sense more vibration compared with plastic. Thus, the body of our drums and pianos were cut by the laser cutter and we stick them later with the wood glue. We tried to 3D print the drumsticks at first. But after several trials failed, we decided to use the wood sticks instead. For the piano, we cut the frames several times to get the frame that exactly fits our piano keys since we printed out the seven keys first. We considered using buttons and putting the keys on top of the buttons at first. However, the keys were poorly balanced when put above the small buttons. Then an LA named Zhiyang advised us to create soft buttons. The piano keys are switches themselves. We used several conduct tapes, some springs, and foam tapes at first to make the piano keys move up and down and then after the user testing, we figured out a more effective way for the piano keys to move by using the stick as I mentioned in Part B.
For the codes we were first trying to make the piano codes animated when pressing the keys, however, it’s too much work because they have to be in the same sketch of the drums and these two functions sometimes conflict with each other.
Maybe the sound could be better if we connect the MP3 speakers to the computer.
D. Conclusion
In conclusion, our project achieved the goal that we want our users to engage with the sounds as well as visualized music art. With our project, the audience is able to learn about playing these instruments and use them as tools to express themselves through art. They can keep interacting with these instruments, which aligns with my understanding of consistent interaction.
Even though we’ve met a lot of challenges, we learned a lot about how to make the craft achieve our aims by using proper materials and methods. The process of changing the piano keys indicates the importance of choosing the right methods as well as materials. We learned a lot about the coding program as well, such as the syntax errors and the “class” function.
If I had more time I would improve the animation by making the spray paint appear in a certain order(circle/a certain track based on the different drums you play) and also improve the animation of piano notes. I’ll also add MP3 speakers to amplify the sound of the instruments.
E. Appendix
Pictures:
Videos:
1. Project before user testing:
2. Project after user testing:
Processing Codes:
import processing.serial.*;
import processing.sound.*;
ArrayList<MusicNote> move = new ArrayList<MusicNote>();
Splat splatArray[] = new Splat[0];
Splat splatter;
MusicNote musicnote;
int oldValue = 0;
int m;
Serial serialPort; // Serial port
int NUM_OF_VALUES_FROM_ARDUINO = 10;
int arduino_values[] = new int[NUM_OF_VALUES_FROM_ARDUINO];
int old_arduino_values[] = new int[NUM_OF_VALUES_FROM_ARDUINO];
SoundFile sounds[] = new SoundFile[10]; // Array to store sound files
boolean isPressed = false;
void setup() {
size(1500, 800);
// Load sound files
sounds[0] = new SoundFile(this, “Drum sound 1.wav”);
sounds[1] = new SoundFile(this, “Drum 2.wav”);
sounds[2] = new SoundFile(this, “Drum 3.wav”);
sounds[3] = new SoundFile(this, “do.wav”);
sounds[4] = new SoundFile(this, “re.wav”);
sounds[5] = new SoundFile(this, “mi.wav”);
sounds[6] = new SoundFile(this, “fa.wav”);
sounds[7] = new SoundFile(this, “so.wav”);
sounds[8] = new SoundFile(this, “la.wav”);
sounds[9] = new SoundFile(this, “ti.wav”);
smooth();
//splatter = new Splat();
musicnote = new MusicNote();
serialPort = new Serial(this, “/dev/cu.usbmodem11201”, 9600);
m = millis();
}
void draw() {
getSerialData();
background(255);
musicnote.move();
if (splatArray.length >0) {
for (int k = 0; k<splatArray.length; k++) {
splatArray[k].display();
}
}
// Draw drum pads
//background(255);
if (millis() >= m + 60000) {
saveFrame(“arts-######.png”);
m = millis();
}
//if (arduino_values[0] == 1 && arduino_values[0] != oldValue) {
// int = random(
// sounds[i].play();
// oldValue = arduino_values[0];
// splatter.splats();
//}
for (int i=0; i<NUM_OF_VALUES_FROM_ARDUINO; i++) {
if (arduino_values[i] == 1 && arduino_values[i] != old_arduino_values[i]) {
sounds[i].play();
if (i < 3) {
strokeWeight(0);
//splatter.splats();
float tempX = random(50, 1950);
float tempY = random(50, 950);
float tempR = random(0,255);
float tempG = random(0,255);
float tempB = random(0,255);
for ( float j =3; j < 90; j++) {
splatArray = (Splat[])append(splatArray, new Splat(tempX + cos(random(0, TWO_PI))*2*j,tempY+ sin(random(0, TWO_PI))*3*j,random(0, 50),tempR, tempG, tempB));
//noLoop();
}
} else if (i > 2) {
isPressed = true;
musicnote.Notes();
}
//} else {
// sounds[i].stop();
println(“Got 1”);
}
else if (arduino_values[i] == 2 && arduino_values[i] != old_arduino_values[i]) {
if (i < 3) {
sounds[i].play();
float x = random(width);
float y = random(height);
noFill();
stroke(0);
strokeWeight(random(5, 30));
circle(random(x), random(y), random(80, 150));
triangle(random(x), random(y), random(x+10), random(y+10), random(x+20), random(y+20));
}
println(“Got 2”);
}
old_arduino_values[i] = arduino_values[i];
if (isPressed) {
for (int j = 0; j < 10; j++) {
move.add(new MusicNote());
}
println(“update”);
for (int j = 0; j < 10; j++) {
//move.get(j).display();
move.get(j).move();
}
isPressed = false;
}
}
//old_arduino_values[i] = arduino_values[i];
//if (isPressed){
// for (int j = 0; j < 10; j++){
// move.get(j).display();
// move.get(j).move();
// }
// isPressed = false;
//}
}
class Splat {
float x;
float y;
float rad;
float R;
float G;
float B;
Splat(float tx,float ty,float trad,float tr,float tg,float tb) {
x = tx;
y = ty;
rad = trad;
R = tr;
G = tg;
B = tb;
//x = random(50, 1950);
//y = random(50, 950);
//rad = random(0, 20);
//R = random(0, 255);
//G = random(0, 255);
//B = random(0, 255);
fill(R, G, B);
noStroke();
ellipse(x, y, rad, rad);
//ellipse(x, y, rad, rad);
}
//void splats() {
//x = random(50, 1450);
//y = random(50, 750);
//R = random(0, 255);
//G = random(0, 255);
//B = random(0, 255);
//fill(R, G, B);
//for ( float i =3; i < 90; i++) {
// float angle = random(0, TWO_PI);
// float splatX = x + cos(angle)*2*i;
// float splatY = y + sin(angle)*3*i;
// ellipse(splatX, splatY, rad-i, rad-i+1.8);
// //noLoop();
//}
void display() {
fill(R,G,B);
noStroke();
ellipse(x,y,rad,rad);
}
}
class MusicNote {
// float xPos;
// float yPos;
// float oldxPos;
// float oldyPos;
// float ySpd;
// String[] sample = {“♪”, “♫”}; // array of musical symbols
// int n;
// String note;
// float wordSize;
// MusicNote() {
// xPos = random(width);
// yPos = random(height);
// oldxPos = xPos;
// oldyPos = yPos;
// ySpd = 2;
// n = int(random(0, 1));
// note = sample[n];
// wordSize = random(30, 150);
// }
// void move() {
// if (yPos < height) {
// // yPos += ySpd;
// yPos = yPos+random(-100, 100);
// }
// xPos = xPos + random(-100, 100);
// println(“moving”);
// }
//void display() {
// //background(255);
// fill(0);
// textSize(wordSize);
// text(note, xPos, yPos);
//}
float xs[] = new float[10]; // int[] numbers = new int[3]
float ys[] = new float[10];
String[] sample = {“♪”, “♫”}; // array of musical symbols
String[] notes =new String[10];
MusicNote(){
for(int i=0; i<xs.length; i++){
int n = int(random(0,1));
notes[i] = sample[n];
}
for (int i = 0; i < 10; i++) {
xs[i] = random(width);
ys[i] = random(height);
}
}
void move() {
textSize(random(30, 100));
fill(0);
for (int i = 0; i < 10; i =i+1) {
text(notes[i], xs[i], ys[i]); //todo: notes index
ys[i] = ys[i] + 2;
if (ys[i] > 800) {
ys[i] = 0;
}
}
}
void Notes() {
move();
int index = (int) random(0, 1);
text(notes[index], xs[0], ys[0]);
}
}
void getSerialData() {
while (serialPort.available() > 0) {
String in = serialPort.readStringUntil( 10 ); // 10 = ‘\n’ Linefeed in ASCII
if (in != null) {
//print(“From Arduino: ” + in);
String[] serialInArray = split(trim(in), “,”);
if (serialInArray.length == NUM_OF_VALUES_FROM_ARDUINO) {
for (int i=0; i<serialInArray.length; i++) {
arduino_values[i] = int(serialInArray[i]);
}
}
}
}
}
Arduino Codes:
const int sensorPin0 = A0; // Piezo vibration sensor connected to analog pin A0
const int sensorPin1 = A1;
const int sensorPin2 = A2;
void setup() {
Serial.begin(9600); // Start serial communication
}
void loop() {
int sensorValue1 = analogRead(sensorPin0);
int sensorValue2 = analogRead(sensorPin1);
int sensorValue3 = analogRead(sensorPin2); // Read the sensor value
//delay(100); // Delay for stability
if (sensorValue1 > 5) {
Serial.print(1);
} else {
Serial.print(0);
}
Serial.print(“,”);
if (sensorValue2 > 5) {
Serial.print(1);
} else {
Serial.print(0);
}
Serial.print(“,”);
if (sensorValue3 > 5) {
Serial.print(1);
} else {
Serial.print(0);
}
Serial.println();
delay(10);
}
Laser cutter files:
3D printing file picture:


Leave a Reply