A. Electronic Music Master – Monica Xu – Professor Andy Garcia
B. CONTEXT AND SIGNIFICANCE
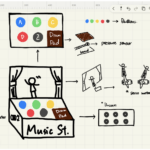
In the previous group project, our group created a human-machine interactive device that helps solve the pain points people encountered during the pandemic, for example, inconvenient groceries shopping. Therefore, it inspired me to contemplate else pain points that trouble people in different scenarios. My initial idea was to design an “alert” with a distance sensor that helps people stay within a range around laptops so as to keep them focusing on study and work. My group mate, Jae, has a completely different idea – Music Box – which involves more entertaining elements in the design draft. After discussing with professor Andy, we believed the “electronic music instrument” was a more feasible artifact we could make for the midterm project given what we have learned (code) in class. Our creation is unique because it involves two-hand cooperation at the same time; we have also seen two people playing simultaneously during the final presentation to make different sounds (with different pitches), making the performance sounds like a band playing multiple instruments. Speaking of existing projects, professor Andy indeed shared two examples that inspired us. One is called simple Arduino Synthesizer Build (we therefore related distance sensor to pitches changing) (https://www.youtube.com/watch?v=x07FF-A67Nc&t=155s), another is called One Man Band designed by student Christophe Lu that inspired us to include multiple music sounds in our design. Apparently, those works involve a huge amount of human interaction as the music sounds out only when players press, touch, or use multiple body parts to control the artifacts. I wouldn’t say our project was way better than any of them, but we derived ideas from both so our design has certain combined features that make the user experience quite interesting. Meanwhile, from my perspective, we do not have a targeted audience group (perhaps people who are into electronic music if I have to think of one) because our project is more for entertainment instead of having a particular purpose, people from different age groups and engaged in different industries are welcome to play with our project. Music and art in general have no boundaries, it brings limitless joy to everyone. Our project may remind people of certain interesting childhood memories such as the background music of Mario, electronic music games, etc).
C. CONCEPTION AND DESIGN
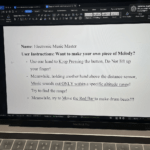
At the very beginning, my group mate and I didn’t realize instructions would be necessary until the user testing stage. We simply considered that players will interact by automatically pressing the button and moving their hands up and down above the distance sensor, so we have the button lined up in a row. The feedback we obtained from user testing was that 1) some people did not recognize the distance sensor, instead, they might perceive it as a loudspeaker 2) players could lift their hands after pressing the button, which is the common habit we acquired based on real-life button user instructions; but our project required players to keep pressing the button even when they playing round other functions 3) we didn’t glue the cup (which serves as a loudspeaker for grove speaker) to our main cardboard box, which made player have to hold the cup when playing such that they could not easily control different parts (difficult to handle both cup, button, and distance sensor at the same time). Therefore, we glued the cup and grove sensor to the box and put up instructions in the final presentation. But as one of the players suggested, it would be better if we wrote instructions right on the box instead of printing it out on a separate paper.
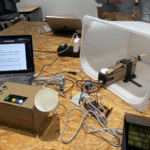
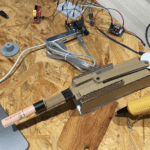
Two straightforward criteria we used for material selection are “accessibility” and “feasibility – meaning we are able to write code for it in order to realize certain functions. The materials we used in this project include: a sliding rheostat, a grove sensor, a cup, a stepper motor, a distance sensor, five colorful buttons, cardboard, wires, jumper cables, a white plastic bucket, etc. More explanation for criteria: 1) primarily, we filtered some motors and sensors based on functions we intended to realize 2) we consulted with professors and learning assistants about what kinds of materials to use. Instead of saying they were best suited, I’d rather say we chose them because we have learned coding similar functions in previous classes and recitations, therefore we can start more easily. We first thought about using a servo motor, but we eventually choose the stepper motor because it has a circular top on which we could connect a rotation bar to realize the drum-beating function & the maximum rotation range for a servo motor is 180 degrees which are not enough as we wanted it to be able to make a full 360-degree circle.
D. FABRICATION AND PRODUCTION
Steps in the building process:
Electronic Music Part:
- We started with coding to make each button have one piece of sound played out by a buzzer. Initially, we planned to assign each button with one notes[], which we began with making an Array consisting of several notes, for example, NOTE_A3. To make the buzzer sound last longer, we set the lasting duration at 500 for each press (each press corresponded to one sound). We also use the servo motor in the initial design, we extracted the code from the example code of the servo motor and adjusted its rotating range.
- Error 1: When we ran the code, we realized that it caused certain errors when we run the program, such as overlapping of different sounds, suddenly silent, and unexpected sound-lasting duration. A professor kindly pointed out that it might result from the servo motor code part because it was included in the project’s big loop and the entire program had to wait for servo motors to turn 90 degrees to start a new Loop. With the professor’s help, we changed the code so that the servo motor only turned 1 degree in each Loop. See the code in the picture attached here. (Excuse me for using the picture as the file for this early version code is no longer accessible).
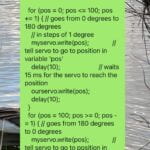
- Error 2: our entire project suddenly went wrong during user testing. The professor kindly suggests that might be the problem from function delay() in between different pressings. Therefore, we tried to reduce the delay duration until deleted it completely.
- As the self-experienced audiences, our group believed there are better “sound out” tools better than buzzers, so we tried different speakers. However, some speakers better fit high-volume devices and some require SD cards, which Arduino is unable to achieve. After careful selection, we settled on the grove speaker. To solve the low volume issue, we attached the grove speaker to the bottom of a cup to make a loudspeaker/sound amplifier.
- We also changed the interval for each pitch several times. We first set the working distance in range (10, 50), but we later found many users started with a very close distance to the distance sensor such that they couldn’t understand how the entire project functioned very easily. So we lowered the lower boundary and the interval for each pitch so that players could better feel the change in the sounds.
Drum Beats Part: In our initial design, we didn’t have the “drum beats” feature. As professor Andy suggested, it would be better if we have various musical elements (sounds of different instruments), for instance, drum beats and sounds of knocking. With a number of tools being offered, it occurred to us that our previous work focused on the Stepper motor could serve as the punching part on which we put an empty lip cream on its top, so it can hit the bucket when the motor rotated. We also added a red sliding rheostat to control the speed of the stepper motor rotation.
Roles & Contribution & Teamwork: In general, we went through everything including the brainstorming, coding, and building process together. Specifically, Jae is more familiar with coding given her previous coding experience, so she helped me a lot in terms of introducing different functions and how to efficiently code for each function we aimed to realize. I enjoyed our teamwork, sometimes we worked together in Studio and sometimes we did work in turn due to different class schedules. Communication was fantastic and my groupmate is a creative girl 🙂
As already mentioned above, we obtained good suggestions during user testing, for example, instructions could be necessary and helpful, and gluing the cup and speaker part to the music box could free players’ one hand so that they could handle other parts more easily, etc. We adopted those suggestions as we found them accurate and conducive, and it turned out in good ways in the final presentation.
My code for Mechanism Part:
// int MoPin = 7;    // vibrator Grove connected to digital pin 9
#include
#define PIN_SLIDE_POT_A A0
int value_slide_pot_a;
int spd;
int DIR_PIN = 2;
int STEP_PIN = 3;
int EN_PIN = 4;
int pt_PIN = 8;
int ding;
int DING;

// Define a stepper and the pins it will use
// AccelStepper::DRIVER means a stepper driver (with step and direction pins)
AccelStepper stepper(AccelStepper::DRIVER, STEP_PIN, DIR_PIN);

void setup() {
  // pinMode(MoPin, OUTPUT);
  pinMode(PIN_SLIDE_POT_A, INPUT);
  pinMode(EN_PIN, OUTPUT);
  digitalWrite(EN_PIN, LOW);
  Serial.begin(9600);
  // The run() function will accelerate up to
  // the speed set here
  stepper.setMaxSpeed(1000);
}

void loop() {
 spd = map(value_slide_pot_a, 120, 1023, 0, 800);
  stepper.setSpeed(spd);
  value_slide_pot_a = analogRead(PIN_SLIDE_POT_A);
  stepper.runSpeed();
  Serial.println(value_slide_pot_a);

}
My code for Tone Part: (another tab “pitches.h” is automatically generated)
#include "pitches.h"
const int threshold = 10;  // minimum reading of the sensors that generates a note

// notes to play, corresponding to the 5 sensors:
int notesY[] = {
  NOTE_C4, NOTE_D4, NOTE_E4, NOTE_F4, NOTE_G4
};
int notesW[] = {
  NOTE_D5, NOTE_E5, NOTE_F5, NOTE_G5, NOTE_A6
};
int notesBlack[] = {
  NOTE_F3, NOTE_G3, NOTE_A4, NOTE_B4, NOTE_C4
};
int notesG[] = {
  NOTE_B3, NOTE_C3, NOTE_D3, NOTE_E3, NOTE_F3
};
int notesBlue[] = {
  NOTE_G4, NOTE_A5, NOTE_B5, NOTE_C5, NOTE_D5
};

// defines pins numbers
const int trigPin = 9;
const int echoPin = 10;
// defines variables
long duration;
int distance;


void setup() {
  pinMode(trigPin, OUTPUT);  // Sets the trigPin as an Output
  pinMode(echoPin, INPUT);   // Sets the echoPin as an Input
  Serial.begin(9600);        // Starts the serial communication
}

int servoPos;
int servoDir = 1;

void loop() {
  // Clears the trigPin
  digitalWrite(trigPin, LOW);
  delayMicroseconds(2);
  // Sets the trigPin on HIGH state for 10 micro seconds
  digitalWrite(trigPin, HIGH);
  delayMicroseconds(10);
  digitalWrite(trigPin, LOW);
  // Reads the echoPin, returns the sound wave travel time in microseconds
  duration = pulseIn(echoPin, HIGH);
  // Calculating the distance
  distance = duration * 0.034 / 2;
  // Prints the distance on the Serial Monitor
  Serial.print("Distance: ");
  Serial.println(distance);


  int button_0 = digitalRead(2);
  int button_1 = digitalRead(3);
  int button_2 = digitalRead(4);
  int button_3 = digitalRead(5);
  int button_4 = digitalRead(6);

  if (button_0 == 1) {
    if (distance >= 5 && distance < 14) { delay(20); tone(8, notesY[0], 1000); } if (distance >= 14 && distance < 23) { delay(20); tone(8, notesY[1], 1000); } if (distance >= 23 && distance < 32) { delay(20); tone(8, notesY[2], 1000); } if (distance >= 32 && distance < 41) { delay(20); tone(8, notesY[3], 1000); } if (distance >= 41 && distance < 50) { delay(20); tone(8, notesY[4], 1000); } } if (button_1 == 1) { if (distance >= 5 && distance < 14) { delay(20); tone(8, notesW[0], 1000); } if (distance >= 14 && distance < 23) { delay(20); tone(8, notesW[1], 1000); } if (distance >= 23 && distance < 32) { delay(20); tone(8, notesW[2], 1000); } if (distance >= 32 && distance < 41) { delay(20); tone(8, notesW[3], 1000); } if (distance >= 41 && distance < 50) { delay(20); tone(8, notesW[4], 1000); } } if (button_2 == 1) { if (distance >= 5 && distance < 14) { delay(20); tone(8, notesBlack[0], 1000); } if (distance >= 14 && distance < 23) { delay(20); tone(8, notesBlack[1], 1000); } if (distance >= 23 && distance < 32) { delay(20); tone(8, notesBlack[2], 1000); } if (distance >= 32 && distance < 41) { delay(20); tone(8, notesBlack[3], 1000); } if (distance >= 41 && distance < 50) { delay(20); tone(8, notesBlack[4], 1000); } } if (button_3 == 1) { if (distance >= 5 && distance < 14) { delay(20); tone(8, notesG[0], 1000); } if (distance >= 14 && distance < 23) { delay(20); tone(8, notesG[1], 1000); } if (distance >= 23 && distance < 32) { delay(20); tone(8, notesG[2], 1000); } if (distance >= 32 && distance < 41) { delay(20); tone(8, notesG[3], 1000); } if (distance >= 41 && distance < 50) { delay(20); tone(8, notesG[4], 1000); } } if (button_4 == 1) { if (distance >= 5 && distance < 14) { delay(20); tone(8, notesBlue[0], 1000); } if (distance >= 14 && distance < 23) { delay(20); tone(8, notesBlue[1], 1000); } if (distance >= 23 && distance < 32) { delay(20); tone(8, notesBlue[2], 1000); } if (distance >= 32 && distance < 41) { delay(20); tone(8, notesBlue[3], 1000); } if (distance >= 41 && distance < 50) {
      delay(20);
      tone(8, notesBlue[4], 1000);
    }
  }
}
Pictures
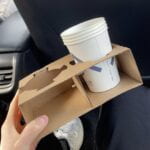
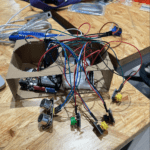
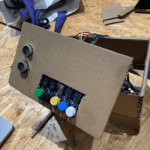
 (user instruction)
  (music box draft work by Jae Yang)
VIDEO
E. CONCLUSIONS
Project Goal: In this project, we wish to make an electronic music box that allows players to create different melodies by pressing different buttons (buttons corresponding to notes, moving their hand above the distance sensor (distance corresponds to different pitches), modifying sliding rheostat value to control drum beats speed.
Alignment and User interaction feedback: I believed our project is aligned with my definition of interaction. Players can only create a melody when they participate, and they are expected to spend time exploring how to integrate different notes, pitches, and drum beatings to create mellifluously electronic music. So the engagement and interaction are continuous as well as immersive. As stated above, players successfully demonstrated the expected interaction with our magic music box. Looking back, however, I would consider a better design to guide players to explore the function by themselves (perhaps with some hint on the music box) instead of printing detailed instructions on a separate paper.
Improvement: If time allowed, we initially wished to have two stepper motors as suggested by the professor. We would add an additional potentiometer to another stepper motor so that the two motors could function together but hopefully beat at different paces. If so, we would have one more varying element in our drum beats part and it would be great.
Stebakcs & Accomplishment: The setbacks came from two primary aspects. One is we found it difficult to code perfectly to support some great functions we wished to establish, so we had to make easier versions of it and achieve more basic functions. Second is that we had very limited time to add more decorations and run code again and again before the final presentation. An additional setback was that I found our group worked more efficiently together than when we handled different tasks alone in our personal spare time. Speaking of accomplishment, we refined the code and initial design over and over again with help from the professor, which eventually allowed us to realize the most basic functions we wished to have. Moreover, the teamwork got better and better in the process of the project and we cherish the teammate friendship all way along.
Leave a Reply