IMA Recitation 9: Digital Fabrication

In recitation9, we want to make a kinetic sculpture that creates art using movement.

First, my partner and I had to make the base for our sculpture using cuttle.xyz. Since the base wasn’t to large, we changed the inches to milimeters. I first created a 80 mm wide and 120 mm tall rectange for the main body. Then, a 40 mm wide and 2.8 mm tall rectange, whose Y axis is -17.5 mm, on the side of the larger one. I used “Boolean Difference”, so that it looked as if it had been cut. Finally, according to the servo dimensions measured by my partner, a rectange was put on the center top. Two circles with the size of the servo’s screw hole were placed on both sides of it. Putting together the parts my partner built, the result looks like this.

The left part is mine.

After finishing the base, we only had to design the patterns that we want to put on the servo. A circle of 120mm was put on the canva’s origin point to make the designing easier. I first used pen to draw some lines and then use rotation repeat and outline stroke. A rectange was put in the center of my partner’s design, because it will need to integrate with the servo. A small circle representing the motor was in my design. We put together our design and it looked like this.
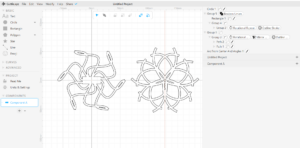
The right part is mine.

As for the laser cutting, we went to 823, where there were printing machine and all kinds of equipment. Some modifications were needed for my partner’s design, because it couldn’t hold the servo, so the professor there added a rectange inside as you can see from the picture.
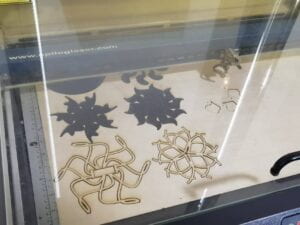
The final result looked like this after assembling together all the pieces.
IMA final project proposal

title: The Boundless Light

While I was thinking of the final project, a memory suddenly came into my mind. Several months earlier, I went to “teamLab Borderless Shanghai”, in which a mirror room with countless lights composing a boundless secene left a deep impression on me. I also reserch some of Yayoi Kusama’s works, who built the Infinity Mirror Room I mentioned before. Therefore, I decided to create something as imaginative as possible. Besides, “The Ascent” in my final project research post also give me insights on engaging the audience into a fanscinating experience. The challenge I will address is how to make neopixels display lights in different patterns according to the mouse position sent from Processing. This is intended to make the artifact more engaging and impressive, since the audience can see and play with it. I think this is pretty relavant to people who want to find insights for their artworks or want to broaden their imagination.

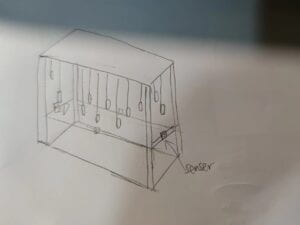
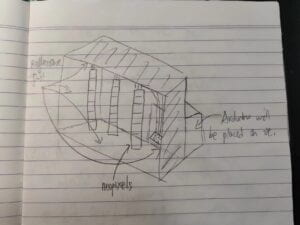
To build my project, I will first build up a wooden frame for the neopixels, only one side will be open to the audience, which ultimately makes a box with one door. Some reflective foil will needed to cover the inside of the box. With more reflection, the patterns will appear more dreamlike, which can help my intended audience. Second, I will integrate multiple neopixels into the box, which provides the main function of my project. Arduino is used in this step. Last is the programming. Since I want the audience to use the Processing to control the neopixels, I will have to record the mouse position and send it to Arduino. I plan to build the box next week. The neopixels may take much more time, but I will try to finish it also in the next week. The programming will happen simultaneously as I interagte the neopixels, so it won’t take many times. I suppose I can finish it in two weeks.

Back to the preparatory research, “The Ascent” gives me a visual shock, except for how it involves the audience. So does the Infinit Mirror Room. This is different from my midterm project which seems ordinary and boring at first glance. Light is a powerful way to attract people’s attention and leave impression on them. Thus, I was inspired and got the idea of the Boundless Light. This project is align with my definition of interaction, because it clearly leaves something in the audience’s heads. The message of immersing in this dreamlike experience is very obvious. I think this kind of interaction gives the audience an engagement what Ernest Edmonds concludes as “relating”. He describes it as “a long term interest, which occurs when the audience wants
to experience the work again and again, perhaps over many years” (12). Well, this is similar to what I have said in the begining, the experience of the room suddenly hopped into my mind. However, my project is different in that it let the audience control the lights and the patterns are varied.

My project leads to the interaction between human and lights. More creative artifacts can be built upon what I designed. Due to the restriction of space, I cannot make it a room for it, but I’m sure it will be amazing if the room displays different light patterns when people enters different sections. I hope many artists can be inspired just as what I have been, if so, this is the value of my project.

IMA recitation8: Serial Communication

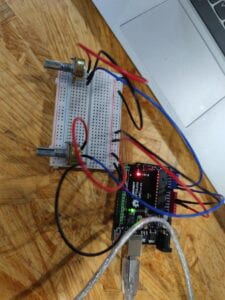
For task1, I had to make a Etch-A-Sketch through Processing. To achieve this, I’ll send values of two potentiometers to Processing, where I used SerialRecord library.

#include "SerialRecord.h"

SerialRecord writer(2);

void setup() {
 Serial.begin(9600);
}

void loop() {
 int value1 = analogRead(A0);
 int value2=analogRead(A1);
 writer[0] = value1;
 writer[1]=value2;
 writer.send();

 //delay(20);
}

To test whether the value has been send, I used ReceiveMultipleValues in the example of Processing for test. Values sent are displayed in the left corner.

In the next step, I modify the example so that the potentiometers can control a circle.

But to make it a Etch-A-Sketch, I had to draw lines. To achieve this, I drew multiple short lines, which appeared like dots, but became a line when connected together. New variables were created to record previous coordinates. In this task, I encountered problem that I can only draw a dot on the screen. Consulting the professor, I understand the background function in draw() will override each time it is called, so it should be put into setup. 

import processing.serial.*;
import osteele.processing.SerialRecord.*;

Serial serialPort;
SerialRecord serialRecord;
float px;
float py;

void setup() {
  size(500, 500);

  String serialPortName = SerialUtils.findArduinoPort();
  serialPort = new Serial(this, serialPortName, 9600);
  background(102);
  // If the Arduino sketch sends a different number of values, modify the number
  // `2` on the next line to match the number of values that it sends.
  serialRecord = new SerialRecord(this, serialPort, 2);
}

void draw() {
  

  serialRecord.read();
  int value1 = serialRecord.values[0];
  int value2 = serialRecord.values[1];

  float x = map(value1, 0, 1024, 0, width);
  float y = map(value2, 0, 1024, 0, height);
  stroke(255);
  line(x, y, px, py);
  px=x;
  py=y;
}

The interaction is that Processing immediately respond to the change of potentiometers that are controlled by me. Therefore, it happens between me and the computer. However, it only gives visual feedback, which makes the communication rather weak.

In task2, we wanted to display a ball in Processing which bounces from left to right. Position of the ball is sent to Arduino, so that the servo motors on both sides move as if they hit the ball. The major problem was not in Processing, but in Arduino where the servo motors move randomly. Even though we set the boundaries in the if condition correctly, the problem still existed. Professor suggested we only send 0 or 1 to Arduino instead of the position of the ball, so that the condition is clearer. 

Processing:

import processing.serial.*;
import osteele.processing.SerialRecord.*;
Serial serialPort;
SerialRecord serialRecord;
int x;
int add=10;
void setup(){
  fullScreen();
  String serialPortName = SerialUtils.findArduinoPort();
  serialPort = new Serial(this, serialPortName, 115200);
  serialRecord = new SerialRecord(this, serialPort,1);
}

void draw(){
  background(0);
  fill(255);
  stroke(0);
  circle(x,height/2,50);
  if (x>=width){
    add=-add;
    serialRecord.values[0]=0;
    serialRecord.send();
  } else if (x<0){
    add=-add;
    serialRecord.values[0]=1;
    serialRecord.send();
  }
  x=x+add;
}

Arduino:

#include <Servo.h>
#include "SerialRecord.h"
SerialRecord reader(1);
Servo myservo;
Servo myservo2;
int value;
void setup() {
  // put your setup code here, to run once:
  Serial.begin(115200);
  myservo.attach(8);
  myservo2.attach(7);
}

void loop() {
  // put your main code here, to run repeatedly:
  if (reader.read()){
  value=reader[0];
  if (value==0){
    myservo.write(100);
    delay(250);
    myservo.write(0);
  } else if (value==1){
    myservo2.write(100);
    delay(250);
    myservo2.write(0);
  }
}
}

I didn’t stick the servo motors onto the computer, but I asked my teammate Hanwen Hu and Ricky to hold them. They also helped me to build up the circuit.

Considering the interaction, it happens within the computer itself, but it is really interesting. The audience can easily get the message.

IMA final project: three project proposal

1. Avoid the Trap:

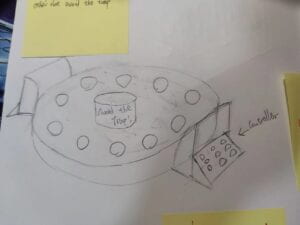
Avoid the Trap is a two-player game that requires one player to set the trap among 10 options and the other have to avoid choosing the trap. When the player select one LED, a random LED other than the trap will also automatically  go out. This mechanism is to make the game more difficult. In the second stage, a computer-controlled ghost will enter the game, which means it will choose a LED to be the trap. As you can see, the topic of this project is ‘game’. Different from my midterm project, it involves two players and a computer player, which is more innovative and interesting. 

The idea comes from a children’s toy. It bites the player when he/she press the wrong teeth. My project changes the interaction between human, so that the audience can immersively play this game.

2. The Adaptive helmet:

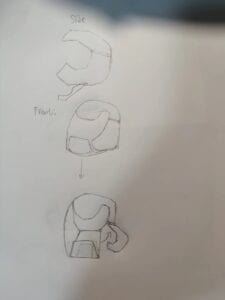
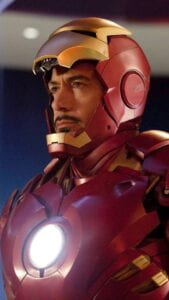
This helmet not only just covers your head, but also it can adapt itself to the size of your head. I intend to make a button for the user to initialize the helmet or to turn off the helmet. More functions can be added to it, like playing music. This helmet appears pretty much like the one of iron man’s, but his is more superior. 

The interaction happens between user and helmet. I want to give the audience a new horizon of what can happen in the future. Moreover, many other functions can be included, so the imagination is also spurred.

3. The Boundless Light:

This series of light will respond to the audience and change their color. Approching from different directions, the lights will display different colors. Besides, the more distant a light is, the less bright it will be. Through this, I believe the audience can have a fantastic and fariy-tale like experience. This idea originates from the “teamLab Borderless Shanghai”, where there is a room filled with lights working in similar pattern. But the brightness of the lights is modified my my project according to the distance, which seems more rational, and appears as if you are a light source.

IMA Recitation 7: Neopixel Music Visualization

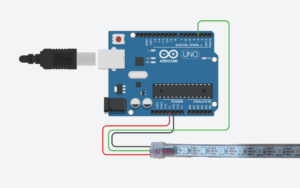
In task1, I tested the Neopixel using the FastLED library, which makes the first LED blink. The circuit looks like this.

In task2, I need to use SerialRecord to send messages from Processing to Arduino. The function of the given code is to change the color of the Neopixel according to the coordinates of mouse.

The main part of the recitation was task3, where I first downloaded and tested a given code. It displayed a circle that changes according to the volume of the music. To add my own music, I had to transform mp3, the type of my downloaded music, into aiff, the acquired music type. 

void setup() {
  size(640, 480);
  W = width/NUM;
  // load and play a sound file in a loop
  sample = new SoundFile(this, "Alan-Walker-Faded.aiff");
  sample.loop();

You can actually see I add the soundfile of Faded. The modification was successful. Since the original code already display a visualization on computer, I just needed to focus on how to make the Neopixel produce the light. The code in task2 gave me inspirations. If it can make Neopixel shine when mouse is clicked, then I only need to change the variables to the volume of the music, so that not only the circle in Processing will change, but also the LED on Neopixel. There are 60 LED on Neopixel, so I need to reset them after it reaches the capacity. 

After the Neopixel was done, I could consider modifying the visualization of Processing. I want to change the pattern displayed after a certain amount of time, but  I won’t change the code before that point. Writing the code during refcitation would take much of the time, so I utilized the code from my IMA post. Adding the code to Processing, the final result looks like this.


import processing.sound.*;
import processing.serial.*;
import osteele.processing.SerialRecord.*;
Serial serialPort;
SerialRecord serialRecord;

int W;         //width of the tiles
int NUM = 60;  //amount of pixels
int[] r = new int[NUM]; //red of each tile
int[] g = new int[NUM]; //red of each tile
int[] b = new int[NUM]; //red of each tile
int i;
int m=1;

SoundFile sample;
Amplitude analysis;

void setup() {
  size(640, 480);
  W = width/NUM;
  // load and play a sound file in a loop
  sample = new SoundFile(this, "Alan-Walker-Faded.aiff");
  sample.loop();

  // create the Amplitude analysis object
  analysis = new Amplitude(this);
  // analyze the playing sound file
  analysis.input(sample);
  
  String serialPortName = SerialUtils.findArduinoPort();
  serialPort = new Serial(this, serialPortName, 9600);
  serialRecord = new SerialRecord(this, serialPort, 4);
  serialRecord.logToCanvas(false);
  rectMode(CENTER);
}

void draw() {
  //println(analysis.analyze());
  long t = millis();
  background(125, 255, 125);
  noStroke();
  fill(255, 0, 150);

  // analyze the audio for its volume level
  float volume = analysis.analyze();

  // volume is a number between 0.0 and 1.0
  // map the volume value to a useful scale
  float diameter = map(volume, 0, 1, 0, width);
  // draw a circle based on the microphone amplitude (volume)
  circle(width/2, height/2, diameter);
  println(t);
  if (t>13000){
    background(255);
  //for(int m=0; m<width;m=m+
    noFill();
    for (int j=-10; j< 10; j = j+1) {
      stroke(50,82,234);
      ellipse(width/2,height/2,m + j *30 ,m+j*30);
    }
    m=m+5;
    if(m>=width){
      m=-m-150;
    }
  }
  if (i>60){
    i=1;
    for (int j=1;j<60;j=j+1){
      serialRecord.values[0] = j;     // which pixel we change (0-59)
      serialRecord.values[1] = r[0];  // how much red (0-255)
      serialRecord.values[2] = g[0];  // how much green (0-255)
      serialRecord.values[3] = b[0];  // how much blue (0-255)
      serialRecord.send();
    }
  }
  light(i);
  i=i+1;
}
void light(int i){
    int n = floor(random(60));

    r[n] = floor(random(255));
    g[n] = floor(random(255));
    b[n] = floor(random(255));
    if (analysis.analyze()<0.3){
      serialRecord.values[0]=i;
      serialRecord.values[1]=r[n];
      serialRecord.values[2]=g[n];
      serialRecord.values[3]=b[n];
    } else if(analysis.analyze()>0.3 && analysis.analyze()<0.6){
      serialRecord.values[0]=i;
      serialRecord.values[1]=r[n];
      serialRecord.values[2]=g[n];
      serialRecord.values[3]=b[n];
    } else{
      serialRecord.values[0]=i;
      serialRecord.values[1]=r[n];
      serialRecord.values[2]=g[n];
      serialRecord.values[3]=b[n];
    }
    serialRecord.send();
    delay(50);
}


IMA final project preparatory research and analysis

The first project I chose is “The Ascent” by xxxy, which is an automtic show-control system. It engages the player and audience into this levitating ride. For the players, they had to release thier desire and contend with themselves. I think the imaginative design and the engaging experience are what attracts me most.

The second project is “Mind the ‘Uuh'” by Benedikt Groß, Maik Groß and Thibault Durand. This clock-like device is aware of “uhh” fill words and gives signals. In contrast to the first one, it is rather simple, but useful, which is the reason why I chose it.

They both inform my work, but in different ways. “The Ascent” informs me that I should engage audience into this experience and be creative, while the second one pulls me back to reality, since it’s impossible for me build such artifact as a real artist, so functionality is also important. I once give the definition of interaction as “a conversation between two individuals (man or objects) that conveys messages with each other without limimtation”. Based on this and the research of the two projects, I realize to provide an interactive experience the involvment of the audience is vital. 

Ernest Edmonds summarizes experience into three categories——“attracting”, a matter of dawing attention, “sustaining”, the process of retaining the that attention, and “relating”, development of a long time interest (12). In other words, the experience is about leading audience into my project maintain and further produce a long-time feeling. The role of the audience can’t be more obvious, because they are the ones that are experiencing my project. Whether my project is creative or pragmatic, these all serves for providing an unforgettable while long-lasting experience. Thus the key to an interactive experience is how to use there elements to produce involvment.

Work cited

Ernest Edmonds,Art, Interaction and Engagement, 2011, International Conference on Information Visualization(IV), pp.451-459

IMA recitation6: Animating an interactive poster

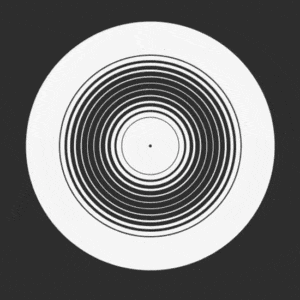
The post in recitation6 required us to make a fixed pattern that covers the whole screen. I got inspiration from the animation in the recitation instructions.

The circle in it goes from center to the border. To create my own post, I decided to make to circle goes back from border to the center, so that it appears more like a  ripple.

void setup(){
  size(1024,768);
}
float i;
void draw(){
  background(255);
  //for(int m=0; m<width;m=m+
  noFill();
  for (int j=-10; j< 10; j = j+1) {
    stroke(i,153,67);
    ellipse(width/2,height/2,i + j *30 ,i+j*30);
  }
  i=i+5;
  if (i>500 && i<width || i<-400){
    textSize(100);
    fill(55,47,250);
    text("IMA",width/2-70,height/2+30);
  }else if (i>=width){
    i=-i-150;
  }
}


As the circle moves, its color also changes according to the range. The text appears when the center is blank, so that the whole picture seems more filled. I encountered a problem when I want to generate multiple circles, then Professor suggested me using a for loop with a new variable ‘j’, which not only counts the time, but also change the radius.

To make it more interactive, I added a function to it that the color changes when the mouse is clicked. Besides, clicking different places will display different colors.

color circleCol;

void setup(){
  size(1024,768);
  circleCol = color(255, 0, 0);
}
float i;
float mouse=50;
void draw(){
  background(255);
  //for(int m=0; m<width;m=m+
  noFill();
  for (int j=-10; j< 10; j = j+1) {
    stroke(circleCol);
    ellipse(width/2,height/2,i + j *30 ,i+j*30);
  }
  i=i+5;
  if (i>500 && i<width || i<-400){
    textSize(100);
    fill(55,47,250);
    text("IMA",width/2-70,height/2+30);
  }else if (i>=width){
    i=-i-150;
  }
}
void mouseClicked(){
  colorMode(HSB);
  circleCol = color(mouseX % 360, 255, 255);
  //mouse=mouse+20;
}

The mouseclicked function appears to be useful and interesting. It records the x coordinate of the mouse when it is clicked, so that the color can be changed. Through this function, I can do things more than just changing colors, for example, I have the thought of making a ripple in the place where mouse is clicked.


IMA recitation5: Processing basics

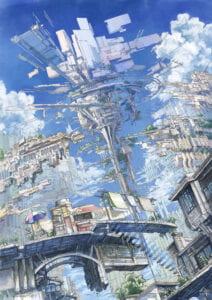
In recitation 5, we had to draw an image using Processing. The reason why I chose the picture above was that the main tower in it was made of blocks which means easy to drawn by Processing. Besides, I would like to try whether Processing can accomplish a picture as complex as this.

To draw the tower, I plan to break the top into small blocks and use curves to form the lower part. I decide to use rect() to draw the blocks above. I’ll use vertex to draw the ring around the tower and the lower part of it. 

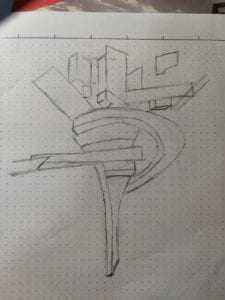
I first started drawing the sketch of it. Though I simplified the tower, I was still to complex for a beginner, so I decided to further reduce the blocks and curves during my composing process.

code:

void setup() {
size(600, 600);
}
void draw() {
// Your drawing code goes here
background(255);
stroke(168);
push();
translate(width/50, height/50);
rotate(PI/3.0);
fill(88,146,244);
rect(100,0,100,50);
noFill();
pop();
fill(223,234,232);
quad(90,140,90,50,100,30,100,120);
quad(100,30,150,80,150,160,100,120);
quad(150,60,170,20,170,140,150,170);
quad(170,0,250,20,250,160,170,140);
quad(150,170,170,140,250,160,230,190);
noFill();
fill(181,216,222);
quad(90,140,100,120,150,160,140,180);
quad(250,160,250,140,400,120,400,140);
noFill();
line(350,200,450,70);
line(350,180,450,50);
beginShape();
vertex(65, 220);
bezierVertex(400, 100, 320, 350, 200, 350);
bezierVertex(350, 300, 260, 140, 60, 220);
endShape();
beginShape();
vertex(65,220);
bezierVertex(150,300,140,400,150,520);
endShape();
beginShape();
vertex(200,350);
bezierVertex(200,350,200,350,180,500);
endShape();
line(150,520,180,500);
line(20,350,220,300);
line(30,320,220,270);
line(220,300,220,270);
line(70,310,50,343);
line(200,200,180,280);
line(220,300,200,350);
line(192,307,165,510);
beginShape();
vertex(90,250);
bezierVertex(90,250,150,220,190,250);
endShape();
}

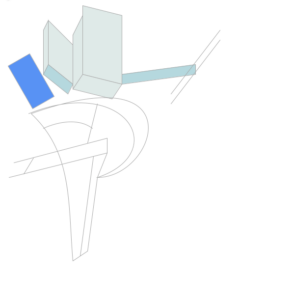
The final work looks like this. During the process, I had to record the coordinate of some important points for reducing my job. Despite that drawing the 3D blocks was still time-consuming.

I try my best to make it conforms to the original image, but I found using Processing to deal with details is challenging for beginners, which is what my drawing lacks. However, it does manifest the overall shape of the tower. 

In conclusion, I think Processing can handle most of the sketches, but, as far as I’m concerned, it is not capable of drawings demanding various details due to the fussy and bald modification work. However, it is enough for my interaction design. After all, I’m not a professional artist.