- Auto-Trashcan- KENNETH CHU – GOTTFRIED
- CONTEXT AND SIGNIFICANCE
I think that the previous research project provided me with the idea of how easy it was to work with cardboard. It also gave me some insight into interactivity from watching other groups present their projects. My definition of interaction is the feedback one receives from doing an action, such as my project, in which my trash can opens its lid automatically when it senses someone is near. I think that something significant about my project is the ability for me to automate a task that was annoying for me, since the mechanism in my trash can back in my dorm was broken. Since similar designs already exist, one example of its application outside of my own use is a hospital room in developing countries such as Ecuador. Nurses in such countries often don’t have the necessary vaccine needle covers that protect them from being stabbed by the needle, and since the disposal bins are manual, some nurses have been stabbed accidentally which puts them at risk of being infected by a disease. I think an automatic disposal bin such as mine could help reduce the amount of accidental needle stabbings in developing countries.
CONCEPTION AND DESIGN:
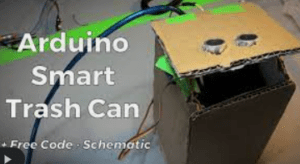
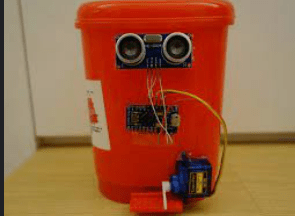
My partner and I knew from the beginning that this trash can was meant to be put on the floor, so it made sense to put the ultrasonic sensor at the bottom of the bin. We used the 2 images below as references, but we knew they wouldn’t work, because of how the cables were managed. For the materials, we used cardboard. This decision was made, because cardboard was easily available to us, and we both had some experience with it. Moreover, cardboard was very easy to cut, unlike wood, which requires special machinery to cut. Another we could have used was plastic, but it would be harder to find plastic in such a shape we were expecting.
Visual references for the project:


- Sketch/ diagram initial prototype:
FABRICATION AND PRODUCTION:
Firstly, my partner and I met together and both of us proposed our ideas, and we decided to go on with mine. The mechanism we decided to use was an ultrasound sensor attached to a servo motor, which would be triggered when it sensed something within a certain distance. Afterwards, we looked for a box that resembled a trash can, because building it from scratch would result in not being aesthetically pleasing. We then spray painted it with an oil based paint, thus leaving a shiny finish. I think that the communication between me and my partner was pretty good, and living on the same floor, we could easily work on the project whenever we wanted to. I focused more on the software side, and he focused more on the fabrication process.
Spray painting:
We started designing the schematic in Tinkercad, which is a tool we used in previous recitations. After viewing different projects on the arduino project hub and using them as references, this is the schematic we designed. We built the schematic, and coded it on the same day in the dorm, because it is really hard for us to concentrate on the IMA studio, as there are too many people doing different things. Then we mounted everything together in Thursday’s class. We decided to use the battery pack as a power option, because it would facilitate cable management, and the arduino also had a memory storage, so it could remember the code.
Schematic:
Circuit:
Circuit test:
Mounting together:
Inside view:
For the coding part, we also looked in the arduino project hub for references, as well as to the slides provided to us. Below is the initial code. We modified this code, because we thought that it made the mechanism too aggressive, and sometimes it sent the lid flying backwards. After talking with Gottfried in Thursday’s class, he suggested to us to make the servo motor activate in stages, and put some delay which in turn resulted in a smoother opening of the lid. The new code can be found below and the stage activation is in bold.
Initial code:
#include
Servo servo;
int const Pulse = 9; //blue cable
int const Echoreceive = 10; // green cable
void setup() {
Serial.begin(9600); //channel for serial monitor
pinMode(Pulse, OUTPUT);
pinMode(Echoreceive, INPUT);
servo.attach(6); //Blue long cable
}
void loop() {
int duration, distance;
digitalWrite(Pulse, HIGH);
digitalWrite(Pulse, LOW);
duration = pulseIn(Echoreceive, HIGH);
distance = duration * 0.034 / 2;
//We found distance formula from arduino project hub.
// servo triger distance is from 0 – 45 cm
if (distance <= 45 && distance >= 0) {
servo.write(90);
delay(3000);
} else {
servo.write(180);
}
delay(10);
Serial.print(“Distance: “);
Serial.print(distance);
Serial.println(“cm”);
delay(300);
}
Second code:
#include
Servo servo;
int const Pulse = 9; //blue cable
int const Echoreceive = 10; // green cable
int open;
void setup() {
Serial.begin(9600); //channel for serial monitor
pinMode(Pulse, OUTPUT);
pinMode(Echoreceive, INPUT);
servo.attach(6); //Blue long cable
}
void loop() {
int duration, distance;
digitalWrite(Pulse, HIGH);
digitalWrite(Pulse, LOW);
duration = pulseIn(Echoreceive, HIGH);
distance = duration * 0.034 / 2;
//We found distance formula from arduino project hub.
// servo triger distance is from 0 – 15 cm
if (distance <= 15 && distance >= 0) {
if (open == 0) {
//servo.write(90);
//delay(5000);
servo.write(162);
delay(100);
servo.write(153);
delay(100);
servo.write(144);
delay(100);
servo.write(135);
delay(100);
servo.write(126);
delay(100);
servo.write(117);
delay(100);
servo.write(108);
delay(100);
servo.write(90);
open = 1;
delay(5200);
}
} else {
open = 0;
servo.write(180);
}
delay(10);
Serial.print(“Distance: “);
Serial.print(distance);
Serial.println(“cm”);
delay(300);
}
After the user testing session we realized that we had made one major design flaw. At first we placed the ultrasonic sensor outside the box, which allowed it to have a better detection range. However people were stepping on the sensor during the test round, which could very possibly damage it, so after the class we decided to place it inside the box, with just the ultrasonic part protruding out. This was effective, because it protected the mechanism from damage, but we also had to reduce the detection distance to 15 cm, in order to avoid false triggers. As for the feedback received, it mostly focused on how this project could be applied on a larger scale, and increasing the volume of the trash can. The code was also slightly modified to hold for 5.2 seconds when it was triggered, and to keep open as long it sensed something in front of the trashcan.
ultrasonic sensor first design:
New ultrasonic design sketch:
New ultrasonic design:
User testing Feedback:
User testing:
Final Test:
- CONCLUSIONS:
To summarize this project, we had to create a an artifact that was either, useful, interesting, or entertaining. With me choosing the first option, because I wanted to solve a problem I had back in the dorm. Automation of a mundane task could also help people save a lot of time, in the long run. I think that our project aligns with my concept of interaction, because it provides a response (opening) every time time you put a input in it (senses something). I think that most of the audience that tried interacting with our project figured out what to pretty quickly. I think that an aspect we could improve, if we had more time would be the finishes for the trash can, as it looks really basic. I learned that I can always ask for help, and or suggestions from other people if we are not sure what to do, but ultimately it for us to decide what to do. My takeaway from this project is on how to plan and execute a project, and also how I could be able to better introduce a background story into my designs. The whole process was really rewarding to me from start to finish, and I am looking forward to next coming weeks!
Other people testing:
References:
https://create.arduino.cc/projecthub/abdularbi17/ultrasonic-sensor-hc-sr04-with-arduino-tutorial-327ff6 ** allowed us to view how the code looked like, and how the sensor worked.
https://docs.arduino.cc/learn/electronics/servo-motors ** review on servos
https://www.arduino.cc/education/smart-trash-can ** schematic ideas
https://create.arduino.cc/projecthub/corn_isamazing/smart-trash-can-d080e3 ** schematic ideas
Leave a Reply