Hand Wrestling Game PRO —— Jiamu Wu (jw7880) Instructor: Rodolfo Cossovich

(Please pay attention that this work was accomplished alone. I wish I could’ve had a pair but I didn’t)

INSPIRATION

Though it is a hand wrestling game, the initiative idea actually came from the Speed Game which was introduced in the previous classes. The appearances look so different but the two games share a lot of characters. First, they both include a scoring system. Second, in both scoring systems, the faster player to finish the required task scores. What I improved is optimizing the game rules, adding sound reminders for scoring and a dreamy program for the winner’s celebration. Another interactive work that triggered my idea was Arche-Scriptures – Our digital traces in the future-past (click to visit). It’s a device that can scan the QR codes printed on the ceramic relics and play the audio messages they contain. It’s pretty cool and it also applies an Arduino microcontroller to the function. However, what made me alert was that such a cool device is not that interactive. It can only scan certain objects instead of interacting with the users efficiently, and it’s not so portable, which adds much trouble to usage.

The significance of my work is that it requires a full participation of the users, and the interaction not only happens between a user and the device, but also between the two users, where the mutual engagement offsets the limitations of machines and adds more fun to the game. The intended users include all the people who want to have fun, train the biceps or find a way to release pressure. Anyone interested is invited to have a try and it is definitely an unforgettable experience.
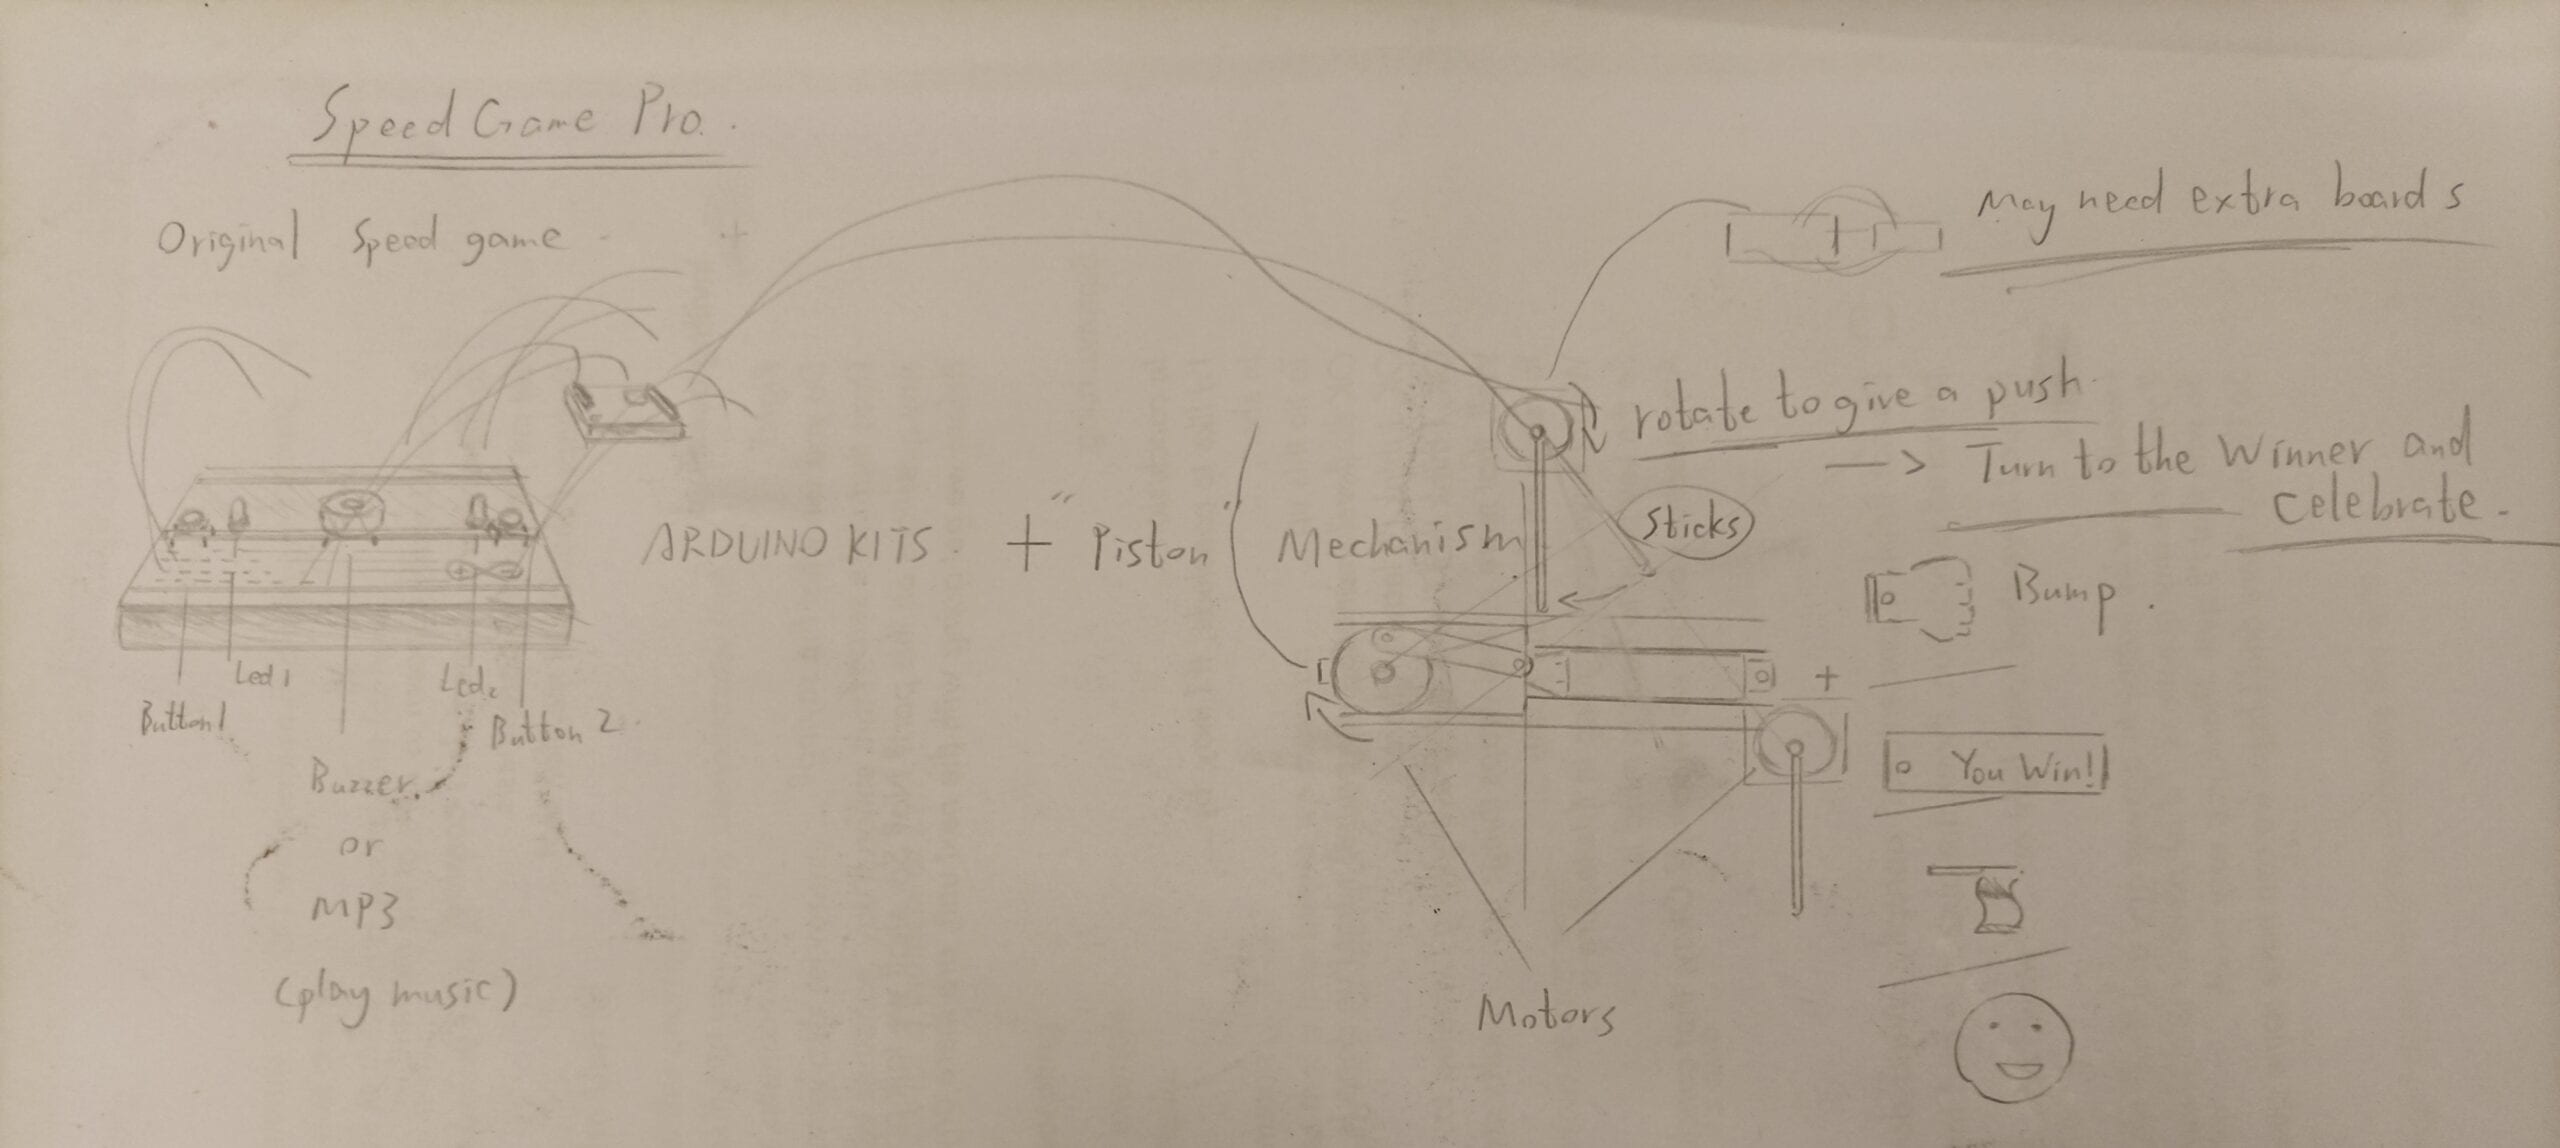
 

Fig.1. initial diagram of the operation principle  (1. Buttons were later replaced by the hand rings and art paper 2. I failed to realize the piston part).


CONCEPTION AND DESIGN

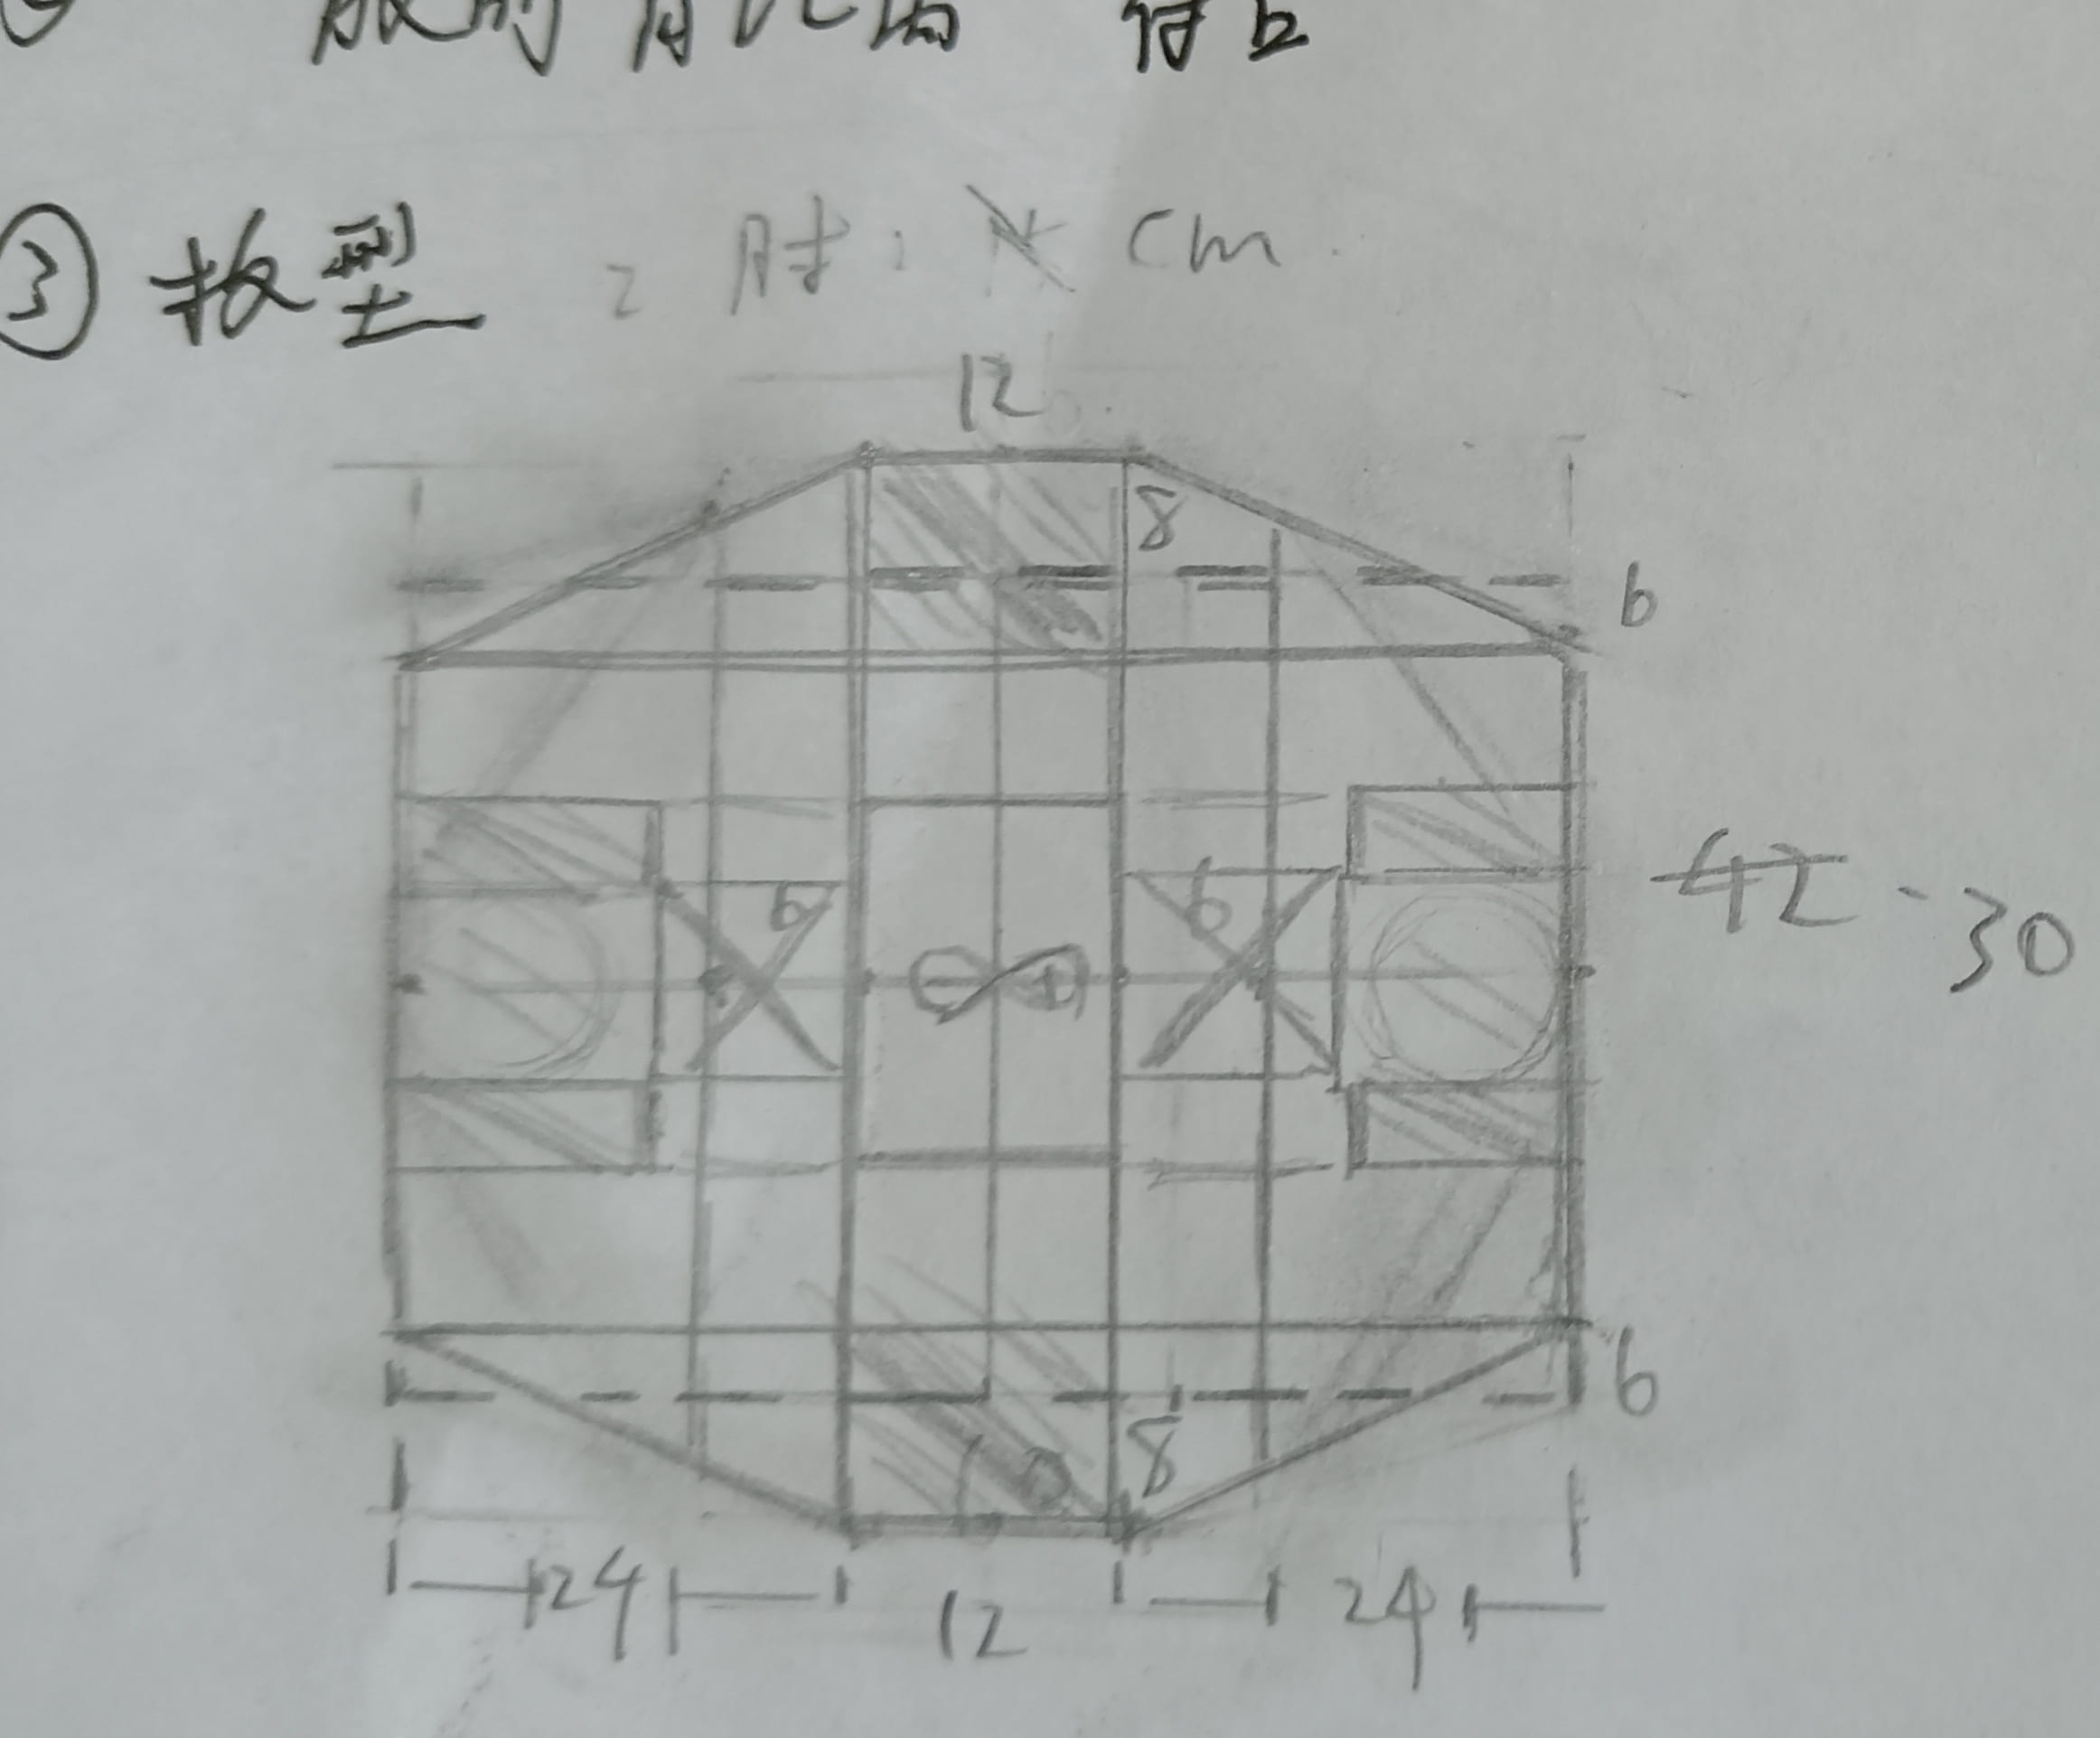
Fig.2. Sketch of the board, upgraded after user test. 
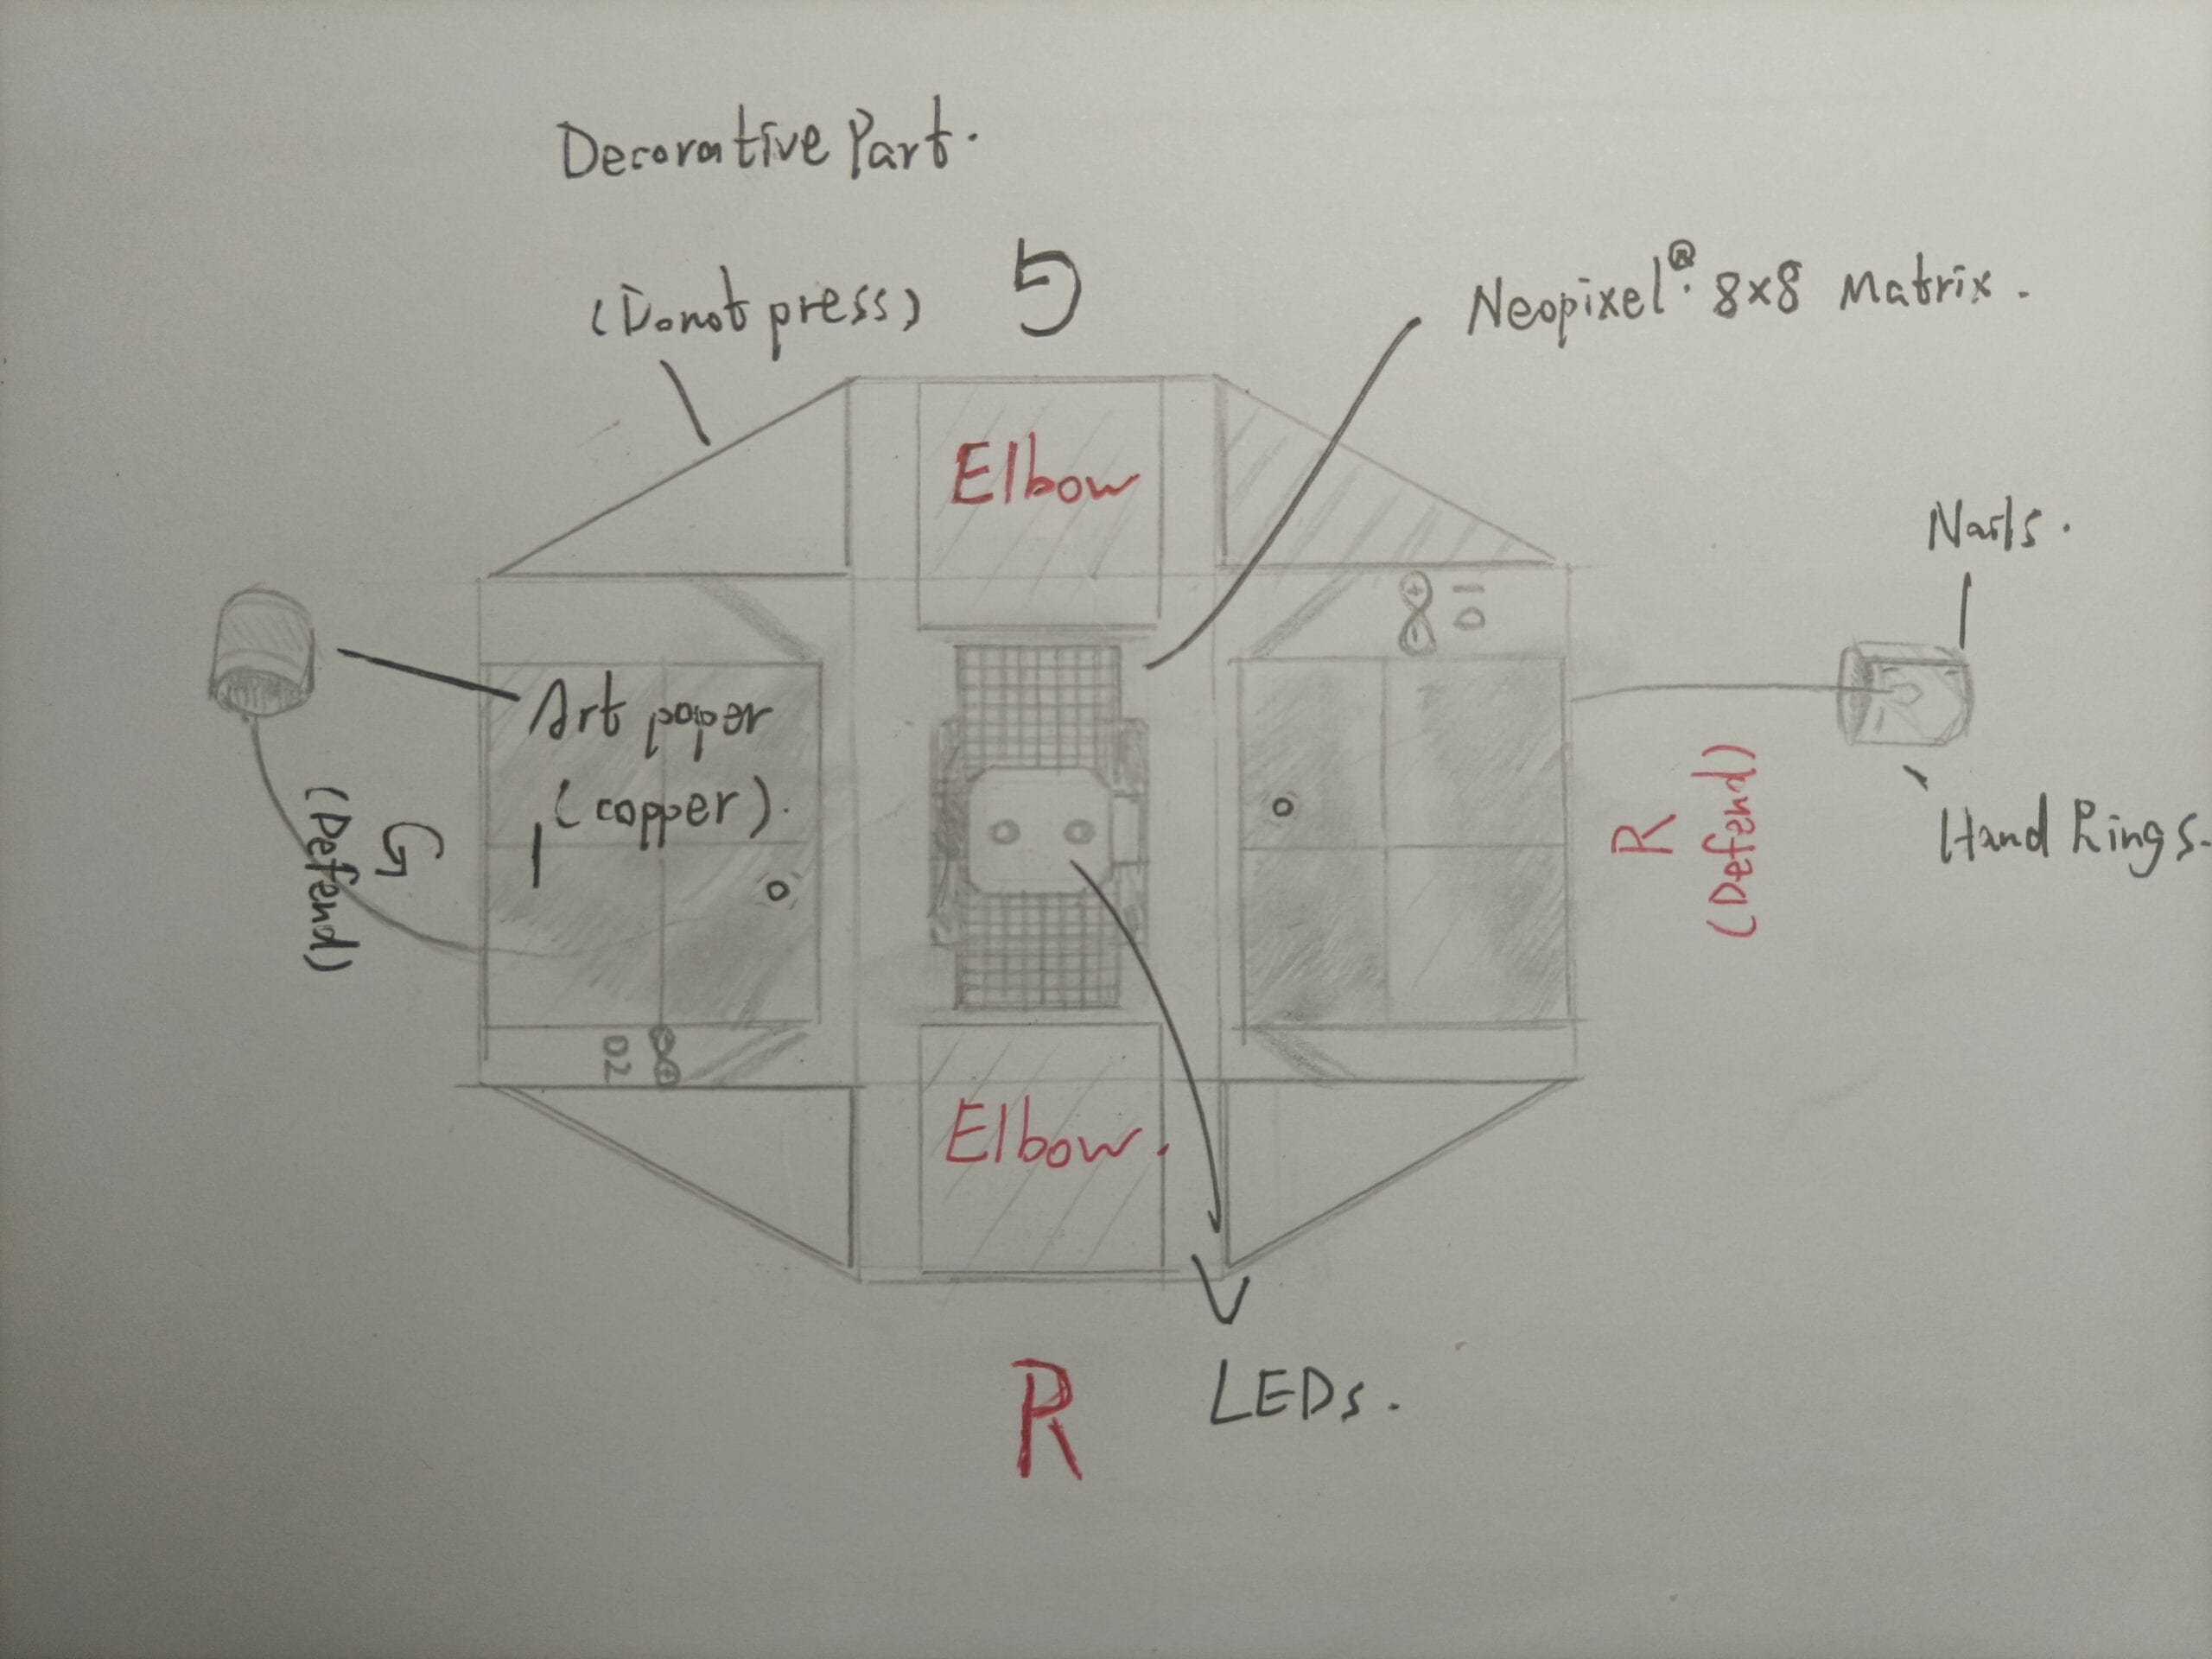
Fig.3. Detailed sketch, plane

In order to make the game more interactive, as well as interesting, I designed the game rule below. Both players and the device achieve a full engagement in the process. The device records the score automatically, and players get a blink and a beep as a reminder for scoring. The beep sounds different, where green team gets a bass one while red team gets a lighter one so that they know the scoring situations and can put all attention and efforts on the game. The celebration is definitely a surprise since there’s no sign before rainbows appear on Neopixel boards.

GAME RULES

  1. A best-of-seven game, three games in total, two players representing team red and green respectively.
  2. Wear hand rings and stand in intended position (right in front of “Elbow”)
  3. Game will start after two blinks of the LEDs and a heavy sound of the buzzer, before which any attempt of scoring won’t be taken into account.
  4. Try to attack the enemy’s area and defend yours. It doesn’t matter whose ring touches the scoring area.
  5. A celebration of about 20 sec after each game, next game will start with the same reminders.
  6. Final winner unlocks all celebrations, including cool Neopixel special effects and Star Wars music.

As is known to all, a hand wrestling game demands lots of physical strength and may cause damage to the underlying objects if they’re too fragile, so I specially designed the supports for the positions where elbows are intended to place, and where fists are intended to strike on. They’re very thick cardboards glued together and a little bit wider than the scoring area.
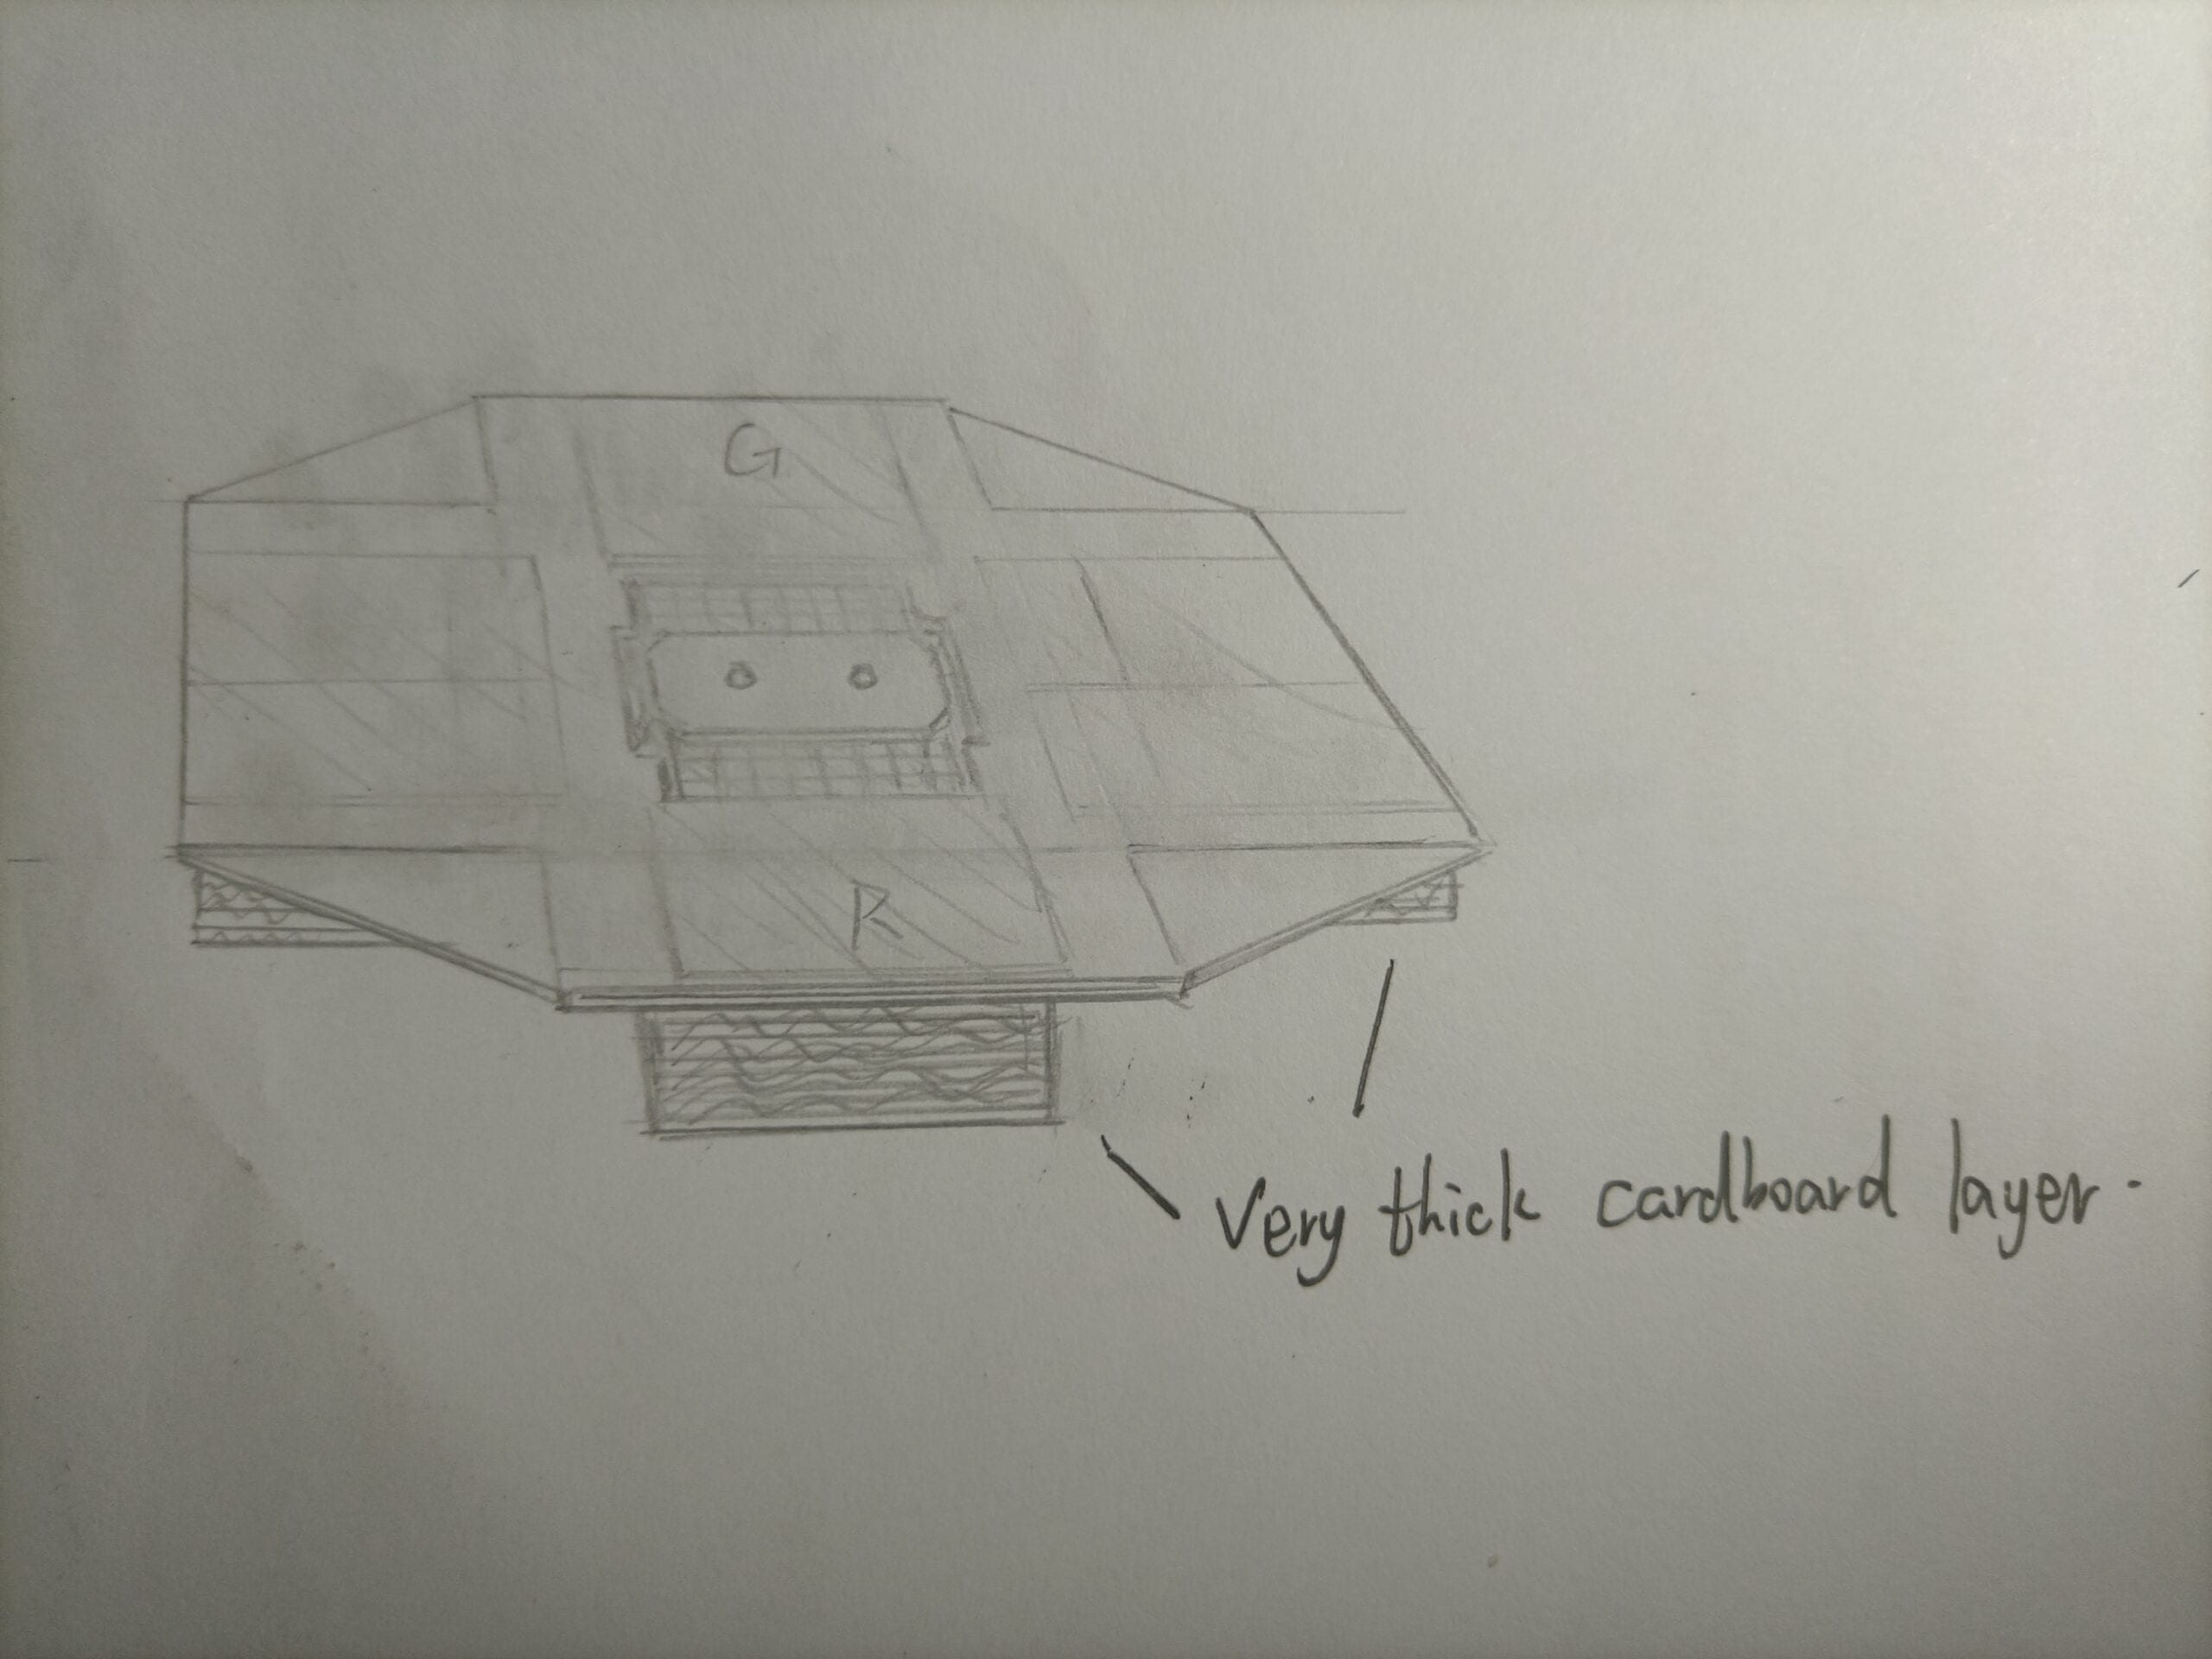
Fig.4. Detailed sketch, 3D

As for the materials, I didn’t use much more than cardboards. They, though common and cheap, are simple, solid, plastic, retro, and durable, which is an ideal material when one doesn’t have many advanced tools. Other materials include a microcontroller, a breadboard, a red led, a green led, two 220R resistors, a buzzer, several cables, eight pieces of art paper, and two Neopixel 8*8 boards.

I chose the materials based upon these principles:

  1. Accessibility. ——All materials are accessed either in my toolkit or equipment room in 826 so that it’s easy to fix the broken parts and find alternatives in time.
  2. Durability. ——It’s very important to all interactive works, but especially to a physical game like this, which requires solid devices with simple external form and reliable structure.
  3. Sustainability. ——I also tried my best to reuse waste materials and reduce my own waste, so lots of cardboards in my device are recycled from the trash pile, as well as some cables. I also restricted the use of glue gun and soldering iron because they’re energy-consuming. For those unimportant parts, I preferred twin adhesives.

I chose the form/element based upon these principles:

  1. Durability. —— It’s very important to all interactive works, but especially to a physical game like this, which requires solid devices with simple external form and reliable structure.
  2. Playability. —— An interactive work is born to bring happiness, so my work is more than a hand wrestling game with an automatic scoring system. Instead, it has entertainment elements including multiple interesting prompt tones and celebration mechanism.
  3. Portability. —— Obviously, a game is meaningless without more players to engage in, but they won’t automatically come to 826 for this work, so I designed it as a portable device with solid structure and simple geometric appearance, so that it doesn’t get damaged during transportation, Also, since it’s mainly made of cardboards, it’s light and you can carry it on your shoulder like an old video recorder, back to the 80s?

I actually had come up with the ideas of exposing some of the cables and other components. Have you heard of CYBERPUNK? It has become a genre of art! But the idea was later abandoned. Rationally, this will make the geometric appearance of my work very complex, and the structure will become loose and fragile, which violates the principles of “Durability” and “Portability“. I abandoned the idea of adding a piston mechanism for the same reason.


FABRICATION AND PRODUCTION

I’ve mentioned that I didn’t have a pair, so I finished all the steps below either alone or with the help of a fellow or instructor.

Steps:

 1. Preparing for the materials.

Successful.

 2. Making the base.

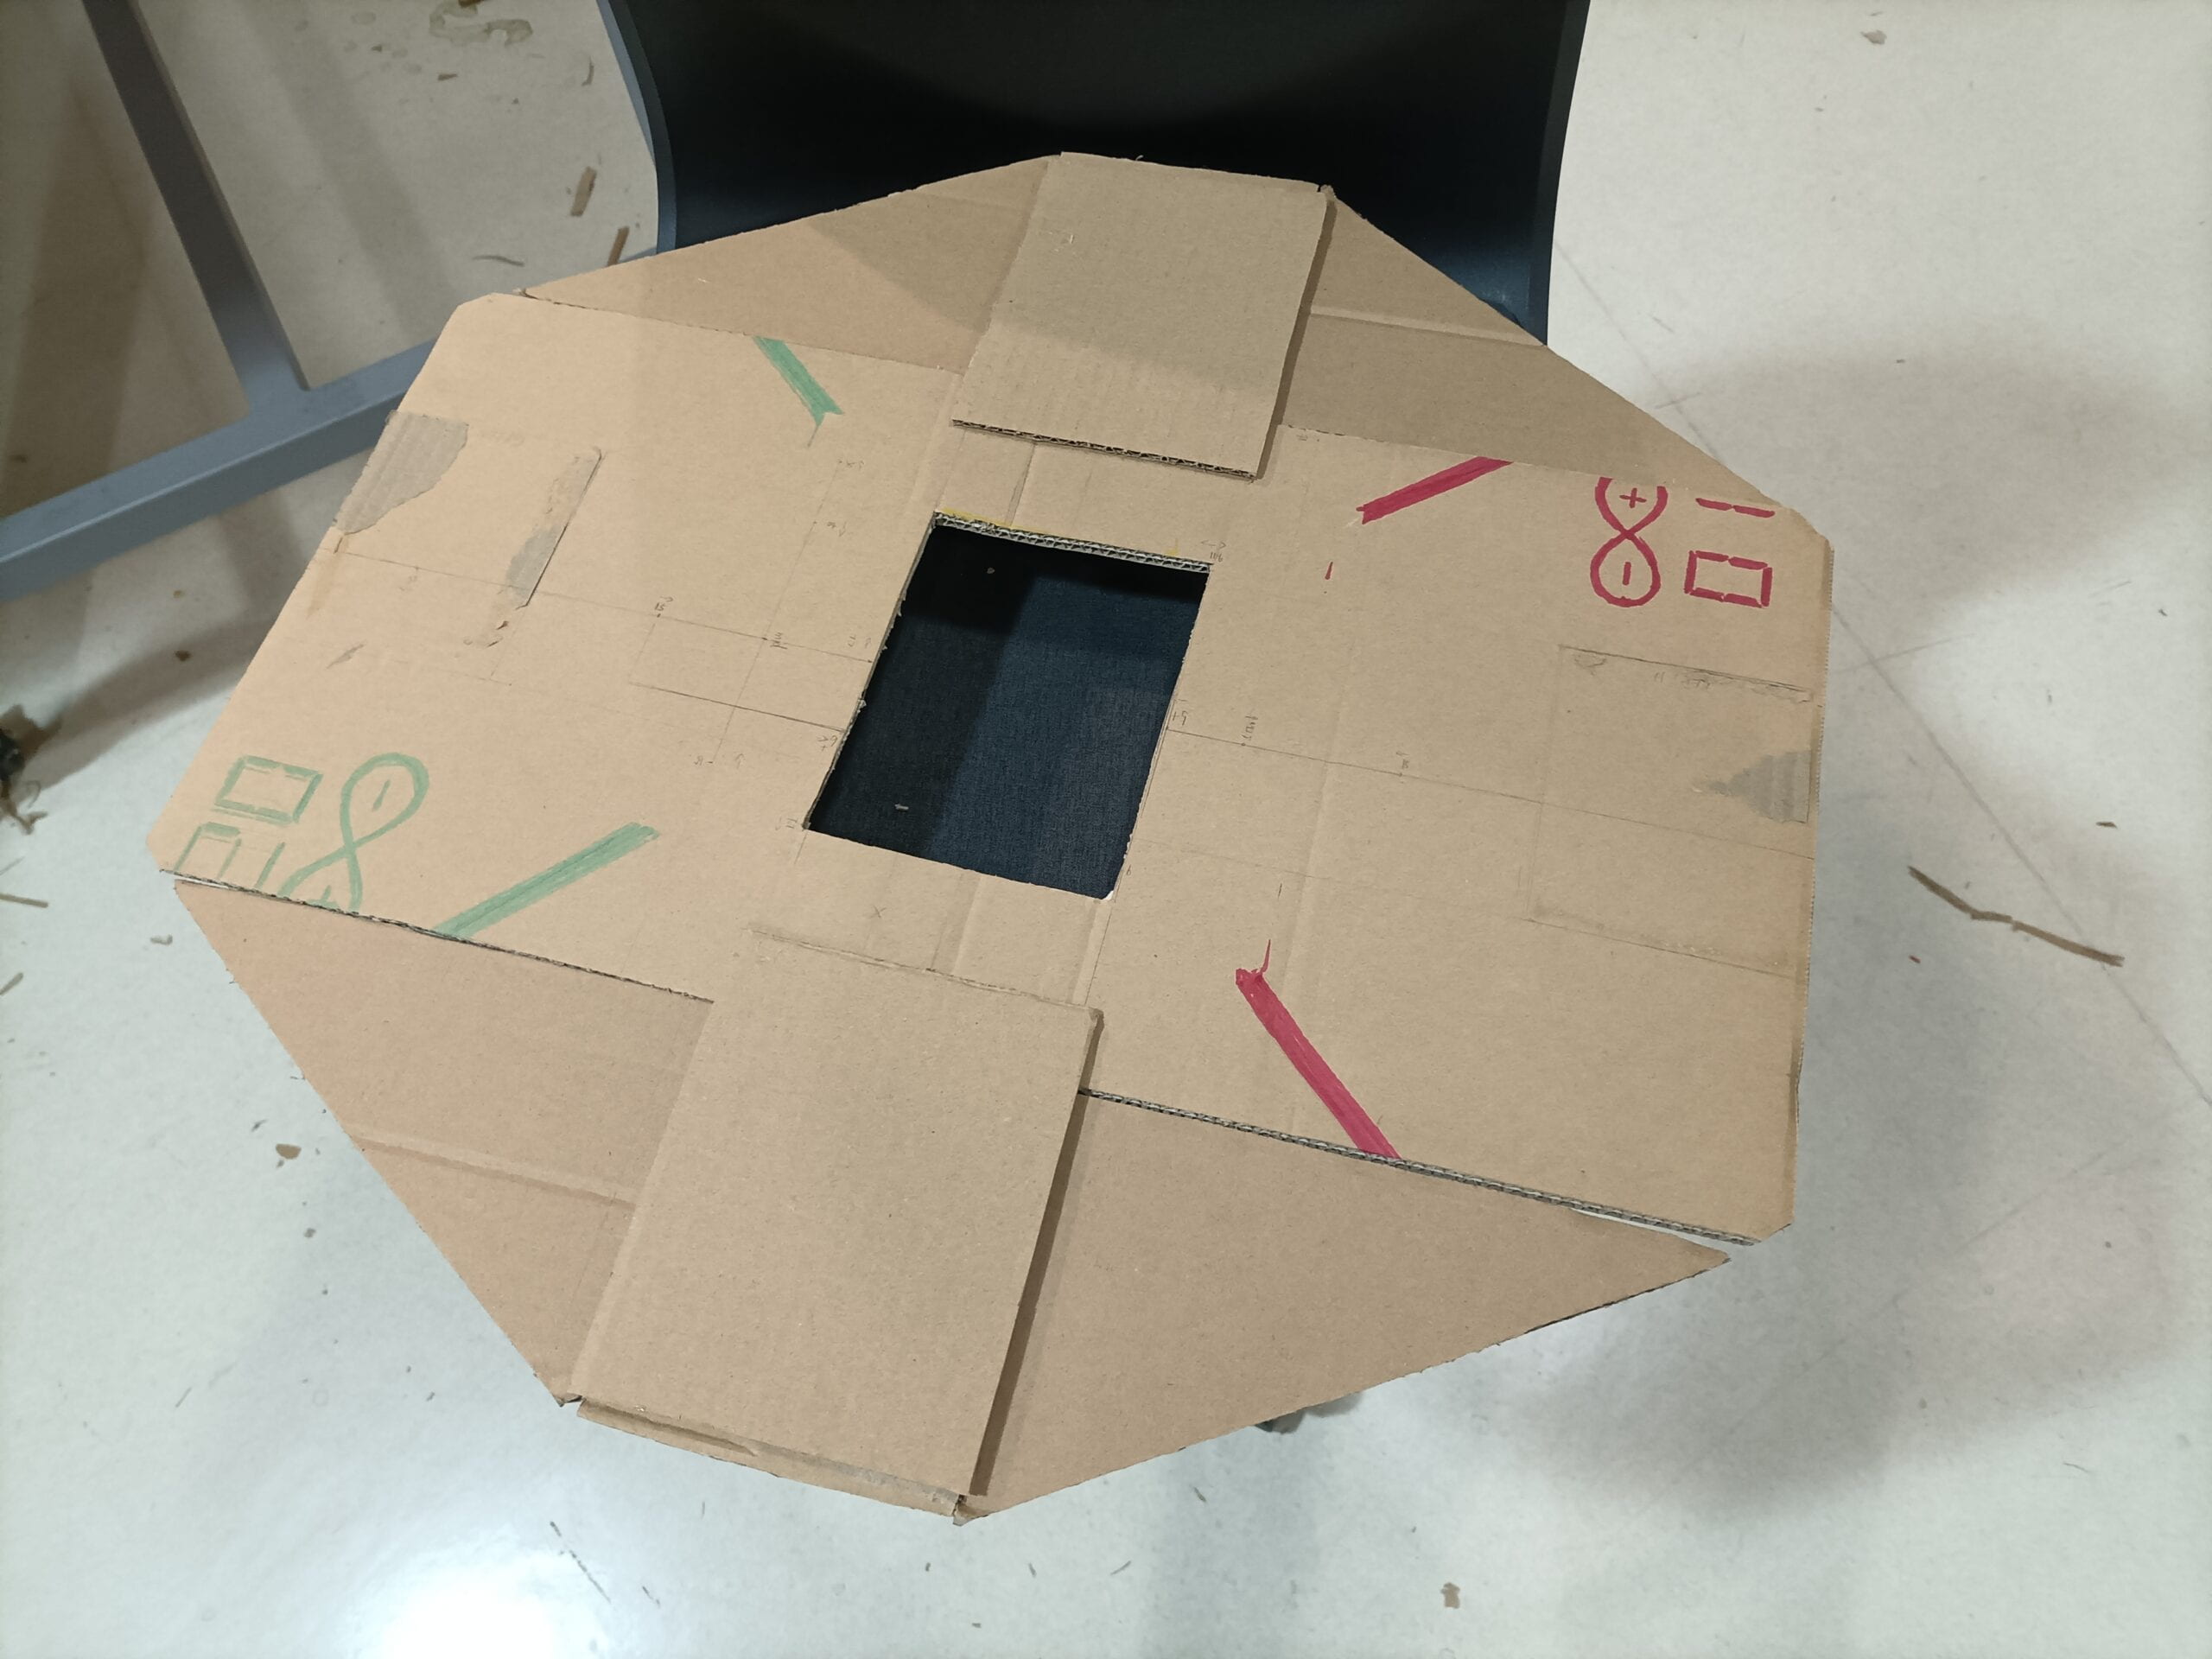
The problem was that the components seemed to have feet. They liked moving around before I glued them, which led to assembly errors and I had to redo the process. I designed the board as an octagon, instead of a rectangle, because this looks more sci-fi and complex and takes less space when the length and the width are the same. In one word, it’s more 2022. 

 3. Solidifying the base with cardboard support. 

Successful.                                       

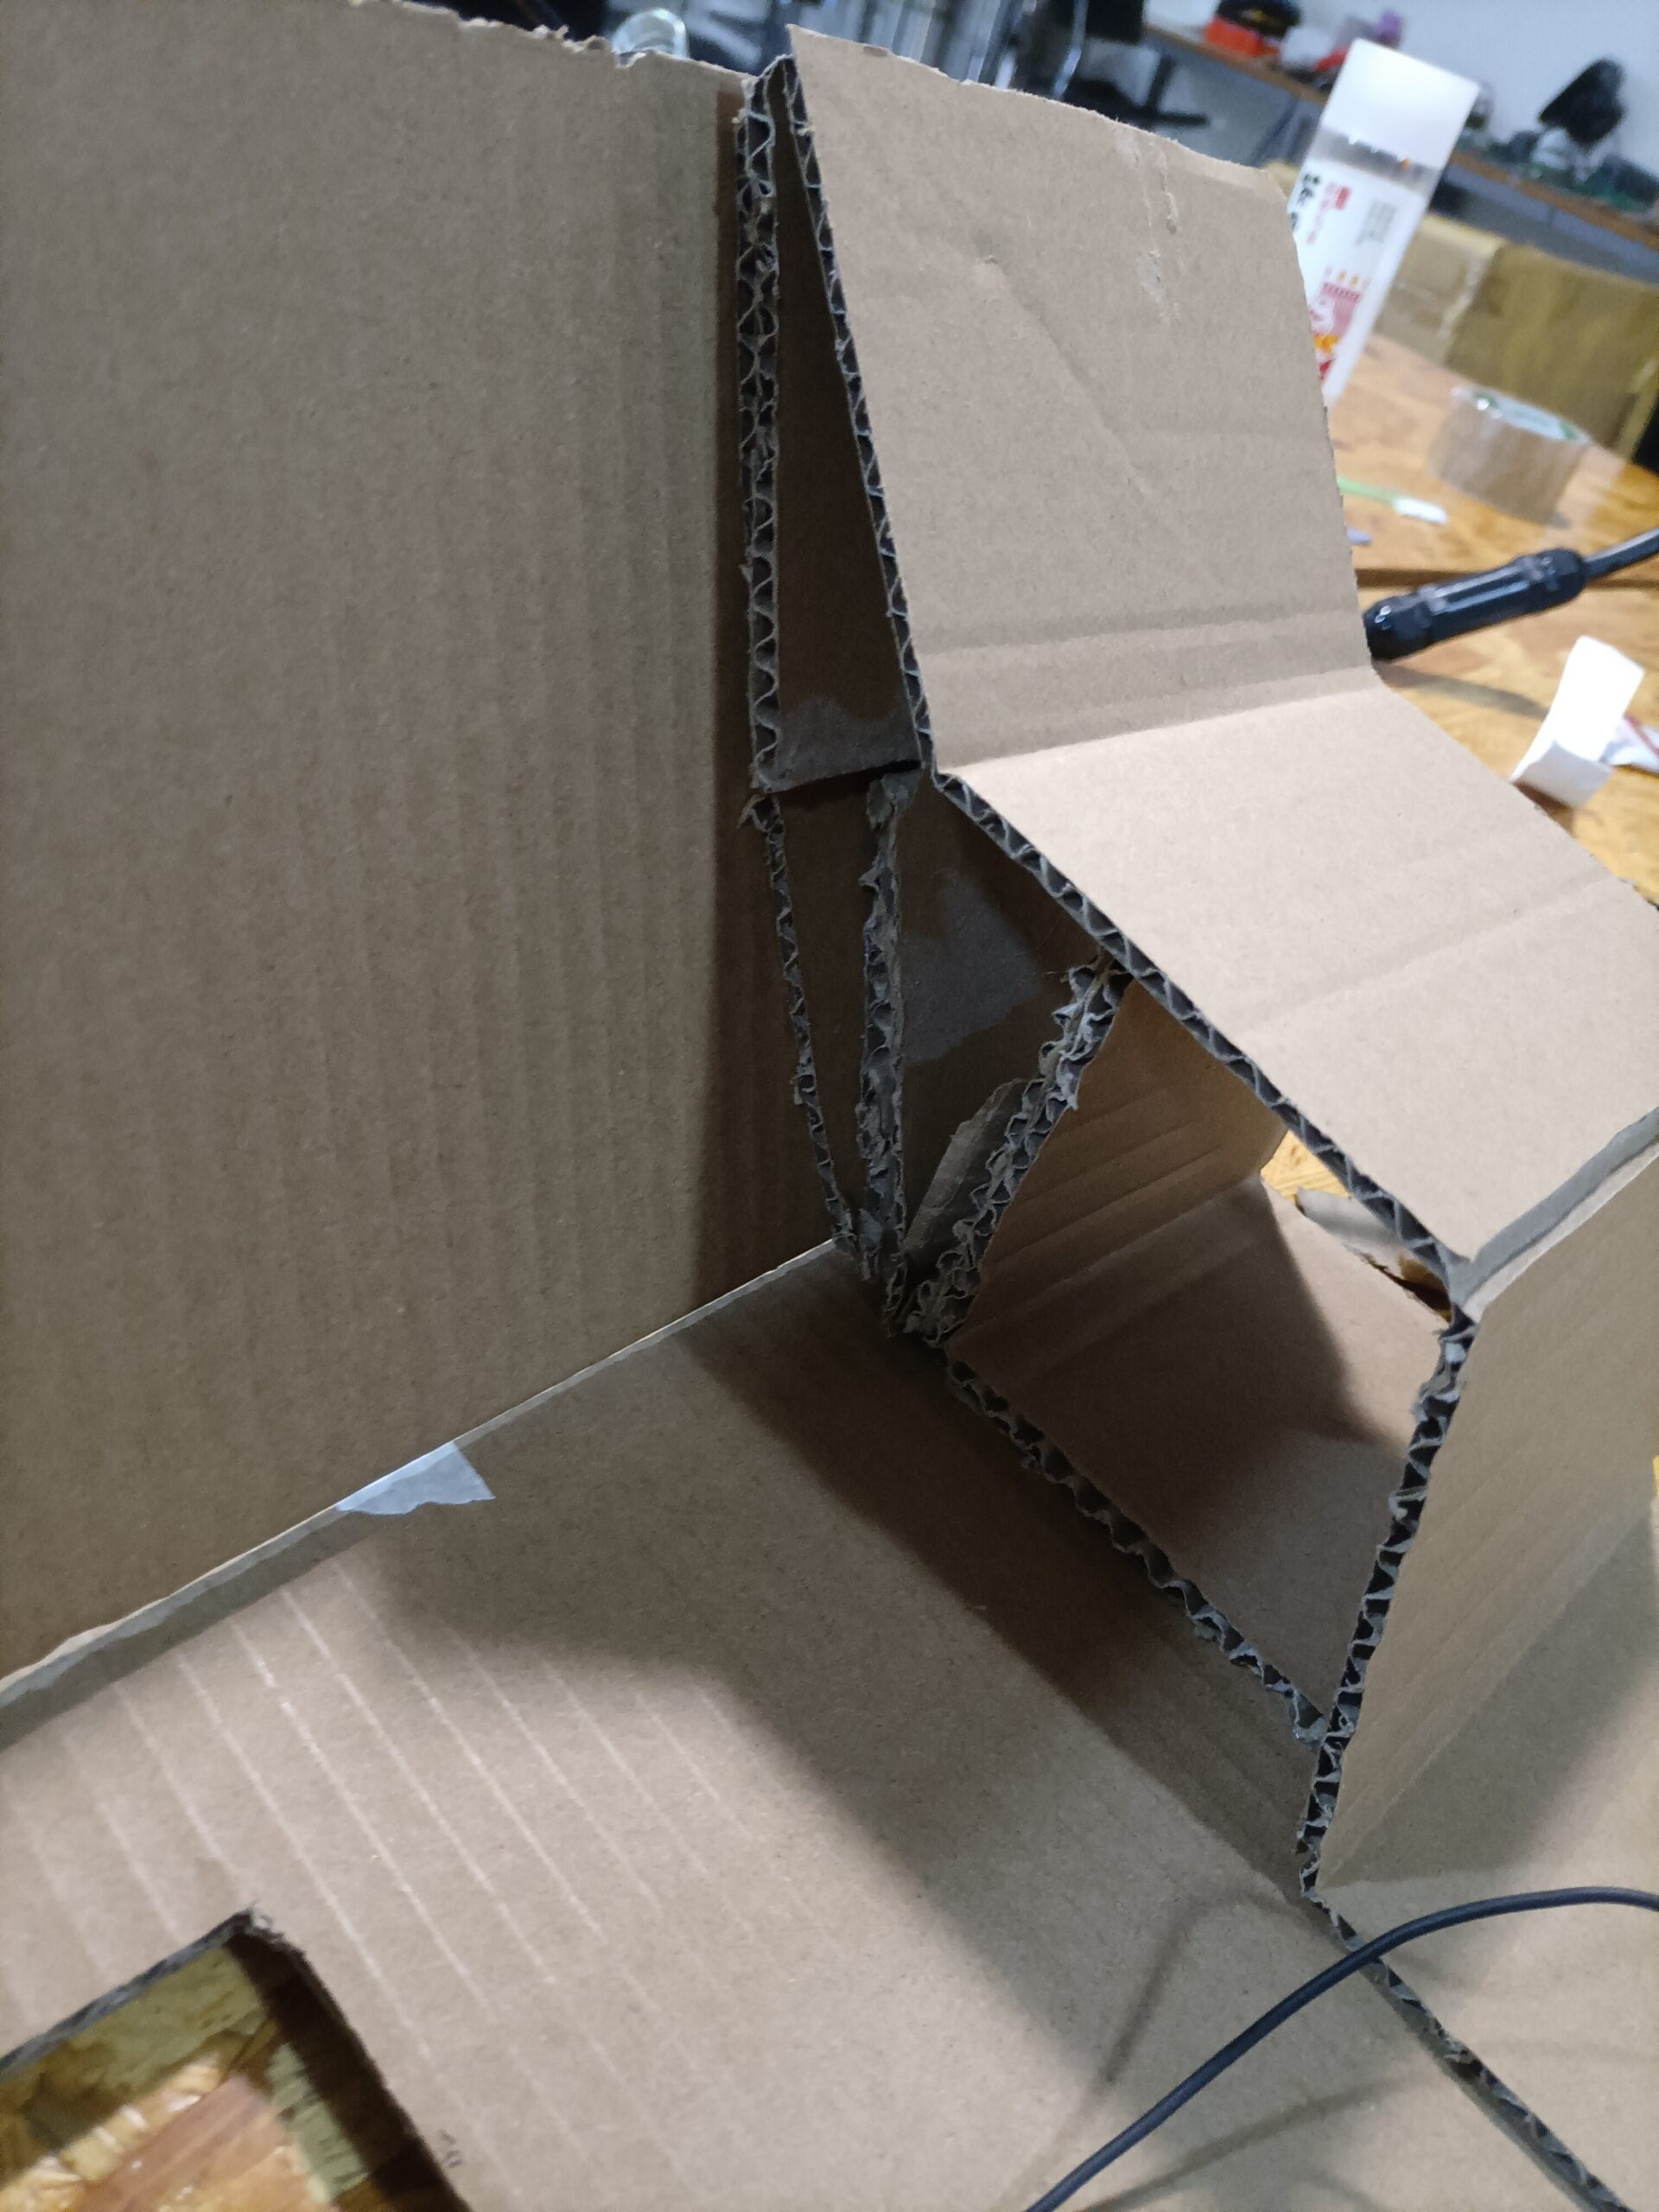
 4. Add the device layer. Include the folding parts.

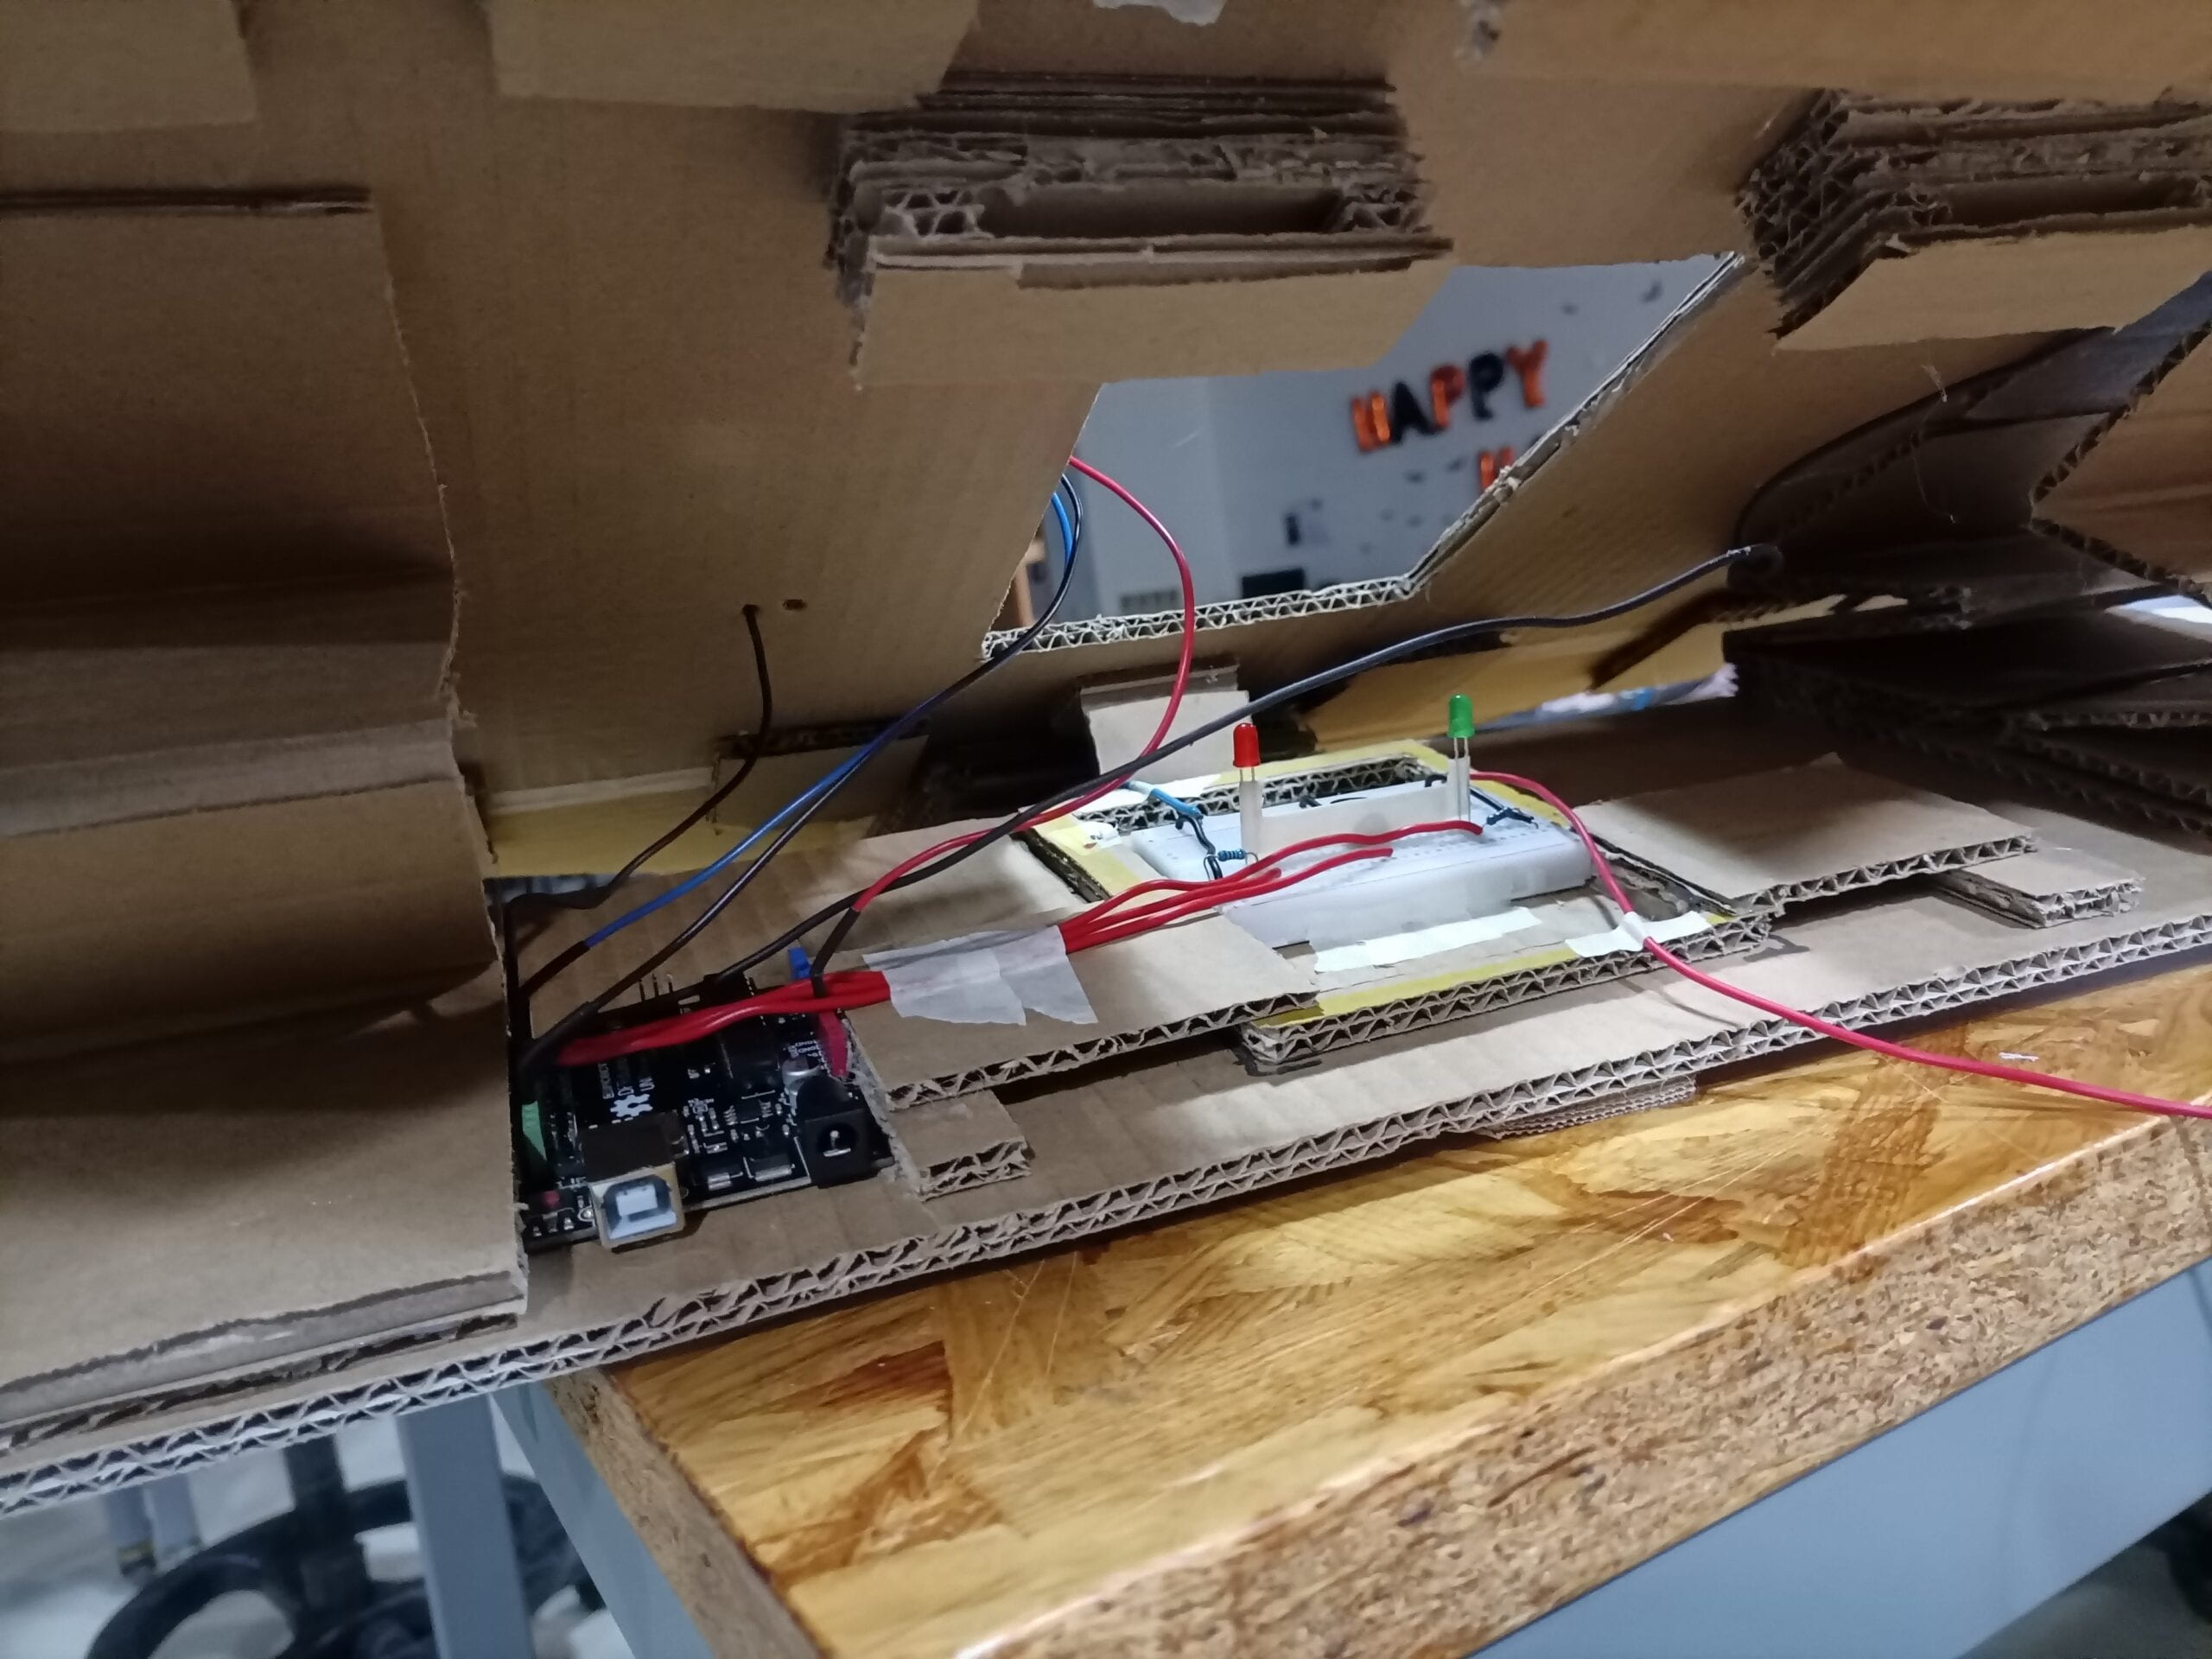
I encountered some failures here, since dealing with the cardboards like this is really demanding, and I cut off them by mistake several times.

 5. Solder, place and glue the scoring area .

The art paper didn’t cover the whole area and there were cracks between pieces of paper. I spent more time filling the cracks. Another problem was that I tried drilling a hole beneath the cardboard for the cables to go through and be soldered to the art paper, but the operating surface was really small and I didn’t find a good position to operate. In fact it could’ve been much easier if I first get the cables through and soldered and then fix the art paper. Anyhow, I made it.

 6. Design and connection of the electric parts.

This is actually the second most time-consuming part of all. I referred to the connection of Neopixel online and got some help from a fellow.

 7. Place the electric parts & add the head cover. 

Successful.

 8. Writing the codes.

This took more than 2/3 of my time. The initial idea of my work was driven by “Speed Game”, and a small part of its codes, mainly the scoring part, contributed to my work. In the beginning I only intended to type 100 lines of codes, but finally it came to about 400! I also referred to a program for Neopixel online, but adjusted some parameters. For example, I changed the color appearing in the beginning from a mixture of red, green and blue to red or green for different winners respectively, set the program a time limit of about 20 sec,and dismissed a part I considered “boring”.

Below are the codes of my work:

1. Midterm test and polish.uno (main tab)

//midterm code test and polish.
// Including A basic everyday NeoPixel strip test program.
// NEOPIXEL BEST PRACTICES for most reliable operation:
// – Add 1000 uF CAPACITOR between NeoPixel strip’s + and – connections.
// – MINIMIZE WIRING LENGTH between microcontroller board and first pixel.
// – NeoPixel strip’s DATA-IN should pass through a 300-500 OHM RESISTOR.
// – AVOID connecting NeoPixels on a LIVE CIRCUIT. If you must, ALWAYS
// connect GROUND (-) first, then +, then data.
// – When using a 3.3V microcontroller with a 5V-powered NeoPixel strip,
// a LOGIC-LEVEL CONVERTER on the data line is STRONGLY RECOMMENDED.
// (Skipping these may work OK on your workbench but can fail in the field)
#include <Adafruit_NeoPixel.h>
#ifdef __AVR__
#include <avr/power.h> // Required for 16 MHz Adafruit Trinket
#endif
// Which pin on the Arduino is connected to the NeoPixels?
// On a Trinket or Gemma we suggest changing this to 1:
#define LED_PIN 6
// How many NeoPixels are attached to the Arduino?
#define LED_COUNT 128
// Declare our NeoPixel strip object:
Adafruit_NeoPixel strip(LED_COUNT, LED_PIN, NEO_GRB + NEO_KHZ800);
// Argument 1 = Number of pixels in NeoPixel strip
// Argument 2 = Arduino pin number (most are valid)
// Argument 3 = Pixel type flags, add together as needed:
// NEO_KHZ800 800 KHz bitstream (most NeoPixel products w/WS2812 LEDs)
// NEO_KHZ400 400 KHz (classic ‘v1’ (not v2) FLORA pixels, WS2811 drivers)
// NEO_GRB Pixels are wired for GRB bitstream (most NeoPixel products)
// NEO_RGB Pixels are wired for RGB bitstream (v1 FLORA pixels, not v2)
// NEO_RGBW Pixels are wired for RGBW bitstream (NeoPixel RGBW products)
// setup() function — runs once at startup ——————————–
#include “pitches.h”
// notes in the melody:
int melody[] = {
NOTE_C4, NOTE_G3, NOTE_G3, NOTE_GS3, NOTE_G3, 0, NOTE_B3, NOTE_C4
};
// note durations: 4 = quarter note, 8 = eighth note, etc.:
int noteDurations[] = {
4, 8, 8, 4, 4, 4, 4, 4
};
int reset = 2;
int led1 = 8;
int led2 = 9;
int buzzer = 10;
int button1 = 11; //(button1 is red)
int button2 = 12; //(button2 is green)
int buttonState1 = HIGH; //initial state of button1;
int previousState1 = HIGH;
int buttonState2 = HIGH; //initial state of button2;
int previousState2 = HIGH;
int goal = 3;
int counter1 = 0;
int counter2 = 0;
boolean winner1 = false;
boolean winner2 = false;
long startTime = 0;
int bigScore1 = 0;
int bigScore2 = 0;
int bigGoal = 3;
boolean finalWinner1 = false;
boolean finalWinner2 = false;
void setup() {
// put your setup code here, to run once:
Serial.begin(9600);
pinMode(led1, OUTPUT);
pinMode(led2, OUTPUT);
pinMode(buzzer, OUTPUT);
pinMode(button1, INPUT_PULLUP);
pinMode(button2, INPUT_PULLUP);
Serial.println(“=============================== HAND WRESTLING, SAFETY FIRST ===============================”);
delay(1000);
Serial.println(“READY”);
digitalWrite(led1, HIGH);
digitalWrite(led2, HIGH);
tone(10, 500, 500);
delay(500);
digitalWrite(led1, LOW);
digitalWrite(led2, LOW);
delay(500);
noTone(10);
Serial.println(“SET”);
digitalWrite(led1, HIGH);
digitalWrite(led2, HIGH);
tone(10, 500, 500);
delay(500);
digitalWrite(led1, LOW);
digitalWrite(led2, LOW);
noTone(10);
delay(700);
Serial.println(“GO!!!!!!!!!!!!!!!!”);
tone(10, 1000, 1100);
digitalWrite(led1, HIGH);
digitalWrite(led2, HIGH);
delay(1000);
digitalWrite(led1, LOW);
digitalWrite(led2, LOW);
noTone(10);
// These lines are specifically to support the Adafruit Trinket 5V 16 MHz.
// Any other board, you can remove this part (but no harm leaving it):
#if defined(__AVR_ATtiny85__) && (F_CPU == 16000000)
clock_prescale_set(clock_div_1);
#endif
// END of Trinket-specific code.
strip.begin(); // INITIALIZE NeoPixel strip object (REQUIRED)
strip.show(); // Turn OFF all pixels ASAP
strip.setBrightness(5); // Set BRIGHTNESS to about 1/5 (max = 255)
}
// loop() function — runs repeatedly as long as board is on —————
void loop() {
// put your main code here, to run repeatedly:
buttonState1 = digitalRead(button1);
buttonState2 = digitalRead(button2);
if (bigScore1 < bigGoal && bigScore2 < bigGoal) {
if (counter1 < goal && winner2 == false) {
if (buttonState2 != previousState2) {
if (buttonState2 == LOW) { //green scores
tone(10, 800, 200);
counter1++;
Serial.print(“player 01: “);
Serial.println(counter1);
digitalWrite(led1, HIGH);
delay(300);
digitalWrite(led1, LOW);
delay(1000);
}
}
if (counter1 == goal && winner2 == false) {
winner1 = true;
digitalWrite(led1, HIGH);
Serial.println(“PLAYER 01 WINS”);
bigScore1++;
Serial.print(“PLAYER 01 overall: “);
Serial.println(bigScore1);
startTime = millis();
for (int thisNote = 0; thisNote < 8; thisNote++) {
// to calculate the note duration, take one second
// divided by the note type.
//e.g. quarter note = 1000 / 4, eighth note = 1000/8, etc.
int noteDuration = 1000 / noteDurations[thisNote];
tone(10, melody[thisNote], noteDuration);
//pause for the note’s duration plus 30 ms:
delay(noteDuration + 30);
}
if (millis() – startTime < 5000) {
// Fill along the length of the strip in various colors…
colorWipe(strip.Color(50, 0, 0), 4); // Red
colorWipe(strip.Color(150, 0, 0), 8); // Green
colorWipe(strip.Color(250, 0, 0), 12); // Blue
delay(2000);
// Do a theater marquee effect in various colors…
// theaterChase(strip.Color(127, 127, 127), 50); // White, half brightness
// theaterChase(strip.Color(127, 0, 0), 50); // Red, half brightness
// theaterChase(strip.Color(0, 0, 127), 50); // Blue, half brightness
rainbow(10); // Flowing rainbow cycle along the whole strip
//theaterChaseRainbow(50); // Rainbow-enhanced theaterChase variant
}
if (millis() – startTime >= 5000) {
digitalWrite(led1, LOW);
Serial.println(“=============================== HAND WRESTLING, SAFETY FIRST ===============================”);
delay(1000);
Serial.println(“READY”);
digitalWrite(led1, HIGH);
digitalWrite(led2, HIGH);
tone(10, 500, 500);
delay(500);
digitalWrite(led1, LOW);
digitalWrite(led2, LOW);
delay(500);
noTone(10);
Serial.println(“SET”);
digitalWrite(led1, HIGH);
digitalWrite(led2, HIGH);
tone(10, 500, 500);
delay(500);
digitalWrite(led1, LOW);
digitalWrite(led2, LOW);
noTone(10);
colorWipe(strip.Color(0, 0, 0), 2); // none
Serial.println(“GO!!!!!!!!!!!!!!!!”);
tone(10, 1000, 1100);
digitalWrite(led1, HIGH);
digitalWrite(led2, HIGH);
delay(1000);
digitalWrite(led1, LOW);
digitalWrite(led2, LOW);
noTone(10);
counter1 = 0;
counter2 = -1;
winner1 = false;
winner2 = false;
}
}
}
//this checks the times player 02 has pressed the button
if (counter2 < goal && winner1 == false) { //red scores;
if (buttonState1 != previousState1) {
if (buttonState1 == LOW) {
tone(10, 400, 200);
counter2++;
Serial.print(“player 02: “);
Serial.println(counter2);
digitalWrite(led2, HIGH);
delay(300);
digitalWrite(led2, LOW);
delay(1000);
}
}
if (counter2 == goal && winner2 == false) {
winner2 = true;
digitalWrite(led2, HIGH);
Serial.println(“PLAYER 02 WINS”);
bigScore2++;
Serial.print(“PLAYER 02 overall: “);
Serial.println(bigScore2);
startTime = millis();
for (int thisNote = 0; thisNote < 8; thisNote++) {
// to calculate the note duration, take one second
// divided by the note type.
//e.g. quarter note = 1000 / 4, eighth note = 1000/8, etc.
int noteDuration = 1000 / noteDurations[thisNote];
tone(10, melody[thisNote], noteDuration);
//pause for the note’s duration plus 30 ms:
delay(noteDuration + 30);
}
if (millis() – startTime < 5000) {
// Fill along the length of the strip in various colors…
colorWipe(strip.Color(0, 50, 0), 4); // Red
colorWipe(strip.Color(0, 150, 0), 8); // Green
colorWipe(strip.Color(0, 250, 0), 12); // Blue
delay(2000);
//Do a theater marquee effect in various colors…
// theaterChase(strip.Color(127, 127, 127), 2); // White, half brightness
// theaterChase(strip.Color(127, 0, 0), 4); // Red, half brightness
// theaterChase(strip.Color(0, 0, 127), 6); // Blue, half brightness
rainbow(10); // Flowing rainbow cycle along the whole strip
//theaterChaseRainbow(50); // Rainbow-enhanced theaterChase variant
}
if (millis() – startTime >= 5000) {
digitalWrite(led2, LOW);
digitalWrite(6, LOW);
Serial.println(“=============================== HAND WRESTLING, SAFETY FIRST ===============================”);
delay(1000);
Serial.println(“READY”);
digitalWrite(led1, HIGH);
digitalWrite(led2, HIGH);
tone(10, 500, 500);
delay(500);
digitalWrite(led1, LOW);
digitalWrite(led2, LOW);
delay(500);
noTone(10);
Serial.println(“SET”);
digitalWrite(led1, HIGH);
digitalWrite(led2, HIGH);
tone(10, 500, 500);
delay(500);
digitalWrite(led1, LOW);
digitalWrite(led2, LOW);
noTone(10);
colorWipe(strip.Color(0, 0, 0), 2); // none
Serial.println(“GO!!!!!!!!!!!!!!!!”);
tone(10, 1000, 1100);
digitalWrite(led1, HIGH);
digitalWrite(led2, HIGH);
delay(1000);
digitalWrite(led1, LOW);
digitalWrite(led2, LOW);
noTone(10);
counter1 = 0;
counter2 = -1;
winner1 = false;
winner2 = false;
}
}
}
}
}
// Some functions of our own for creating animated effects —————–
// Fill strip pixels one after another with a color. Strip is NOT cleared
// first; anything there will be covered pixel by pixel. Pass in color
// (as a single ‘packed’ 32-bit value, which you can get by calling
// strip.Color(red, green, blue) as shown in the loop() function above),
// and a delay time (in milliseconds) between pixels.
void colorWipe(uint32_t color, int wait) {
for (int i = 0; i < strip.numPixels(); i++) { // For each pixel in strip…
strip.setPixelColor(i, color); // Set pixel’s color (in RAM)
strip.show(); // Update strip to match
delay(wait); // Pause for a moment
}
}
// Theater-marquee-style chasing lights. Pass in a color (32-bit value,
// a la strip.Color(r,g,b) as mentioned above), and a delay time (in ms)
// between frames.
void theaterChase(uint32_t color, int wait) {
for (int a = 0; a < 10; a++) { // Repeat 10 times…
for (int b = 0; b < 3; b++) { // ‘b’ counts from 0 to 2…
strip.clear(); // Set all pixels in RAM to 0 (off)
// ‘c’ counts up from ‘b’ to end of strip in steps of 3…
for (int c = b; c < strip.numPixels(); c += 3) {
strip.setPixelColor(c, color); // Set pixel ‘c’ to value ‘color’
}
strip.show(); // Update strip with new contents
delay(wait); // Pause for a moment
}
}
}
// Rainbow cycle along whole strip. Pass delay time (in ms) between frames.
void rainbow(int wait) {
// Hue of first pixel runs 5 complete loops through the color wheel.
// Color wheel has a range of 65536 but it’s OK if we roll over, so
// just count from 0 to 5*65536. Adding 256 to firstPixelHue each time
// means we’ll make 5*65536/256 = 1280 passes through this loop:
for (long firstPixelHue = 0; firstPixelHue < 5 * 65536; firstPixelHue += 256) {
// strip.rainbow() can take a single argument (first pixel hue) or
// optionally a few extras: number of rainbow repetitions (default 1),
// saturation and value (brightness) (both 0-255, similar to the
// ColorHSV() function, default 255), and a true/false flag for whether
// to apply gamma correction to provide ‘truer’ colors (default true).
strip.rainbow(firstPixelHue);
// Above line is equivalent to:
// strip.rainbow(firstPixelHue, 1, 255, 255, true);
strip.show(); // Update strip with new contents
delay(wait); // Pause for a moment
}
}
// Rainbow-enhanced theater marquee. Pass delay time (in ms) between frames.
void theaterChaseRainbow(int wait) {
int firstPixelHue = 0; // First pixel starts at red (hue 0)
for (int a = 0; a < 30; a++) { // Repeat 30 times…
for (int b = 0; b < 3; b++) { // ‘b’ counts from 0 to 2…
strip.clear(); // Set all pixels in RAM to 0 (off)
// ‘c’ counts up from ‘b’ to end of strip in increments of 3…
for (int c = b; c < strip.numPixels(); c += 3) {
// hue of pixel ‘c’ is offset by an amount to make one full
// revolution of the color wheel (range 65536) along the length
// of the strip (strip.numPixels() steps):
int hue = firstPixelHue + c * 65536L / strip.numPixels();
uint32_t color = strip.gamma32(strip.ColorHSV(hue)); // hue -> RGB
strip.setPixelColor(c, color); // Set pixel ‘c’ to value ‘color’
}
strip.show(); // Update strip with new contents
delay(wait); // Pause for a moment
firstPixelHue += 65536 / 90; // One cycle of color wheel over 90 frames
}
}
 
if (bigScore1 == bigGoal && finalWinner1 == false) {
finalWinner1 == true;
digitalWrite(led1, HIGH);
Serial.print(“PLAYER 01 IS THE FINAL WINNER”);
colorWipe(strip.Color(50, 50, 50), 4); // RGB
colorWipe(strip.Color(150, 50, 50), 8); //
colorWipe(strip.Color(250, 0, 0), 12); //
delay(5000);
//Do a theater marquee effect in various colors…
theaterChase(strip.Color(127, 127, 127), 2); // White, half brightness
theaterChase(strip.Color(127, 0, 0), 4); // Red, half brightness
theaterChase(strip.Color(0, 0, 127), 6); // Blue, half brightness
rainbow(10);
// Flowing rainbow cycle along the whole strip
theaterChaseRainbow(50);
//Rainbow-enhanced theaterChase variant
colorWipe(strip.Color(0, 0, 0), 50);
}
if (bigScore2 == bigGoal && finalWinner2 == false) {
finalWinner2 == true;
digitalWrite(led2, HIGH);
Serial.print(“PLAYER 02 IS THE FINAL WINNER”);
colorWipe(strip.Color(50, 50, 50), 4); // RGB
colorWipe(strip.Color(50, 150, 50), 8); //
colorWipe(strip.Color(0, 250, 0), 12); //
delay(5000);
//Do a theater marquee effect in various colors…
theaterChase(strip.Color(127, 127, 127), 2); // White, half brightness
theaterChase(strip.Color(127, 0, 0), 4); // Red, half brightness
theaterChase(strip.Color(0, 0, 127), 6); // Blue, half brightness
rainbow(10);
// Flowing rainbow cycle along the whole strip
theaterChaseRainbow(50);
//Rainbow-enhanced theaterChase variant
colorWipe(strip.Color(0, 0, 0), 50);
}
// if (counter2 == goal && winner2 == false) {
// winner2 = true;
// digitalWrite(led2, HIGH);
// Serial.println(“PLAYER 02 WINS”);
// bigScore2++;
// Serial.print(“PLAYER 02 overall “);
// Serial.println(bigScore2);
}


2. Pitches.h (side tab)

#define NOTE_B0 31
#define NOTE_C1 33
#define NOTE_CS1 35
#define NOTE_D1 37
#define NOTE_DS1 39
#define NOTE_E1 41
#define NOTE_F1 44
#define NOTE_FS1 46
#define NOTE_G1 49
#define NOTE_GS1 52
#define NOTE_A1 55
#define NOTE_AS1 58
#define NOTE_B1 62
#define NOTE_C2 65
#define NOTE_CS2 69
#define NOTE_D2 73
#define NOTE_DS2 78
#define NOTE_E2 82
#define NOTE_F2 87
#define NOTE_FS2 93
#define NOTE_G2 98
#define NOTE_GS2 104
#define NOTE_A2 110
#define NOTE_AS2 117
#define NOTE_B2 123
#define NOTE_C3 131
#define NOTE_CS3 139
#define NOTE_D3 147
#define NOTE_DS3 156
#define NOTE_E3 165
#define NOTE_F3 175
#define NOTE_FS3 185
#define NOTE_G3 196
#define NOTE_GS3 208
#define NOTE_A3 220
#define NOTE_AS3 233
#define NOTE_B3 247
#define NOTE_C4 262
#define NOTE_CS4 277
#define NOTE_D4 294
#define NOTE_DS4 311
#define NOTE_E4 330
#define NOTE_F4 349
#define NOTE_FS4 370
#define NOTE_G4 392
#define NOTE_GS4 415
#define NOTE_A4 440
#define NOTE_AS4 466
#define NOTE_B4 494
#define NOTE_C5 523
#define NOTE_CS5 554
#define NOTE_D5 587
#define NOTE_DS5 622
#define NOTE_E5 659
#define NOTE_F5 698
#define NOTE_FS5 740
#define NOTE_G5 784
#define NOTE_GS5 831
#define NOTE_A5 880
#define NOTE_AS5 932
#define NOTE_B5 988
#define NOTE_C6 1047
#define NOTE_CS6 1109
#define NOTE_D6 1175
#define NOTE_DS6 1245
#define NOTE_E6 1319
#define NOTE_F6 1397
#define NOTE_FS6 1480
#define NOTE_G6 1568
#define NOTE_GS6 1661
#define NOTE_A6 1760
#define NOTE_AS6 1865
#define NOTE_B6 1976
#define NOTE_C7 2093
#define NOTE_CS7 2217
#define NOTE_D7 2349
#define NOTE_DS7 2489
#define NOTE_E7 2637
#define NOTE_F7 2794
#define NOTE_FS7 2960
#define NOTE_G7 3136
#define NOTE_GS7 3322
#define NOTE_A7 3520
#define NOTE_AS7 3729
#define NOTE_B7 3951
#define NOTE_C8 4186
#define NOTE_CS8 4435
#define NOTE_D8 4699
#define NOTE_DS8 4978


IMPROVEMENTS

During the user test, I received lots of advice and complaints of my work. I sorted out the most significant part of them with the state of accomplishment:

  1. Use the cables for hand rings of the same colors of the team.   Basically Successful. (I changed the cable for the green team from red to blue ¯__‾??)
  2. Add a reset button, or make the reset button on the microcontroller more accessible.   Successful. (Reset button is much closer to the surface)
  3. Add a proper area to place the elbows.   Successful. (the initial work was pretty small and didn’t offer such an area)
  4. Simplify the central part and add a protection for it.   Successful. (We got a movable head cover) 
  5. Solidify the device and fill the blanks of important areas (elbow & scoring areas).   Successful. (They were well filled)
  6. Upgrade the hand rings and add more art paper.   Failed. (Tight schedule)
  7. Upgrade the digital expression of scoring.   Successful. (We got Neopixel!)
  8. Add a device layer and wrap and fix the cables inside.   Successful.
  9. Add more music.   Failed. (Tight schedule)
  10. A place to place the hand rings.   Successful. (Neopixel area is lower than the surroundings and is a good storage tank for hand rings)
  11. Try sensors.   Failed. (Tight schedule, unacquaintance)
  12. Expand the scoring areas.  Successful. (I expanded them nearly twice)
  13. Cut some cables short so that they don’t disturb the players.  Successful. (You can see in video 3 below that I cut them very short and they almost lay on the ground)

Personally speaking, all the improvements I made are IMPROVEMENTS and they all contribute to a better user experience.


Below are some images that display the process of assembly. Please check in the order of numbers. I’m sorry I met some problems sorting them.
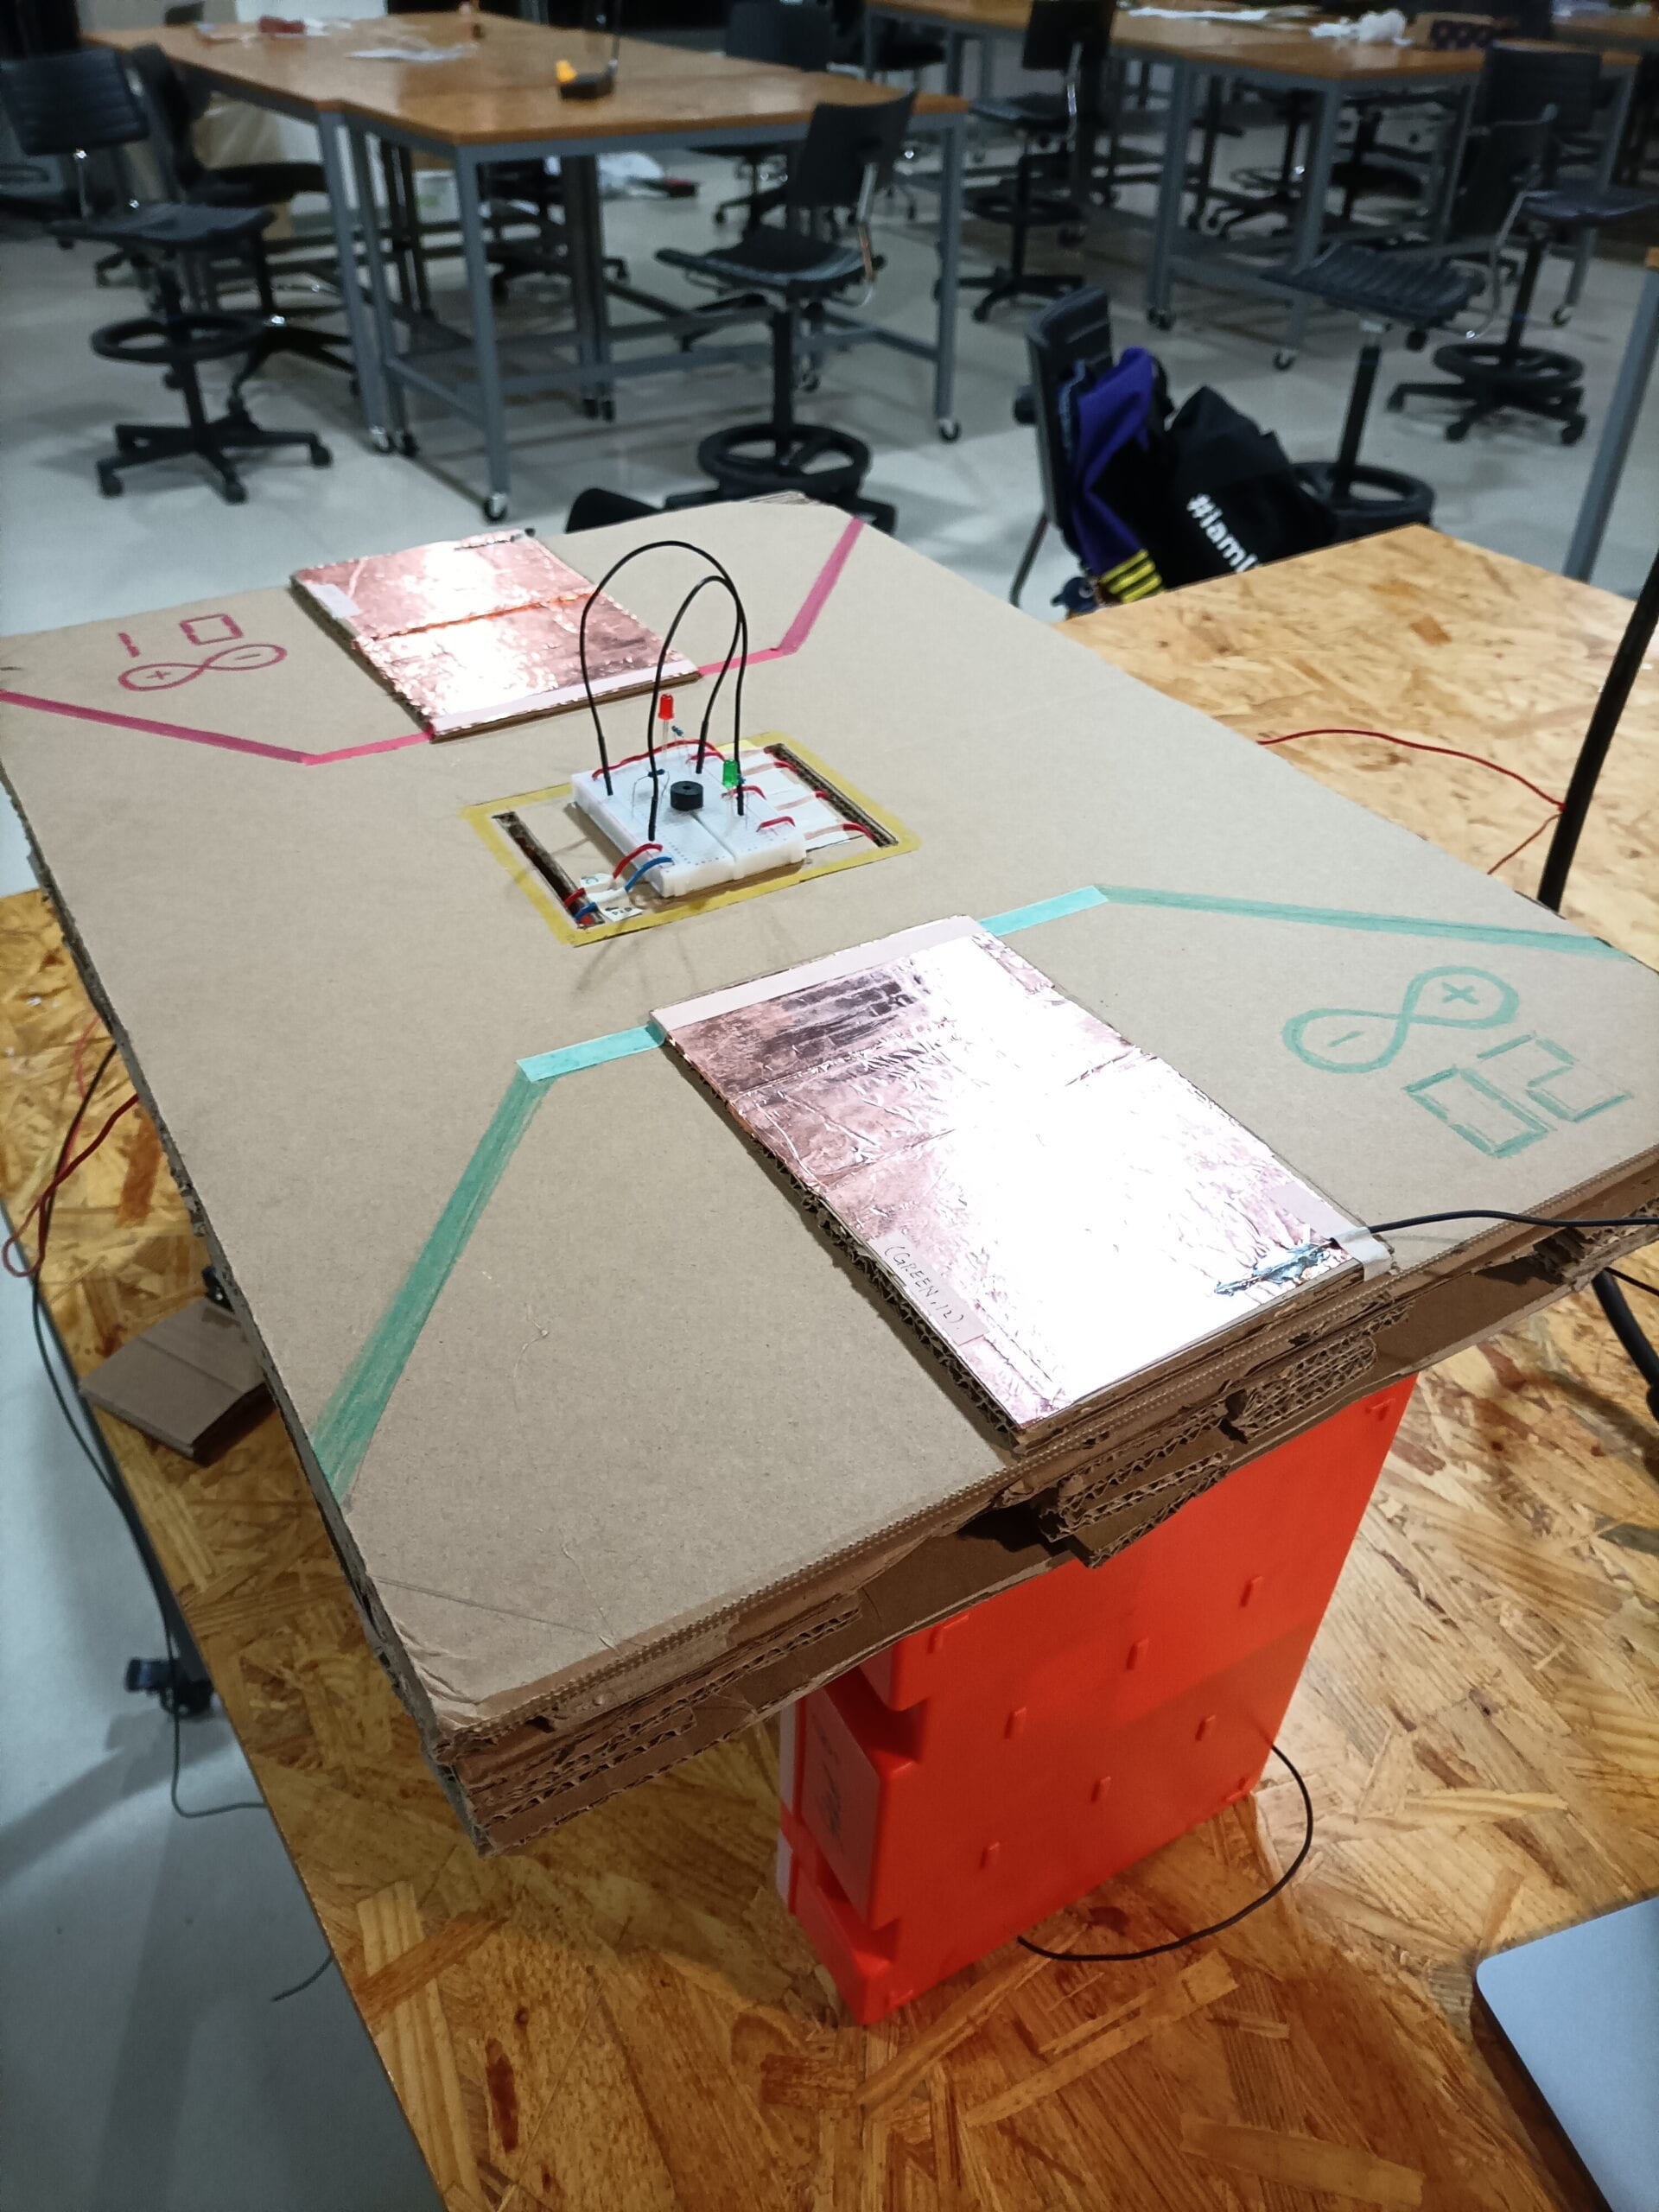
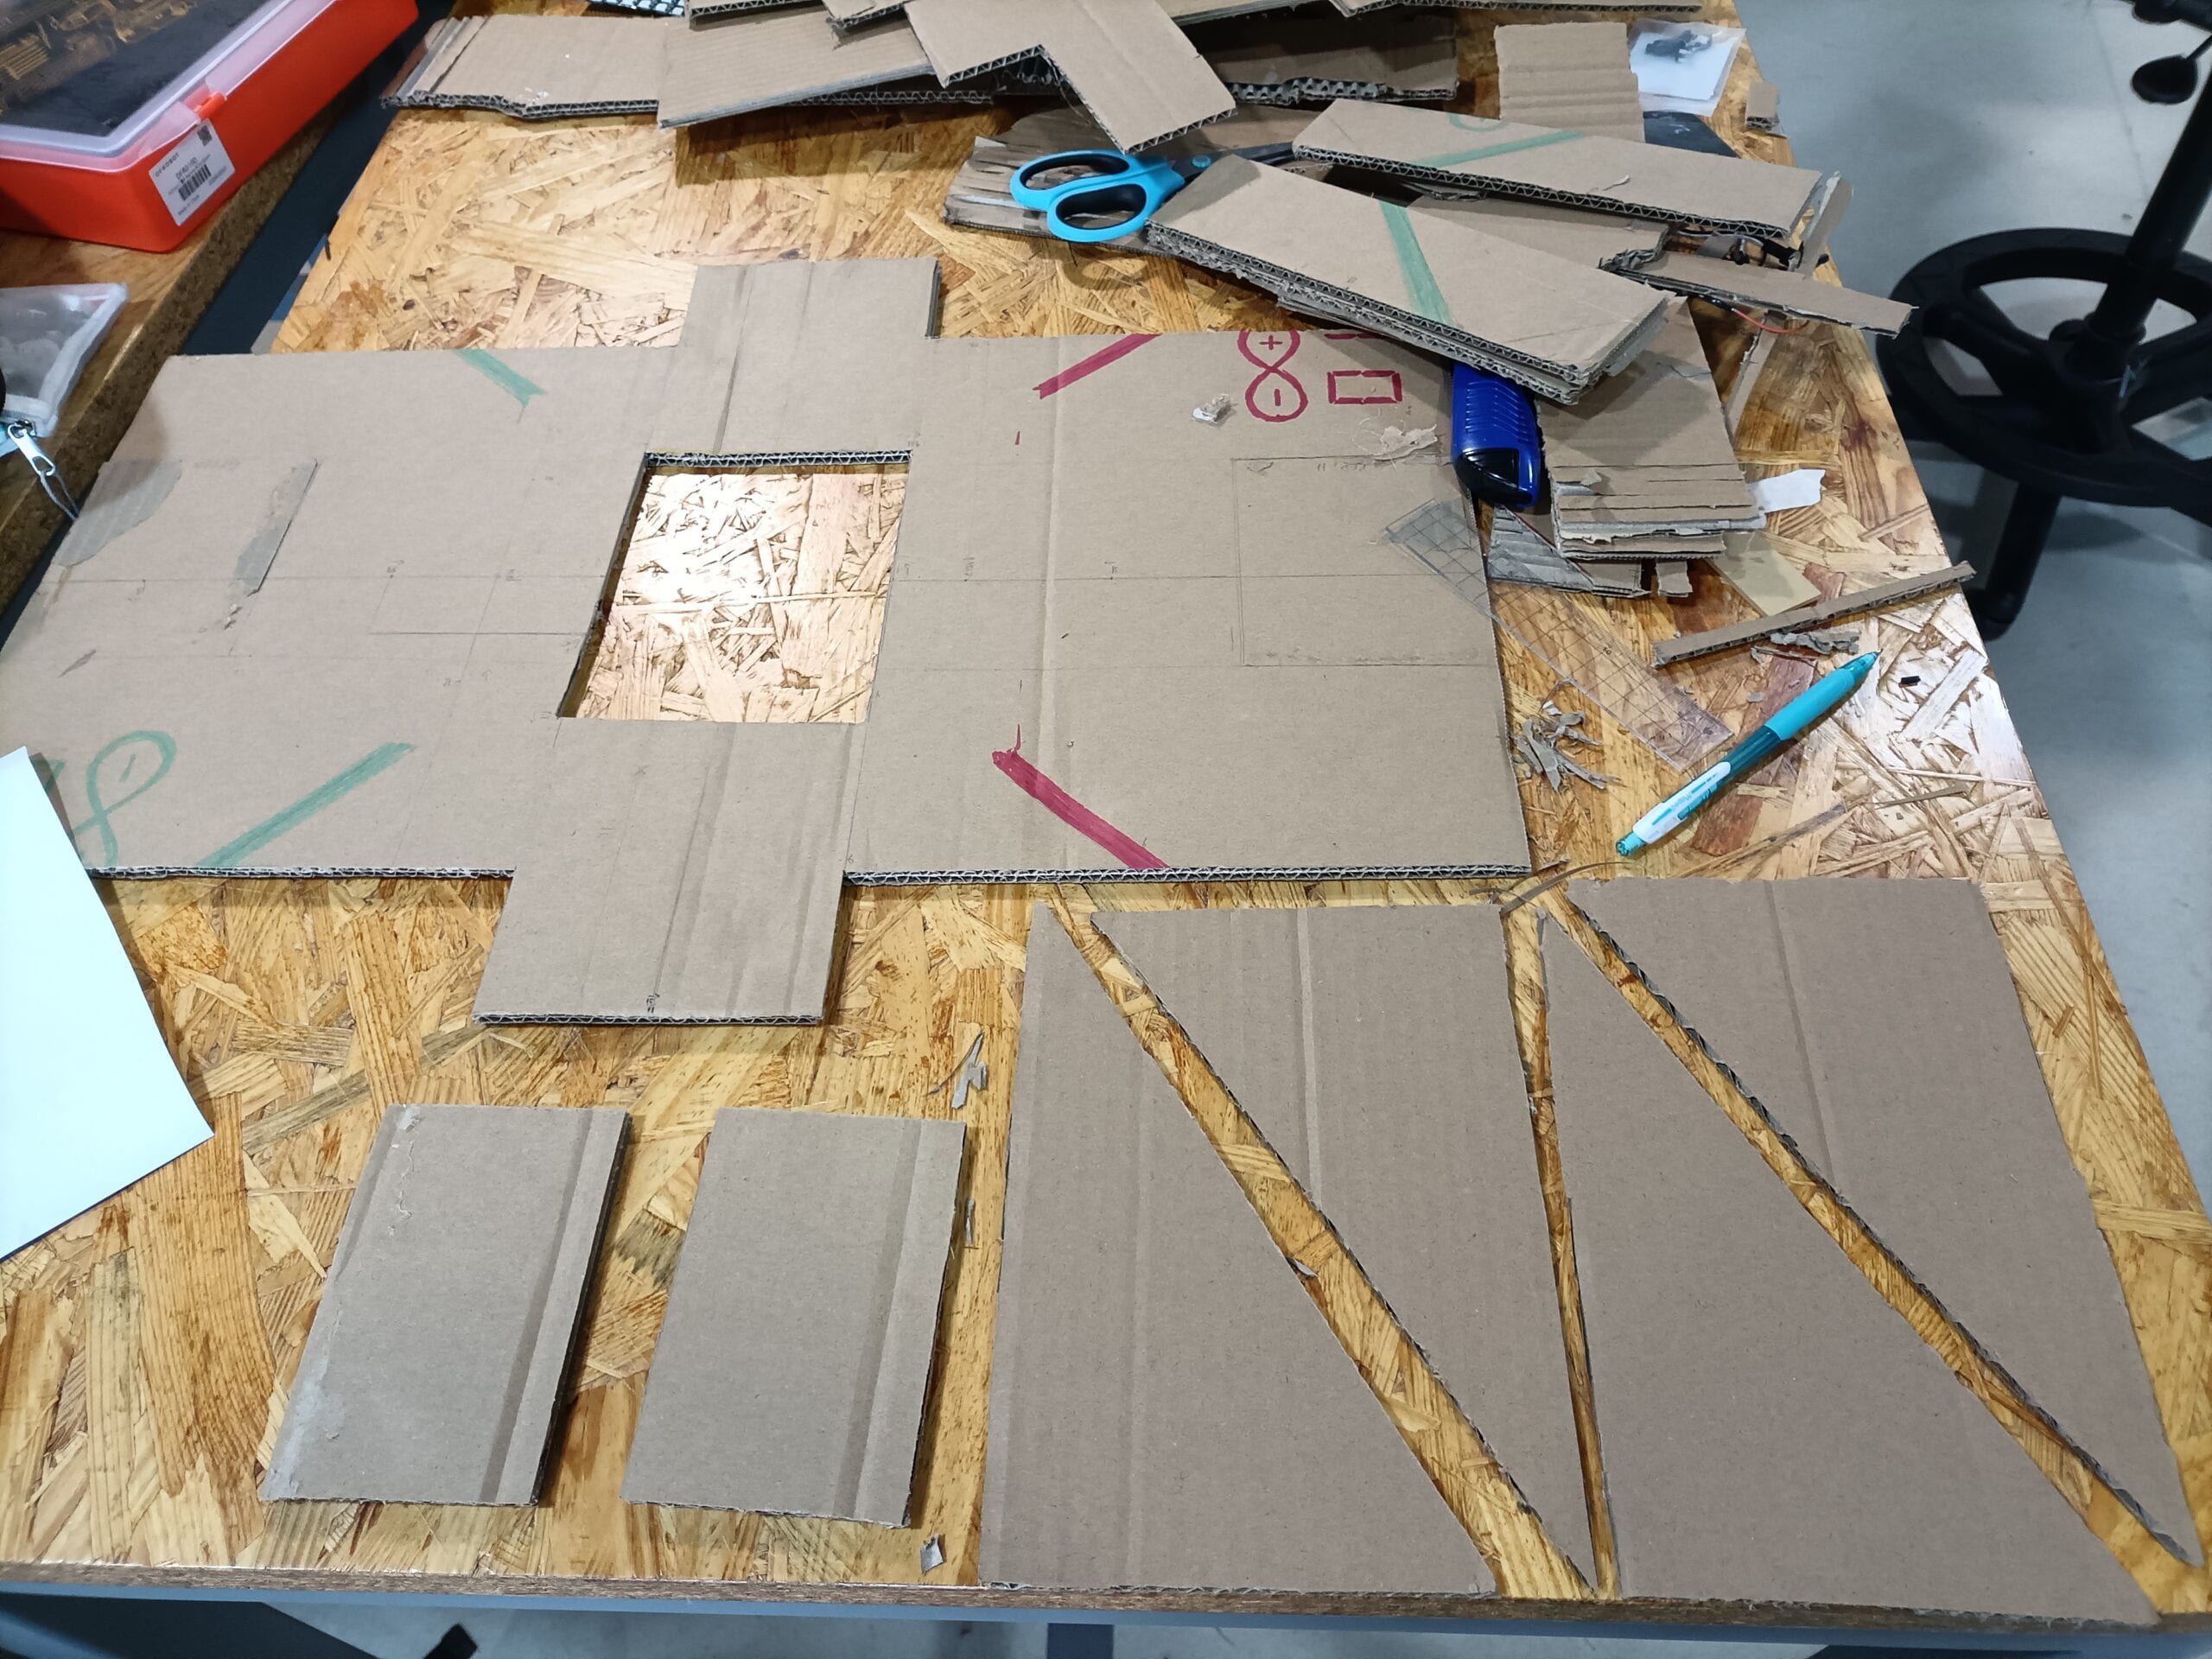
 

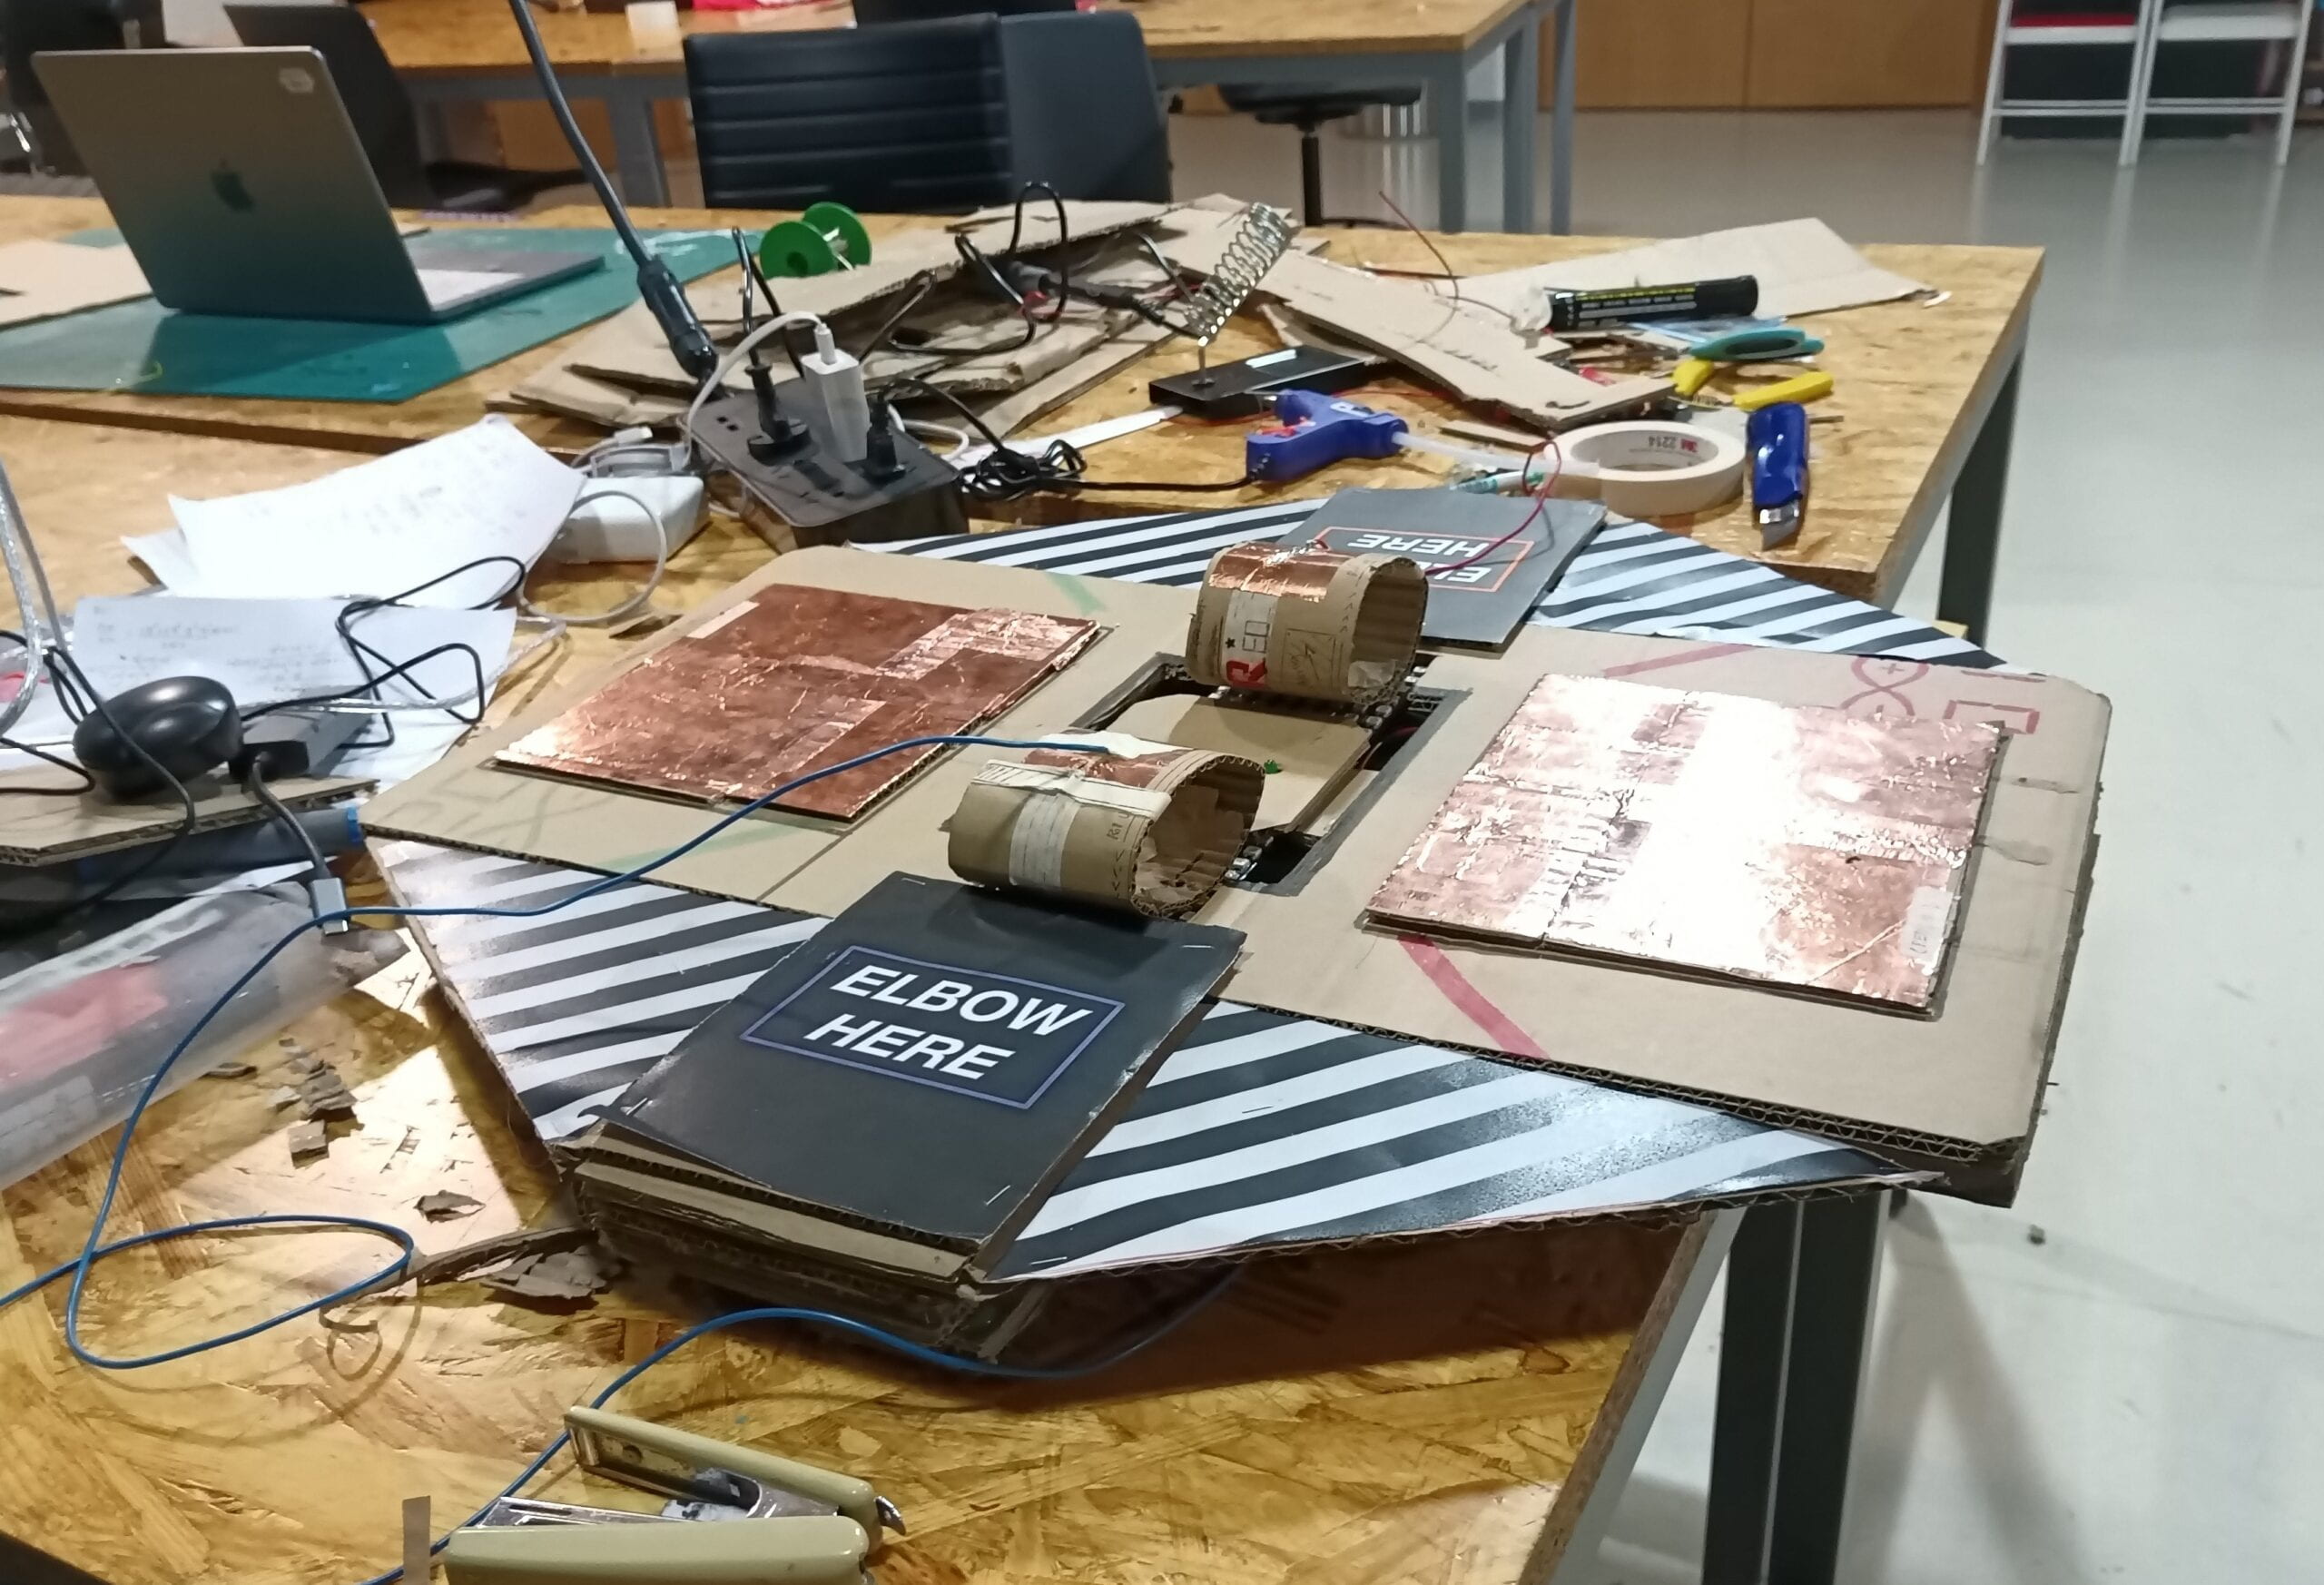
Fig.5. Initial primitive work before user test.                                               (I took it apart with no sympathy)
Fig.6. Recycled materials and new ones
stupid wp system
 Fig.7. Glue the materials to get a base


Fig.8. Folding cardboards


Fig.11. Base almost completed (Extremely symmetric. Finally the four triangle parts were solidified with extra cardboards and tapes)


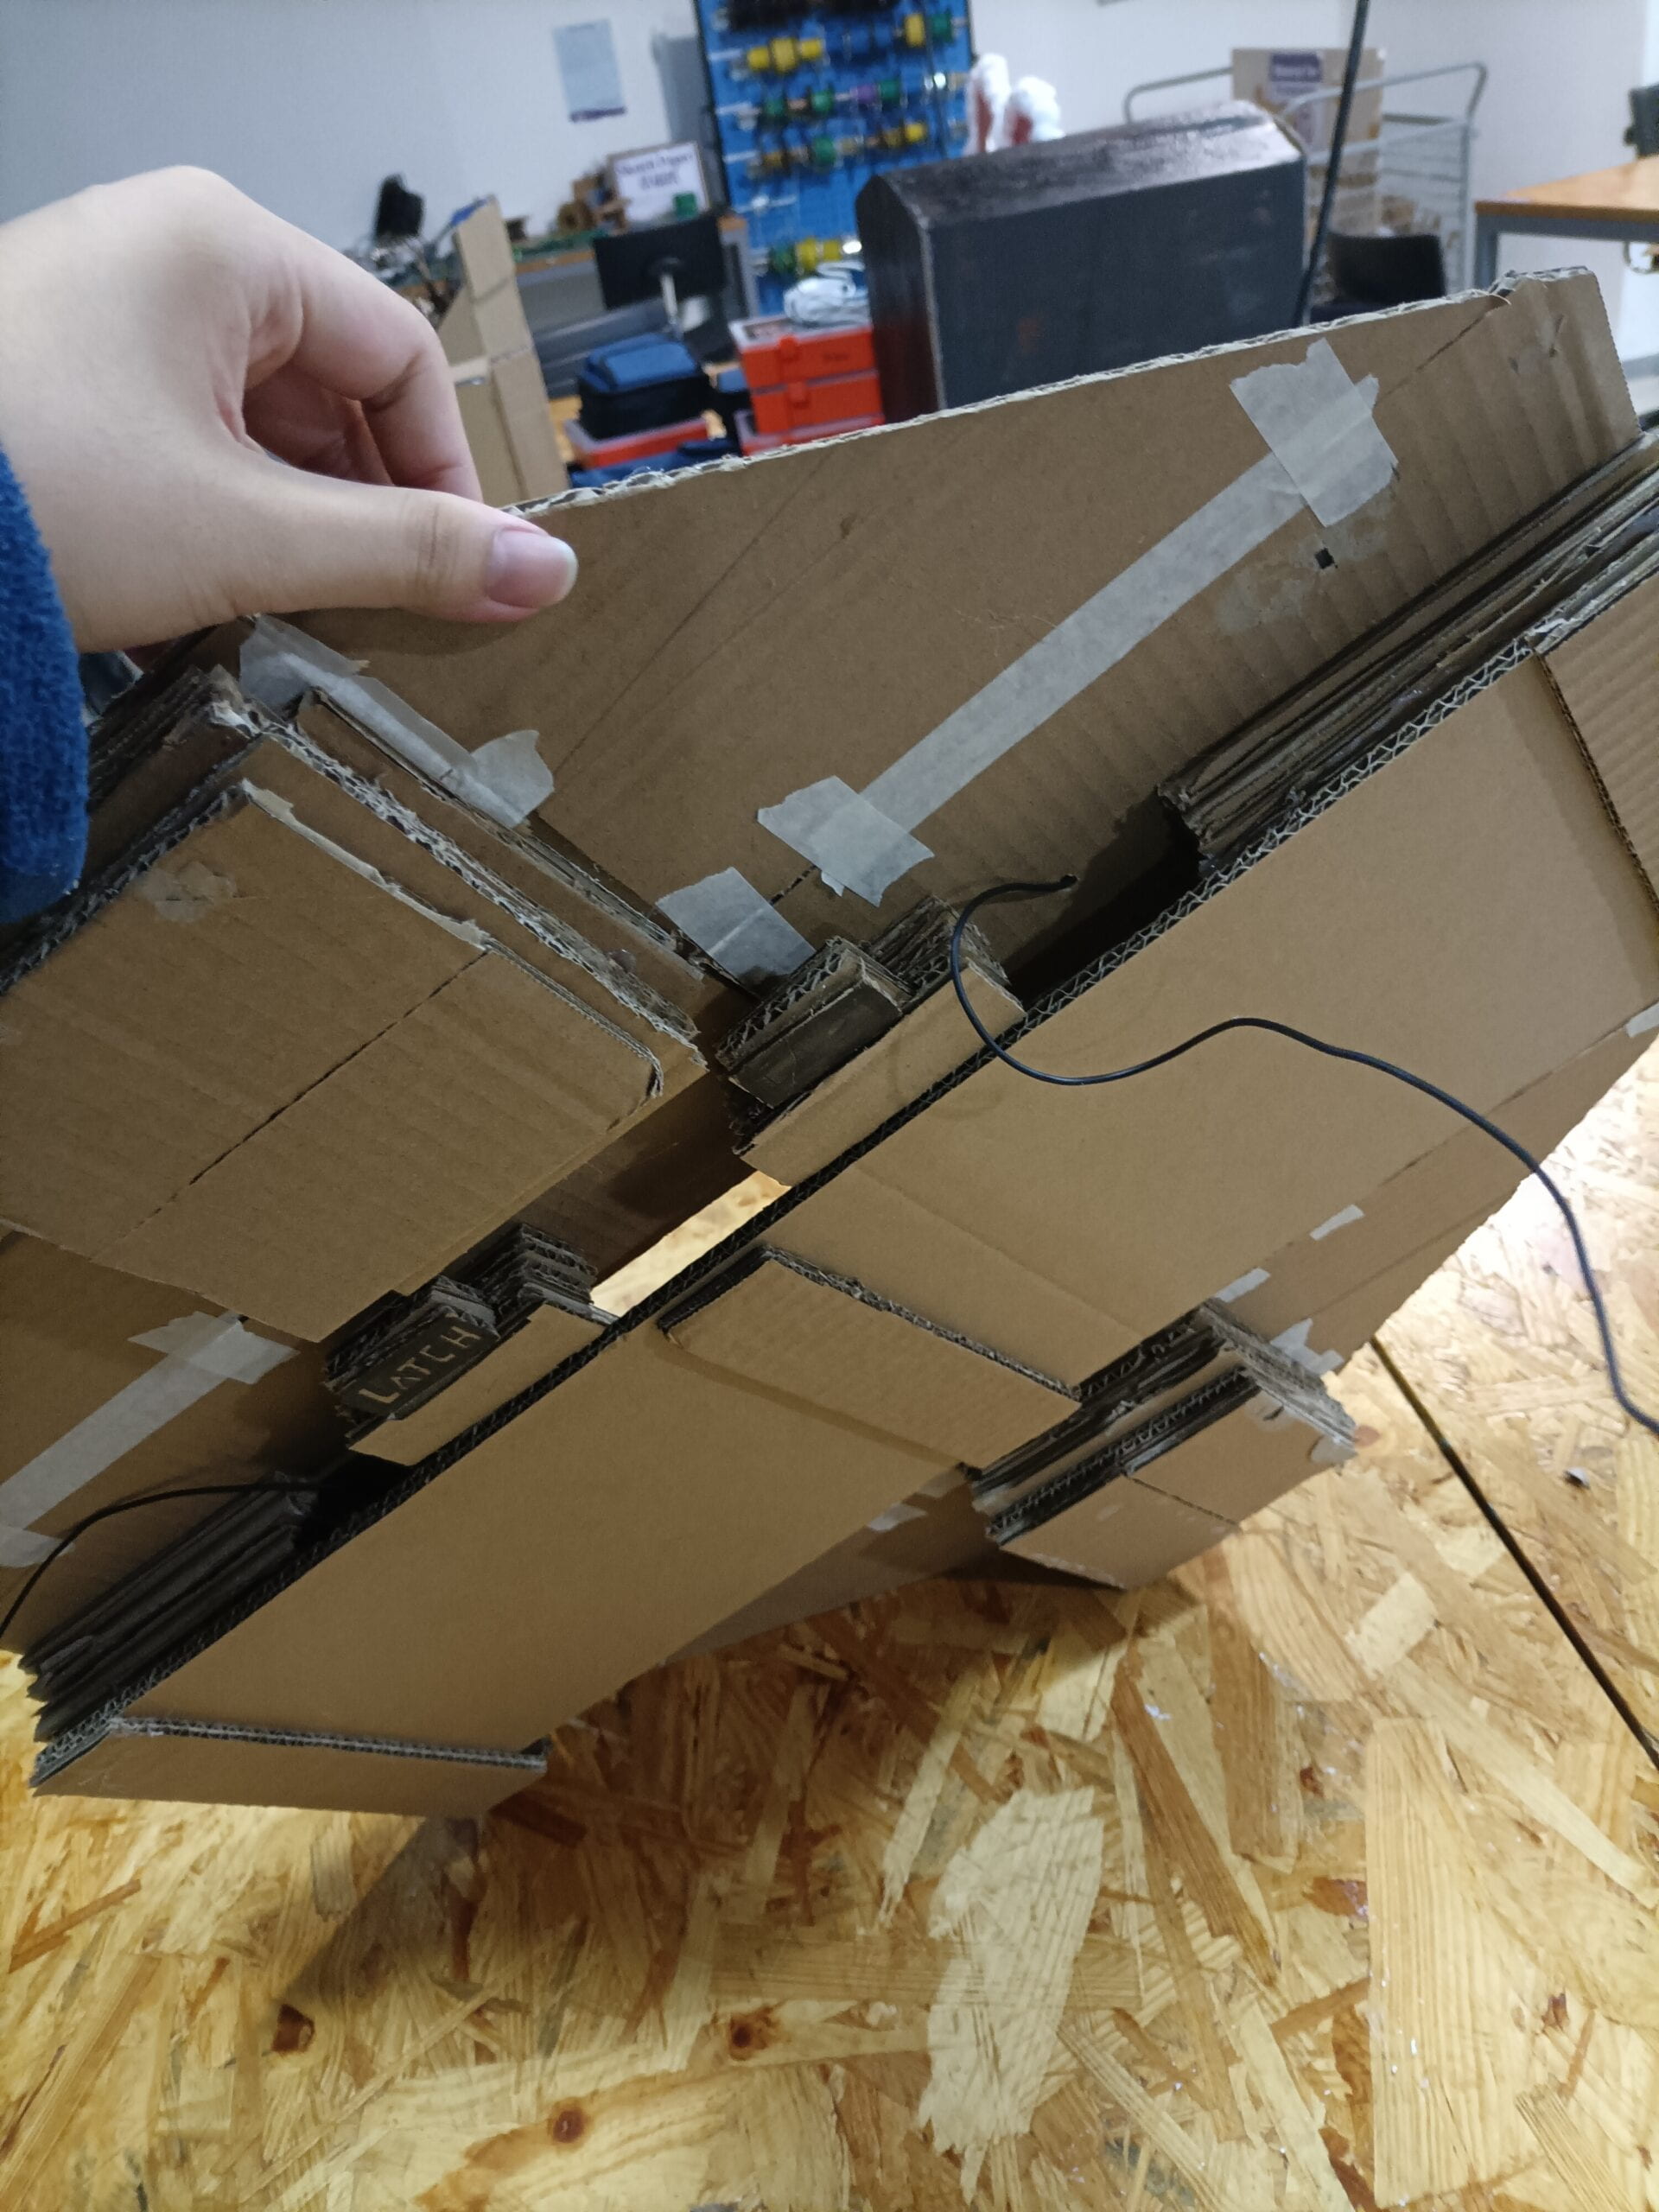
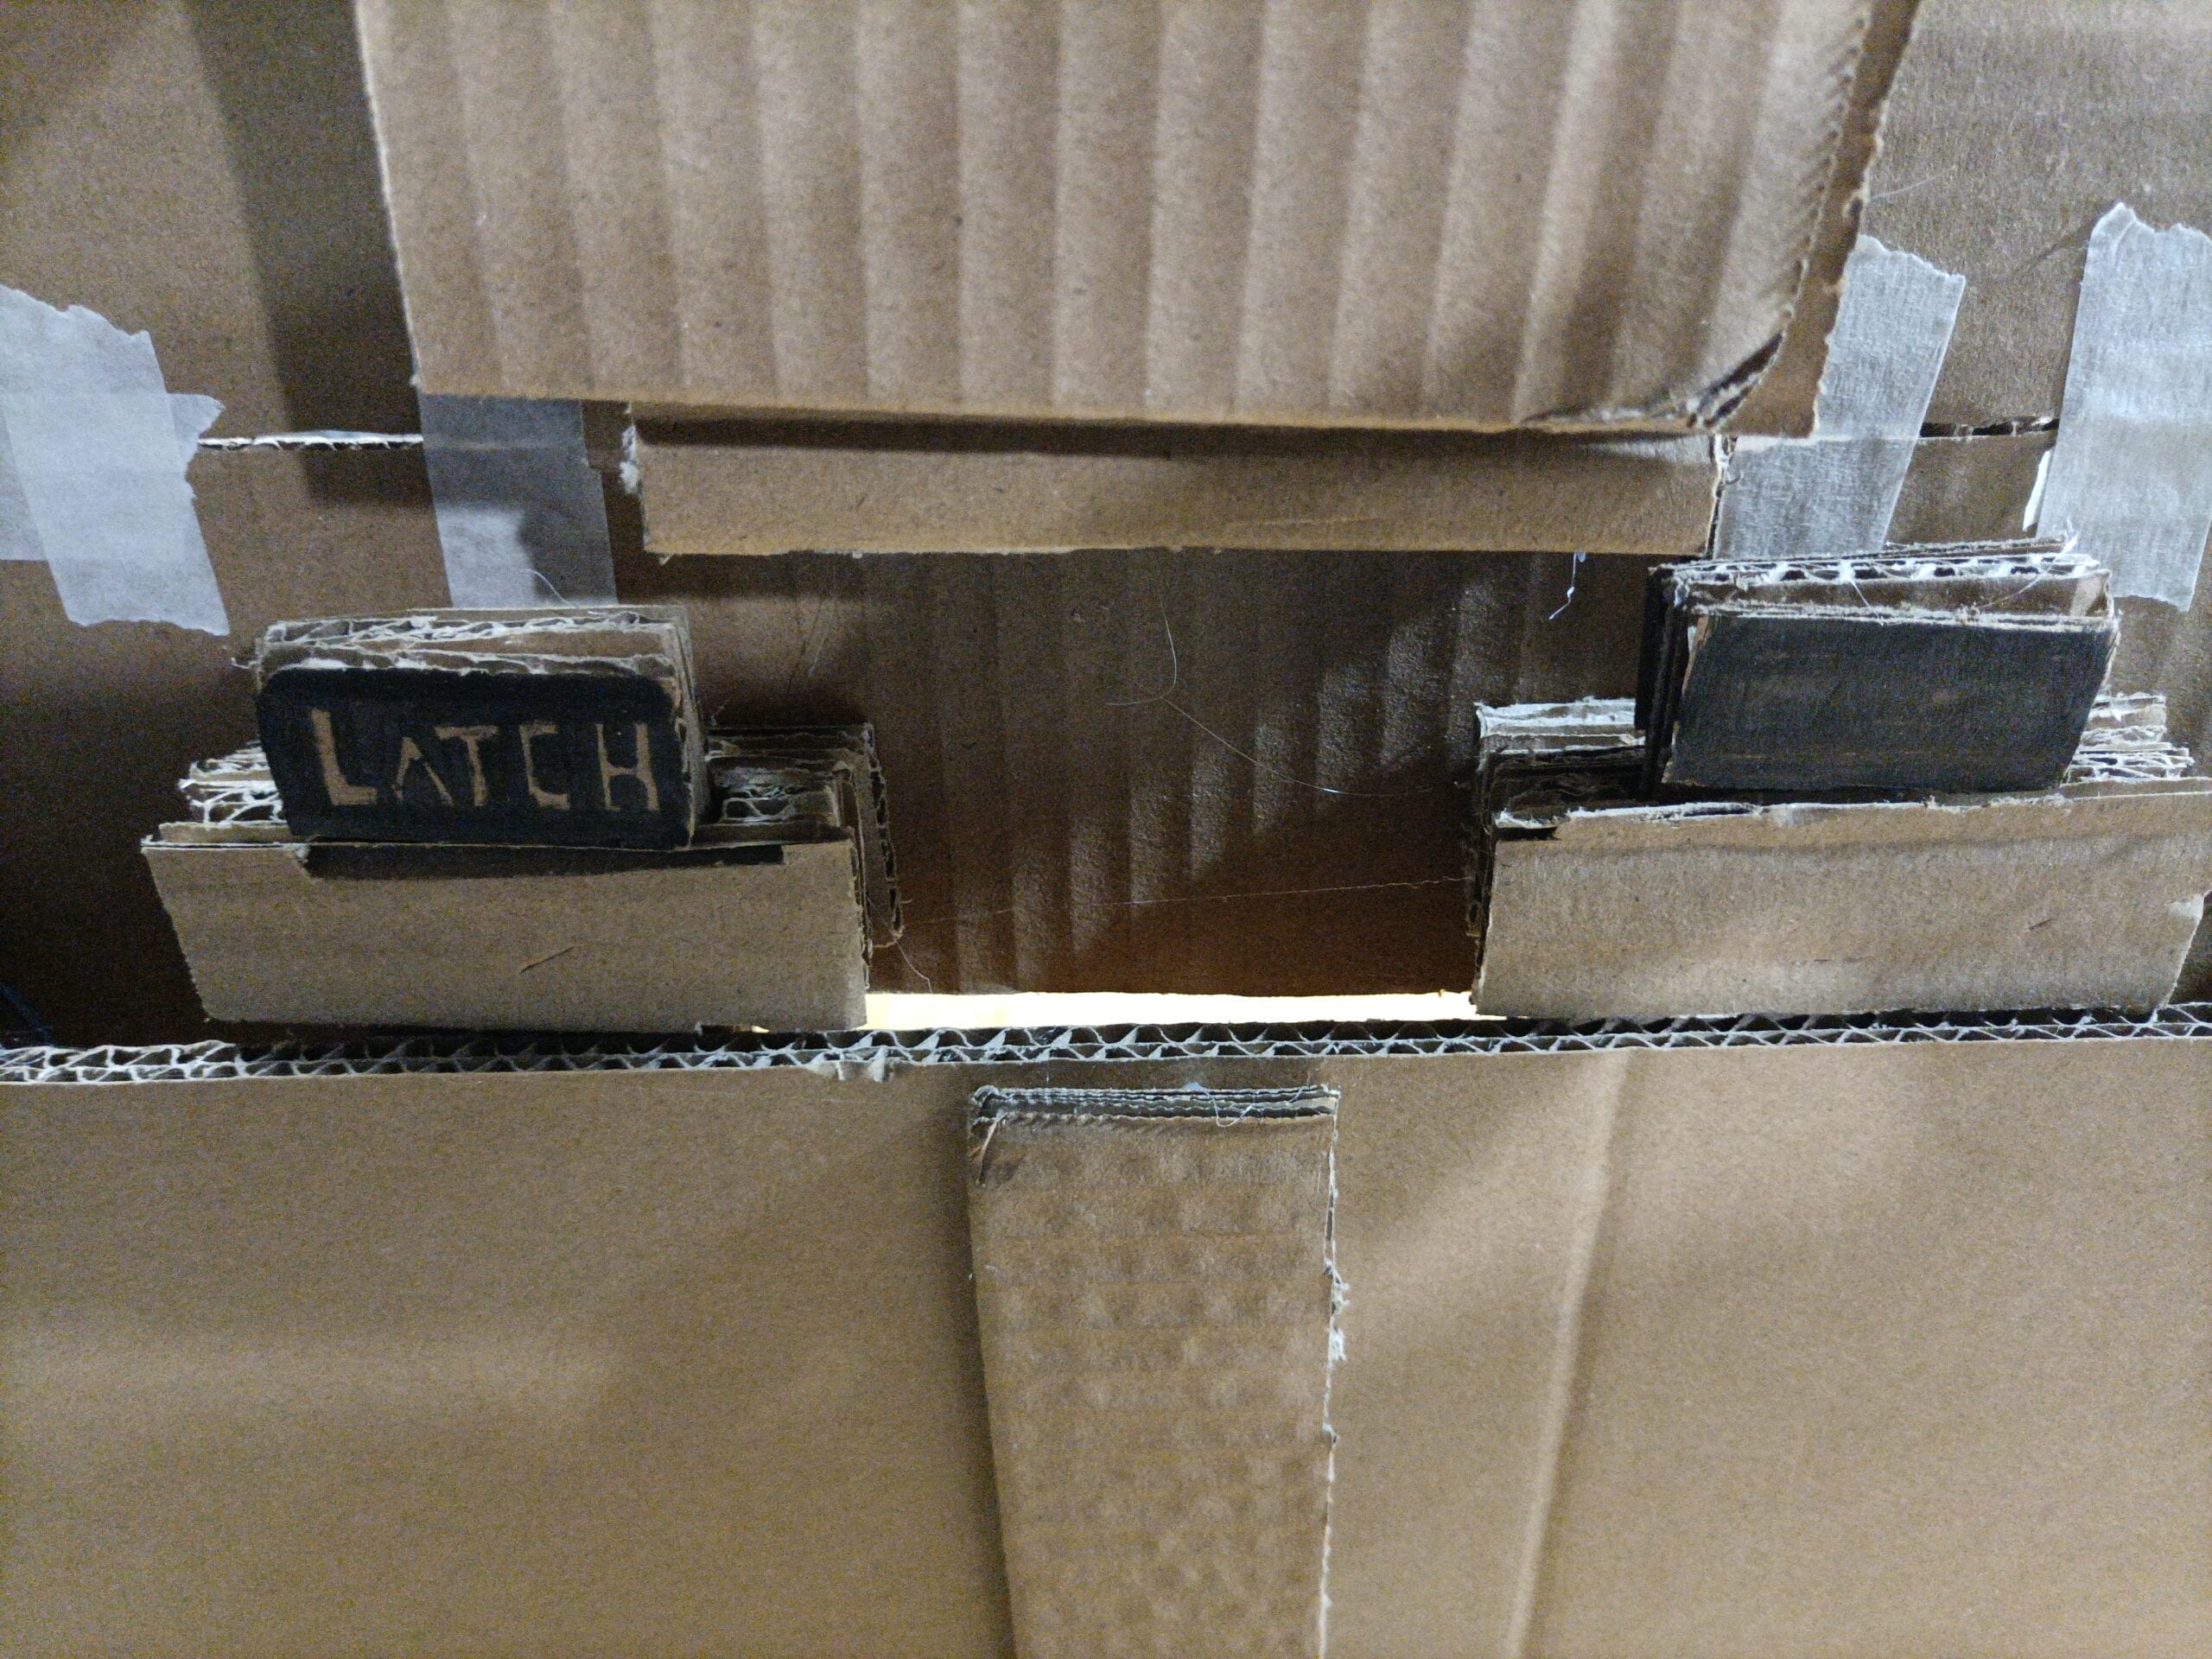
Fig.12. Latches
Insert the two to fix the device layer closed. Pull to open.
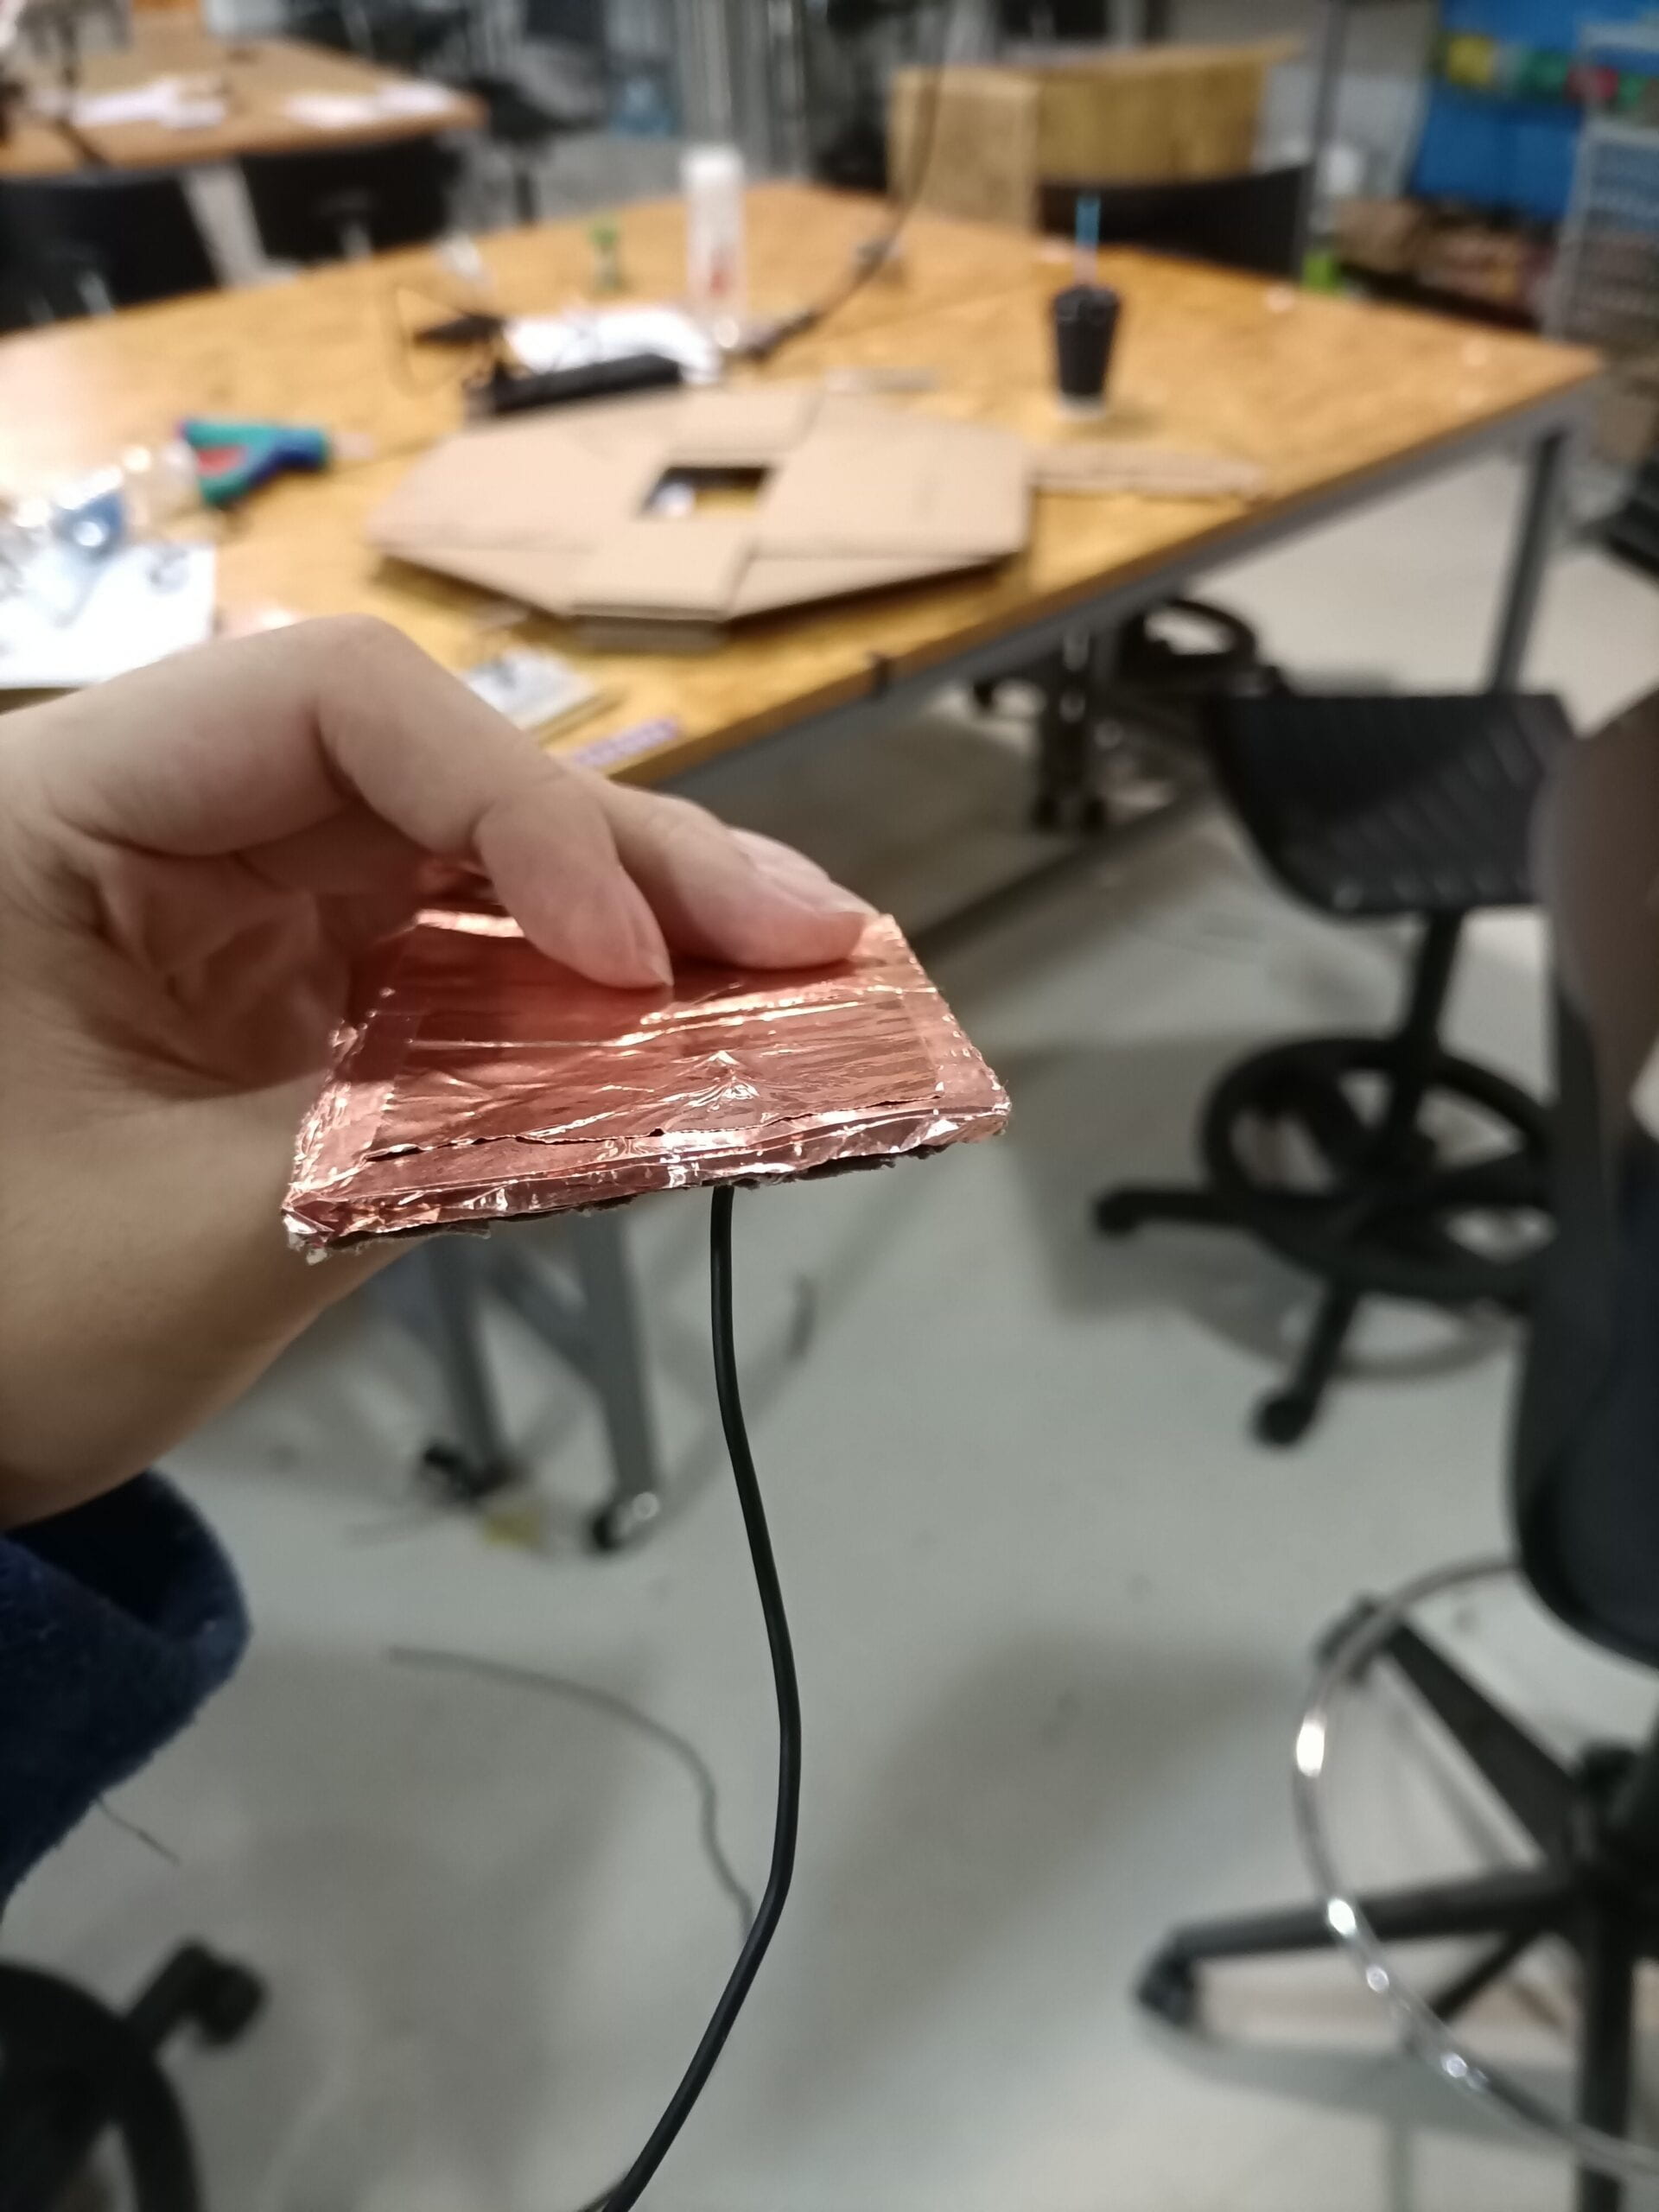
Fig.13. Soldering a cable and art paper together
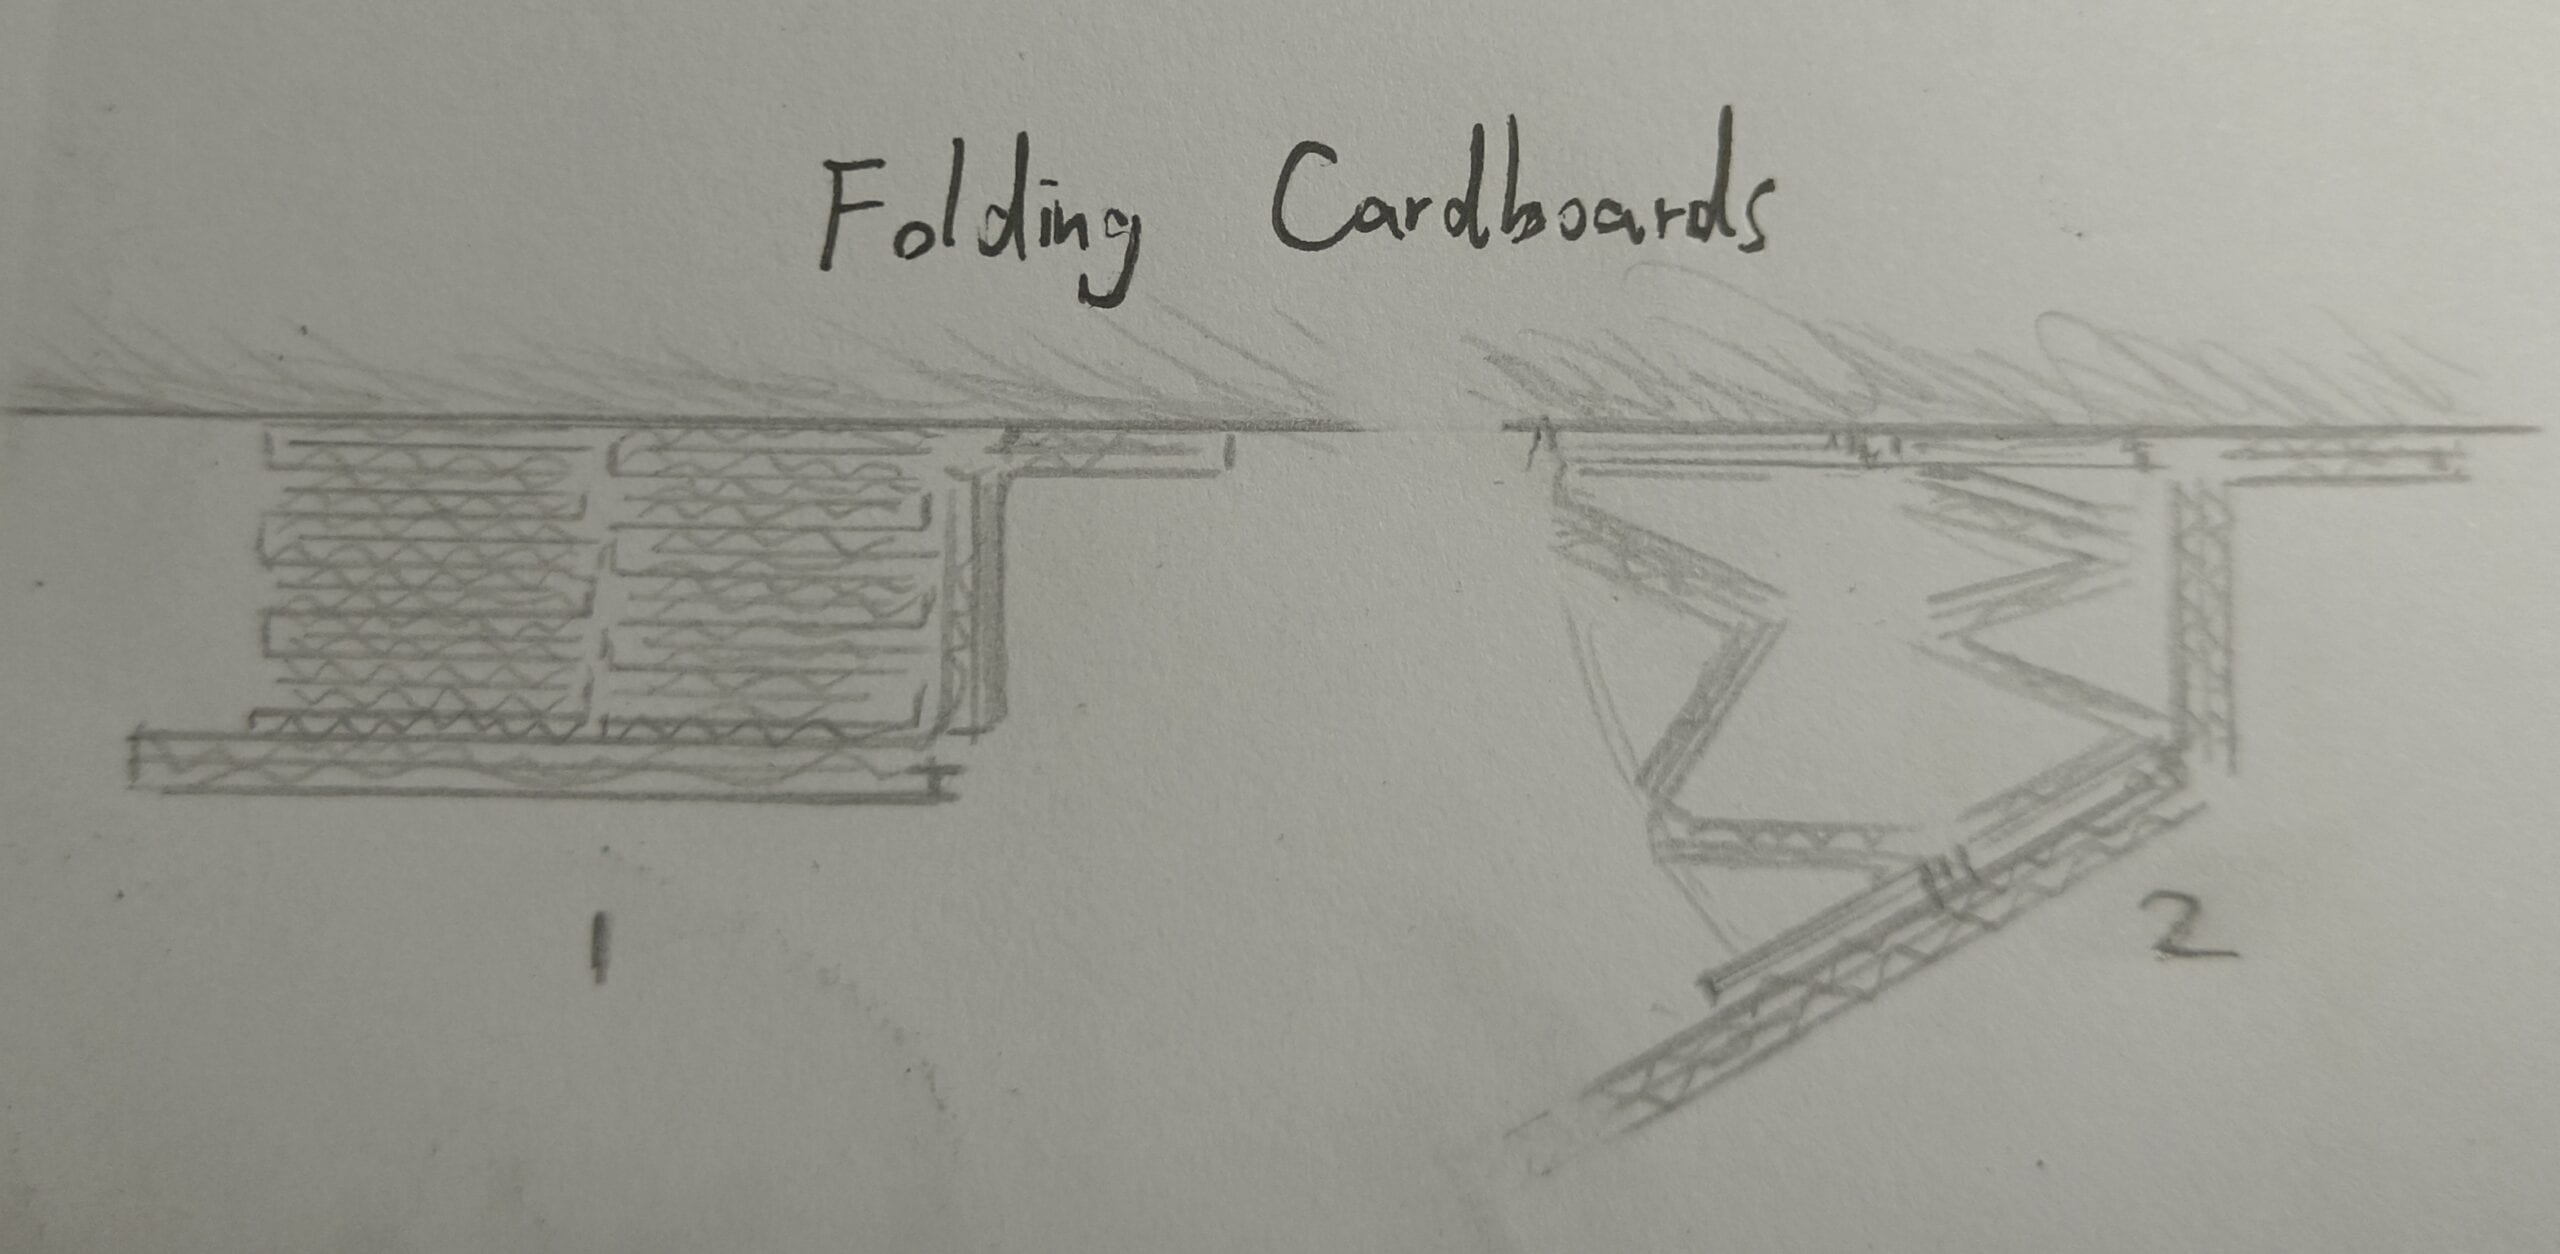
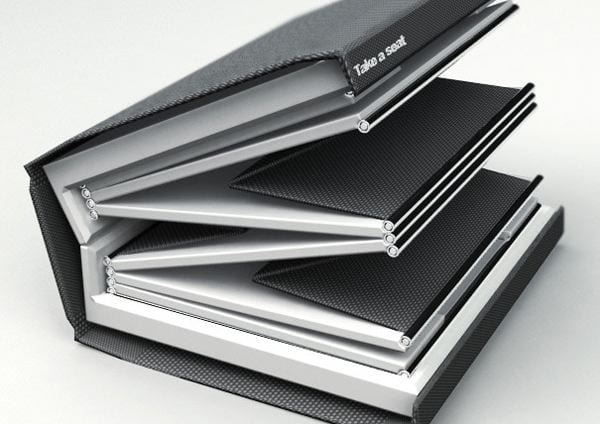
Fig.9. Principle of folding cardboards
Fig.10. Reference design of folding cardboards


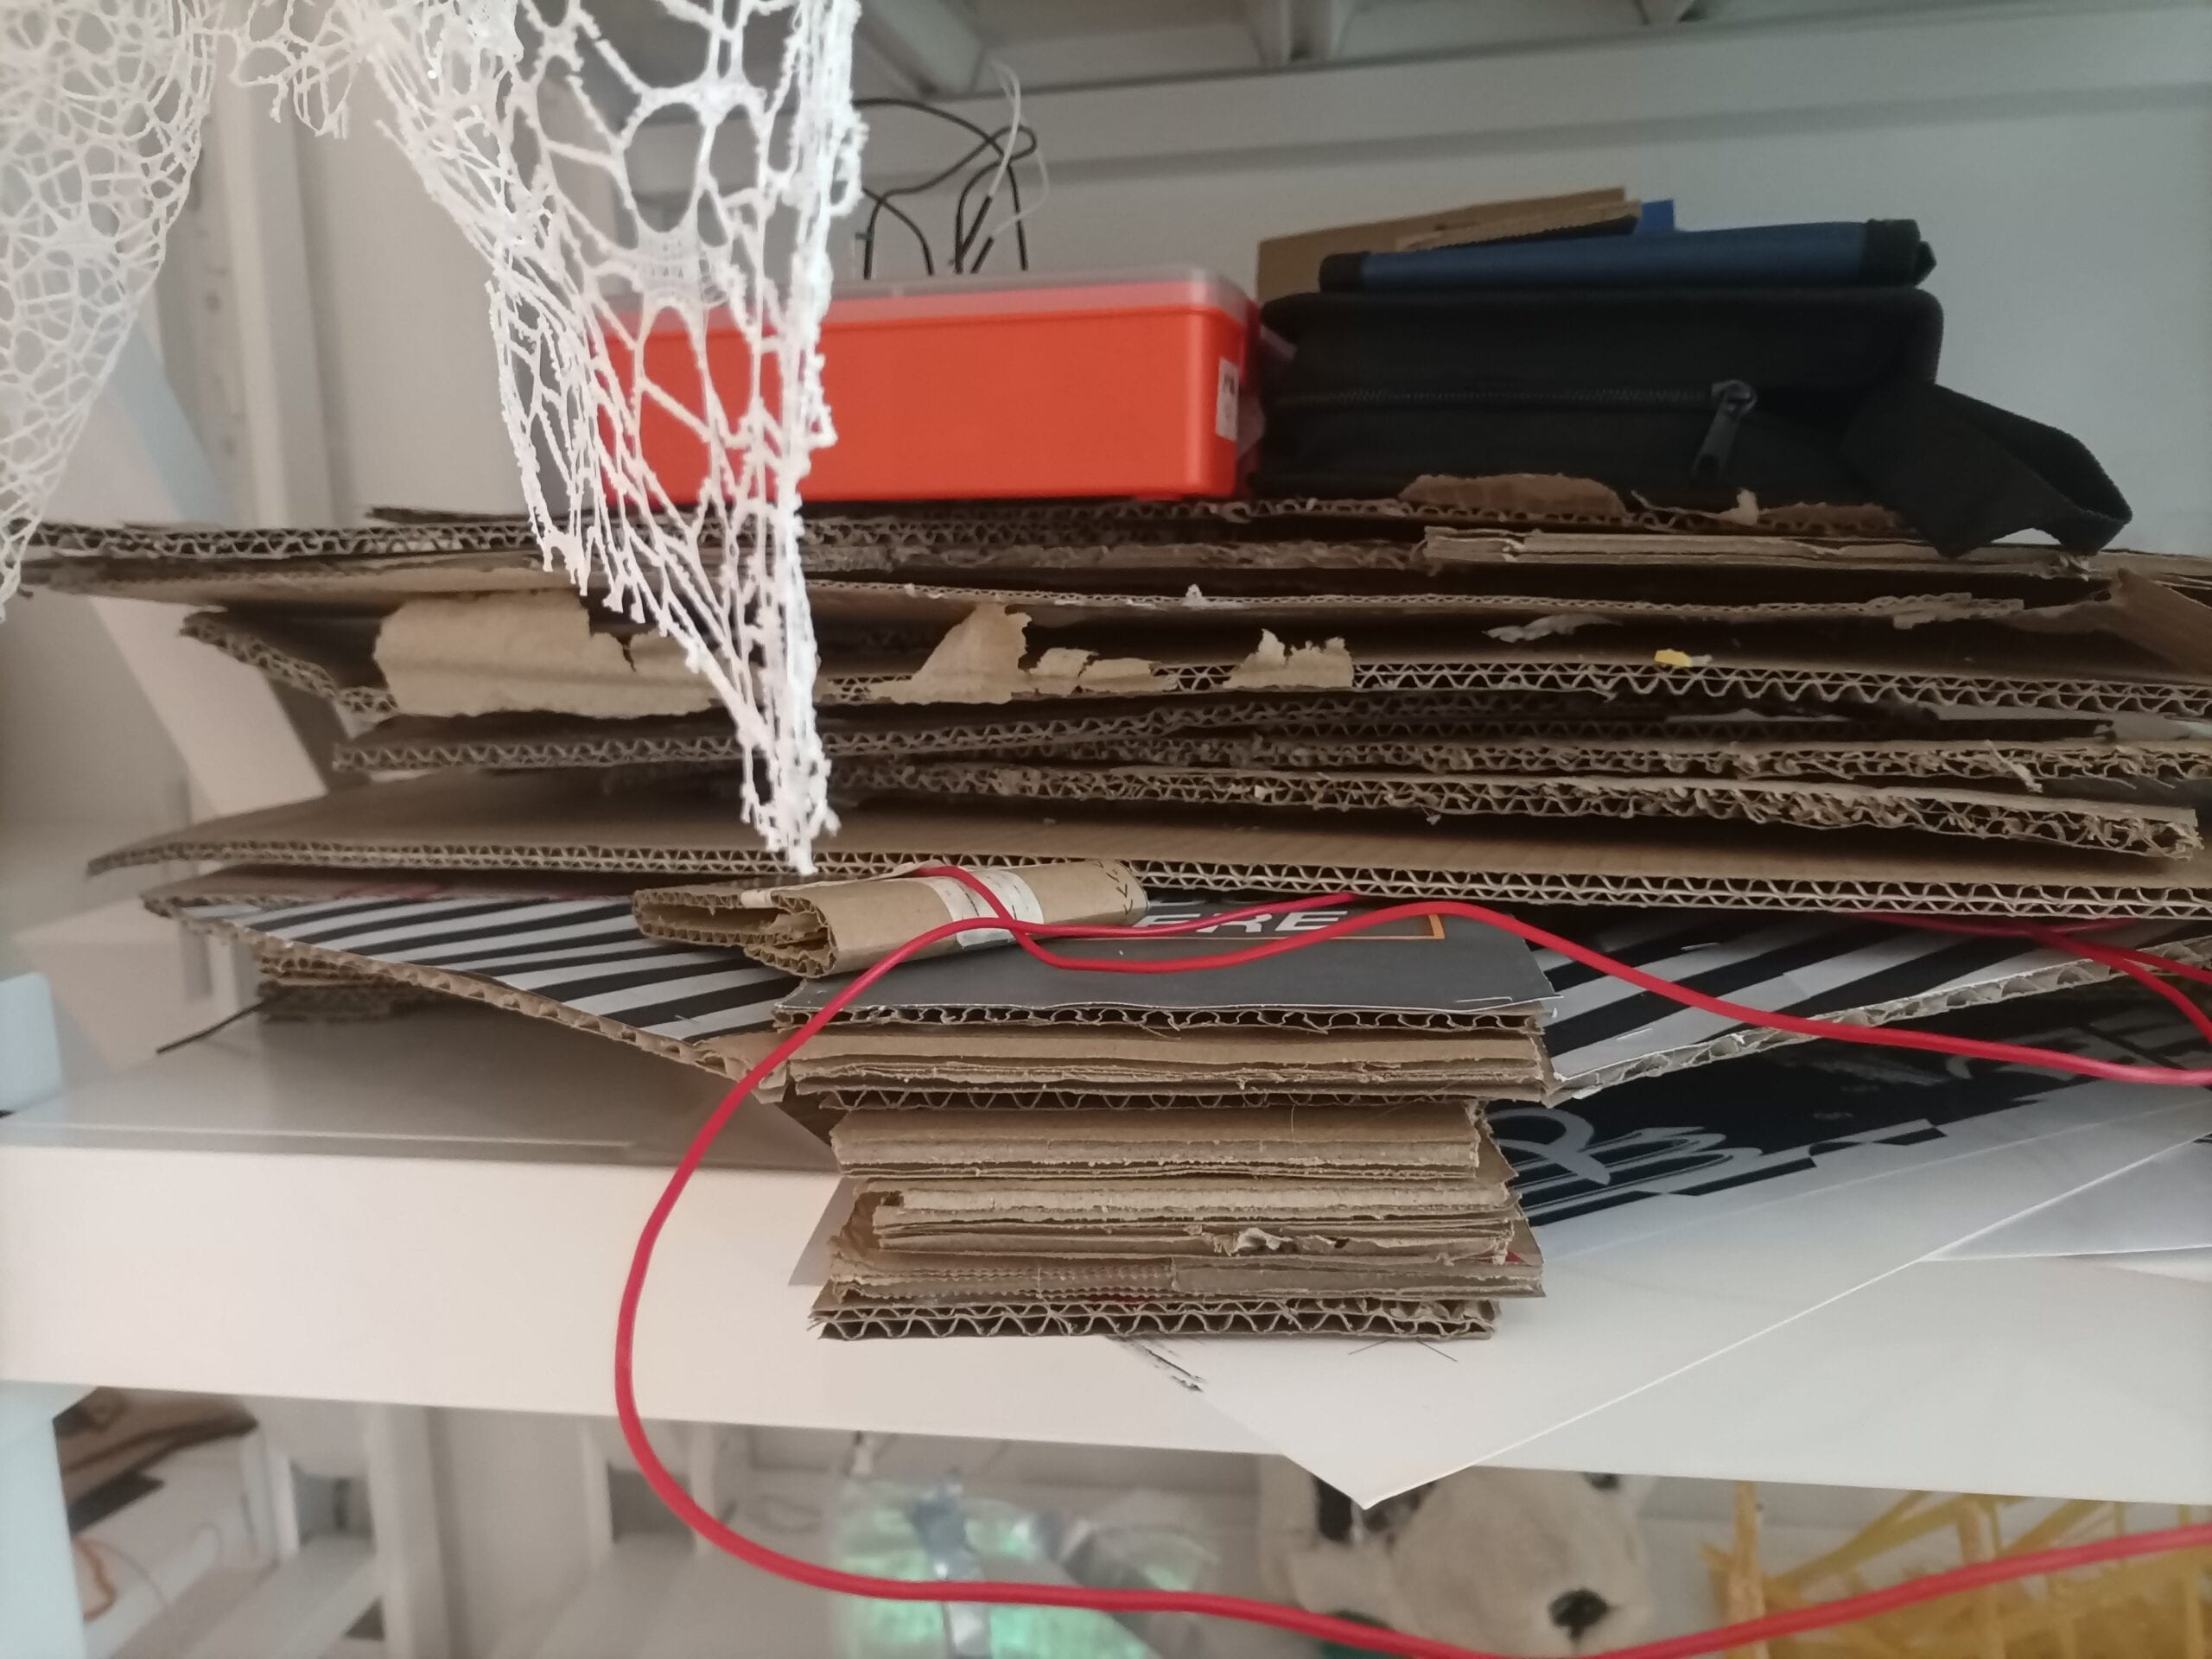
Fig.14. Load-bearing test on the shelf
Fig.14. Final state, exterior
Fig.15. Close to final state, interior. (Only the Neopixel parts and head cover were missing)


Below are some videos that display the process of my own test.

1. The function of latches and folding cardboards: to create an openable device layer and bring convenience when checking the system.

2. Experimental stage. The color of Neopixel changes according to the team of the winner.

3&4. Openable head cover and device layer. As you can see, long cables are fixed by tapes so that they don’t get messed up and block the layer. Meanwhile, I strengthened the LEDs with tapes and wrapped the buzzer inside, so that they were more stable and unbreakable.

5&6. A brief and informal display of the game rules. In this video the green team wins the game and gets rewarded with 3 times of color wipe in green, each time the brightness of which adds a little. Then is the cheerful rainbow chasing animation.

CONCLUSIONS:

As is mentioned above, my goal is to design a game that can bring fun, relaxation and physical exercise to anyone who wants to have a try and “take them by surprise”.

From my perspective, my project aligns with the definition of interaction in these ways:

  1. Offering necessary tips and reminders to the players through electronic devices.
  2. Reading the players’ scoring situation automatically
  3. Preparing an amazing form of celebration for the winners.
  4. Playable, restartable and fair with proper game rules.  

My project doesn’t align with my definition of interaction enough in these ways: 

  1. Terrible experience of wearing hand rings (They’re fixed on the wrists by nails which are primitive and hard to operate).
  2. Primitive way to restart the game (through the reset button of the microcontroller).
  3. Lack an advanced scoring system (Mine can record scores, but not analyze the time the players take to score, or strength of the punch when scoring).

Possible solutions:

  1. Replace the nails with velcro fastener and replace the cardboard rings with cloth or faux leather which are more durable and comfortable.
  2. Design a reset button on the breadboard and let it stretch out from the cardboard layer and be fixed on the surface.
  3. Add pressure sensors to detect the strength of the punches and include codes that can record the time of one game.

Finally I solved most of the issues appearing during the user test and my own test. They are shown in the “IMPROVEMENT” part above. Some of my ideas are of great importance during the design and assembly of my work. For example, recycling the waste and using common materials saved my time and referring to previous classes and recitations inspired my creativity and brought me practical solutions. The test was successful.

I’d like to emphasize again that my project is centered around a fun and surprising user experience and based upon the principle of the Olympic spirits: peace, mutual respect, and understanding. Since two players will be engaged in it, this adds much unknown to the game and even if there are only two final results, you won’t get the same experience for each game. Therefore, it has a long-lasting vitality and always attracts new players to come. So you should care about my work and give it a try.

What I learnt from my accomplishments is that operating an interactive project is much more than doing handcrafts or DIY. It’s more demanding both in imagination, creativity and time management, and could be very difficult without the help of a pair. However, all the efforts, all the staying up at night and searching for solutions alone, get paid when the project was completed. I came to realize that not only my projects need an improvement of interactivity, but myself. A good communication with others can bring treasurable ideas and support to the projects, and you won’t feel so at a lost when confronting technical problems.


Technical Sources List

1. A basic everyday NeoPixel strip test program. It can control all the animations shown in the videos above.

Link: Adafruit_NeoPixel/strandtest.ino at master (click to visit)

2. A reference design of my folding cardboards. 

Link: 独特的可折叠的书本凳子(A unique, foldable, book-like stool)

3. A small part of the codes of Speed Game. They function as an automatic score recorder and calculator. I modified them instead of copying them.

Link: Race The Led – Interaction Lab IMA | Tinkercad

Leave a Reply

Your email address will not be published. Required fields are marked *