From the group project…
In the group project, my group focused on customized experiences, which I found it rather important in interaction. For me, a good and complete interaction should not only be interactive but also be personalized, which means the device should tailor at least part of its function to the special character or feature of the user. Based on this idea, we chose the heart-rate sensor as our main sensor as the heartbeat is something that everyone has and differs from person to person. Also, from the presentation of other groups, I realized that fabrication takes a significant place in user experience. As a result, I decided to also pay more attention on the visual effect as well.
Inspiration & Concept
I got greatly inspired by the project of “Overflow (2021) – A real-time data sculpture that bridges people and places” (https://www.creativeapplications.net/member-submissions/overflow-2021-a-real-time-data-sculpture-that-bridges-people-and-places/), which strongly showcased the power of aldolization by interpreting traffic flow into a living soundscape. The project reminded me of the five senses of human beings, which have been seen as the most direct ways of knowing and feeling the surroundings and finally brought me to the idea of visualizing heartbeats as part of our project. The idea is also matching with my definition of interaction: “A performance where audience is the cast and allowing participants to explore themselves.”
What makes our project unique is that we provide a combination between two of personalized features of individuals- their heartbeat and their pressing force. The level of the press will lead to an instruction for the user to try to change their heartbeat accordingly. By doing this, the project also provides an opportunity for users to explore their body (to be more specific, their heartbeats in this case).
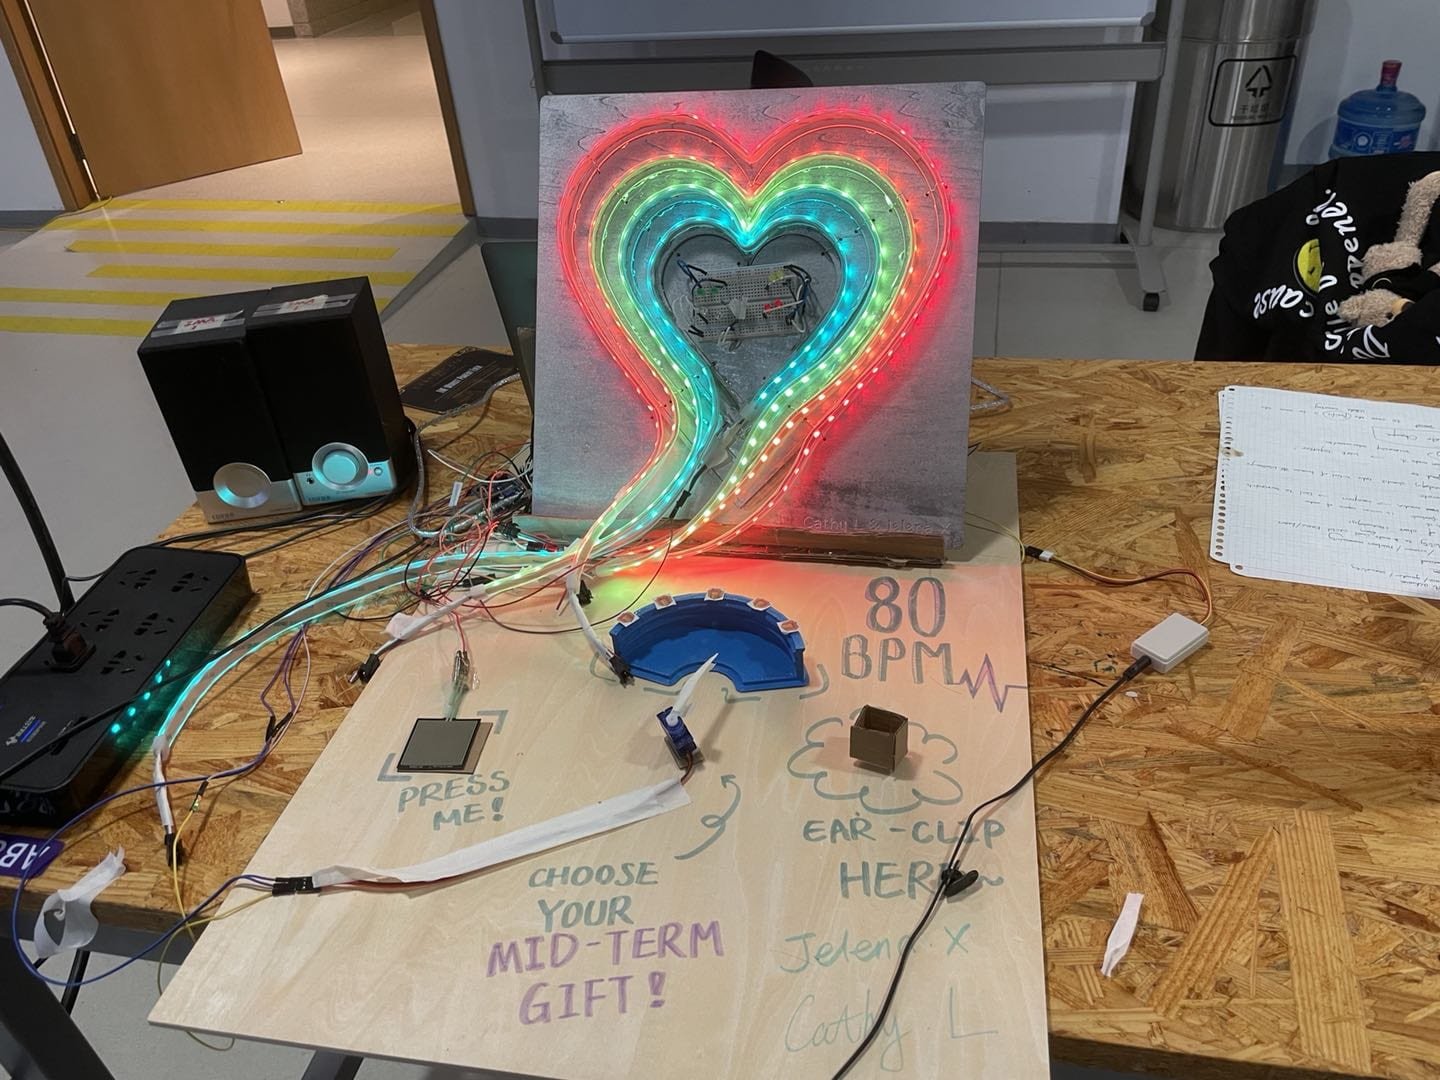
For our original design, we thought of collaborating the data from the heart-rate sensor and the FSR to match a specific song. However, in terms of user interaction and experience, such design may fail to let users know clearly about what is going on. So, we decided to add a “meter” to the press sensor by using the servo with the “map ()” function, which would help a lot with the interaction between users and the project. And in this stage, we decided the equipment we were going to use, which included:
- Ear Clip Heart Rate Sensor– The core equipment to detect users’ heartbeats
- LED Strips– The media of visualizing the heartbeats
- FSR (Press sensor)– Another factor collaborated with the heartrate sensor
- Servo– To visualize the data of FSR, making the project more user-friendly
- Serial MP3 Player & Speakers– To play the music pieces
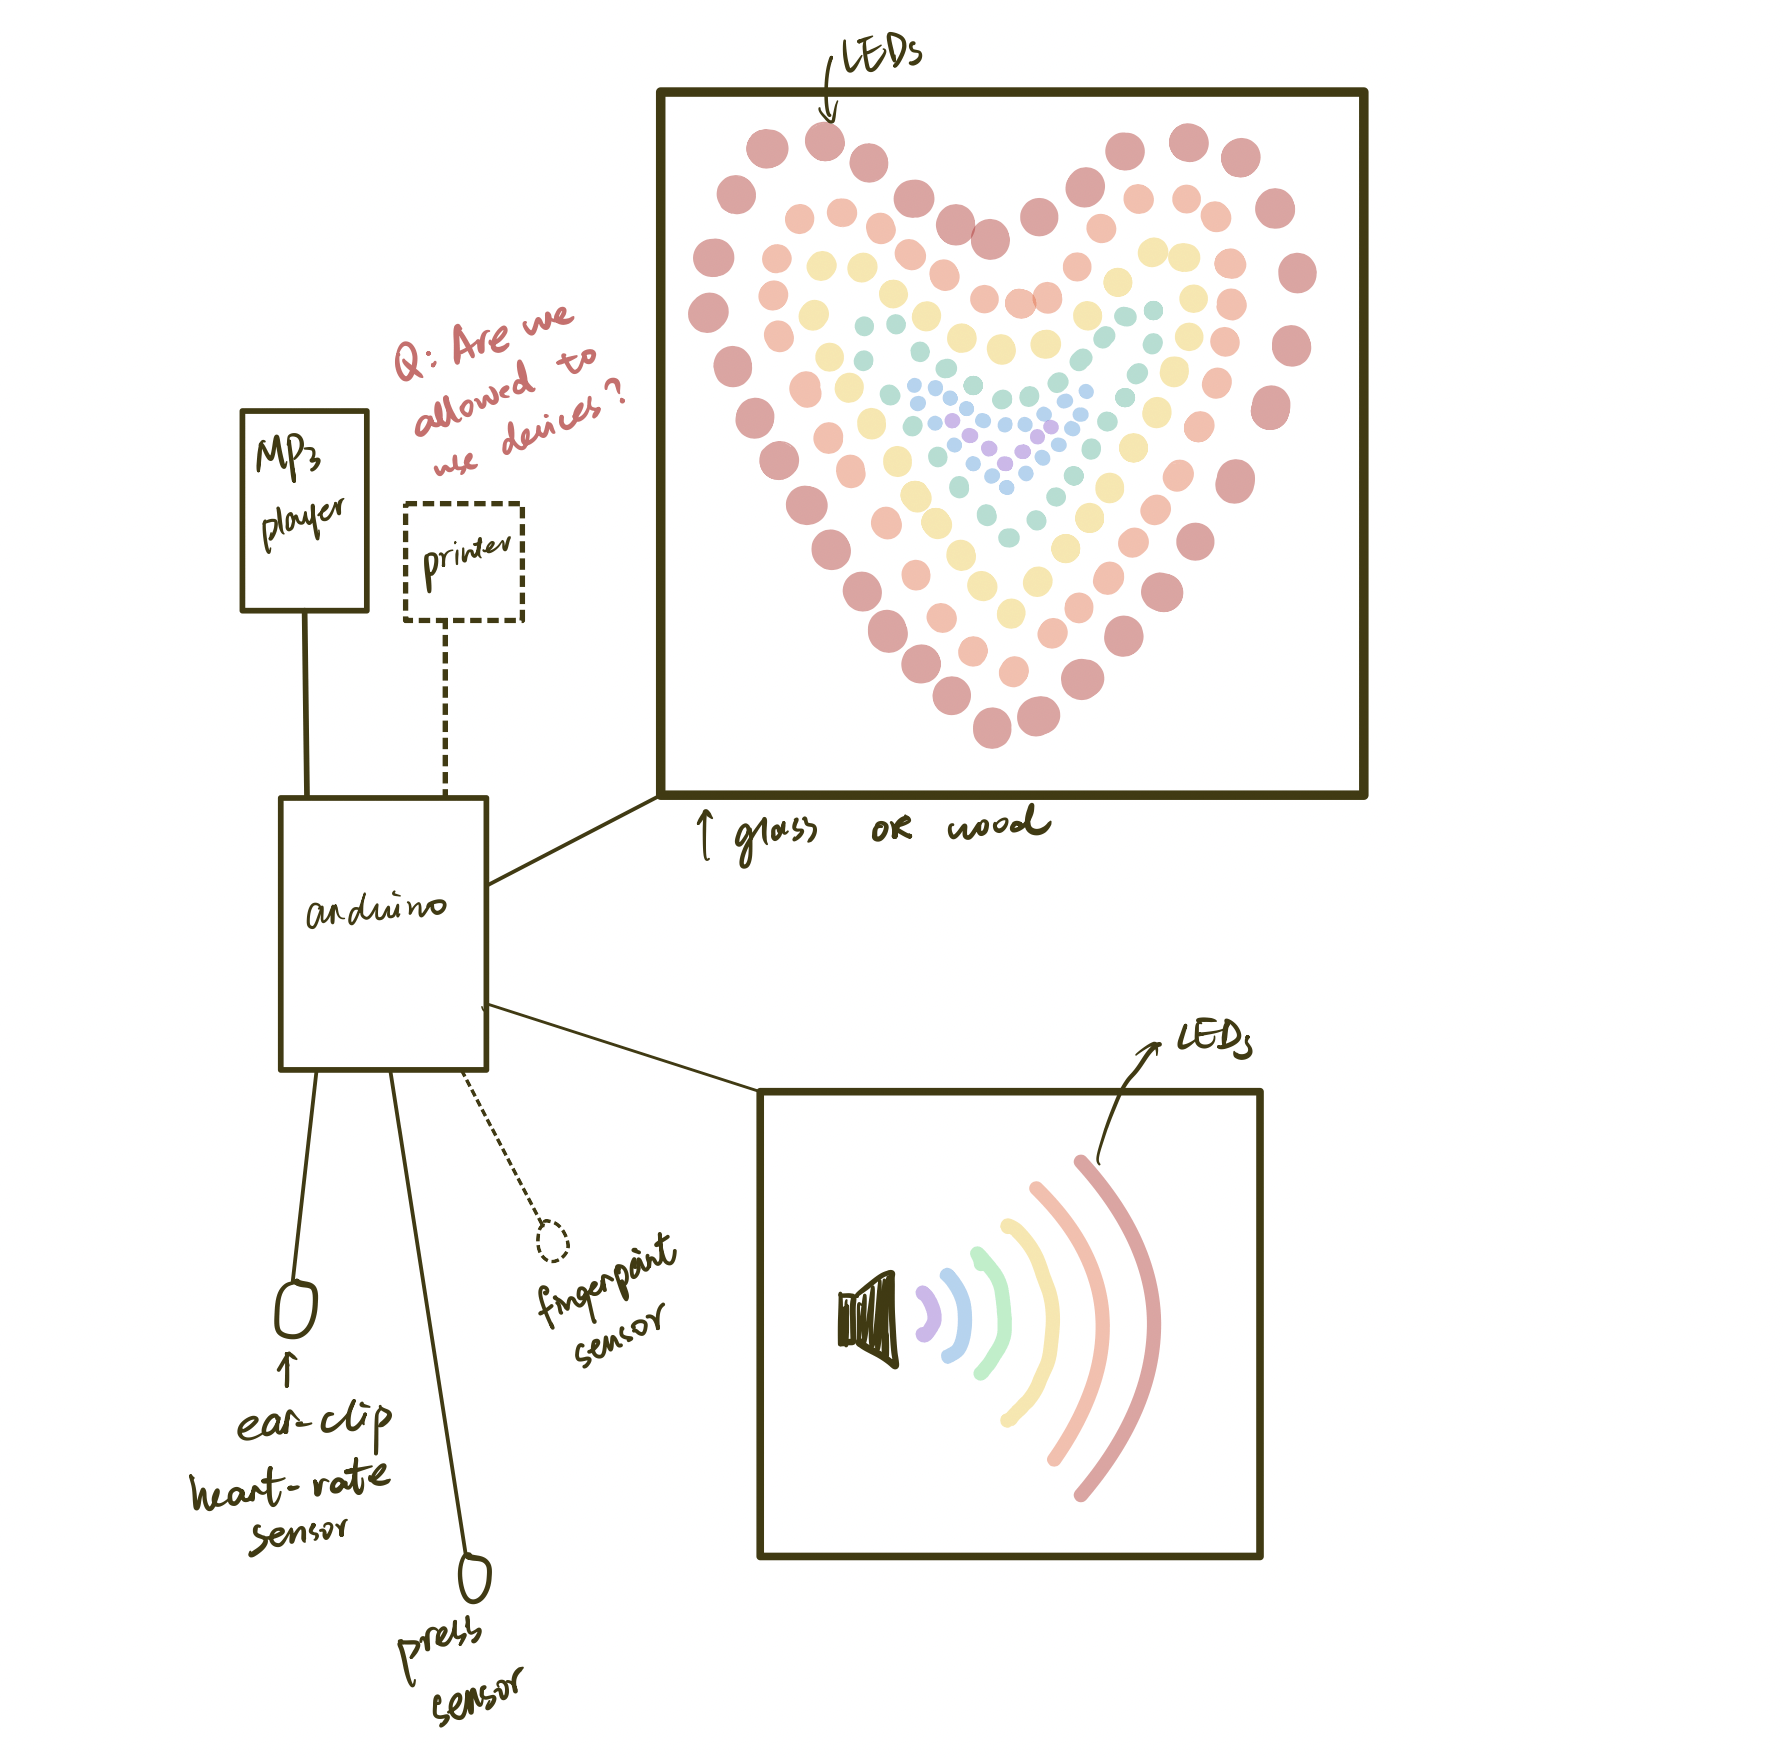
👆the primal design
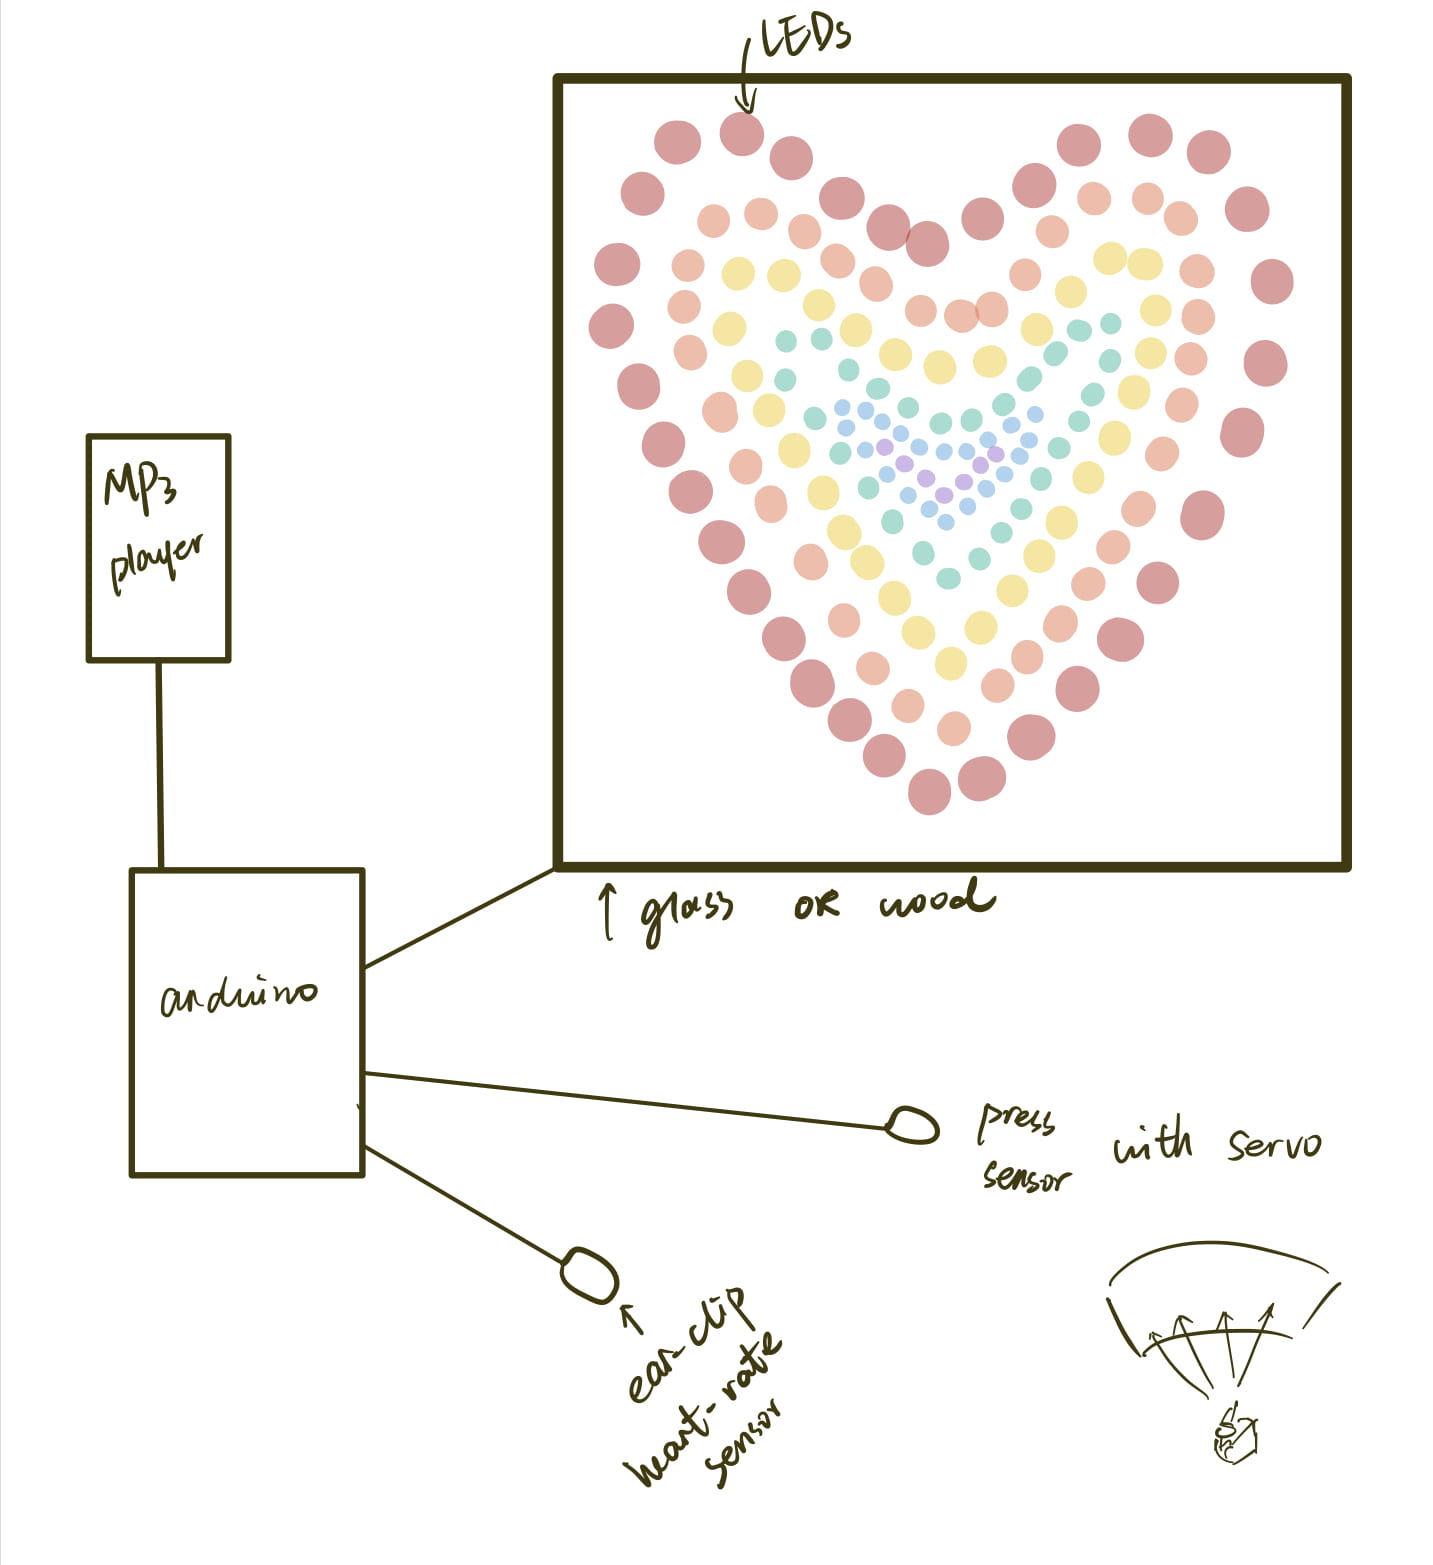
We have divided our project into the following parts:
- Programming – LED Strips x Heart-rate sensor ; Servo x FSR; MP3 player
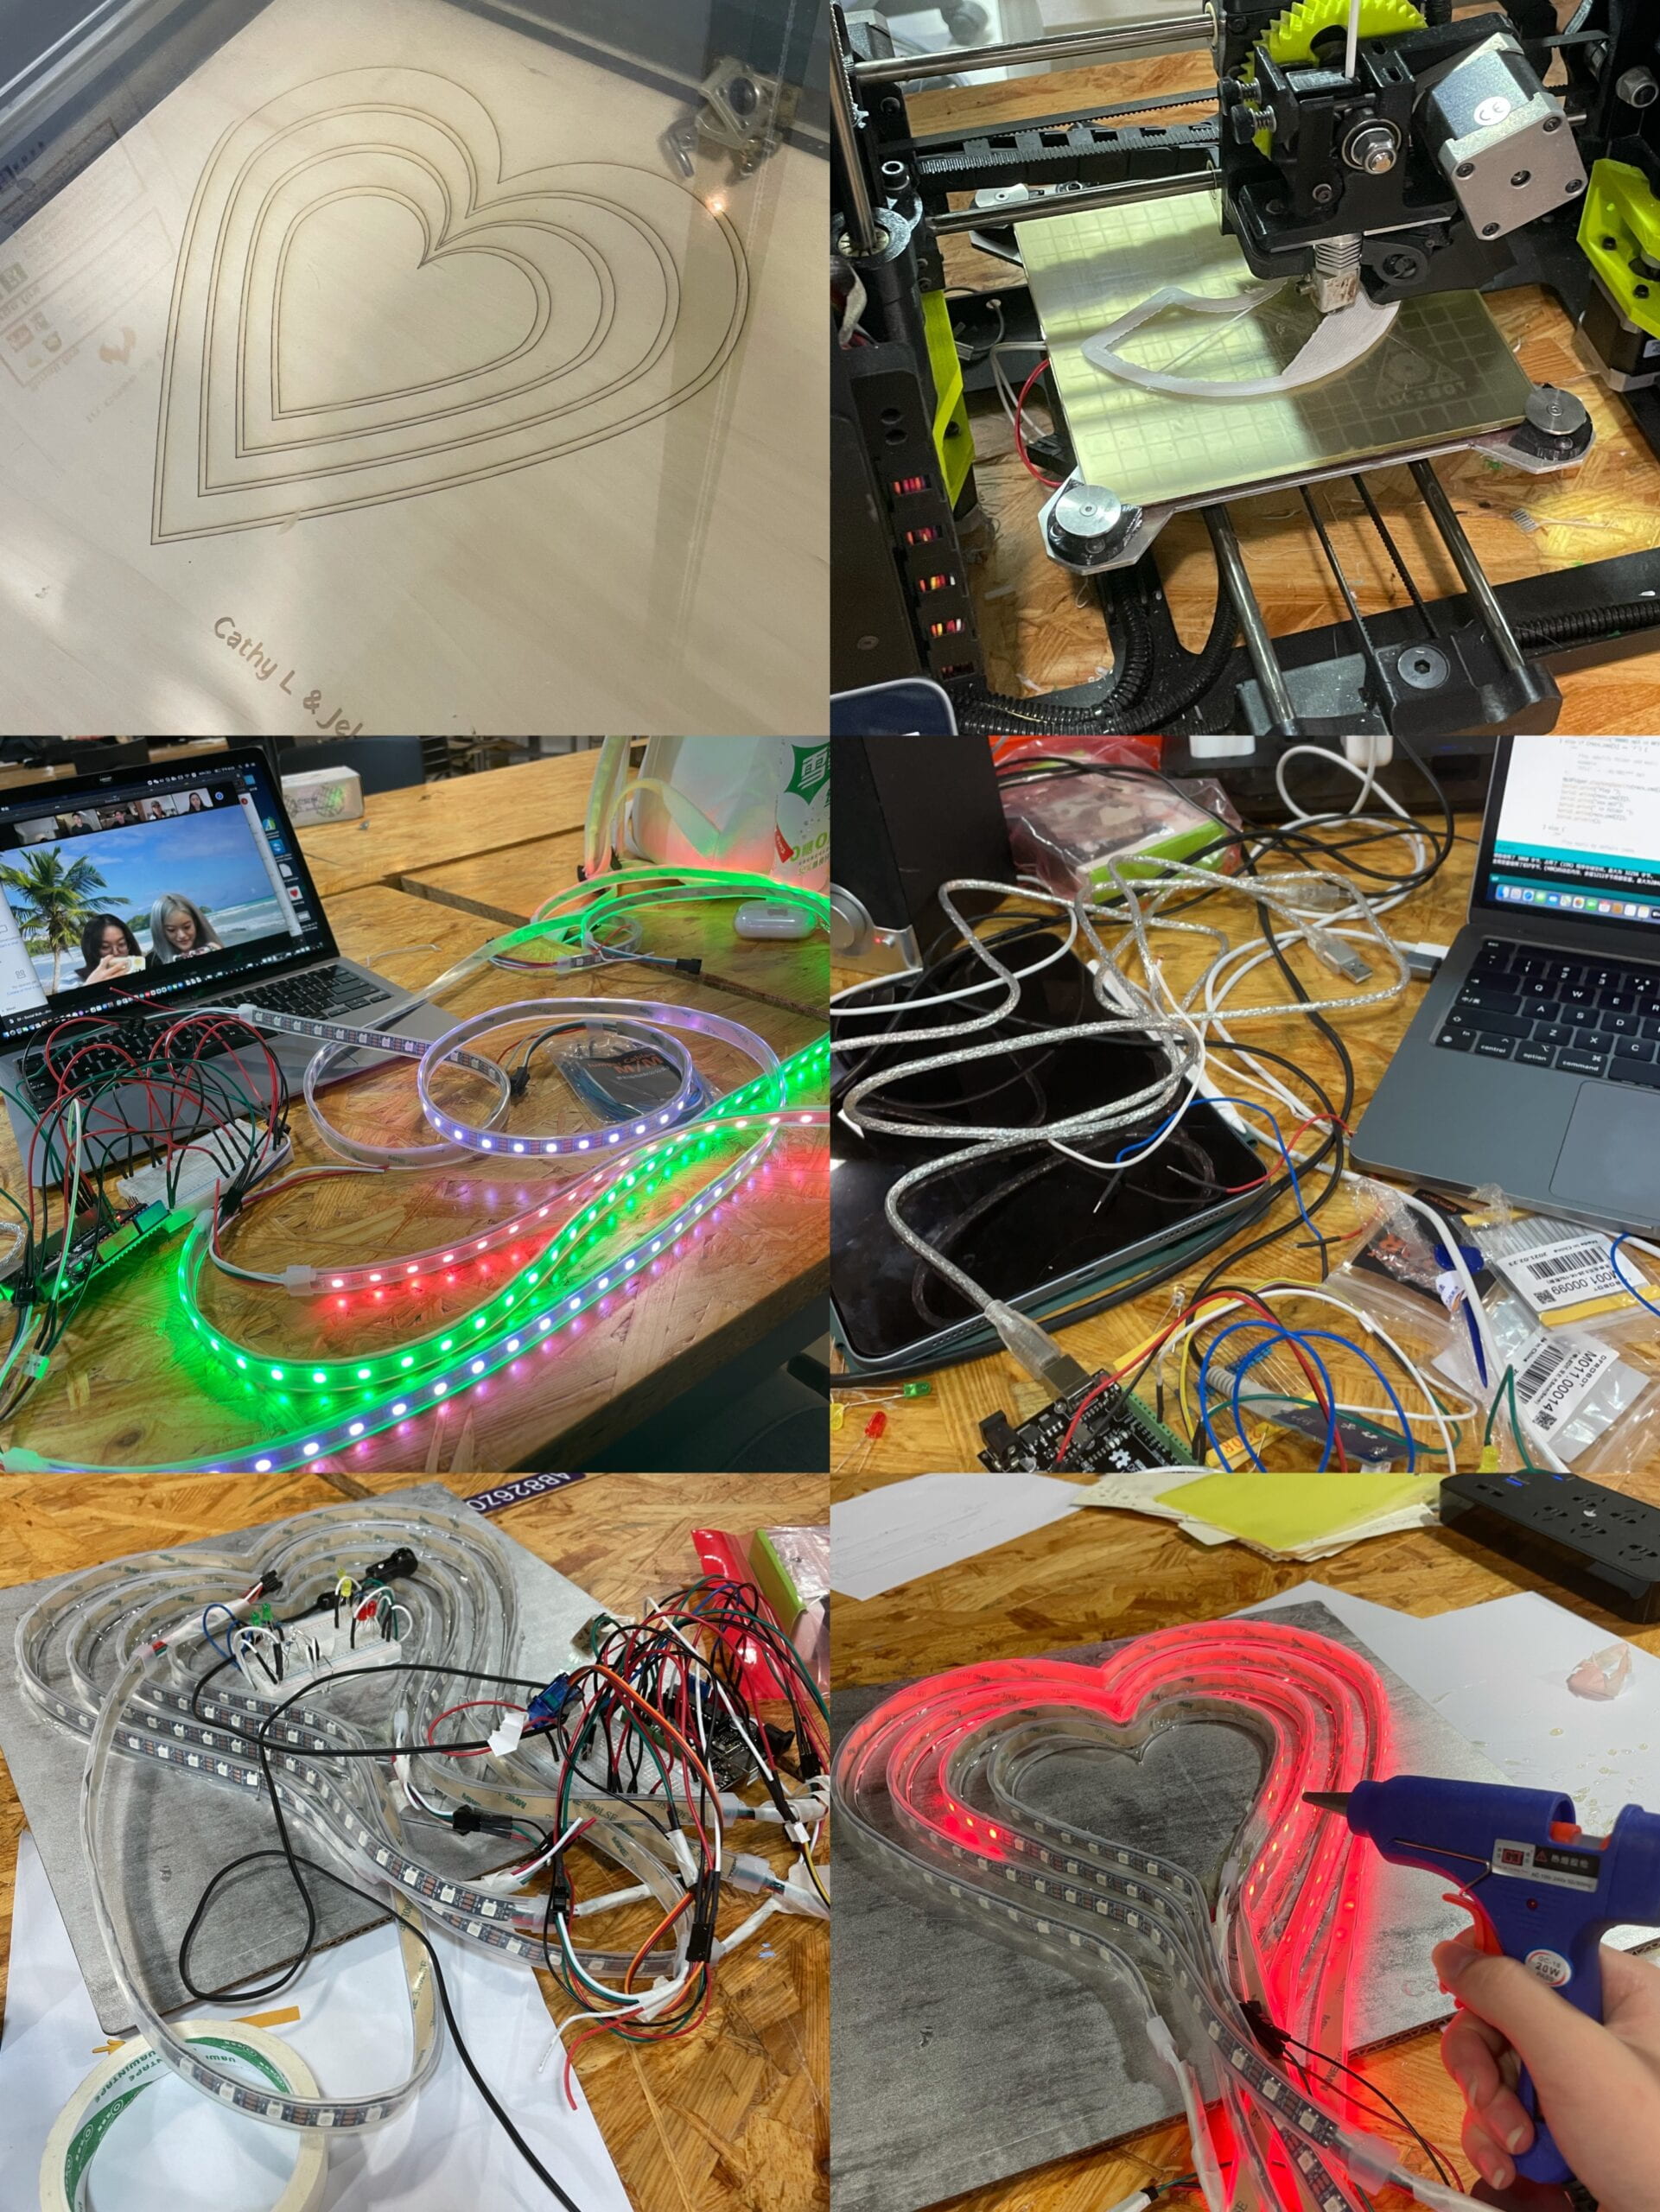
- Modeling (2D/3D design)- board with heart-shaped tracks(laser-cut); dash board (3D-printing) ; poster design
- Fabrication – sticking the LED Strips to the board; grouping all the parts together
Failure and success always came together and two of them are really unforgettable.
- LED Strips x Heart-rate sensor
When linking the heart-rate sensor to the led strips, it happened that the embedded LED on Arduino was always blinking with the heartbeat as expected. However, the LED strips never turned on even once. After reaching for the help of Learning Assistants, we turned to Professor Parren. It turned out that the number of heartbeat was calculated from the average number every 20 beats and was calculated with the millis() function. And the number of data_effect finally controlled the HIGH or LOW mode of the embedded LED. As a result, when using “if led_state = HIGH” as the condition, there will be continuous LOW with a sudden HIGH in it, of which the time period was too short for the Neopixel to react. What we did was to change the conditionals to the counter, making it add 1 after each round, also using the millis() function. Then let the counter to control the condition of LED Strips. After the change, the LED Strips began to blink accordingly with the heartbeat.
- An Overall Collapse
We got everything except the MP3 player working orderly together, but after we glued the LED strips to the board with a hot melt glue gun, everything was no longer working. Even the servo which is connected to the press sensor and is separate from the LED things were also not working and the LED Strips began to send out intermittent red lights. It happened just the night before the user testing recitation. We thought it might have something to do with the code or there is a broken device. But it finally turned out that there was a misconnection of the resistor, which ended up in a shortcut and messed up the information from the Arduino. Great thanks to our Professor Eric Parren who saved our “broken heart” and made our project workable during the user test, from which we got greatly inspired.
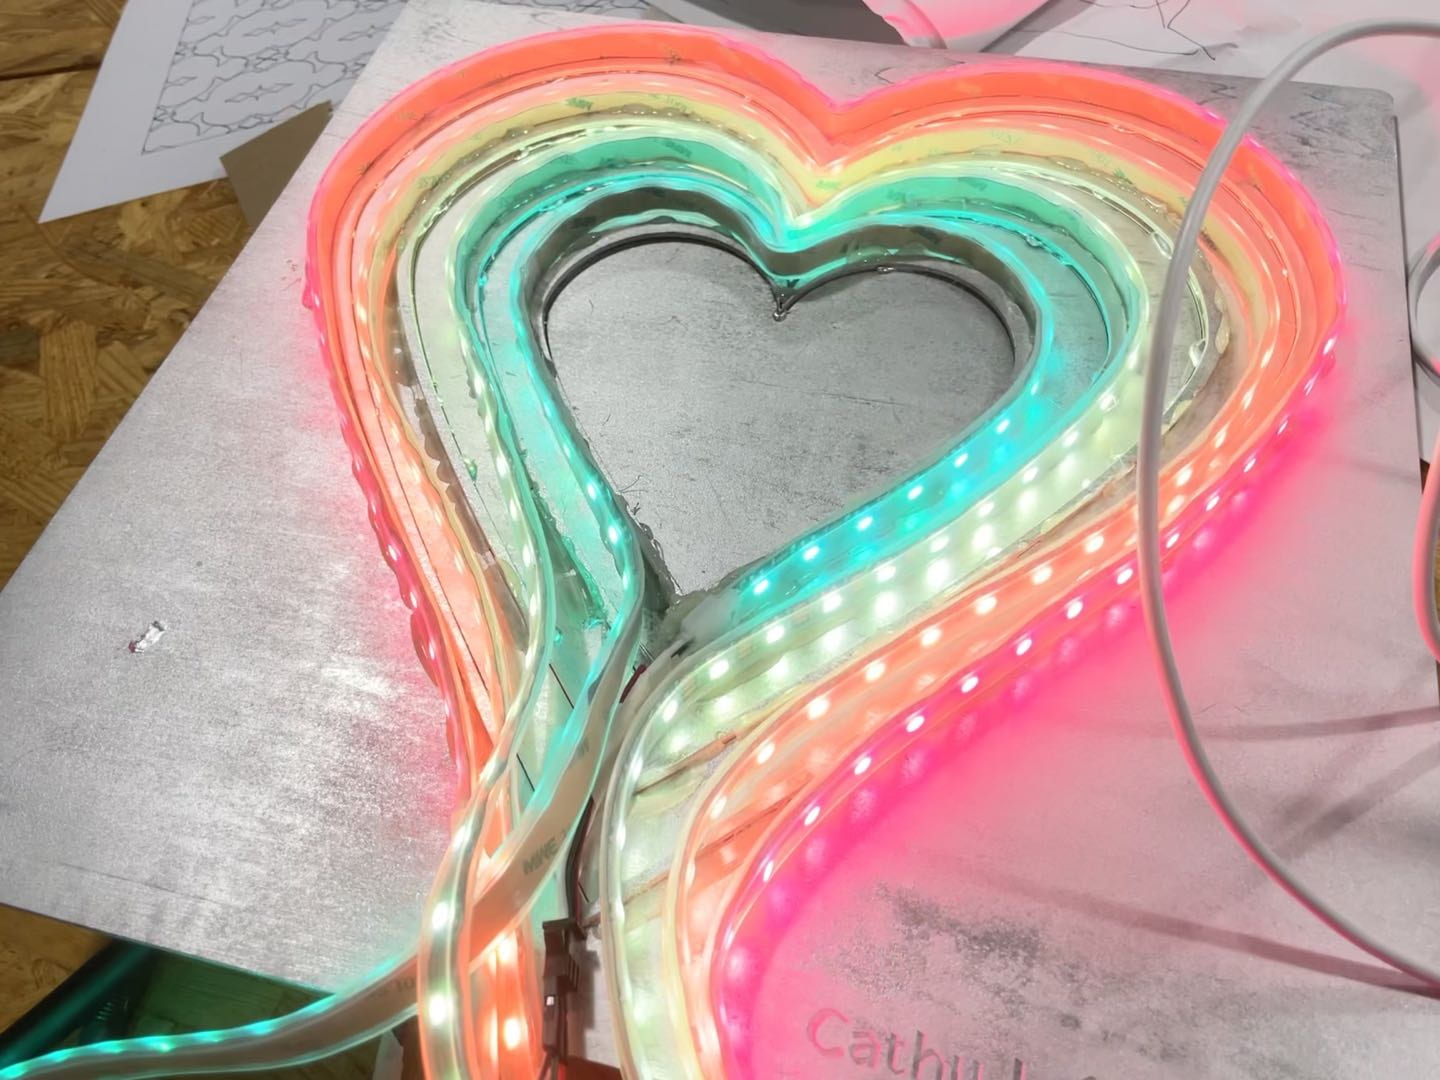
I mainly took responsibility of the overall programming part and part of the fabrication and design works. I finished the modeling of the dash board by using thinkercad. Cathy and I also cooperated in the grouping of the project. The LED heart part took us a lot of work. We first used the glue gun to stick the LED Strips to the wooden tracks. But they fell off easily with slight stretches because the rubber cover over the strip was too smooth. So we used drills to made several holes around the track and used some metal lines to fasten the strips.
In the case of the poster, we came up with the idea together and I mainly did the searching work, while Cathy took most responsibility of designing.
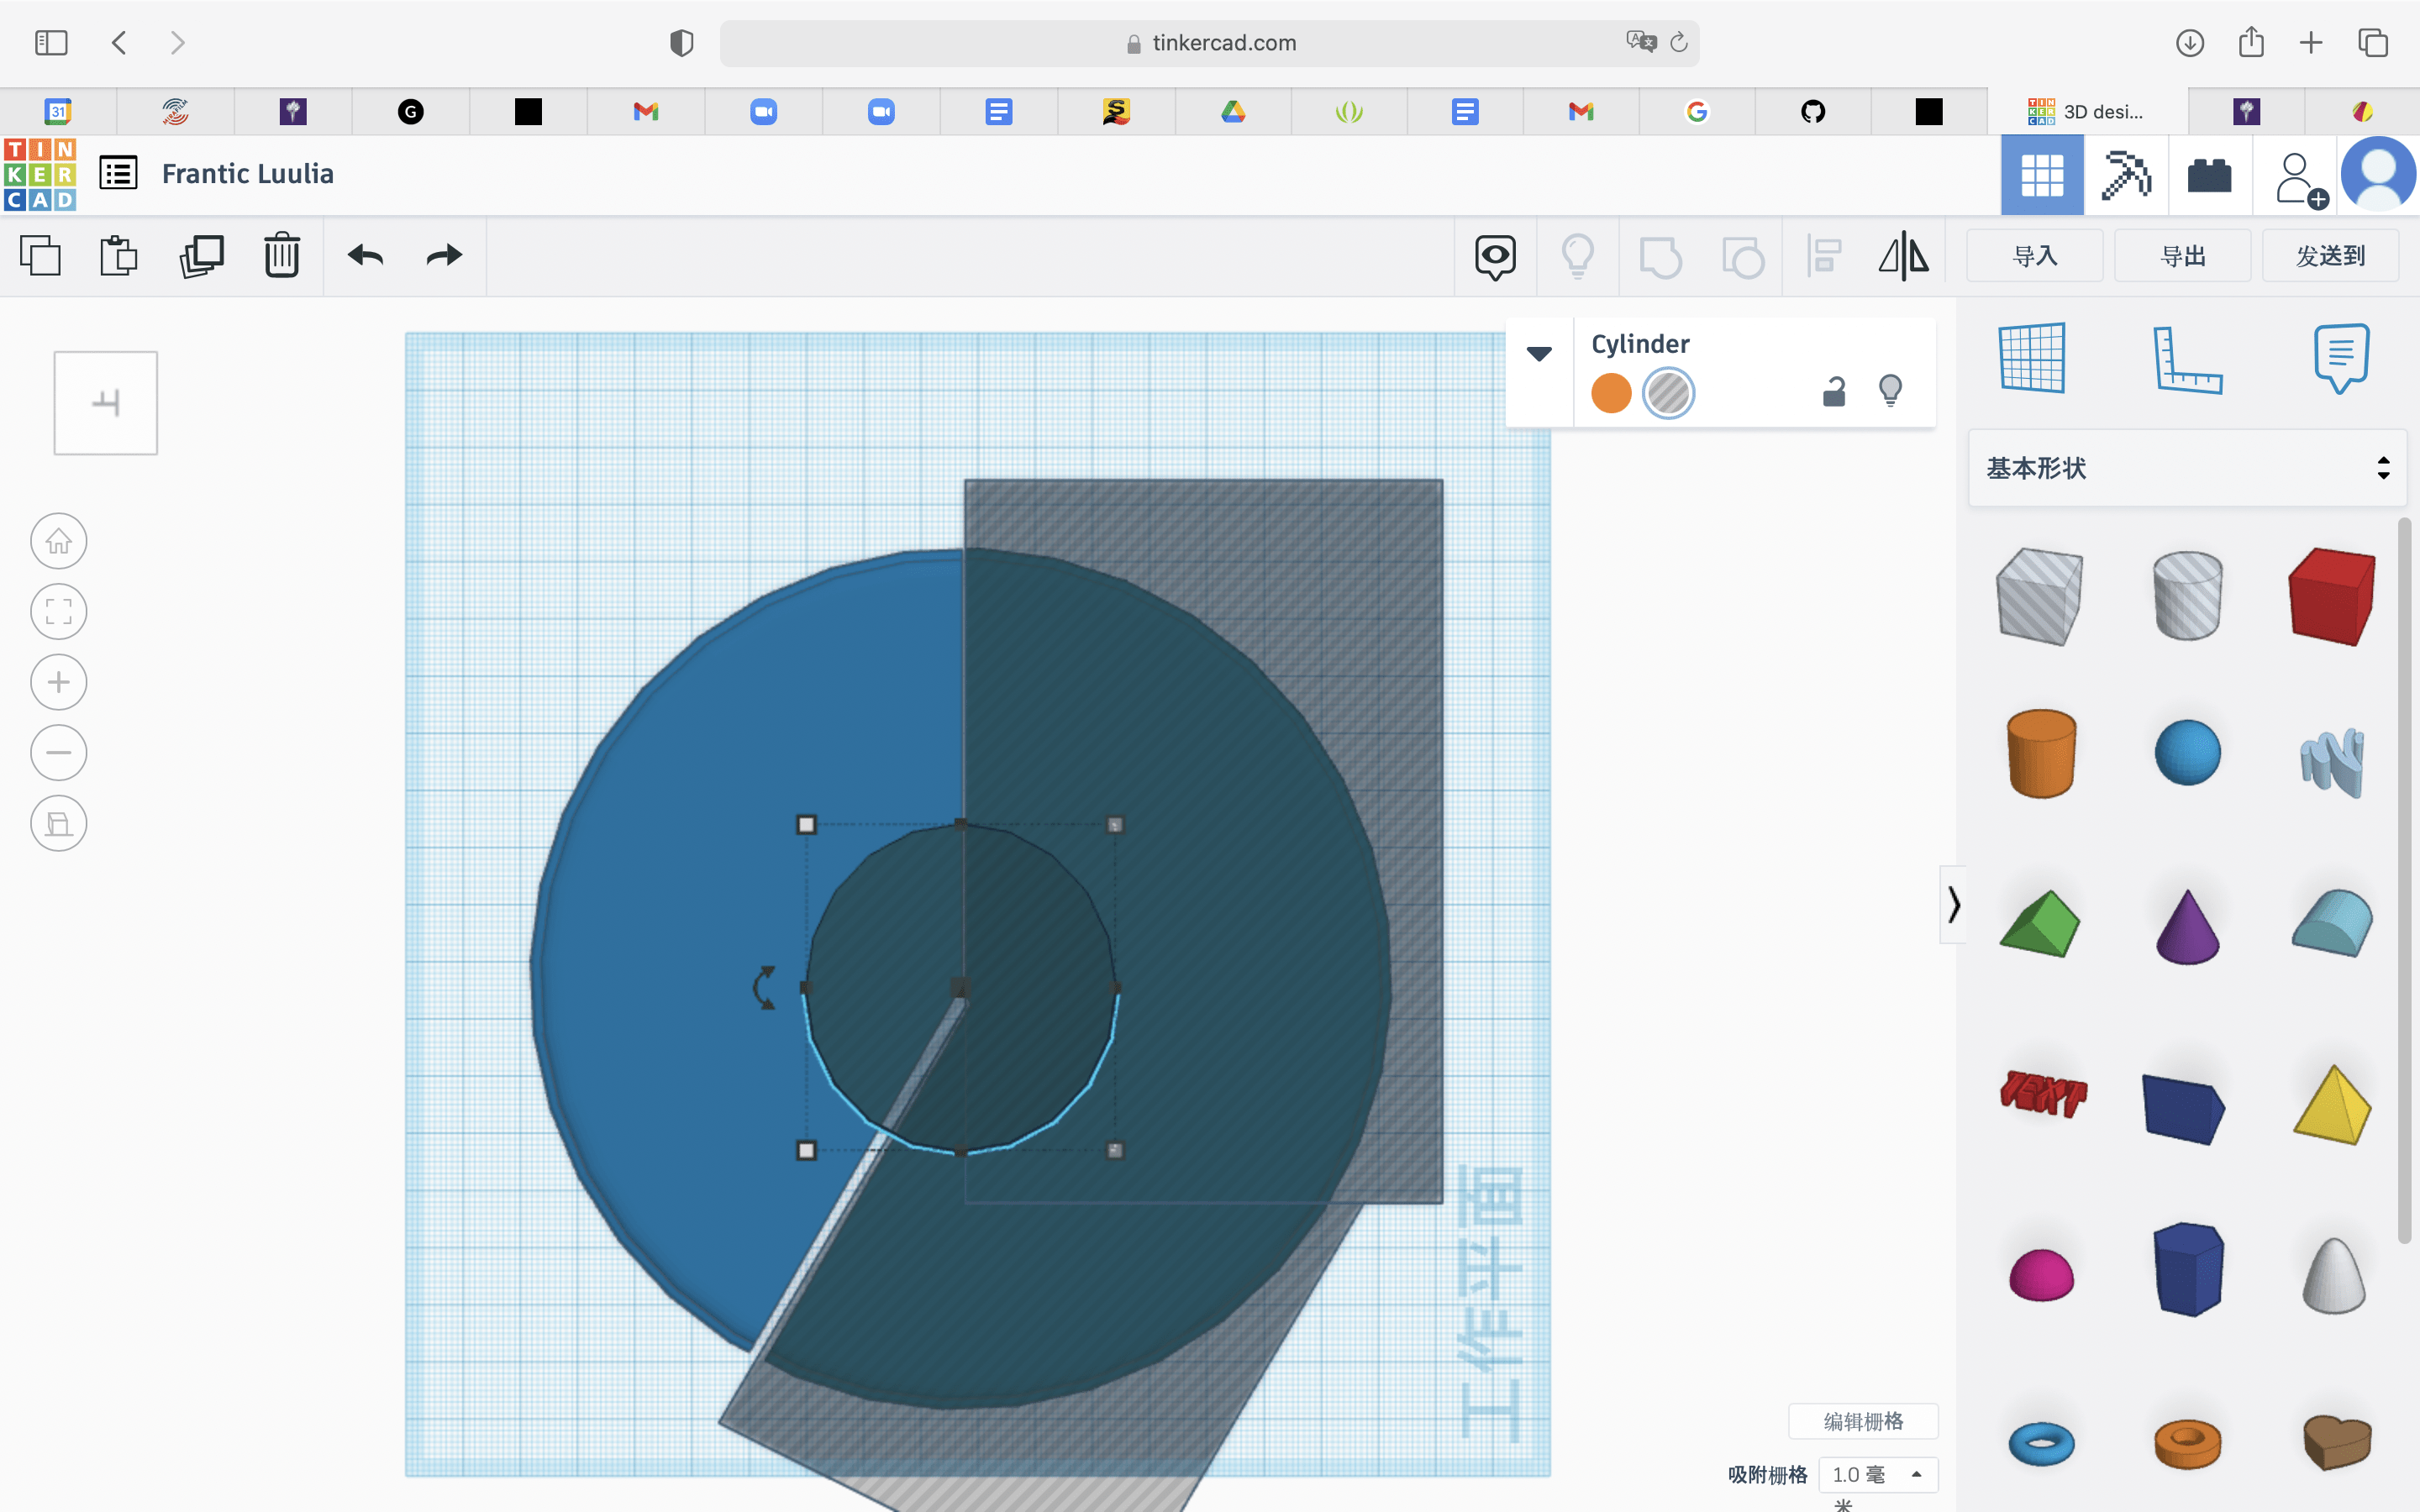
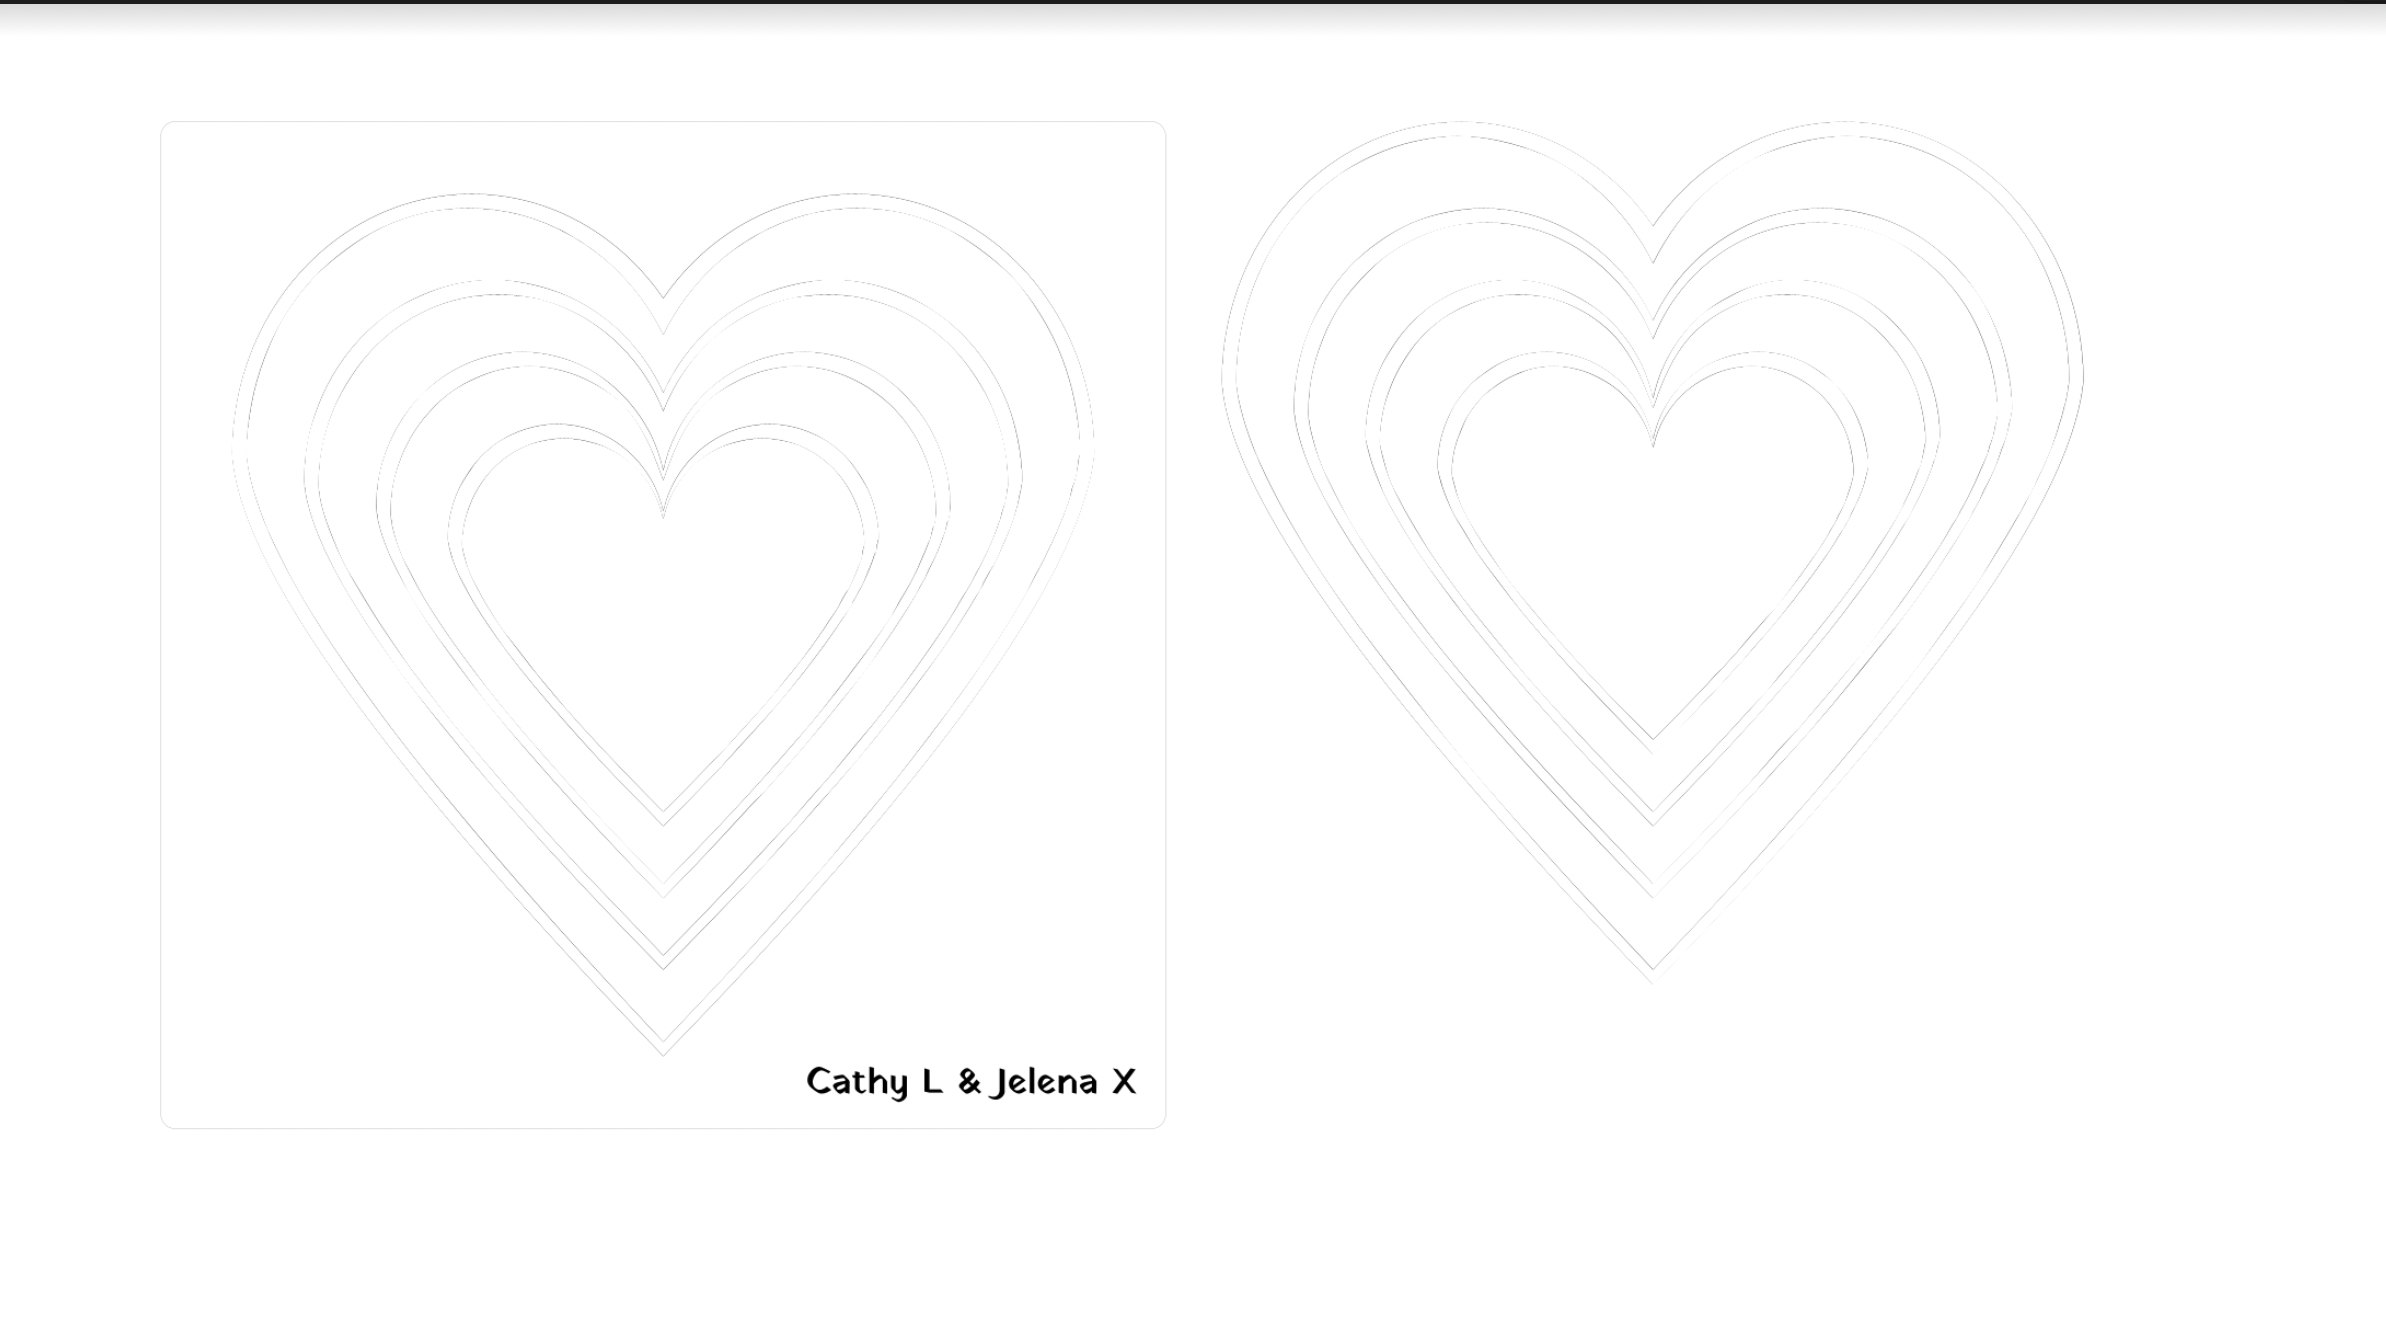
User Testing
The user testing session was significant to our project . During the session, we found that it would be much more interactive if it could be possible for users to explore more and visualize how they can affect their heartbeats, which is also a way of utilizing the big led heart we’ve made. So after the session, we decided to give up the idea of music pieces. We came up with the idea of matching each range of the FSR read to a certain interaction, guiding the user to try lifting their heartbeat with the specific movement. In this case, the MP3 player was no longer for music but for instructions, so we were still using the same equipments. What we did was adding a breadboard with four groups of LEDs in different color, with the rise of user’s heart rate , the four groups of LEDs will light up successively. Once the users managed to light up all the LEDs on the breadboard, it means SUCCESS!
—CONCLUSIONS—
The goal of our project was to visualize one of the individual features which is heart rate and the press force in this case, providing the user a great, customized chance to explore their own body features.
The point that I think our project was perfectly matching my definition of interaction is that it is highly customized for the reason that heart rate is unique for everyone. Once combined with the pressing force, which is possibly related to the mood, strength, pressing angle and many other subtle factors, it became even more unique. Also, with the “blind box” design, a little randomization was also added to the project, which added to the recreation and surprise of the project.
I’d say that our project failed to fulfill my definition of interaction about “A process for the designer to experience how your work communicate with participants and what the feedback is like.” In our project, as the designer, I can only see the user’s heart rate blinking, which is not sufficient to be seen as experiencing how my work communicate with participants.
During the presentation, the MP3 player messed up because we were sharing an SD card with another group, and the files somehow messed up within, which really made the interaction and user experience worse than expected.
However, there is also a lot of things that can be optimized to fit in better with my definition of interaction. For example, the feedback given to the users can be added. It might be also a great idea to try combining two or more heart-rate sensors to the device so that more users can engage in the progress together and see how they can interact and affect each other. It will also be great if we can make the instructions more interesting and more unexpected, which we have thought about but fail to achieve because we failed to get enough research on it. If there is more time, I’d like to research and experiment for more possibilities of changing a person’s heartbeat. For instance, how music, temperature, surrounding volume will affect heartbeats. Moreover, the breadboard in the centre of the huge heart was kind of ugly and destroyed the overall beauty and the light of the single LEDs are also hard to be observed as they are too dim compared to the bright LED Strips. What we can do to solve this problem is to utilize the nice LED strips we’ve got, maybe adding some programming things into it and make it light layer by layer with the increase of heart rate.
I really learned a lot from the project, either from the failure or from the accomplishments. First, when making the design, it is also important to think of the possibility of accomplishment considering the time and ability limit, sometimes it is better to focus on less things and go deeper into each part. Second, during the project, I learned a lot about how to accurately search for useful information on the internet, especially for Arduino. I also delightedly found that my understanding of Arduino coding increased greatly. I can not only understand most of the code but also tailor and write the code on my own to cater to my needs, which is really a great progress for me. Thirdly, I also got an overall knowledge on how to use the layer cutter, 3D printer and many other devices for fabrication work, as well as knowing how to do the design and modeling work with Gravit and Thinkercad. Last but not least, I enjoyed a lot during the whole process and felt a lot of happiness even though there were failures and late night working. It also further triggered my interest in IMA as well as getting a great partner and friend!
—About The Project—
Poster:
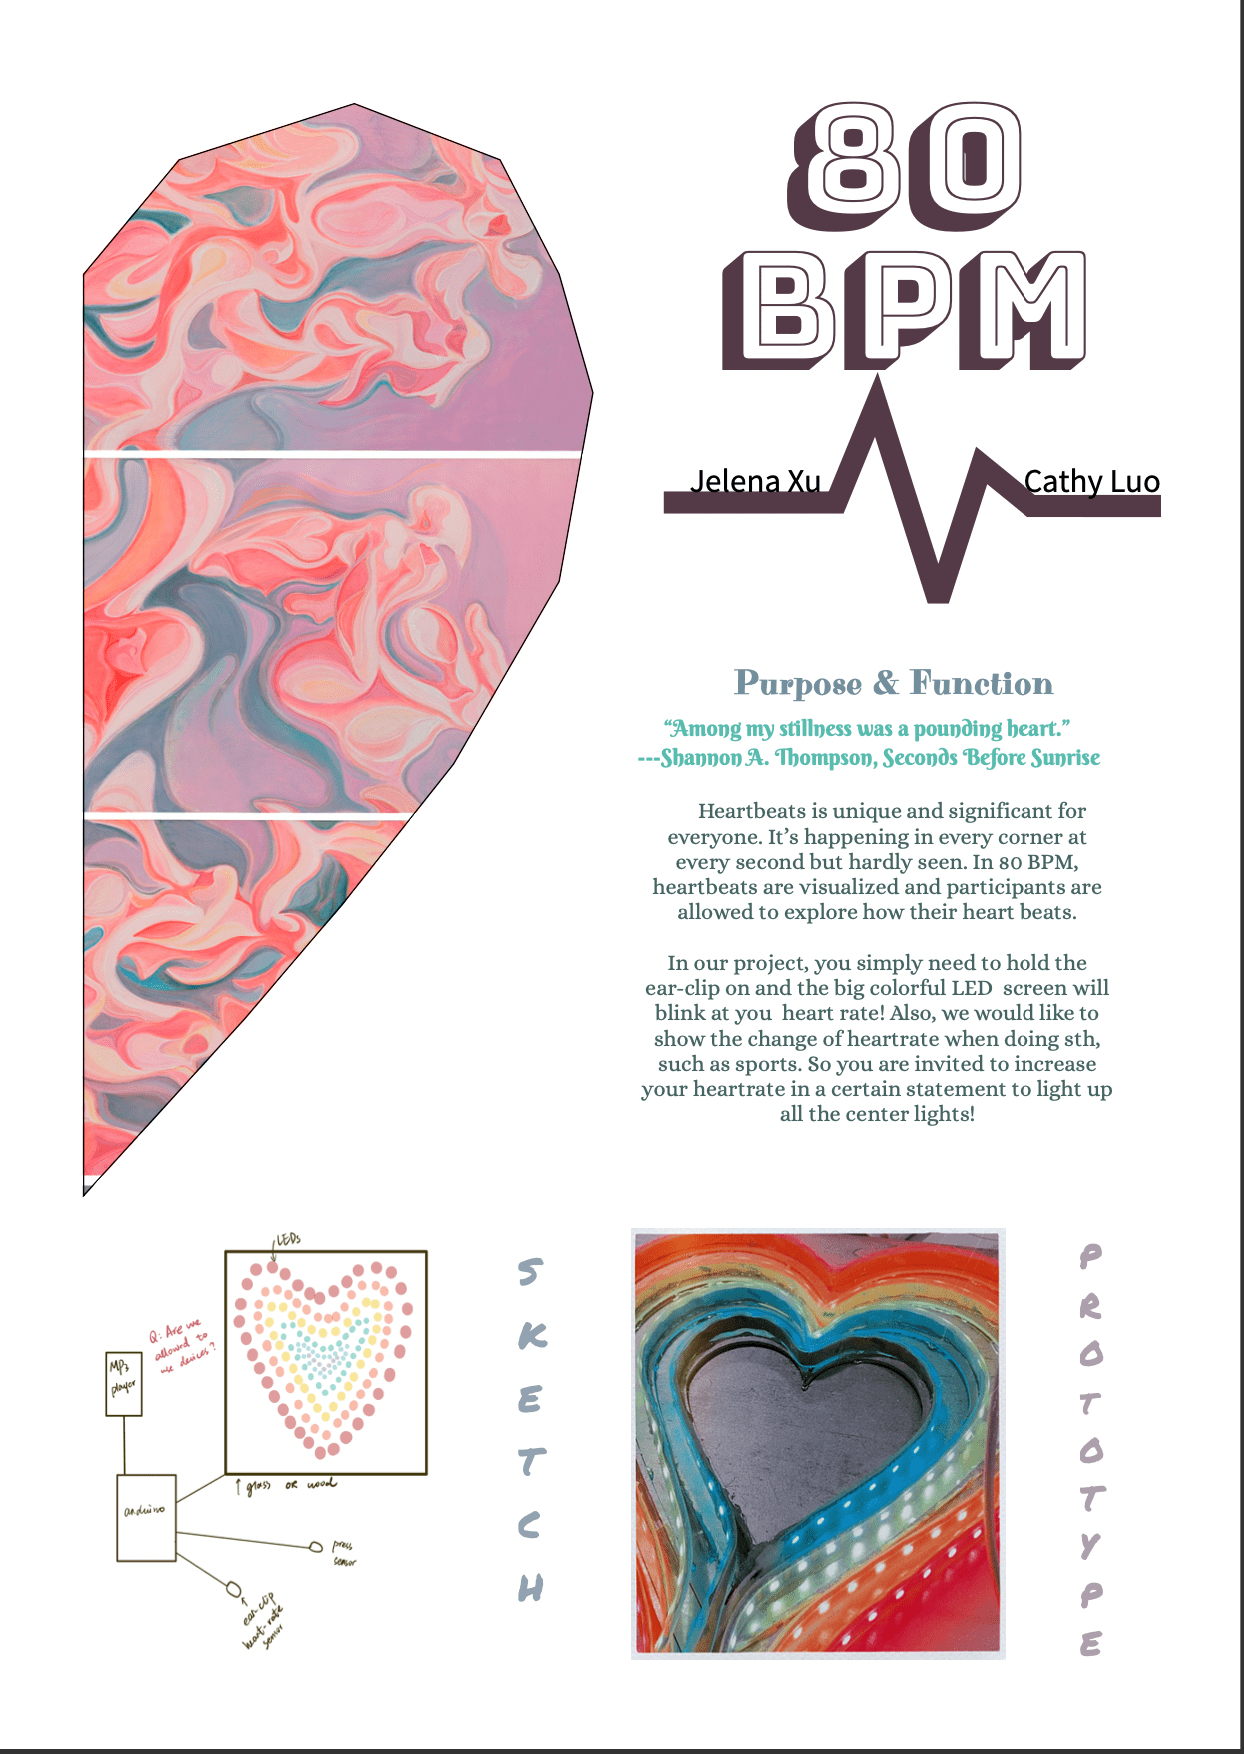
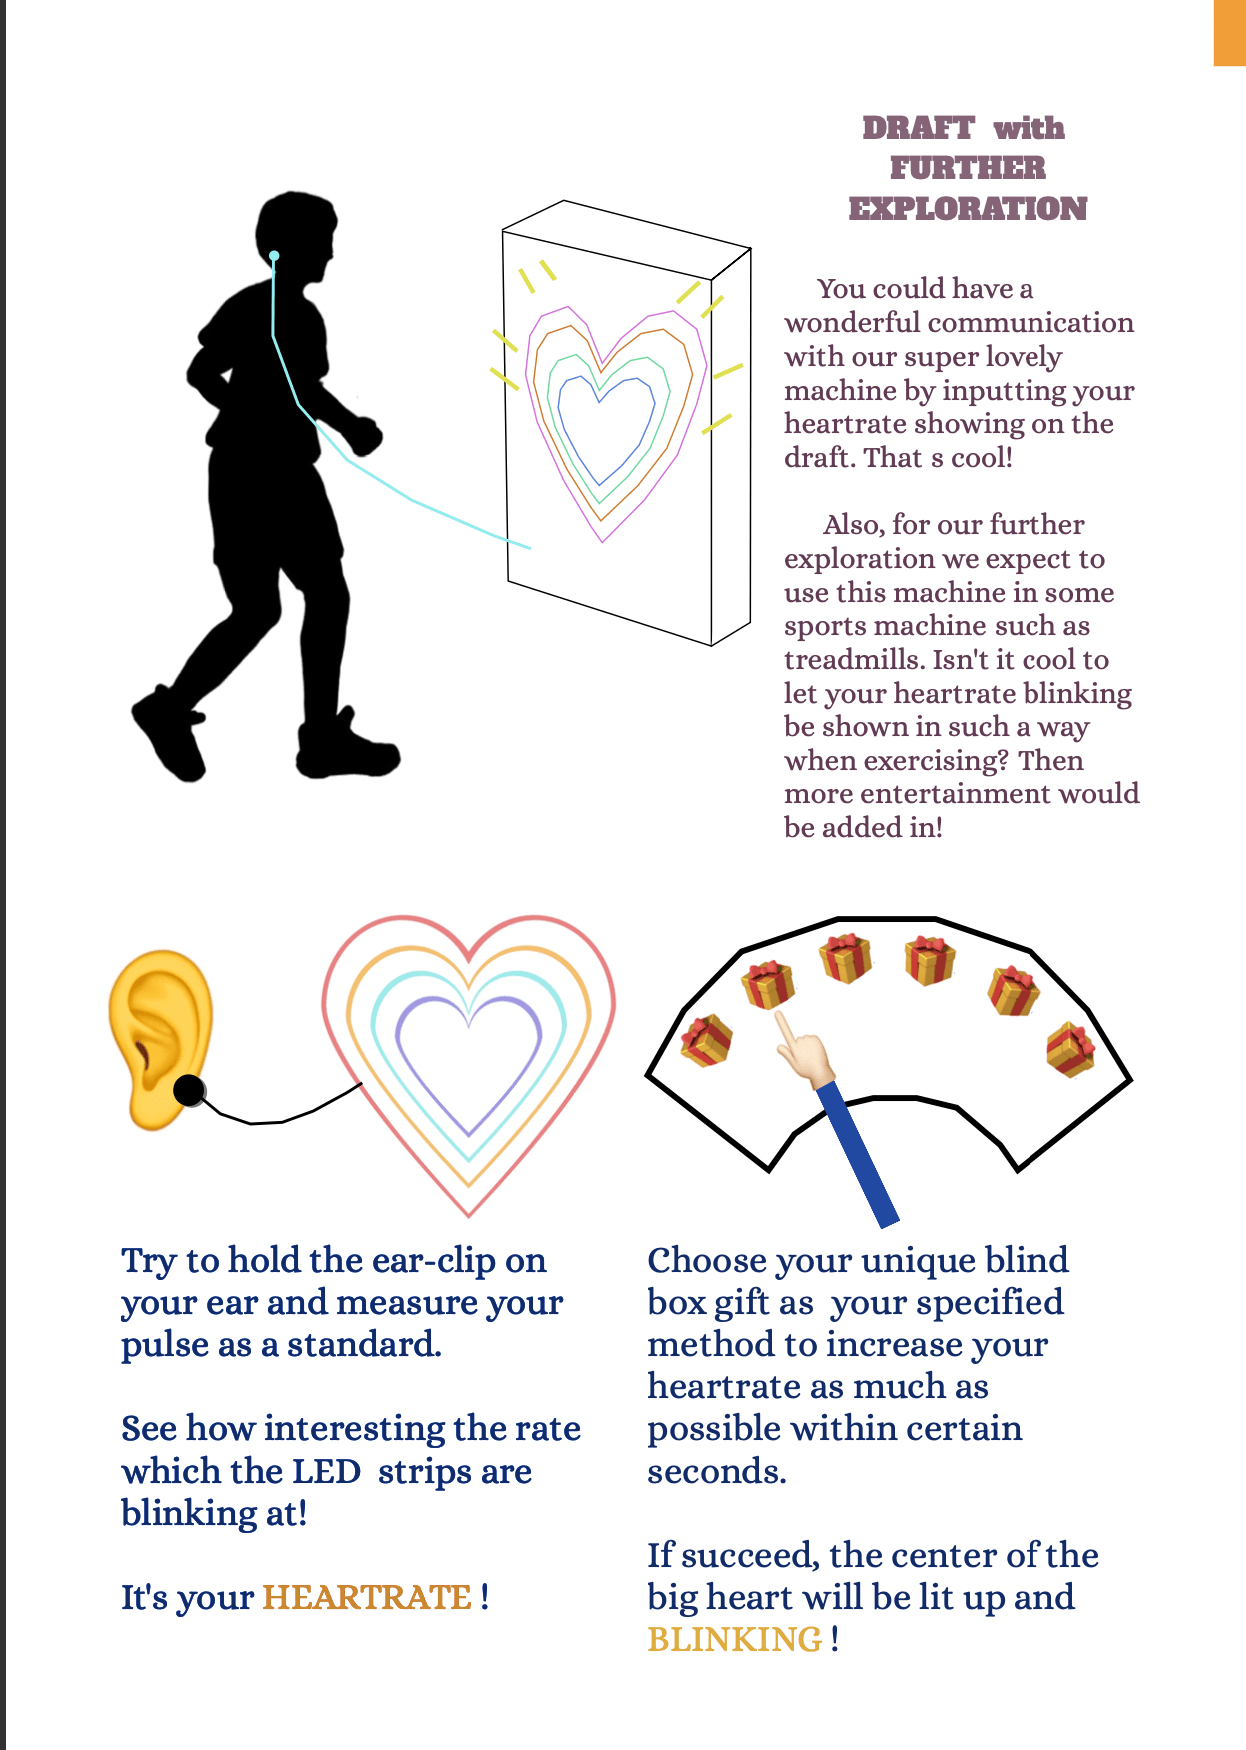
Image:
Video:
CODE:
// Function: This program can be used to measure heart rate, the lowest pulse in the program be set to 30.
//         Use an external interrupt to measure it.
// Hardware: Grove - Ear-clip Heart Rate Sensor, Grove - Base Shield, Grove - LED
// Arduino IDE: Arduino-1.0
// Author: FrankieChu
// Date: Jan 22, 2013
// Version: v1.0
// by www.seeedstudio.com
//Heart rate
#define LED 13//indicator, Grove - LED is connected with D4 of Arduino
//xboolean led_state = LOW; //state of LED, each time an external interrupt
//will change the state of LED
unsigned char counter;
unsigned long temp[21];
unsigned long sub;
bool data_effect = true;
unsigned int heart_rate;//the measurement result of heart rate

const int max_heartpluse_duty = 2000;//you can change it follow your system's request.
//2000 meams 2 seconds. System return error
//if the duty overtrip 2 second.

//LED Strip
// NeoPixel Ring simple sketch (c) 2013 Shae Erisson
// Released under the GPLv3 license to match the rest of the
// Adafruit NeoPixel library

#include <Adafruit_NeoPixel.h>
#ifdef __AVR__
#include <avr/power.h> // Required for 16 MHz Adafruit Trinket
#endif

// Which pin on the Arduino is connected to the NeoPixels?
#define PINs1        6 // On Trinket or Gemma, suggest changing this to 1
#define PINs2        5
#define PINs3        4
#define PINs4        3

// How many NeoPixels are attached to the Arduino?
#define NUMPIXELS1 60 // Popular NeoPixel ring size
#define NUMPIXELS2 60
#define NUMPIXELS3 60
#define NUMPIXELS4 60


// When setting up the NeoPixel library, we tell it how many pixels,
// and which pin to use to send signals. Note that for older NeoPixel
// strips you might need to change the third parameter -- see the
// strandtest example for more information on possible values.
Adafruit_NeoPixel pixels1(NUMPIXELS1, PINs1, NEO_GRB + NEO_KHZ800);
Adafruit_NeoPixel pixels2(NUMPIXELS1, PINs2, NEO_GRB + NEO_KHZ800);
Adafruit_NeoPixel pixels3(NUMPIXELS1, PINs3, NEO_GRB + NEO_KHZ800);
Adafruit_NeoPixel pixels4(NUMPIXELS1, PINs4, NEO_GRB + NEO_KHZ800);

#define DELAYVAL 500 // Time (in milliseconds) to pause between pixels

long int blinkTime = 200;
long int blinkStartTime = 0;
boolean lightsOn = false;
int prevCounter = 0;

//Servo
int fsrAnalogPin = 0; // FSR is connected to analog 0
int fsrReading;      // the analog reading from the FSR resistor divider
int servo=9;
int val;

//MP3
#include <Arduino.h>
#include "DYPlayerArduino.h"
#include <SoftwareSerial.h>

SoftwareSerial SoftSerial(10, 11);  //RX and TX from Arduino
DY::Player player(&SoftSerial);     //should connect them to io0 and io1

//LEDs
int led1 = 7;
int led2 = 8;
int led3= 12;
int led4 = 13;

void setup()
{

  pixels1.begin(); // INITIALIZE NeoPixel strip object (REQUIRED)
  pixels2.begin();
  pixels3.begin();
  pixels4.begin();


  //  pixels1.clear(); // Set all pixel colors to 'off'
  //  pixels2.clear();
  //  pixels3.clear();
  //  pixels4.clear();

  pinMode(LED, OUTPUT);
  Serial.begin(9600);
  Serial.println("Please ready your chest belt.");
  delay(5000);
  arrayInit();
  Serial.println("Heart rate test begin.");
  attachInterrupt(0, interrupt, RISING);//set interrupt 0,digital port 2


  Serial.begin(9600);   // We'll send debugging information via the Serial monitor
  pinMode(6, OUTPUT);
  analogWrite(servo, 250);

  Serial.begin(9600);
  Serial.println("Starting the Player...");
  delay(50);
  player.begin();
  player.playSpecified(9);
  player.setVolume(30);

  pinMode(7,OUTPUT);
  pinMode(8,OUTPUT);
  pinMode(12,OUTPUT);
  pinMode(13,OUTPUT);
}


void loop()
{

  fsrReading = analogRead(fsrAnalogPin);
  Serial.print("Analog reading = ");
  Serial.println(fsrReading);

  val=analogRead (A0);

  int x;
  // we'll need to change the range from the analog reading (0-1023) down to the range
  // used by analogWrite (0-255) with map!

  x = map(val, 0, 600, 90, 220);
//   LED gets brighter the harder you press
  Serial.println(x);

  analogWrite(servo, x);

  delay(50);


  if(counter != prevCounter) {
    blinkStartTime = millis();
    lightsOn = true;
    Serial.println("lights on");
    prevCounter = counter;
    pixels1.fill(pixels1.Color(198, 0, 211), 0, 60);
    pixels2.fill(pixels1.Color(255, 70, 160), 0, 60);
    pixels3.fill(pixels1.Color(67, 220, 220), 0, 60);
    pixels4.fill(pixels1.Color(0, 91, 255), 0, 60);
    pixels1.show();
    pixels2.show();
    pixels3.show();
    pixels4.show();
  }

  if(millis() - blinkStartTime > blinkTime) {
    lightsOn = false;
    Serial.println("lights off");
    pixels1.fill(pixels1.Color(0, 0, 0), 0, 60);
    pixels2.fill(pixels1.Color(0, 0, 0), 0, 60);
    pixels3.fill(pixels1.Color(0, 0, 0), 0, 60);
    pixels4.fill(pixels1.Color(0, 0, 0), 0, 60);
    pixels1.show();
    pixels2.show();
    pixels3.show();
    pixels4.show();
  }

  delay(50);
  if(fsrReading>80 && fsrReading<=110){
    player.begin();
    player.playSpecified(4);
    player.setVolume(30);
  }
 else if(fsrReading>110 && fsrReading<=130){
    player.begin();
    player.playSpecified(5);
    player.setVolume(30);
 }
 else if(fsrReading>130 && fsrReading<=145){
    player.begin();
    player.playSpecified(6);
    player.setVolume(30);
 }
else if(val>145 && val<=160){
    player.begin();
    player.playSpecified(7);
    player.setVolume(30);
 }
 else if(val>160){
    player.begin();
    player.playSpecified(8);
    player.setVolume(30);
 }
  if (heart_rate>=90 && heart_rate<100){
    digitalWrite(7, HIGH);
    digitalWrite(8, LOW);
    digitalWrite(13,LOW);
    digitalWrite(12, LOW);
    }
    else if (heart_rate>=100 && heart_rate<110){
    digitalWrite(7, HIGH);
    digitalWrite(8,HIGH);
    digitalWrite(13,LOW);
    digitalWrite(12, LOW);
    }
    else if (heart_rate>=110 && heart_rate<150){
    digitalWrite(7, HIGH);
    digitalWrite(8,HIGH);
    digitalWrite(13,HIGH);
    digitalWrite(12, LOW);
    }
    else if (heart_rate>=150){
    digitalWrite(7, HIGH);
    digitalWrite(8,HIGH);
    digitalWrite(13,HIGH);
    digitalWrite(12, HIGH);
    }

    delay(20000);
    if (heart_rate>=150){
    player.begin();
    player.playSpecified(10);
    player.setVolume(30);
    }
    else{
    player.begin();
    player.playSpecified(11);
    player.setVolume(30);
    }
}


//  if(analogRead>0 && analogRead<=70){
//    player.begin();
//    player.playSpecified(4);
//    player.setVolume(30);
//  }
// else if(analogRead>70 && analogRead<=130){
//    player.begin();
//    player.playSpecified(5);
//    player.setVolume(30);
// }
// else if(analogRead>130 && analogRead<=200){
//    player.begin();
//    player.playSpecified(6);
//    player.setVolume(30);
// }
//else if(analogRead>200 && analogRead<=280){
//    player.begin();
//    player.playSpecified(7);
//    player.setVolume(30);
// }
// else if(analogRead>280 && analogRead<=360){
//    player.begin();
//    player.playSpecified(5);
//    player.setVolume(30);
// }
// else{
//   player.stop()
// }

/*Function: calculate the heart rate*/
void sum()
{
  if (data_effect)
  {
    heart_rate = 1200000 / (temp[20] - temp[0]); //60*20*1000/20_total_time
    Serial.print("Heart_rate_is:\t");
    Serial.println(heart_rate);
  }
  data_effect = 1; //sign bit
}
/*Function: Interrupt service routine.Get the sigal from the external interrupt*/
void interrupt()
{
  temp[counter] = millis();
  Serial.println(counter, DEC);
  Serial.println(temp[counter]);
  switch (counter)
  {
    case 0:
      sub = temp[counter] - temp[20];
      Serial.println(sub);
      break;
    default:
      sub = temp[counter] - temp[counter - 1];
      Serial.println(sub);
      break;
  }
  if (sub > max_heartpluse_duty) //set 2 seconds as max heart pluse duty
  {
    data_effect = 0; //sign bit
    counter = 0;
    Serial.println("Heart rate measure error,test will restart!" );
    arrayInit();
  }
  if (counter == 20 && data_effect)
  {
    counter = 0;
    sum();
  }
  else if (counter != 20 && data_effect)
    counter++;
  else
  {
    counter = 0;
    data_effect = 1;
  }
}
/*Function: Initi/alization for the array(temp)*/
void arrayInit()
{
  for (unsigned char i = 0; i < 20; i ++)
  {
    temp[i] = 0;
  }
  temp[20] = millis();
}
References:
https://www.makerguides.com/fsr-arduino-tutorial/
https://github.com/ima-nyush/interaction-lab/blob/main/DYplayer/readme.md
https://github.com/adafruit/Adafruit_NeoPixel
https://wiki.seeedstudio.com/Grove-Ear-clip_Heart_Rate_Sensor/