Context and Significance
After reading “The Art of Interactive Design” by Chris Crawford in the previous group project, I realized that interactive products are similar to a good conversation. It would be better if the project combined both the interactions between the users and the projects and the interactions between the users via the products. My team partner Robert Cen, as a card player, prompted that we could do a card dealer since the servo and motor in the previous recitations could be useful in making the outputs. Initially, it started with a running race but after the User Testing, we changed it to Drum Master. The details of User Testing will be covered in Fabrication and Production. The significance of our project is that the card is for the loser of the race in the interactive game and we created a system of workout instructions for the poker cards to enhance interactivity. After all, you lost, indicating you need more exercise. If one of the players loses the race then they will have to do the workout as the instructions given by the card dealt with by the card dealer. For instance, the loser would have to do 5 push-ups if the card is Heart 5. We believe the target audience is the people who would like to make the workout fun and the game and the card instructions are capable of meeting the expectations.
Conception and Design
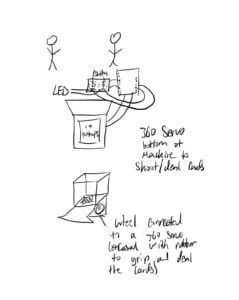
Originally, the project would be a racing game plus a card dealer for exercise penalty. The two players run to the project and the one who gets to the project first wins. The loser will be assigned a card as the penalty to do the workout. We thought that the first interaction could be the distance sensor sensing the distance between the project and the players. The distance sensor measures how close the player is to the project, making it the most direct measurement for the race. Then the card dealer would give out the card through the servo and the motor. The cardboard in the IMA studio is useful for structuring the card dealer and the sensor. The springs can be stuffed in the cardboard box to deal cards better when the card size decreases as the cards are shot out. As you can see, the main criteria was on the function. In other words, we came up with an idea and then thought about the gadgets that would realize the movements.
Fabrication and Production
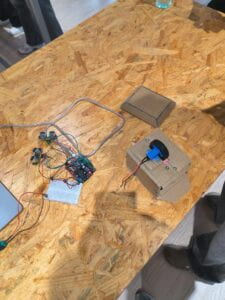
For the project, I mainly worked on the sensors, circuits, and code while my partner Robert focused on the cardboard and the card dealer. We would check on each other’s process give feedback to each other and combine the input and output together.
At first, we tried to use the distance sensor since it was about the running race.
//1

int triggerPin1 = 6;

int echoPin1 = 7;

long distance1;

//2

int triggerPin2 = 3;

int echoPin2 = 4;

long distance2;

int w=0;

int gamestate = 0;

//condition

void setup() {

Serial.begin(9600);


//set 1

pinMode(triggerPin1, OUTPUT);

pinMode(echoPin1, INPUT);

//set 2

pinMode(triggerPin2, OUTPUT);

pinMode(echoPin2, INPUT);

}

void loop() {

// additional 2 microsecond delay to ensure pulse clarity

//loop1

digitalWrite(triggerPin1, LOW);

delayMicroseconds(2);

digitalWrite(triggerPin1, HIGH);

delayMicroseconds(10);

digitalWrite(triggerPin1, LOW);

// pulseIn waits for signal to go from HIGH to LOW,

// timeout according to max range of sensor

//1

long duration1 = pulseIn(echoPin1, HIGH, 17400);

//loop2

digitalWrite(triggerPin2, LOW);

delayMicroseconds(2);

digitalWrite(triggerPin2, HIGH);

delayMicroseconds(10);

digitalWrite(triggerPin2, LOW);

//2

long duration2 = pulseIn(echoPin2, HIGH, 17400);

// sound travels roughly 29cm per microsecond so we divide by 29,

// then by 2 since we recorded sound both going forth and back

distance1 = duration1 / 29 / 2;

distance2 = duration2 / 29 / 2;

//conditions

//if 1 hits and 2 not hit

if(distance1 < 10 && distance1>0){

w = 1;


}elseif(distance2 < 10 && distance2>0){

// if 2 hits and 1 not hit

w = 2;


}

//print test

Serial.print("distance1:");

Serial.print(distance1);

Serial.print(" distance2:");

Serial.print(distance2);

// Serial.print("distance1:");
ab
//if not equal to 0, then someone won state 1

}
The code above helped us try out the distance sensor. The following video is a demonstration of how the distance sensors work.
https://drive.google.com/file/d/1N8KmzAkgbtwQXgIO-sxINK8QBiUO53Ay/view?usp=sharing
During the User Testing Session, we tried to deal the card with the card dealer. However, the card dealer was not working as expected, the cards were stuck in the machine and the distance sensors were not as efficient as we expected. If the distance is too far, the sensor cannot sense the player. Also, in the previous video, when I removed my hands, the distance suddenly changed from 13 to 65, detecting some mysterious object.
Fortunately, we received a lot of feedback from the users. Learning Assistant Amelia suggested that we change the sensor to a pressure sensor to set the time instead of measuring the distance. Professor Andy Garcia advised that the game should have a shortcut to restart and visual cues for the players to know the game is on. Other advice included that the card dealer spin card might not be as “intense” as the running race. Based on this feedback, the first adaptation is to switch the game to drum master. For the sensor, we tested both the vibration sensor and the pressure sensor. The vibration sensor detected the wave of the vibration:
https://drive.google.com/file/d/1ftOagVBww0U1Irg2I0dEF9ujkHdfjjfh/view?usp=drive_link
However, as shown in the video, it still activates vibrantly after I stopped interfering.
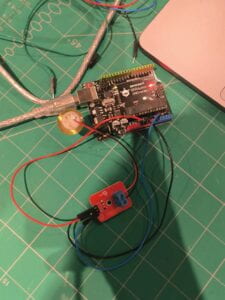
The pressure sensor detected the pressure on it:

https://drive.google.com/file/d/1NA8sgF-9jvrfJ7QWZwv-qqHg_C6so4Bl/view?usp=drive_link
It is more stable than the vibration sensor after the interaction. The second adaptation was to add a button to restart and the LED to visually cue the players who won. The winner side’s LED would be on.
https://drive.google.com/file/d/1p1xB9Z2ZvsD6ZM1OrtRD4usZwSPosZ3c/view?usp=drive_link
The problem that I encountered was how to stop the game when the time was up.
if(millis() - startTime >= 10000){
Serial.print("GAME OVER!");
// stop the game by setting an unreachable pressure
HIT1 = 1500;
HIT2 = 1500;
Originally, I wanted to use millis() – startTime == 10000, but it didn’t work as expected. Professor Garcia explained that the time was too instant to detect so it would be better to use >= instead. At the same time, Robert finished the servo and the card dealer. The servo is to point at the loser to cue them to get the card.
https://drive.google.com/file/d/1EByl1kbUEftUgMMsmoGYk8A_ulKXEGI_/view?usp=drive_link
https://drive.google.com/file/d/1vm4fDy9z9uS3PpRWr8NwClLSk-Cz21Ay/view?usp=drive_link
https://drive.google.com/file/d/1cu7FRDn5tT8iKJlijgMi9cB3aa4UrNL1/view?usp=drive_link
The final demonstration is shown in the following video and the code is attached.
https://drive.google.com/file/d/1_X0WzuAjVlsJ0AfuKvE4I6G3ZMHIEwu7/view?usp=drive_link
#include <Servo.h>

Servo myservo;

int servov;

int p1;

int p2;

int val;

int prevVal;

int count1 = 0;

int count2 = 0;

int HIT1 = 210;

int HIT2 = 50;

int winner;

long startTime;

long shuffleTime;

int ledPin1_GREEN = 9;

int ledPin2_RED = 10;

int shuffle = 5;

bool shuffled = false;

void setup() {

myservo.attach(11);

Serial.begin(9600);

pinMode(2, INPUT);

pinMode(ledPin1_GREEN, OUTPUT);

pinMode(ledPin2_RED, OUTPUT);

pinMode(shuffle, OUTPUT);

}

void loop() {

//timer

val = digitalRead(2);

if(prevVal == LOW && val == HIGH){

Serial.println("Pressed");

startTime = millis();

count1 = 0;

count2 = 0;

HIT1 = 210;

HIT2 = 50;

shuffled = false;

// digitalWrite(ledPin1_GREEN, LOW);

// digitalWrite(ledPin2_RED, LOW);

digitalWrite(ledPin1_GREEN, HIGH);

digitalWrite(ledPin2_RED, HIGH); // turn the LED on (HIGH is the voltage level)

delay(1000); // wait for a second

digitalWrite(ledPin1_GREEN, LOW);

digitalWrite(ledPin2_RED, LOW); // turn the LED off by making the voltage LOW

delay(1000);

digitalWrite(shuffle, LOW);

myservo.write(90);

}

prevVal = val;

// read the input on analog pin 0 GREEN

p1 = analogRead(A1);

// print out the value of the sensor

Serial.print("player1:");

Serial.print(p1);

if(p1>HIT1){

count1 += 1;

}

Serial.print(" 1Hits:");

Serial.print(count1);

// delay for stability

delay(10);

// read the input on analog pin 0 GREEN

p2 = analogRead(A0);

// print out the value of the sensor

Serial.print(" player2:");

Serial.println(p2);

if(p2>HIT2){

count2 += 1;

}

Serial.print(" 2Hits:");

Serial.print(count2);

// delay for stability

delay(60);

//GAME OVER AFTER 10 SECONDS

if(millis() - startTime >= 10000){

Serial.print("GAME OVER!");

// stop the game by setting an unreachable pressure

HIT1 = 1500;

HIT2 = 1500;

if(count1>count2){

Serial.print("1 win!!!!!!");

digitalWrite(ledPin1_GREEN, HIGH);

digitalWrite(shuffle, HIGH);

myservo.write(0);

}elseif(count2>count1){

Serial.print("2 win!!!");

digitalWrite(ledPin2_RED, HIGH);

myservo.write(180);

}else{

Serial.print("DRAW!!!");

digitalWrite(ledPin1_GREEN, HIGH);

digitalWrite(ledPin2_RED, HIGH);

myservo.write(90);

}

if((count1>count2 || count2>count1) && shuffled == false){

digitalWrite(shuffle, HIGH);

shuffleTime = millis();

shuffled = true;

}

if(millis() - shuffleTime >= 3000 && shuffled){

digitalWrite(shuffle, LOW);

myservo.write(90);

}

}

}
The adaptations, the drum game, and the visual cues worked mostly as expected. The game is easier to monitor with straightforward winners and losers. The visual cues could show who won and who needed to do the exercise.
Conclusion
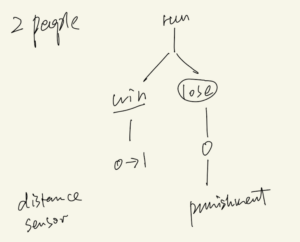
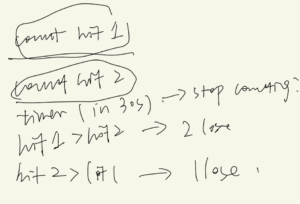
The project is called Deal A Workout. The 2 players try to hit the drum as fast as they can after they press the button and the lights go off. After 10 seconds, the game stops. The winner side’s LED will be on and the arrow will point at the loser. The card dealer will work for 3 seconds. The loser needs to get the card and do the exercise as the card indicates. Spades mean jumping jacks; hearts mean push-ups; clubs mean squats; diamonds mean burpees. For instance, if it is Heart 5, the loser needs to do 5 push-ups. If you press the button, the game starts again. The project aligns with my definition of interaction because the project responds to the users’s behaviors and the users can have an activity afterward. Ultimately, the audience interacted with the project mostly. I would improve the project in aesthetics, visual and sound cues, and the card dealer if we had more time. First, the wires could be hidden in some boxes rather than exposed to air. That would make the project more organized. In addition, the physical cues could be more obvious. The audience might not realize that the game has stopped as the LED is not that obvious. Especially, it might be difficult for the loser to know that since only the winner side’s LED will be on. We could add a buzzer to notify the players that the game is over. I have learned from the setbacks that the most direct instinct might not be the most practical approach to realizing the expectations. Sometimes, it might take some detours to make it. For this project, we changed 3 types of sensors from the most intuitive distance sensor to the pressure sensor. It took some time to realize that. Furthermore, the timer setting is another example. The game should stop after 10 seconds. The most instant one would be to stop it when it reaches 10 seconds. But in practice, it should be when the time is over 10 seconds. The takeaway from my accomplishments is that the logic of the conditions is not that scary as long as you have a flowchart.
Disassembly
Trash and the stuff we returned.


Appendix
Testing the outcomes for the win-lose two pressure sensors.
https://drive.google.com/file/d/1Iv_S2eF4CBAoF8aUO3G9Jx12ZiZ3Rxod/view?usp=drive_link