A. Star Dance – Jaidyn Perry – Eric
B. Context and Significance
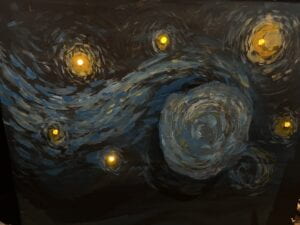
This project was impacted by the definition of interaction that I learned from the readings for the first group project. Ever since then I have thought of interaction as a conversation between the object and the user, so for this project I wanted to take something that is full of emotion, namely art, and allow the user to have a physical conversation with it. This is what makes our project unique, we have taken a painting that utilizes classical and traditional media, and turned it into something that all can interact with. This project is intended for people that love art, but also those that don’t, or those that may not understand it fully. I had the opportunity to see The Starry Night in person in New York, and although it was a powerful experience for me, I took note that some others around me were regarding it as not that impressive, and that they didn’t understand it. This is what I thought of when thinking about an interactive project, that maybe we could find a way to bring a still painting to life and let more people experience the emotion and life within it.

C. Conception and Design
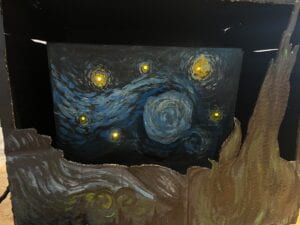
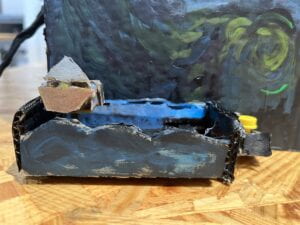
We knew from the beginning that we wanted our users to be able to interact with the project using their arms. The Starry Night specifically has a lot of movement within it with the wind, so we wanted to focus on that. Then we began thinking about how to combine the two things, with the arms and the wind. We originally were thinking of using some sort of projection, but we ended up deciding that it was better for the project requirements if we were to use the stepper motor that we learned about in class, as well as creating the painting with traditional art mediums. We thought that the stepper motor alone was not enough to create a project that is complete enough for midterms, so we decided to also implement the LEDs to show the shining of the lights, this is where our name for the project came from. We also understood that people have a tendency to just touch the things that are in front of them, so we decided to make a box around all the moving parts, so that people would be more inclined to use the tools we give them instead of directly touching the painting. It also would give more of a 3D effect that further brings the painting to life.
D. Fabrication and Production
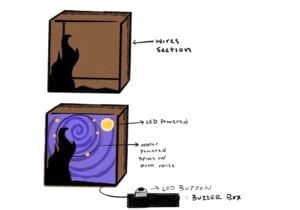
Our most significant steps were construction of the internal part of the painting, as well as the coding of the stepper motor. My partner and I worked together on the coding of the motor and LEDs, but our schedules contrasted greatly, and we rarely had time to work on the project with each other. Even so, we saved the most important aspects for our working together, and mainly focused on construction and painting when we were unable to work on the project at the same time. When we were unable to be together in person, we were in contact on WeChat and made sure to ask each other for advice, and solutions to any problems we faced. As for failures, we had a lot of them when it came to the motor. Coding it was much harder than we originally thought, and as time went on and we were unable to figure it out with the help of each other, I took up spending most of my focus on the code of the motor. I looked through the ARDUINO forums and examples, as well as got the help of multiple professors and learning assistants. Professor Gottfried helped me to take all the x,y and z values being taken in by the accelerometer and put them into one value, so that we could use conditionals to change the action of the motor based on the value given by the accelerometer.
//motor
xvalue = analogRead(xpin);int x = map(xvalue, 267, 400, -100, 100);float xg = (float)x / (-100.00);// Serial.print(xg);// Serial.print("g ");yvalue = analogRead(ypin);int y = map(yvalue, 272, 406, -100, 100);float yg = (float)y / (-100.00);// Serial.print("\t");// Serial.print(yg);// Serial.print("g ");zvalue = analogRead(zpin);int z = map(zvalue, 277, 410, -100, 100);float zg = (float)z / (100.00);// Serial.print("\t");// Serial.print(zg);// Serial.println("g ");int diff = abs(xvalue - pxvalue) + abs(yvalue - pyvalue) + abs(zvalue - pzvalue);Serial.println(diff);
Our vision for the motor was that the user would have an accelerometer to hold, and then be able to control the speed of the spinning wind with the speed being picked up by the accelerometer. We were unable to get this done before the User Testing Session, so we settled for having the stepper motor run to new position when the accelerometer picks up a value greater than 100, but this was not as effective as we would have liked it to be.
// if (diff >= 100){// //stepper.runToNewPosition(500);// delay(10);// }// else {//stepper.runToNewPosition(0);
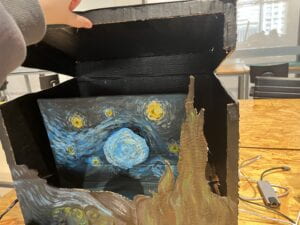
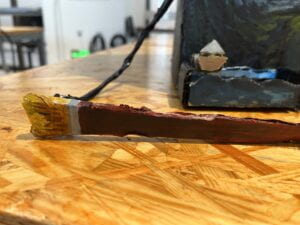
// delay(10);// }We spent so much time on our motor code that we did not have time to create the box around our project, so during the user testing, a lot of people grabbed onto the motor directly and tried to spin it around instead of reaching for the accelerometer. This helped us understand the importance of making something that would hide the accelerometer. We settled on making a paintbrush and making sure to build the box, and it ended up being very successful at stopping users from trying to directly touch the motor.
Professor Eric had also told us during the user testing that a big part of the success of our project would end up being the presentation. We took that very seriously and I think our presentation ended up being very successful. We are both passionate about art, and spent lots of time on the painting. After the user testing, Professor Eric also helped me with the code for the motor, which allowed our project to be much more successful.
if (diff > 8) {stepper.setSpeed(diff * 1.5);stepper.setAcceleration(500);if (stepper.distanceToGo() <= 0) {targetPos = targetPos + 100;stepper.moveTo(targetPos);}stepper.runSpeed();}E. Conclusions
The goals of this project were to bring to life one of our favorite artworks, and allow people that are less interested in art to still experience the beauty of it. Our project results align with my definition of interaction because the project is able to respond based on input from the user. Our project results do not align with my definition of interactive because not all of the project was able to be manipulated by the user, a lot of it was just static painting. The audience interacted with our project well, except the paintbrush was not entirely intuitive. Some people did not hold the brush by the handle, but instead by the bristles, which I think we could have fixed with a different design for the paintbrush instead of a flat bristled brush. If we had more time, we may have improved the project with the use of the fan that is in the Arduino kit as well as using an MP3 player to create a fuller effect. From our setbacks and failures I have learned about the importance of asking for help, and have found important resources such as the Arduino forums to assist me on future endeavors. From our accomplishments I take away the importance of creativity in projects, as well as the value of collaboration.
F. Annex
More Detail Pictures:
Link to User Testing Video here
Link to Video Showing All Functions here
Full Code:
#include <AccelStepper.h>#define ledOn LOW#define ledOff HIGHint DIR_PIN = 2;int STEP_PIN = 3;int EN_PIN = 4;int xpin = A3;int ypin = A2;int zpin = A1;int xvalue;int yvalue;int zvalue;int pxvalue;int pyvalue;int pzvalue;int ledPin = 9;int ledPin2 = 10;int ledPin3 = 11;int ledMoon = 6;int buttonPin = 12;int sensorValue = 0;int sensorPin = A0;/*** An LED that turns ON and OFF at different rates when button is held down.* This was adapted from a the tutorial found here:* https://forum.arduino.cc/t/solved-push-button-to-blink-led/657628/20*/int ledState = ledOff; // the current state of the LEDint previousState = LOW; // the previous buttonState from the button pinunsigned long buttonTime = 0; // The last time the output pin was toggledunsigned long debounceTime = 100; // debounceTime time (I am using a noisy button)long targetPos = 5;/*** AccelStepper reference source:*http://www.airspayce.com/mikem/arduino/AccelStepper/classAccelStepper.html#a9d917f014317fb9d3b5dc14e66f6c689*/AccelStepper stepper(AccelStepper::DRIVER, STEP_PIN, DIR_PIN);void setup() {Serial.begin(9600); // initialize the serial communications:pinMode(EN_PIN, OUTPUT);digitalWrite(EN_PIN, LOW);// The run() function will accelerate up to// the speed set herestepper.setMaxSpeed(2000);stepper.setCurrentPosition(5);stepper.moveTo(targetPos);// Set the desired constant speed for use with// runSpeed()// stepper.setSpeed(100);stepper.setAcceleration(500);pinMode(ledPin, OUTPUT);pinMode(ledPin2, OUTPUT);pinMode(ledPin3, OUTPUT);//moonpinMode(buttonPin, INPUT_PULLUP);pinMode(ledMoon, OUTPUT);}void loop() {//buttonint buttonState = digitalRead(buttonPin);if (buttonState != previousState && millis() - buttonTime > debounceTime) {ledState = !ledState;buttonTime = millis();}if (ledState == ledOn) {digitalWrite(ledMoon, (millis() >> 6) & 3); //Blink} elsedigitalWrite(ledMoon, ledOff);previousState = buttonState;// stepper.runSpeed();//LEDS, adapted from https://forum.arduino.cc/t/solved-push-button-to-blink-led/657628/20sensorValue = analogRead(sensorPin);analogWrite(ledPin, sensorValue / 4);analogWrite(ledPin2, sensorValue / 4);analogWrite(ledPin3, sensorValue / 4);//analogWrite(ledMoon, sensorValue / 4);// analogWrite(ledMoon, brightness);// delay(1);//motorxvalue = analogRead(xpin);int x = map(xvalue, 267, 400, -100, 100);float xg = (float)x / (-100.00);// Serial.print(xg);// Serial.print("g ");yvalue = analogRead(ypin);int y = map(yvalue, 272, 406, -100, 100);float yg = (float)y / (-100.00);// Serial.print("\t");// Serial.print(yg);// Serial.print("g ");zvalue = analogRead(zpin);int z = map(zvalue, 277, 410, -100, 100);float zg = (float)z / (100.00);// Serial.print("\t");// Serial.print(zg);// Serial.println("g ");int diff = abs(xvalue - pxvalue) + abs(yvalue - pyvalue) + abs(zvalue - pzvalue);Serial.println(diff);if (diff > 8) {stepper.setSpeed(diff * 1.5);stepper.setAcceleration(500);if (stepper.distanceToGo() <= 0) {targetPos = targetPos + 100;stepper.moveTo(targetPos);}stepper.runSpeed();}//stepper.runToNewPosition(targetPos);// stepper.run();// if (diff >= 100){// //stepper.runToNewPosition(500);// delay(10);// }// else {// delay(10);// }pzvalue = zvalue;pyvalue = yvalue;pxvalue = xvalue;delay(1);}