Midterm Project: Electronic Music Master
Electronic Music Master – Jae Yang – Andy Garcia
CONTEXT AND SIGNIFICANCE
Electronic Music Master is a special music station and people can use it to play tunes operating in an interesting way. In my previous group research, my team and I designed a device that could receive neural signals and transmit feedback from users. In this project, we designed the voice feedback according to the user’s left hand height, so that the user could adjust the left hand height according to the feedback to achieve the desired sound.
From my perspective, I will define interaction as an environment in or with which two actors can listen, think and speak to each other as a cycle. This environment is built with digital code and different elements which themselves remain their identity, which can make it have countless possibilities and also be automated easily. This project actually provides an environment where the audience can explore how the movements in their hands affect the music being played by the instrument. Throughout the course of the audience experience project, the control panel listens by sensing the shadow of the audience’s hand, tracks the movements to think and translate into an executive program that activates the instrument, and finally speaks by outputting the music.
This project is intended for all people who love music. Electronic Music Master is easy for everyone to make tunes even by just randomly move your hand up and down and does not require any music knowledge. There has already been many types of music stations but our project is easier to operate and make you act more like a DJ.
CONCEPTION AND DESIGN
Here is the initial sketch of Electronic Music Master.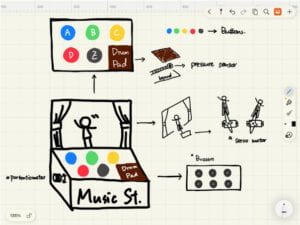
We decided to build a music station that could make electronic music, we considered the user would like to act like a DJ, with one of their hand up and down, and the other hand operating directly on the station. So we disigned the musical part according to these movements. We also made musical part and mechanism part separately so that though user can make a song with drum beats, they would not affect eacher when one of them does not need to be working. It is also clearer for users to operate this project and not feeling confused with matching the controllers and parts that responds. For the materials, we chose to use carboard to make the main body of the mucal part. We used a carboard cup holder from Starbucks as well for a container of Arduino and breadboard. Carboard is hard enough to protect and support the whole project but also easy for us to cut and build this box because we needed to cut out many spaces for buttons and the sensor. Besides, we tried to use the MP3 player to present different timbres. Then we found it very hard to download and store a large number of pitches in different sounds on an SD card and present them according to buttons and sensors. Finally we chose a grove speaker instead of that MP3 player.
FABRICATION AND PRODUCTION
When we decided to work on the way to my proposal, I built a simple version of circuit of musical part and we worked together on coding. We were not very good at coding and we asked a lot to friends and LAs in IMA studio. We almost spent a whole day on coding of musical part on Wednesday because luckily both of us were free on that day.
Here are two simple function tests of the button and distance sensor.
On the next day we made the outlook and completed the circuit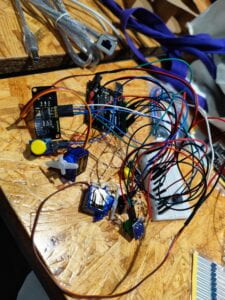 with multiplebuttons. Mostly we were working together at the same time. We cut the carboard according to the size of the carcoard cup holder and used hot glue to glue them together. As it happens, the arduino and the breadboard could fit perfectly inside the cupholder and the adaptor could get in from the back side. We did not glue the cover because we still wanted to improve our project after the user test.
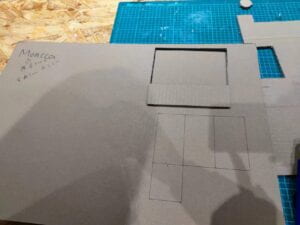
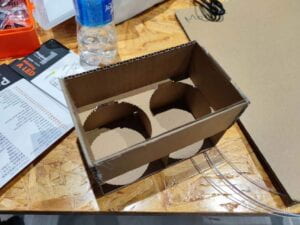
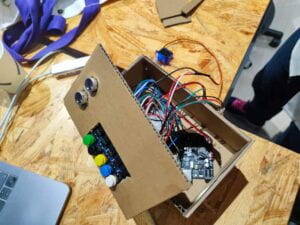
We had an accident in the user test. At first, people were very interesting about our project, but said we could think about how we could use this project to make real tunes rather than simple sounds. In the middle of the user test, our project suddenly stopped working. We checked the circuit connection and coding and found no problem. My partner had something to do on Monday so I worked alone in the studio. So I asked Andy how to solve the problem. Finally we found that there’s a dalay in coding of the servo motor that stopped the whole code. It would be tricky to solve this problem so I decided to remove the servo motor. Andy suggested us to add more sounds instead of the speaker and gave us many things including a metal tray, a metal bowl and a plastic bucket. Since we did not have much time to work, we only chose the step motor to make a “drum”. I connected the circuit of step motor and changed the sound of the buttons to make them more coherent and easier to make tunes. In the morning before class, my partner came to studio while I was having class. She made the mechanism part and hot-glued the cover after checking the code and connection. We tested several times before class and it was working correctly.
Here’s the code for musical part:
#include "pitches.h"
const int threshold = 10;  // minimum reading of the sensors that generates a note

// notes to play, corresponding to the 5 sensors:
int notesY[] = {
  NOTE_C4, NOTE_D4, NOTE_E4, NOTE_F4, NOTE_G4
};
int notesW[] = {
  NOTE_D5, NOTE_E5, NOTE_F5, NOTE_G5, NOTE_A6
};
int notesBlack[] = {
  NOTE_F3, NOTE_G3, NOTE_A4, NOTE_B4, NOTE_C4
};
int notesG[] = {
  NOTE_B3, NOTE_C3, NOTE_D3, NOTE_E3, NOTE_F3
};
int notesBlue[] = {
  NOTE_G4, NOTE_A5, NOTE_B5, NOTE_C5, NOTE_D5
};
// defines pins numbers
const int trigPin = 9;
const int echoPin = 10;
// defines variables
long duration;
int distance;

void setup() {
  pinMode(trigPin, OUTPUT);  // Sets the trigPin as an Output
  pinMode(echoPin, INPUT);   // Sets the echoPin as an Input
  Serial.begin(9600);        // Starts the serial communication
}

void loop() {
  // Clears the trigPin
  digitalWrite(trigPin, LOW);
  delayMicroseconds(2);
  // Sets the trigPin on HIGH state for 10 micro seconds
  digitalWrite(trigPin, HIGH);
  delayMicroseconds(10);
  digitalWrite(trigPin, LOW);
  // Reads the echoPin, returns the sound wave travel time in microseconds
  duration = pulseIn(echoPin, HIGH);
  // Calculating the distance
  distance = duration * 0.034 / 2;
  // Prints the distance on the Serial Monitor
  Serial.print("Distance: ");
  Serial.println(distance);
  int button_0 = digitalRead(2);
  int button_1 = digitalRead(3);
  int button_2 = digitalRead(4);
  int button_3 = digitalRead(5);
  int button_4 = digitalRead(6);
  if (button_0 == 1) {
    if (distance >= 5 && distance < 14) { delay(20); tone(8, notesY[0], 1000); }; if (distance >= 14 && distance < 23) { delay(20); tone(8, notesY[1], 1000); }; if (distance >= 23 && distance < 32) { delay(20); tone(8, notesY[2], 1000); }; if (distance >= 32 && distance < 41) { delay(20); tone(8, notesY[3], 1000); }; if (distance >= 41 && distance < 50) { delay(20); tone(8, notesY[4], 1000); }; }; if (button_1 == 1) { if (distance >= 5 && distance < 14) { delay(20); tone(8, notesW[0], 1000); }; if (distance >= 14 && distance < 23) { delay(20); tone(8, notesW[1], 1000); }; if (distance >= 23 && distance < 32) { delay(20); tone(8, notesW[2], 1000); }; if (distance >= 32 && distance < 41) { delay(20); tone(8, notesW[3], 1000); }; if (distance >= 41 && distance < 50) { delay(20); tone(8, notesW[4], 1000); }; }; if (button_2 == 1) { if (distance >= 5 && distance < 14) { delay(20); tone(8, notesBlack[0], 1000); }; if (distance >= 14 && distance < 23) { delay(20); tone(8, notesBlack[1], 1000); }; if (distance >= 23 && distance < 32) { delay(20); tone(8, notesBlack[2], 1000); }; if (distance >= 32 && distance < 41) { delay(20); tone(8, notesBlack[3], 1000); }; if (distance >= 41 && distance < 50) { delay(20); tone(8, notesBlack[4], 1000); }; }; if (button_3 == 1) { if (distance >= 5 && distance < 14) { delay(20); tone(8, notesG[0], 1000); }; if (distance >= 14 && distance < 23) { delay(20); tone(8, notesG[1], 1000); }; if (distance >= 23 && distance < 32) { delay(20); tone(8, notesG[2], 1000); }; if (distance >= 32 && distance < 41) { delay(20); tone(8, notesG[3], 1000); }; if (distance >= 41 && distance < 50) { delay(20); tone(8, notesG[4], 1000); }; }; if (button_4 == 1) { if (distance >= 5 && distance < 14) { delay(20); tone(8, notesBlue[0], 1000); }; if (distance >= 14 && distance < 23) { delay(20); tone(8, notesBlue[1], 1000); }; if (distance >= 23 && distance < 32) { delay(20); tone(8, notesBlue[2], 1000); }; if (distance >= 32 && distance < 41) { delay(20); tone(8, notesBlue[3], 1000); }; if (distance >= 41 && distance < 50) {
      delay(20);
      tone(8, notesBlue[4], 1000);
    };
  };
};
Here’s the code of mechanism part:
#include
#define PIN_SLIDE_POT_A A0
int value_slide_pot_a;
int spd;
int DIR_PIN = 2;
int STEP_PIN = 3;
int EN_PIN = 4;
int pt_PIN = 8;
int ding;
int DING;

// Define a stepper and the pins it will use
// AccelStepper::DRIVER means a stepper driver (with step and direction pins)
AccelStepper stepper(AccelStepper::DRIVER, STEP_PIN, DIR_PIN);

void setup() {
  pinMode(PIN_SLIDE_POT_A, INPUT);
  pinMode(EN_PIN, OUTPUT);
  digitalWrite(EN_PIN, LOW);
  Serial.begin(9600);
  // The run() function will accelerate up to
  // the speed set here
  stepper.setMaxSpeed(1000);
}

void loop() {
 spd = map(value_slide_pot_a, 120, 1023, 0, 800);
  stepper.setSpeed(spd);
  value_slide_pot_a = analogRead(PIN_SLIDE_POT_A);
  stepper.runSpeed();
  Serial.println(value_slide_pot_a);
}
CONCLUSIONS
Our goal of this project is making a music station that plays electronic music.
Electronic Music Master results align with your definition of interaction. The user tells it by pressing the button and move their hand. It would “listen” to the hight of hand by sensor and button the user pressed. Then it “thinks” to combine two parts of imformation together and “tells” the user by the sound. After that, the user would think about the sound that Electronic Music Master gave back, which is also the user listens to, and “tells” again. However, the mechanism part does not really result align with my definition. This part does “listen” to user and “think” by recognizing the value of potentialmeter, also “tell” by beating the plastic basket. But it does not fit the user side. This doesn’t close the loop.
If I had more time to improve our project, I would add more stuff to the mechanism part. Then different beats could exist at the same time and this would be a drum set. I think I would also add some lights or other effects to make it more like a DJ environment. Besides, I would also decorate the outlook instead of only using the simple carboard.