PROJECT NAME – Run Away From Stress Lindy& Audrey
INSTRUCTOR’S NAME: Marcela Godoy
CONCEPTION AND DESIGN
During the pandemic period, we are under different pressures from different aspects, employment, housing, travel, food, and clothing have ushered in new challenges and problems, which invariably bring different impacts on people’s lives, but stress is a very abstract concept, it is invisible and intangible, and we want to specifically target the solution is also a very difficult problem. We wish that the complex and numerous problems could be solved instantly and not overwhelm us. So we want to do a conceptual interactive media design, the pressure we can think of life will be visualized as some small icons, presented in the processing window. his design is intended to express a positive attitude toward the stress of today’s life and sincere hope for the future.
As I have read in “Art, Interaction and Engagement”, Ernest Edmonds claims that “Cybernetics, and the closely related study of Systems Theory, seemed to me to provide a rich set of concepts that helped us to think about change, interaction and living systems (Bertalanffy, 1950; Wiener, 1965). Whilst my art has not been built directly on these scientific disciplines, many of the basic concepts, such as interactive systems and feedback, have influenced the development of the frameworks discussed below”(Ernest Edmonds,2). I started to think about what interactive media actually brings to our life system. While our interaction with the world is not entirely controlled by our subjective consciousness, as in the case of the recent rampant epidemic, we have lost much of our connection with the outside environment, so I wanted to reflect on the relationship between the whole project and the human senses and the outside world through an interactive medium.
Step.1 Pressure in our life
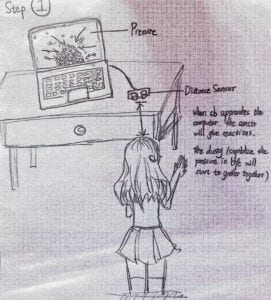
This step will use the progressing and distance sensor. When the user approaches the computer, the distance sensor will sense the person and give signals to the computer. Then the dust which symbolizes the pressure in our life will start to gather together on the computer screen and finally becomes a big cloud. This interaction is aiming to embody the stress we have in our life, all the people meet difficulties in life and feel stressed while aging.
Step.2 Scream out the pressure
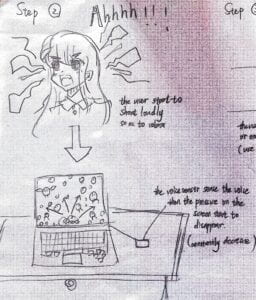
This step will use the voice sensor and also the Progressing. In order to clean up the clouds of dust and relieve the stress, the user should shout loudly while standing in front of the computer screen, then the clouds of dust will become smaller under your voice. Sensing the scream, the voice sensor will deliver signals to the computer so the Progressing can give the user reactions. With the screaming of the person, the dust on the screen will decrease gradually until they disappear.
Step.3 Doing exercises to relax
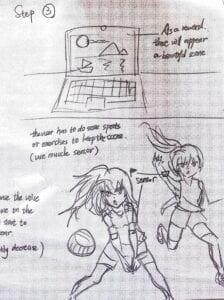
This step will use the tilt sensor and still the Processing. After all the icons disappear, there will appear a beautiful picture on the computer screen as a reword to the user. However, the scene will gradually disappear if you just stand there and appreciate it. In order to keep it existing, the user should wear the somatosensory equipment and make some actions. For example, you can play some sports or do some exercises. Sensing the movements of your body, the muscle sensor will tell the computer to keep the beautiful scene or even change another one for you.


I originally wanted to erase those icons by hitting the sensor, but at Marcela’s suggestion, the sound equation by screaming Processing can better play a role in relieving stress, we modified the previous proposal to replace the sound to control the process from the first step to the second, and the display of pictures from the original fixed one to randomly switch to different photos, but also to increase the interactivity of the entire project
I used this “for” code first with the help of my uncle.
  for (int i=0; i<imgs.length; i++) {
    imgs[i]=loadImage(i+".png");
This code can control the generated image pattern, and when assigning a value to “i”, the image file with the name that has been set can be changed continuously with +1. This step of the code is very important for our project because it solves the most important part of wanting to render multiple photos.
I am mainly responsible for the concept design, pattern selection, and the first and second steps of the programming, Lindy is mainly responsible for the third step and the second step of the interface after the pattern how to keep under the control of the tilt senor will not fade out.
Here is the code for my Arduino and Processing respectively:
Arduino:
#define echoPin 2 // attach pin D2 Arduino to pin Echo of HC-SR04
#define trigPin 3 //attach pin D3 Arduino to pin Trig of HC-SR04
const int SENSOR_PIN = 6;
int tiltVal;
int prevTiltVal;
int counter = 0;
unsigned long lastDebounceTime = 0;
unsigned long debounceDelay = 90;

// defines variables
long duration; // variable for the duration of sound wave travel
int distance; // variable for the distance measurement


void setup() {
pinMode(trigPin, OUTPUT); // Sets the trigPin as an OUTPUT
pinMode(echoPin, INPUT); // Sets the echoPin as an INPUT
Serial.begin(9600); // // Serial Communication is starting with 9600 of baudrate speed
Serial.println("Ultrasonic Sensor HC-SR04 Test"); // print some text in Serial Monitor
Serial.println("with Arduino UNO R3");
pinMode(6, INPUT_PULLUP);


}
void loop() {
// Clears the trigPin condition
digitalWrite(trigPin, LOW);
delayMicroseconds(2);
// Sets the trigPin HIGH (ACTIVE) for 10 microseconds
digitalWrite(trigPin, HIGH);
delayMicroseconds(10);
digitalWrite(trigPin, LOW);
// Reads the echoPin, returns the sound wave travel time in microseconds
duration = pulseIn(echoPin, HIGH);
// Calculating the distancez
distance = duration * 0.034 / 2; // Speed of sound wave divided by 2 (go and back)
// Displays the distance on the Serial Monitor
//Serial.print("Distance: ");
int reading = digitalRead(SENSOR_PIN);
if (reading != prevTiltVal) {
    // reset the debouncing timer
    lastDebounceTime = millis();
  }

  if ( (reading != tiltVal) && (millis() - lastDebounceTime) > debounceDelay) {
    // whatever the reading is at, it's been there for longer than the debounce
    // delay, so take it as the actual current state:
      tiltVal = reading;
  }


  // save the reading. Next time through the loop, it'll be the lastButtonState:
  if (tiltVal == true && prevTiltVal == false) {
    counter = counter +1;
  }

  prevTiltVal = reading;
Serial.print(distance);
Serial.print(",");
Serial.print(counter);
Serial.println();
//Serial.println(" cm");


//analogWrite (6, LEDvol);
//analogWrite
Processing:
// declare an AudioIn object
AudioIn microphone;
// declare an Amplitude analysis object to detect the volume of sounds
Amplitude analysis;
int NUM_OF_VALUES_FROM_ARDUINO = 2;  /** YOU MUST CHANGE THIS ACCORDING TO YOUR PROJECT **/
int sensorValues[];     /** this array stores values from Arduino **/
String myString = null;
Serial myPort;
int val;
PImage []imgs=new PImage[5];
PImage []background=new PImage[8];
ArrayList<Icon>icons=new ArrayList();
float tint=0;
float transparency=0;
float num = 0;
float alpha=255;
boolean volState=false;
int page=1;
int number = 0;
boolean chooseOnce = false;
void setup()
{
  setupSerial();
  fullScreen();
  for (int i=0; i<imgs.length; i++) {
    imgs[i]=loadImage(i+".png");
  }
   for (int i=1; i<background.length; i++) {
    background[i]=loadImage(i+1+".JPG");
  }

  // create the AudioIn object and select the mic as the input stream
  microphone = new AudioIn(this, 0);
  // start the mic input without routing it to the speakers
  microphone.start();
  // create the Amplitude analysis object
  analysis = new Amplitude(this);
  // use the microphone as the input for the analysis
  analysis.input(microphone);
}

void draw() {
  if (page==1) {
    getSerialData();
    //printArray(sensorValues);
    background(0);
    if (sensorValues[0]<50&&num<200) {
      createIcon();
    }
    for (int i=0; i< icons.size(); i++) {
      icons.get(i).run();
    }

    if (num>=100&&!volState)
    {
      float volume = analysis.analyze();
      float vol = map(volume, 0, 0.5, 0, 100);//maybe 100
      if (vol>20) {//
        volState=true;
      }
      println(vol);
      //background(0,transparency);
      //println("2",transparency);
      //println("3",volume);
    }
    if (volState) {
      alpha=lerp(alpha, 0, 0.06);
      //icon alpha
      println(alpha);
      if (alpha<1) {
        page=2;
      }
    }
  } else if (page==2)
  {
    if (chooseOnce == false) {
      chooseRandom();
    }
    //float a = random(1);
    //if (a<=0.125) {
    //  image(page2img, 0, 0, 1920, 1080);
    //} else if ((0.125<=a)&&(a<=0.25)) {
    //  image(page3img, 0, 0, 1920, 1080);
    //} else if ((0.25<=a)&&(a<=0.375)){
    //  image(page4img, 0, 0, 1920, 1080);
    //} else if ((0.375<=a)&&(a<=0.5)) {
    //  image(page5img, 0, 0, 1920, 1080);
    //} else if ((0.5<=a)&&(a<=0.625)) {
    //  image(page6img, 0, 0, 1920, 1080);
    //} else if ((0.625<=a)&&(a<=0.75)) {
    //  image(page7img, 0, 0, 1920, 1080);
    //} else if((0.75<=a)&&(a<=0.825)) {
    //  image(page8img, 0, 0, 1920, 1080);
    //} else if ((0.825<=a)&&(a<=1)) {
    //  image(page9img, 0, 0, 1920, 1080);
    //}
  }
}
void chooseRandom() {
  number = int(random(1, 8));
  image(background[number], 0, 0, 1920, 1080);
  chooseOnce = true;
  println(number);
}
  void createIcon() {
    float dis=map(sensorValues[0], 0, 50, 0, 5);
    num = num + dis;
    //float num=map(dis, 0, 255, 0, 20);
    for (int i=0; i<dis; i++) {
      icons.add(new Icon());
    }
  }
  class Icon {
    PVector pos, vel;
    float stopY;
    int type, size;
    Icon() {
      size=int(random(20, 100));
      pos=new PVector(random(size/2, width-size/2), -random(size, size*3));
      vel=new PVector(0, random(5, 20));
      type=int(random(imgs.length));
      stopY=random(height*0.6, height);
    }
    void run() {
      display();
      drop();
    }
    void display() {
      push();
      translate(pos.x, pos.y);
      imageMode(CENTER);
      tint(255, alpha);
      image(imgs[type], 0, 0, size, size);
      noTint();
      pop();
    }
    void drop() {
      if (pos.y<stopY) {
        pos.add(vel);
      }
    }
  }
  void setupSerial() {
    //printArray(Serial.list());
    myPort = new Serial(this, Serial.list()[ 2 ], 9600);
    // WARNING!
    // You will definitely get an error here.
    // Change the PORT_INDEX to 0 and try running it again.
    // And then, check the list of the ports,
    // find the port "/dev/cu.usbmodem----" or "/dev/tty.usbmodem----"
    // and replace PORT_INDEX above with the index number of the port.

    myPort.clear();
    // Throw out the first reading,
    // in case we started reading in the middle of a string from the sender.
    myString = myPort.readStringUntil( 10 ); // 10 = '\n' Linefeed in ASCII
    myString = null;

    sensorValues = new int[NUM_OF_VALUES_FROM_ARDUINO];
  }

  void getSerialData() {
    while (myPort.available() > 0) {
      myString = myPort.readStringUntil( 10 ); // 10 = '\n'  Linefeed in ASCII
      if (myString != null) {
        String[] serialInArray = split(trim(myString), ",");
        if (serialInArray.length == NUM_OF_VALUES_FROM_ARDUINO) {
          for (int i=0; i<serialInArray.length; i++) {
            sensorValues[i] = int(serialInArray[i]);
          }
        }
      }
    }
  }
To talk about my definition of interaction, which includes continuous communication between input and output, human involvement, intention, and communication of an unpredictable and creative response, which can benefit from cybernetics. In this project, communication is continuous during the exercises and screen displays. In “Art, Interaction, and Participation,” Ernest Edmonds suggests that “the physical way in which the audience interacts with a work is a major part of any interactive art system (11). ”
During the isolation period, thousands of people were closed at home, isolated from the outside world, and lost contact with nature. Human beings are perceptual animals, we are like birds eager to fly in the blue sky, like fish eager to dive into the deep sea, we need to breathe like trees, and relax their lungs, so as to absorb the strength of the mother earth. People achieve many extended interactions in interactive media that go beyond their senses or realize many experiences that are limited to what they cannot feel in the moment. Just like our project, the inspiration inspired by the limitations of the epidemic allows us to reflect and conceptualize how experiences that cannot be felt in the present can be realized indoors, and to build a positive and optimistic attitude towards life while interacting with the media, allowing us to think about how to face strong pressures and how to solve current dilemmas.