Process
In this recitation, I complete the following exercises to send data from Arduino to Processing, and vice versa, using serial communication.
Exercise 1: Make a Processing Etch-A-Sketch
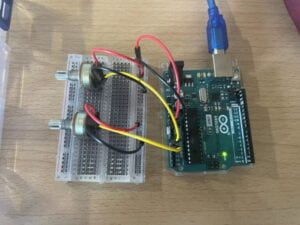
I built a circuit with two potentiometers to provide interactive input from the Arduino side.
Arduino code
void setup() {
Serial.begin(9600);
}

void loop() {
int sensorValue1 = analogRead(A0);
int sensorValue2 = analogRead(A1);
//int mappedvalue1 = map(sensorValue1, 0, 1023, 0, 600);
//int mappedvalue2 = map(sensorValue2, 0, 1023, 0, 600);
Serial.print(sensorValue1);
Serial.print(",");
Serial.print(sensorValue2);
Serial.println();
delay(1);
}
Processing code (line)
// IMA NYU Shanghai
// Interaction Lab
// For receiving multiple values from Arduino to Processing

import processing.serial.*;
String myString = null;
Serial myPort;
int x;
int y;
int NUM_OF_VALUES = 2;
int[] sensorValues;

void setup(){

 size(600,600);
 background(210,210,254);
 setupSerial();
}

void draw(){
  updateSerial();

  stroke(random(100),random(100),0);
  strokeWeight(3);
  line(x,y,sensorValues[0],sensorValues[1]);
  x = sensorValues[0];
  y = sensorValues[1];
}

void setupSerial() {
  printArray(Serial.list());
  myPort = new Serial(this, Serial.list()[ 2 ], 9600);


  myPort.clear();
  // Throw out the first reading,
  // in case we started reading in the middle of a string from the sender.
  myString = myPort.readStringUntil( 10 );  // 10 = '\n'  Linefeed in ASCII; 10 means linebreak in ASCII code
  myString = null;

  sensorValues = new int[NUM_OF_VALUES];
}


void updateSerial() {
  while (myPort.available() > 0) {
    myString = myPort.readStringUntil( 10 ); // 10 = '\n'  Linefeed in ASCII
    if (myString != null) {
      String[] serialInArray = split(trim(myString), ",");
      //put them in the array in this way. remember to put a coma between so that the computer understands
      if (serialInArray.length == NUM_OF_VALUES) {
        for (int i=0; i<serialInArray.length; i++) {
          sensorValues[i] = int(serialInArray[i]);
        }
      }
    }
  }
}
Processing code(circle)
// IMA NYU Shanghai
// Interaction Lab
// For receiving multiple values from Arduino to Processing

import processing.serial.*;

int NUM_OF_VALUES_FROM_ARDUINO = 2;
int sensorValues[];
String myString = null;
Serial myPort;

void setup() {
  size(600, 600);
  background(210,210,254);
  setupSerial();
}

void draw() {
  background(0);
  getSerialData();
  printArray(sensorValues);

  float xpos = map(sensorValues[0], 0, 1023, 0, width);
  float ypos = map(sensorValues[1], 0, 1023, 0, height);
  fill (255);
  ellipse (xpos, ypos, 50, 50);
}

void setupSerial() {
  printArray(Serial.list());
  myPort = new Serial(this, Serial.list()[ 2 ], 9600);

  myPort.clear();
  myString = myPort.readStringUntil( 10 );
  myString = null;

  sensorValues = new int[NUM_OF_VALUES_FROM_ARDUINO];
}

void getSerialData() {
  while (myPort.available() > 0) {
    myString = myPort.readStringUntil( 10 );
    if (myString != null) {
      String[] serialInArray = split(trim(myString), ",");
      if (serialInArray.length == NUM_OF_VALUES_FROM_ARDUINO) {
        for (int i=0; i<serialInArray.length; i++) {
          sensorValues[i] = int(serialInArray[i]);
        }
      }
    }
  }
}


Exercise 2: The Bouncing Ball
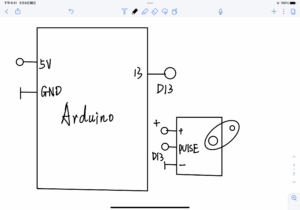
In this exercise, data is transferred from Processing to Arduino. I first coded the Processing part to make the ball bounce on the screen. I added an “else if” sentence to the coding and used one servo motor to react when the ball bounced at one side.
Processing code
import processing.serial.*;

int NUM_OF_VALUES_FROM_PROCESSING = 1;
int processing_values[] = new int[NUM_OF_VALUES_FROM_PROCESSING];
float x = 40;
float speedX = 20;

Serial myPort;
String myString;

void setup() {
  fullScreen();
  background(0);
  setupSerial();
}

void draw() {
  background(0);
  fill(255);
  ellipse(x, height*0.5, 100, 100);
  x = x + speedX;

  if (x > width - 50){
    speedX *= -1;
    processing_values[0] = 1;
  }else if (x < 50) {
    speedX *= -1;
    processing_values[0] = 0;
  }else{
      processing_values[0] = 0;
  }

  sendSerialData();
}

void setupSerial() {
  printArray(Serial.list());
  myPort = new Serial(this, Serial.list()[0], 9600);

  myPort.clear();
  myString = myPort.readStringUntil( 10 );
  myString = null;
}

void sendSerialData() {
  String data = "";
  for (int i=0; i<processing_values.length; i++) {
    data += processing_values[i];
    if (i < processing_values.length-1) {
      data += ",";
    }
    else {
      data += "\n";
    }
  }
  myPort.write(data);
}
Arduino code
import processing.serial.*;

int NUM_OF_VALUES_FROM_PROCESSING = 1;
int processing_values[] = new int[NUM_OF_VALUES_FROM_PROCESSING];
float x = 51;
float speedX = 30;

Serial myPort;
String myString;

void setup() {
  fullScreen();
  background(0);
  setupSerial();
}

void draw() {
  background(0);
  fill(255);
  ellipse(x, height*0.5, 100, 100);
  x = x + speedX;

  if (x > width - 50){
    speedX *= -1;
    processing_values[0] = 1;
  }else if (x < 50) {
    speedX *= -1;
    processing_values[0] = 0;
  }else{
      processing_values[0] = 0;
  }

  sendSerialData();
}

void setupSerial() {
  printArray(Serial.list());
  myPort = new Serial(this, Serial.list()[0], 9600);
  myPort.clear();
  myString = myPort.readStringUntil( 10 );
  myString = null;
}

void sendSerialData() {
  String data = "";
  for (int i=0; i<processing_values.length; i++) {
    data += processing_values[i];
    if (i < processing_values.length-1) {
      data += ",";
    }
    else {
      data += "\n";
    }
  }
  myPort.write(data);
  print(data);
}

Homework
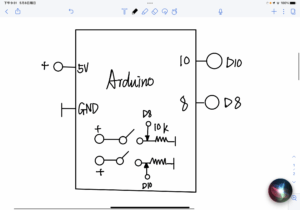
In the workshop, I learned to add variables for star and button states so that I can use if sentences to define situations. I also learned that pushMatrix() and pop Matrix() can be used to transform the position of objects.

Processing code
import processing.serial.*;

String myString = null;
Serial myPort;

int NUM_OF_VALUES = 2;
int[] buttonValues;

int prevButtonValue0 = 0;
int prevButtonValue1 = 0;

boolean star1Display = false;
boolean star2Display = false;


void setup() {
  size(640, 600);
  background(0);
  setupSerial();
}

void draw(){
  background(0);
  getSerialData();
  printArray(buttonValues);


  if(buttonValues[0] == 1 && buttonValues[0] != prevButtonValue0){
    star1Display = !star1Display;
  }

   if(buttonValues[1] == 1 && buttonValues[1] != prevButtonValue0){
    star2Display = !star2Display;
  }

  if(star1Display){
    pushMatrix();
    translate(width * 0.3, height * 0.3);
    rotate(frameCount * 400.0);
    star(0, 0, 30, 70, 5);
    popMatrix();
  }

  if(star2Display){
    pushMatrix();
    translate(width * 0.6, height * 0.6);
    rotate(frameCount * 700.0);
    star(0, 0, 80, 100, 10);
    popMatrix();
  }


  //star(width/2, height/2, 80, 100, 10);

}

void star(float x, float y, float radius1, float radius2, int npoints) {
  float angle = TWO_PI / npoints;
  float halfAngle = angle/2.0;
  beginShape();
  for (float a = 0; a < TWO_PI; a += angle) {
    float sx = x + cos(a) * radius2;
    float sy = y + sin(a) * radius2;
    vertex(sx, sy);
    sx = x + cos(a+halfAngle) * radius1;
    sy = y + sin(a+halfAngle) * radius1;
    vertex(sx, sy);
  }
  endShape(CLOSE);
}

void setupSerial() {
  printArray(Serial.list());
  myPort = new Serial(this, Serial.list()[2], 9600);
  // WARNING!
  // You will definitely get an error here.
  // Change the PORT_INDEX to 0 and try running it again.
  // And then, check the list of the ports,
  // find the port "/dev/cu.usbmodem----" or "/dev/tty.usbmodem----"
  // and replace PORT_INDEX above with the index number of the port.

  myPort.clear();
  // Throw out the first reading,
  // in case we started reading in the middle of a string from the sender.
  myString = myPort.readStringUntil( 10 );  // 10 = '\n'  Linefeed in ASCII
  myString = null;

  buttonValues = new int[NUM_OF_VALUES];
}
void getSerialData() {
  while (myPort.available() > 0) {
    myString = myPort.readStringUntil( 10 ); // 10 = '\n'  Linefeed in ASCII
    if (myString != null) {
      String[] serialInArray = split(trim(myString), ",");
      if (serialInArray.length == NUM_OF_VALUES) {
        for (int i=0; i<serialInArray.length; i++) {
          buttonValues[i] = int(serialInArray[i]);
        }
      }
    }
  }
}
Arduino code
void setup() {
  // put your setup code here, to run once:
Serial.begin(9600);
}

void loop() {
  // put your main code here, to run repeatedly:
  int button1 = digitalRead(9);
  int button2 = digitalRead(10);

  Serial.print(button1);
  Serial.print(",");
  Serial.print(button2);
  Serial.println();


}
Research IMAGE OUTPUT AND INPUT
Pixel array It uses an image as input and recognizes its color, which is displayed on the screen as output, and it uses mouse presses and keyboard input in order to increase user engagement. It is a creative process that reconstructs the colors of the image into changing screen colors.