Find Spring_Audrey&Lindy_Instructor: Marcela
The weather is warming up in March, flowers are blooming, and the neighborhood kittens are hanging out in the sun, but we are locked down in our dorm because the epidemic has struck again and we can’t go enjoy the real spring.
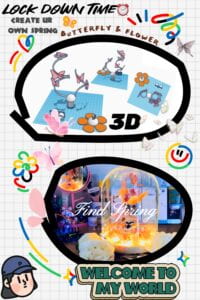
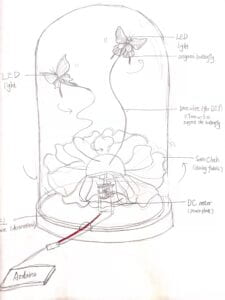
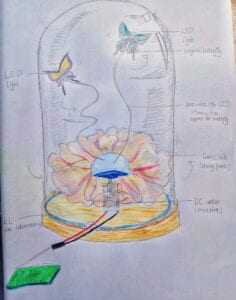
But we still wanted to welcome spring in the special form of IMA students, so we wanted to use light and electricity to create an indoor garden of flowers and butterflies. We wanted to use this project to reflect the butterflies flutter up and down under the control of motors, and the flowers bloom to reflect the vivid spring scene.
So we wanted to create a spring view with motor-controlled flowers and butterflies. Lindy and I had to make this project separately because we are locked down at different places and planned to assemble them when we returned to campus in order to display the complete artwork.
But when I made the butterflies out of wire, I discovered that the motor could not handle the weight of the iron butterflies, so I switched to paper and added small LED lights and glass covers for adding aesthetics. And Lindy, on the other hand, kept the original design for the butterfly and the flower with the light. When people are close to the distance sensor the butterfly will spin and dance and the light in the wick will light up, which is the spring we created for ourselves in the days of lockdown, but we also hope to get out of the room like the butterfly fly out of the glass cover soon and see the real spring of nature.
The materials we use are
Satin cloth (shining fabric)x 0.5m Origami paper x2 DC motor x1 Arduino x1 Electric wires a few Iron wire 0.9mm x 28m glass lampshade 15cm x 18cm x1
We also encountered a lot of difficulties in this process. Neither of us had any prior basic knowledge about coding and was not good at this part. To solve this problem, we asked our classmates and reviewed all the PPTs. we even had two appointments with Marcella during office hours and she helped us to figure out all the problems. Finally, we learned how to make indifferent connections and interact in coding. In the process, we recorded a lot of videos. At first, we wanted to make the iron butterfly, but we found it too heavy and the motor couldn’t support it later. So Audrey had to make some paper butterflies instead. As for me, my motor broke three times and I had to keep soldering them in the process. In the end, I even replaced the wires on it.
Here is the code we used.
// ---------------------------------------------------------------- //
// Arduino Ultrasoninc Sensor HC-SR04
// Re-writed by Arbi Abdul Jabbaar
// Using Arduino IDE 1.8.7
// Using HC-SR04 Module
// Tested on 17 September 2019
// ---------------------------------------------------------------- //

#define echoPin 2 // attach pin D2 Arduino to pin Echo of HC-SR04
#define trigPin 3 //attach pin D3 Arduino to pin Trig of HC-SR04

// defines variables
long duration; // variable for the duration of sound wave travel
int distance; // variable for the distance measurement
int LEDvol = 0;
int Motorspeed = 0;

void setup() {
pinMode(trigPin, OUTPUT); // Sets the trigPin as an OUTPUT
pinMode(echoPin, INPUT); // Sets the echoPin as an INPUT
Serial.begin(9600); // // Serial Communication is starting with 9600 of baudrate speed
Serial.println("Ultrasonic Sensor HC-SR04 Test"); // print some text in Serial Monitor
Serial.println("with Arduino UNO R3");
pinMode(6, OUTPUT);
pinMode(9, OUTPUT);

}
void loop() {
// Clears the trigPin condition
digitalWrite(trigPin, LOW);
delayMicroseconds(2);
// Sets the trigPin HIGH (ACTIVE) for 10 microseconds
digitalWrite(trigPin, HIGH);
delayMicroseconds(10);
digitalWrite(trigPin, LOW);
// Reads the echoPin, returns the sound wave travel time in microseconds
duration = pulseIn(echoPin, HIGH);
// Calculating the distance
distance = duration * 0.034 / 2; // Speed of sound wave divided by 2 (go and back)
// Displays the distance on the Serial Monitor
Serial.print("Distance: ");
Serial.print(distance);
Serial.println(" cm");
LEDvol = map( distance, 30, 0, 0, 255);
LEDvol = constrain( LEDvol,0,30);
Motorspeed = map( distance, 30, 0, 0, 255);
Motorspeed = constrain( Motorspeed,0,30);

analogWrite (6, LEDvol);
analogWrite (9, Motorspeed);

Serial.print( "LEDvol:");
Serial.print(LEDvol);
Serial.print( "Motorspeed:");
Serial.print(Motorspeed);

}
Besides that, we learned how to make 3D models. Doing projects is the best way for us to learn and study because we have to do everything ourselves.
Here is the post with our 3D models.


We were inspired by the video Marcela sent us. Below is the video.
Here is the final video for our project: