Monthly Archives: April 2022

Recitation 8: SERIAL COMMUNICATION

Process

In this recitation, I complete the following exercises to send data from Arduino to Processing, and vice versa, using serial communication.

Exercise 1: Make a Processing Etch-A-Sketch

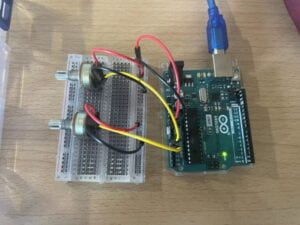
I built a circuit with two potentiometers to provide interactive input from the Arduino side.


Arduino code

void setup() {
Serial.begin(9600);
}

void loop() {
int sensorValue1 = analogRead(A0);
int sensorValue2 = analogRead(A1);
//int mappedvalue1 = map(sensorValue1, 0, 1023, 0, 600);
//int mappedvalue2 = map(sensorValue2, 0, 1023, 0, 600);
Serial.print(sensorValue1);
Serial.print(",");
Serial.print(sensorValue2);
Serial.println();
delay(1);
}

Processing code (line)

// IMA NYU Shanghai
// Interaction Lab
// For receiving multiple values from Arduino to Processing

import processing.serial.*;
String myString = null;
Serial myPort;
int x;
int y;
int NUM_OF_VALUES = 2;   
int[] sensorValues;      

void setup(){
 
 size(600,600);
 background(210,210,254);
 setupSerial();
}

void draw(){
  updateSerial();
  
  stroke(random(100),random(100),0);
  strokeWeight(3);
  line(x,y,sensorValues[0],sensorValues[1]);
  x = sensorValues[0];
  y = sensorValues[1];
}

void setupSerial() {
  printArray(Serial.list());
  myPort = new Serial(this, Serial.list()[ 2 ], 9600);
 

  myPort.clear();
  // Throw out the first reading,
  // in case we started reading in the middle of a string from the sender.
  myString = myPort.readStringUntil( 10 );  // 10 = '\n'  Linefeed in ASCII; 10 means linebreak in ASCII code 
  myString = null;

  sensorValues = new int[NUM_OF_VALUES];
}


void updateSerial() {
  while (myPort.available() > 0) {
    myString = myPort.readStringUntil( 10 ); // 10 = '\n'  Linefeed in ASCII
    if (myString != null) {
      String[] serialInArray = split(trim(myString), ",");
      //put them in the array in this way. remember to put a coma between so that the computer understands 
      if (serialInArray.length == NUM_OF_VALUES) {
        for (int i=0; i<serialInArray.length; i++) {
          sensorValues[i] = int(serialInArray[i]);
        }
      }
    }
  }
}

Processing code(circle)

// IMA NYU Shanghai
// Interaction Lab
// For receiving multiple values from Arduino to Processing

import processing.serial.*;

int NUM_OF_VALUES_FROM_ARDUINO = 2; 
int sensorValues[]; 
String myString = null;
Serial myPort;

void setup() {
  size(600, 600);
  background(210,210,254);
  setupSerial();
}

void draw() {
  background(0);
  getSerialData();
  printArray(sensorValues);

  float xpos = map(sensorValues[0], 0, 1023, 0, width);
  float ypos = map(sensorValues[1], 0, 1023, 0, height);
  fill (255);
  ellipse (xpos, ypos, 50, 50);
}

void setupSerial() {
  printArray(Serial.list());
  myPort = new Serial(this, Serial.list()[ 2 ], 9600);
  
  myPort.clear();
  myString = myPort.readStringUntil( 10 );  
  myString = null;

  sensorValues = new int[NUM_OF_VALUES_FROM_ARDUINO];
}

void getSerialData() {
  while (myPort.available() > 0) {
    myString = myPort.readStringUntil( 10 );
    if (myString != null) {
      String[] serialInArray = split(trim(myString), ",");
      if (serialInArray.length == NUM_OF_VALUES_FROM_ARDUINO) {
        for (int i=0; i<serialInArray.length; i++) {
          sensorValues[i] = int(serialInArray[i]);
        }
      }
    }
  }
}
Exercise 2: The Bouncing Ball

In this exercise, data is transferred from Processing to Arduino. I first coded the Processing part to make the ball bounce on the screen. I added an “else if” sentence to the coding and used one servo motor to react when the ball bounced at one side.

Processing code

import processing.serial.*;

int NUM_OF_VALUES_FROM_PROCESSING = 1;  
int processing_values[] = new int[NUM_OF_VALUES_FROM_PROCESSING]; 
float x = 40;
float speedX = 20;

Serial myPort;
String myString;

void setup() {
  fullScreen();
  background(0);
  setupSerial();
}

void draw() {
  background(0);
  fill(255);
  ellipse(x, height*0.5, 100, 100);
  x = x + speedX;
  
  if (x > width - 50){
    speedX *= -1;
    processing_values[0] = 1;
  }else if (x < 50) {
    speedX *= -1;
    processing_values[0] = 0;
  }else{
      processing_values[0] = 0;
  }
  
  sendSerialData();
}

void setupSerial() {
  printArray(Serial.list());
  myPort = new Serial(this, Serial.list()[0], 9600);

  myPort.clear();
  myString = myPort.readStringUntil( 10 );  
  myString = null;
}

void sendSerialData() {
  String data = "";
  for (int i=0; i<processing_values.length; i++) {
    data += processing_values[i];
    if (i < processing_values.length-1) {
      data += ","; 
    } 
    else {
      data += "\n"; 
    }    
  }
  myPort.write(data);
}

Arduino code

import processing.serial.*;

int NUM_OF_VALUES_FROM_PROCESSING = 1;  
int processing_values[] = new int[NUM_OF_VALUES_FROM_PROCESSING]; 
float x = 51;
float speedX = 30;

Serial myPort;
String myString;

void setup() {
  fullScreen();
  background(0);
  setupSerial();
}

void draw() {
  background(0);
  fill(255);
  ellipse(x, height*0.5, 100, 100);
  x = x + speedX;
  
  if (x > width - 50){
    speedX *= -1;
    processing_values[0] = 1;
  }else if (x < 50) {
    speedX *= -1;
    processing_values[0] = 0;
  }else{
      processing_values[0] = 0;
  }
  
  sendSerialData();
}

void setupSerial() {
  printArray(Serial.list());
  myPort = new Serial(this, Serial.list()[0], 9600);
  myPort.clear();
  myString = myPort.readStringUntil( 10 );  
  myString = null;
}

void sendSerialData() {
  String data = "";
  for (int i=0; i<processing_values.length; i++) {
    data += processing_values[i];
    if (i < processing_values.length-1) {
      data += ","; 
    } 
    else {
      data += "\n"; 
    }
  }
  myPort.write(data);
  print(data);   
}


Homework

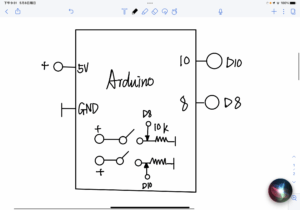
In the workshop, I learned to add variables for star and button states so that I can use if sentences to define situations. I also learned that pushMatrix() and pop Matrix() can be used to transform the position of objects.
Processing code

import processing.serial.*;

String myString = null;
Serial myPort;

int NUM_OF_VALUES = 2;
int[] buttonValues;

int prevButtonValue0 = 0;
int prevButtonValue1 = 0;

boolean star1Display = false;
boolean star2Display = false;


void setup() {
  size(640, 600);
  background(0);
  setupSerial();
}

void draw(){
  background(0);
  getSerialData();
  printArray(buttonValues);
  
  
  if(buttonValues[0] == 1 && buttonValues[0] != prevButtonValue0){
    star1Display = !star1Display;
  }
 
   if(buttonValues[1] == 1 && buttonValues[1] != prevButtonValue0){
    star2Display = !star2Display;
  }
  
  if(star1Display){
    pushMatrix();
    translate(width * 0.3, height * 0.3);
    rotate(frameCount * 400.0);
    star(0, 0, 30, 70, 5);
    popMatrix();
  }
  
  if(star2Display){
    pushMatrix();
    translate(width * 0.6, height * 0.6);
    rotate(frameCount * 700.0);
    star(0, 0, 80, 100, 10);
    popMatrix();
  }
  
  
  //star(width/2, height/2, 80, 100, 10);
  
}

void star(float x, float y, float radius1, float radius2, int npoints) {
  float angle = TWO_PI / npoints;
  float halfAngle = angle/2.0;
  beginShape();
  for (float a = 0; a < TWO_PI; a += angle) {
    float sx = x + cos(a) * radius2;
    float sy = y + sin(a) * radius2;
    vertex(sx, sy);
    sx = x + cos(a+halfAngle) * radius1;
    sy = y + sin(a+halfAngle) * radius1;
    vertex(sx, sy);
  }
  endShape(CLOSE);
}

void setupSerial() {
  printArray(Serial.list());
  myPort = new Serial(this, Serial.list()[2], 9600);
  // WARNING!
  // You will definitely get an error here.
  // Change the PORT_INDEX to 0 and try running it again.
  // And then, check the list of the ports,
  // find the port "/dev/cu.usbmodem----" or "/dev/tty.usbmodem----" 
  // and replace PORT_INDEX above with the index number of the port.

  myPort.clear();
  // Throw out the first reading,
  // in case we started reading in the middle of a string from the sender.
  myString = myPort.readStringUntil( 10 );  // 10 = '\n'  Linefeed in ASCII
  myString = null;

  buttonValues = new int[NUM_OF_VALUES];
}
void getSerialData() {
  while (myPort.available() > 0) {
    myString = myPort.readStringUntil( 10 ); // 10 = '\n'  Linefeed in ASCII
    if (myString != null) {
      String[] serialInArray = split(trim(myString), ",");
      if (serialInArray.length == NUM_OF_VALUES) {
        for (int i=0; i<serialInArray.length; i++) {
          buttonValues[i] = int(serialInArray[i]);
        }
      }
    }
  }
}

Arduino code

void setup() {
  // put your setup code here, to run once:
Serial.begin(9600);
}

void loop() {
  // put your main code here, to run repeatedly:
  int button1 = digitalRead(9);
  int button2 = digitalRead(10);

  Serial.print(button1);
  Serial.print(",");
  Serial.print(button2);
  Serial.println();


}

Research  IMAGE OUTPUT AND INPUT

Pixel array It uses an image as input and recognizes its color, which is displayed on the screen as output, and it uses mouse presses and keyboard input in order to increase user engagement. It is a creative process that reconstructs the colors of the image into changing screen colors.
 

FINAL PROJECT #3: ESSAY

PROJECT NAME – Run Away From Stress

PROJECT STATEMENT OF PURPOSE

As I have read in Art, Interaction and Engagement”, Ernest Edmonds claims that “Cybernetics, and the closely related study of Systems Theory, seemed to me to provide a rich set of concepts that helped us to think about change, interaction and living systems (Bertalanffy, 1950; Wiener, 1965). Whilst my art has not been built directly on these scientific disciplines, many of the basic concepts, such as interactive systems and feedback, have influenced the development of the frameworks discussed below”(Ernest Edmonds,2). I started to think about what interactive media actually brings to our life system. While our interaction with the world is not entirely controlled by our subjective consciousness, as in the case of the recent rampant epidemic, we have lost much of our connection with the outside environment, so I wanted to reflect on the relationship between the whole project and the human senses and the outside world through an interactive medium. 
During the pandemic period, we are under different pressures from different aspects, employment, housing, travel, food, and clothing have ushered in new challenges and problems, which invariably bring different impacts on people’s lives, but stress is a very abstract concept, it is invisible and intangible, and we want to specifically target the solution is also a very difficult problem. We wish that the complex and numerous problems could be solved instantly and not overwhelm us. So we want to do a conceptual interactive media design, the pressure we can think of life will be visualized as some small icons, presented in the processing window. his design is intended to express a positive attitude toward the stress of today’s life and sincere hope for the future.

PROJECT PLAN

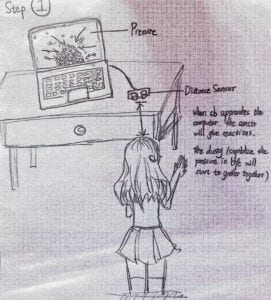
Step.1 Pressure in our life

This step will use the progressing and distance sensor. When the user approaches the computer, the distance sensor will sense the person and give signals to the computer. Then the dust which symbolizes the pressure in our life will start to gather together on the computer screen and finally becomes a big cloud. This interaction is aiming to embody the stress we have in our life, all the people meet difficulties in life and feel stressed while aging.

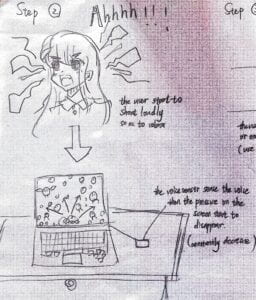
Step.2 Scream out the pressure

This step will use the voice sensor and also the progressing. In order to clean up the clouds of dust and relieve the stress, the user should shout loudly while standing in front of the computer screen, then the clouds of dust will become smaller under your voice. Sensing the scream, the voice sensor will deliver signals to the computer so the progressing can give the user reactions. With the screaming of the person, the dust on the screen will decrease gradually until they disappear.

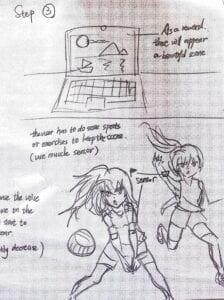
Step.3 Doing exercises to relax

This step will use the muscle sensor and still the progressing. After all the dust disappears, there will appear a beautiful picture on the computer screen as a reword to the user. However, the scene will gradually disappear if you just stand there and appreciate it. In order to keep it existing, the user should wear the somatosensory equipment and make some actions. For example, you can play some sports or do some exercises. Sensing the movements of your body, the muscle sensor will tell the computer to keep the beautiful scene or even change another one for you.

CONTEXT AND SIGNIFICANCE

To talk about my definition of interaction, which includes continuous communication between input and output, human involvement, intention, and communication of an unpredictable and creative response, which can benefit from cybernetics. In this project, communication is continuous during the exercises and screen displays. In “Art, Interaction, and Participation,” Ernest Edmonds suggests that “the physical way in which the audience interacts with a work is a major part of any interactive art system (11). ”  

During the isolation period, thousands of people were closed at home, isolated from the outside world, and lost contact with nature. Human beings are perceptual animals, we are like birds eager to fly in the blue sky, like fish eager to dive into the deep sea, we need to breathe like trees, and relax their lungs, so as to absorb the strength of the mother earth. People achieve many extended interactions in interactive media that go beyond their senses or realize many experiences that are limited to what they cannot feel in the moment. Just like our project, the inspiration inspired by the limitations of the epidemic allows us to reflect and conceptualize how experiences that cannot be felt in the present can be realized indoors, and to build a positive and optimistic attitude towards life while interacting with the media, allowing us to think about how to face strong pressures and how to solve current dilemmas.

FINAL PROJECT #2: PROPOSALS

Propose 1 Blow out the stress

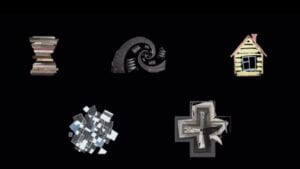
During the pandemic period, we are under different pressures from different aspects, employment, housing, travel, food, and clothing have ushered in new challenges and problems, which invariably bring different impacts on people’s lives, but stress is a very abstract concept, it is invisible and intangible, and we want to specifically target the solution is also a very difficult problem. We wish that the complex and numerous problems could be blown away instantly by a gust of wind and not overwhelm us. So we want to do a conceptual interactive media design, the pressure we can think of life will be visualized as some small icons, presented in the processing window, the Arduino side will use a steam-sensing sensor, when people blow into the sensor, this side of the visualized pressure will be blown away, as the number of blowing increases, the pressure in the window will gradually decrease when the wind is blown away. As the number of blows increases, the pressure in the window will gradually decrease, and when all the pressure in the display is blown out, a wish for a better life will be presented. This design is intended to express a positive attitude toward the stress of today’s life and sincere hope for the future.

Propose 2 VR Mermaid Exploration

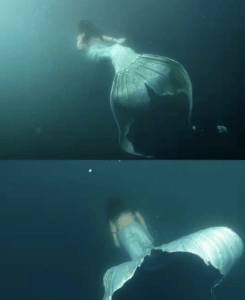
During the isolation period, thousands of people were closed at home, isolated from the outside world, and lost contact with nature. Human beings are perceptual animals, we are like birds eager to fly in the blue sky, like fish eager to dive into the deep sea, we need to breathe like trees, and relax their lungs, so as to absorb the strength of the mother earth. After watching some videos relevant to mermaids in the wild environment (below are the screenshots from the videos), we came up with the idea of VR Mermaid Exploration, hoping users can find their freedom in the virtual world during Covid.

In our design, we are thinking of using VR glasses, Somatosensory belts and media interacted equipment. As for the materials for scenes in VR, we can use some videos recorded underwater in different scenes, such as the deep sea, streams, lakes, and karst caves. Moreover, the somatosensory belt can also sense the user’s waist twist, which simulates the swing of the fishtail in VR. Also, some sensors can be added to the user’s arm and knee as well. In order to make more interactions between the user and the scene, we hope we can more imitations of the water flow with the motivations of the mermaids and simulate the buoyancy in the water.     

Propose 3 Visual Travel
Because of the status of the serious epidemic, people are less and less likely to travel on holidays, and the freedom to travel is greatly reduced, so we want to enjoy the beauty of the world without leaving home, and can fill the desire of the heart through visual satisfaction. So we want to design a game where the person who presses the button more times than the other side in a round can randomly choose an icon in Processing, and according to different icons can see different scenery and hear the different background music, so that we can see the beautiful scenery without leaving home when we want to travel and feel the romance of nature and humanity. This system is a combination of Arduino’s button game and Processing’s interactive media into a random visual travel sensory device, which can feel the visual travel while playing games to relieve the boredom during the blockade in the dormitory.

FINAL PROJECT #1: RESEARCH AND ANALYSIS

RESEARCH PROJECT  1:Synesthesia Machine

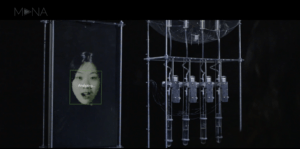
The website of the project is shown here: https://www.manamana.net/video/detail?id=1816079#!en

Synesthesia Machine” is an artificial intelligence with synesthesia, it will emit corresponding unique scents while perceiving human facial expressions. Through the facial expression recognition algorithm, it can analyze the facial expressions of the audience and output the values of different emotions. At the same time, based on these emotional values, the installation is driven to extract different proportions of scent liquid and atomized and mixed to convert the audience’s facial expression into a unique smell.

This project uses cybernetics to present the results, which is consistent with the approach I took in the final project. This is in line with Ernest Edmonds’ statement,“Cybernetics, and the closely related study of Systems Theory, seemed to me to provide a rich set of concepts that helped us to think about change, interaction and living systems (Bertalanffy, 1950; Wiener, 1965)”.  

Considering the interactions, the results of the scents and expressions corresponding to the pre-designed scents reflect the dynamic passivity. The diversity of human expressions is very important, as well as the unpredictability of expressions, creating different dynamic interactions. This prompted me to think more about how simple engagement, such as the interconnection of the senses, can be used to produce fascinating and creative results.

RESEARCH PROJECT 2:Colormatrics – Sonification-driven audiovisual works

The website of the project is shown here: https://www.manamana.net/video/detail?id=1816079#!en

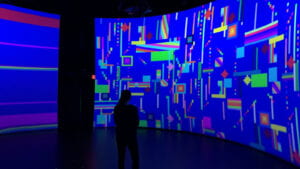
Colormatrics is a set of three sonification-driven audiovisual works specially designed for the Cube at the Moss Arts Center. Based on my line-by-line image scanning method and additive synthesis techniques. Colormatrics converts generative visual patterns into sound and visualizes the sonification process in real time. Colormatrics_01 creates ambient- or pad-like sounds fitting in with the immersive atmosphere of the space. Colormatrics_02 creates beat music following self-changing graphic patterns that become complex. Colormatrics_03 creates timbre according to the colors and spatializes sound where the vertical and horizontal positions of graphics are mapped into 128-speaker systems in Cube.

In my final assignment, I also wanted to use sound to achieve human-machine interaction. Visualizing sound is a very innovative idea that makes me think that making things perceptible that we cannot visualize is a way to broaden the concept of interaction to a wider audience.

WHAT A SUCCESSFUL INTERACTION IS

It involves continuous communication between inputs and outputs, human involvement, intentions, and conveying unpredictable creative responses that can benefit from cybernetics.

I begin by arguing that interaction involves inputs, outputs, and the responses between them. Inputs and outputs can be provided by programs, people, or environmental factors. My mid-term project reminded me of the importance of human involvement as a user. I also grew to understand that interaction should provide and express intent, whether for entertainment or utility.

This reading and research further deepened my knowledge. As Edmonds explored the nature of the interaction, he explored how infants “without a shared language, just by prodding the world and looking at what happens: trying to find patterns (Bower, 1974)”. Interaction should involve more possibilities for connecting with the world. In addition, human-computer integration as well as art (Edmonds) support interaction. Cybernetics plays an important role in improving the variability of modern interaction.

Recitation:FUNCTIONS AND ARRAYS

Process

In this interactive poster, I used the float code and implemented it at the beginning to make only one hexagon move on the screen, but because I want to have a grid screen, I need to determine how a hexagon moves under the control of the mouse first.

float[] posx=new float[100];
float[] posy=new float[100];
void setup() {
  size(820, 820);
  colorMode(HSB, 360, 100, 100);
  for (float i=0; i<10; i+=1) { 
    for (float j=0; j<10; j+=1) {
    }
  }
}
void draw() {
  background(100);

  for (int i=0; i<100; i++) {
    drawShape( posx[i], posy[i], i);
  }
  if (!mousePressed) {
    for (float i=0; i<10; i+=1) { 
      for (float j=0; j<10; j+=1) {
      }
    }
  } else {
    for (int i=0; i<100; i++) {
      posx[i]=lerp(posx[i], mouseX, 0.03);
      posy[i]=lerp(posy[i], mouseY, 0.03);
    }
  }
}
void drawShape(float x, float y, int i) {
  pushMatrix();
  noStroke();
  beginShape();
  translate(x, y);
  rotate(radians(30));
  for (float angle=0; angle<360; angle+=60) {
    float vx=sin(radians(angle))*30;
    float vy=cos(radians(angle))*30;
    vertex(vx, vy);
  }
  endShape(CLOSE);
  beginShape();
  rotate(radians(30));
  for (float angle=0; angle<360; angle+=120) {
    float vx=sin(radians(angle))*20;
    float vy=cos(radians(angle))*20;
    vertex(vx, vy);
  }
  endShape(CLOSE);
  popMatrix();
}

Then I tried to make two hexagons move from the directions of the diagonals. Finally, let the two hexagons overlap with each other.

float[] posx=new float[100];
float[] posy=new float[100];
void setup() {
  size(820, 820);
  colorMode(HSB, 360, 100, 100);
  int index=0;
  for (float i=0; i<10; i+=1) { 
    for (float j=0; j<10; j+=1) {
      posx[index]=map(i, -1, 10, 0, width);
      posy[index]=map(j, -1, 10, 0, width);      
    }
  }
}

void draw() {
  background(100);

  for (int i=0; i<100; i++) {
    drawShape( posx[i], posy[i], i);
  }
  if (!mousePressed) {
    for (float i=0; i<10; i+=1) { 
      for (float j=0; j<10; j+=1) {
      }
    }
  } else {
    for (int i=0; i<100; i++) {
      posx[i]=lerp(posx[i], mouseX, 0.03);
      posy[i]=lerp(posy[i], mouseY, 0.03);
    }
  }
}
void drawShape(float x, float y, int i) {
  pushMatrix();
  noStroke();
  beginShape();
  translate(x, y);
  rotate(radians(30));
  for (float angle=0; angle<360; angle+=60) {
    float vx=sin(radians(angle))*30;
    float vy=cos(radians(angle))*30;
    vertex(vx, vy);
  }


  endShape(CLOSE);
  beginShape();
  rotate(radians(30));
  for (float angle=0; angle<360; angle+=120) {
    float vx=sin(radians(angle))*20;
    float vy=cos(radians(angle))*20;
    vertex(vx, vy);
  }
 

  endShape(CLOSE);
  popMatrix();
}

Later I tried to improve the code

float shapeSize=80;
float[] posx=new float[100];
float[] posy=new float[100];
float[] startposx=new float[100];
float[] startposy=new float[100];
color[] col1=new color[100];
color[] col2=new color[100];
void setup() {
  size(820, 820);
  colorMode(HSB, 360, 100, 100);

  for (float i=0; i<10; i+=1) { 
    for (float j=0; j<10; j+=1) {
     
      
    }
  }
}

void draw() {
  background(100);

  for (int i=0; i<100; i++) {
    drawShape( posx[i], posy[i], i);
  }
  if (!mousePressed) {
    int index=0;
    for (float i=0; i<10; i+=1) { 
      for (float j=0; j<10; j+=1) {
        posx[index]=lerp(posx[index], startposx[index], 0.03);
        posy[index]=lerp(posy[index], startposy[index], 0.03);
        index++;
      }
    }
  } else {
    for (int i=0; i<100; i++) {
      posx[i]=lerp(posx[i], mouseX, 0.03);
      posy[i]=lerp(posy[i], mouseY, 0.03);
    }
  }
}
void drawShape(float x, float y, int i) {
  pushMatrix();
  noStroke();
  beginShape();
  translate(x, y);
  rotate(radians(30));
  for (float angle=0; angle<360; angle+=60) {
    float vx=sin(radians(angle))*30;
    float vy=cos(radians(angle))*30;
    vertex(vx, vy);
  }
  fill(col1[i]);

  endShape(CLOSE);
  beginShape();
  rotate(radians(30));
  for (float angle=0; angle<360; angle+=120) {
    float vx=sin(radians(angle))*20;
    float vy=cos(radians(angle))*20;
    vertex(vx, vy);
  }
  fill(col2[i]);

  endShape(CLOSE);
  popMatrix();
}

float shapeSize=80;
float[] posx=new float[100];
float[] posy=new float[100];
float[] startposx=new float[100];
float[] startposy=new float[100];
color[] col1=new color[100];
color[] col2=new color[100];
void setup() {
  size(820, 820);
  colorMode(HSB, 360, 100, 100);
  int index=0;
  for (float i=0; i<10; i+=1) { 
    for (float j=0; j<10; j+=1) {
      posx[index]=map(i, -1, 10, 0, width);
      posy[index]=map(j, -1, 10, 0, width);      
      startposx[index]=map(i, -1, 10, 0, width);
      startposy[index]=map(j, -1, 10, 0, width);
      
    }
  }
}

void draw() {
  background(100);

  for (int i=0; i<100; i++) {
    drawShape( posx[i], posy[i], i);
  }
  if (!mousePressed) {
    int index=0;
    for (float i=0; i<10; i+=1) { 
      for (float j=0; j<10; j+=1) {
        posx[index]=lerp(posx[index], startposx[index], 0.03);
        posy[index]=lerp(posy[index], startposy[index], 0.03);
        index++;
      }
    }
  } else {
    for (int i=0; i<100; i++) {
      posx[i]=lerp(posx[i], mouseX, 0.03);
      posy[i]=lerp(posy[i], mouseY, 0.03);
    }
  }
}
void drawShape(float x, float y, int i) {
  pushMatrix();
  noStroke();
  beginShape();
  translate(x, y);
  rotate(radians(30));
  for (float angle=0; angle<360; angle+=60) {
    float vx=sin(radians(angle))*30;
    float vy=cos(radians(angle))*30;
    vertex(vx, vy);
  }
  fill(col1[i]);

  endShape(CLOSE);
  beginShape();
  rotate(radians(30));
  for (float angle=0; angle<360; angle+=120) {
    float vx=sin(radians(angle))*20;
    float vy=cos(radians(angle))*20;
    vertex(vx, vy);
  }
  fill(col2[i]);

  endShape(CLOSE);
  popMatrix();
}


float shapeSize=80;
float[] posx=new float[100];
float[] posy=new float[100];
float[] startposx=new float[100];
float[] startposy=new float[100];
color[] col1=new color[100];
color[] col2=new color[100];
void setup() {
  size(820, 820);
  colorMode(HSB, 360, 100, 100);
  int index=0;
  for (float i=0; i<10; i+=1) { 
    for (float j=0; j<10; j+=1) {
      posx[index]=map(i, -1, 10, 0, width);
      posy[index]=map(j, -1, 10, 0, width);      
      startposx[index]=map(i, -1, 10, 0, width);
      startposy[index]=map(j, -1, 10, 0, width);
      col1[index]=color(random(360), 60, 100);     
      col2[index]=color(random(360), 80, 100);  
      index++;
    }
  }
}

void draw() {
  background(100);

  for (int i=0; i<100; i++) {
    drawShape( posx[i], posy[i], i);
  }
  if (!mousePressed) {
    int index=0;
    for (float i=0; i<10; i+=1) { 
      for (float j=0; j<10; j+=1) {
        posx[index]=lerp(posx[index], startposx[index], 0.03);
        posy[index]=lerp(posy[index], startposy[index], 0.03);
        index++;
      }
    }
  } else {
    for (int i=0; i<100; i++) {
      posx[i]=lerp(posx[i], mouseX, 0.03);
      posy[i]=lerp(posy[i], mouseY, 0.03);
    }
  }
}
void drawShape(float x, float y, int i) {
  pushMatrix();
  noStroke();
  beginShape();
  translate(x, y);
  rotate(radians(30));
  for (float angle=0; angle<360; angle+=60) {
    
  }
  fill(col1[i]);

  endShape(CLOSE);
  beginShape();
  rotate(radians(30));
  for (float angle=0; angle<360; angle+=120) {
    float vx=sin(radians(angle))*20;
    float vy=cos(radians(angle))*20;
    vertex(vx, vy);
  }
  fill(col2[i]);

  endShape(CLOSE);
  popMatrix();
}

float shapeSize=80;
float[] posx=new float[100];
float[] posy=new float[100];
float[] startposx=new float[100];
float[] startposy=new float[100];
color[] col1=new color[100];
color[] col2=new color[100];
void setup() {
  size(820, 820);
  colorMode(HSB, 360, 100, 100);
  int index=0;
  for (float i=0; i<10; i+=1) { 
    for (float j=0; j<10; j+=1) {
      posx[index]=map(i, -1, 10, 0, width);
      posy[index]=map(j, -1, 10, 0, width);      
      startposx[index]=map(i, -1, 10, 0, width);
      startposy[index]=map(j, -1, 10, 0, width);
      col1[index]=color(random(360), 60, 100);     
      col2[index]=color(random(360), 80, 100);  
      index++;
    }
  }
}

void draw() {
  background(100);

  for (int i=0; i<100; i++) {
    drawShape( posx[i], posy[i], i);
  }
  if (!mousePressed) {
    int index=0;
    for (float i=0; i<10; i+=1) { 
      for (float j=0; j<10; j+=1) {
        posx[index]=lerp(posx[index], startposx[index], 0.03);
        posy[index]=lerp(posy[index], startposy[index], 0.03);
        index++;
      }
    }
  } else {
    for (int i=0; i<100; i++) {
      posx[i]=lerp(posx[i], mouseX, 0.03);
      posy[i]=lerp(posy[i], mouseY, 0.03);
    }
  }
}
void drawShape(float x, float y, int i) {
  pushMatrix();
  noStroke();
  beginShape();
  translate(x, y);
  rotate(radians(30));
  for (float angle=0; angle<360; angle+=60) {
    float vx=sin(radians(angle))*30;
    float vy=cos(radians(angle))*30;
    vertex(vx, vy);
  }
  fill(col1[i]);

  endShape(CLOSE);
  beginShape();
  rotate(radians(30));
  
  fill(col2[i]);

  endShape(CLOSE);
  popMatrix();
}


float shapeSize=80;
float[] posx=new float[100];
float[] posy=new float[100];
float[] startposx=new float[100];
float[] startposy=new float[100];
color[] col1=new color[100];
color[] col2=new color[100];
void setup() {
  size(820, 820);
  colorMode(HSB, 360, 100, 100);
  int index=0;
  for (float i=0; i<10; i+=1) { 
    for (float j=0; j<10; j+=1) {
      posx[index]=map(i, -1, 10, 0, width);
      posy[index]=map(j, -1, 10, 0, width);      
      startposx[index]=map(i, -1, 10, 0, width);
      startposy[index]=map(j, -1, 10, 0, width);
      col1[index]=color(random(360), 60, 100);     
      col2[index]=color(random(360), 80, 100);  
      index++;
    }
  }
}

void draw() {
  background(100);

  for (int i=0; i<100; i++) {
    drawShape( posx[i], posy[i], i);
  }
  if (!mousePressed) {
    int index=0;
    for (float i=0; i<10; i+=1) { 
      for (float j=0; j<10; j+=1) {
        posx[index]=lerp(posx[index], startposx[index], 0.03);
        posy[index]=lerp(posy[index], startposy[index], 0.03);
        index++;
      }
    }
  } else {
    for (int i=0; i<100; i++) {
      posx[i]=lerp(posx[i], mouseX, 0.03);
      posy[i]=lerp(posy[i], mouseY, 0.03);
    }
  }
}
void drawShape(float x, float y, int i) {
  pushMatrix();
  noStroke();
  beginShape();
  translate(x, y);
  rotate(radians(30));
  for (float angle=0; angle<360; angle+=60) {
    float vx=sin(radians(angle))*30;
    float vy=cos(radians(angle))*30;
    vertex(vx, vy);
  }
  fill(col1[i]);

  endShape(CLOSE);
  beginShape();
  rotate(radians(30));
  for (float angle=0; angle<360; angle+=120) {
    float vx=sin(radians(angle))*20;
    float vy=cos(radians(angle))*20;
    vertex(vx, vy);
  }
  fill(col2[i]);

  endShape(CLOSE);
  popMatrix();
}

QUESTIONS

Q1: In the reading “Art, Interaction and Engagement” by Ernest Edmonds, he identifies four situations in an interactive artwork: ‘Static’, ‘Dynamic-Passive’, ‘Dynamic-Interactive’ and ‘Dynamic-Interactive(Varying)’. From the exercise, you did today which situations do you identify in every part you executed? Explain.

In the first part, the repeating patterns are static because they remain stationary and do not change due to time or the user. The random changes in the colors can be seen as dynamic-passive because the coding provides an internal mechanism for their changes.

In the second part, in addition to what is shown in the first part, the periodic left-right motion also changes according to the internal mechanism of linear motion, which reflects dynamic-passive.

In the optional part, dynamic interaction is included. Mouse clicks affect the color change, adding a variable factor controlled by the human “viewer”. There is also dynamic interaction (Varying) because the color after a mouse click is unpredictable due to the “random” function.

Q2: What is the benefit of using arrays? How might you use arrays in a potential project?

A significant advantage of arrays is that they can be declared once and reused many times. So using arrays in code can make the code look cleaner and easier for me to check and modify. Also, an array is considered to be a homogeneous collection of data. Here, the word collection means that it helps to store multiple values under the same variable. For any purpose, if the user wants to store multiple values of similar types, arrays are the best choice that can be used. When I am designing a potential project, I intentionally use more arrays because it significantly improves my productivity and makes my work more goal-oriented. I will probably use collections more often for color design because I will do better at it.

Recitation 6: INTERACTIVE POSTER

For this recitation, I used Processing for the first time for coding and design. After reviewing the features taught in class and studying the tutorials on the Processing website, I completed my first interactive poster.

Because I had to accommodate the change of the image over time, I designed a loop in the center of the window to periodically zoom in and out of the circle and used mouse interaction to move the small arrow symbols faster when the cursor was on the right side of the screen, and the arrow symbols slowed down until they stopped when the cursor moved to the left side of the screen. These designs reflected the interactive features I gave to the poster.

Video

Coding


String t1="Event: IMA Spring 22 End-Of-Semester Show";
String t2="Location: 8th floor\nDay: Friday May 13\nTime: 6pm to 8pm";
PVector[]pos=new PVector[100];
void setup() {
  size(1024, 768);
  textAlign(CENTER, CENTER);
  textSize(40);
  rectMode(CENTER);
  for (int i=0; i<pos.length; i++) {
    pos[i]=new PVector(random(width), random(height));
  }
}
void draw() {
  background(#3B8BEA);
  noStroke();
  fill(#D1F3FC);
  ellipse(width/2, height/2, sin(frameCount*0.02)*300, sin(frameCount*0.02)*300);
  fill(#FCF0D1, 100);
  stroke(#FCF0D1, 200);
  for (int i=0; i<pos.length; i++) {
    line(pos[i].x, pos[i].y, pos[i].x-30, pos[i].y);

    rect(pos[i].x, pos[i].y, 20, 20);
    pos[i].x+=map(mouseX,0,width,0,10);
    if (pos[i].x>width) {
      pos[i].x=0;
    }
  }
  fill(#9DCAFF, 70);
  text(t1, 500, 100);
  fill(#9DCAFF);
  text(t1, 500, 120);
  fill(#50FFCC);
  text(t2, 500, 620);
}

Comments

At that time, I wanted to use the mouse to control the size of the change of the circle and the speed of the cursor movement behind it but found that the map used by the cursor is only for that one function, so I asked a friend for advice about how the circle changes with time itself, and he demonstrated and modified the demonstration of the two modes of separation, not only to make the code more concise, the poster’s presentation is also more interactive

Midterm Project documentation

Find Spring_Audrey&Lindy_Instructor: Marcela 

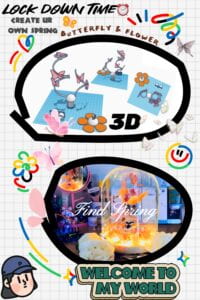
The weather is warming up in March, flowers are blooming, and the neighborhood kittens are hanging out in the sun, but we are locked down in our dorm because the epidemic has struck again and we can’t go enjoy the real spring.

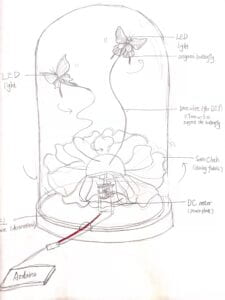
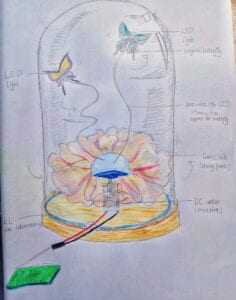
But we still wanted to welcome spring in the special form of IMA students, so we wanted to use light and electricity to create an indoor garden of flowers and butterflies. We wanted to use this project to reflect the butterflies flutter up and down under the control of motors, and the flowers bloom to reflect the vivid spring scene.

So we wanted to create a spring view with motor-controlled flowers and butterflies. Lindy and I had to make this project separately because we are locked down at different places and planned to assemble them when we returned to campus in order to display the complete artwork.   

But when I made the butterflies out of wire, I discovered that the motor could not handle the weight of the iron butterflies, so I switched to paper and added small LED lights and glass covers for adding aesthetics. And Lindy, on the other hand, kept the original design for the butterfly and the flower with the light. When people are close to the distance sensor the butterfly will spin and dance and the light in the wick will light up, which is the spring we created for ourselves in the days of lockdown, but we also hope to get out of the room like the butterfly fly out of the glass cover soon and see the real spring of nature.      

 The materials we use are                                                                      

Satin cloth (shining fabric)x 0.5m                                                                                                        Origami paper x2                                                                                                                                                    DC motor x1                                                                                                                                                             Arduino x1                                                                                                                                                            Electric wires a few                                                                                                                                                  Iron wire 0.9mm x 28m                                                                                                                                        glass lampshade 15cm x 18cm x1 

We also encountered a lot of difficulties in this process. Neither of us had any prior basic knowledge about coding and was not good at this part. To solve this problem, we asked our classmates and reviewed all the PPTs. we even had two appointments with Marcella during office hours and she helped us to figure out all the problems. Finally, we learned how to make indifferent connections and interact in coding. In the process, we recorded a lot of videos. At first, we wanted to make the iron butterfly, but we found it too heavy and the motor couldn’t support it later. So Audrey had to make some paper butterflies instead. As for me, my motor broke three times and I had to keep soldering them in the process. In the end, I even replaced the wires on it.

Here is the code we used.

// ---------------------------------------------------------------- //
// Arduino Ultrasoninc Sensor HC-SR04
// Re-writed by Arbi Abdul Jabbaar
// Using Arduino IDE 1.8.7
// Using HC-SR04 Module
// Tested on 17 September 2019
// ---------------------------------------------------------------- //

#define echoPin 2 // attach pin D2 Arduino to pin Echo of HC-SR04
#define trigPin 3 //attach pin D3 Arduino to pin Trig of HC-SR04

// defines variables
long duration; // variable for the duration of sound wave travel
int distance; // variable for the distance measurement
int LEDvol = 0;
int Motorspeed = 0;

void setup() {
pinMode(trigPin, OUTPUT); // Sets the trigPin as an OUTPUT
pinMode(echoPin, INPUT); // Sets the echoPin as an INPUT
Serial.begin(9600); // // Serial Communication is starting with 9600 of baudrate speed
Serial.println("Ultrasonic Sensor HC-SR04 Test"); // print some text in Serial Monitor
Serial.println("with Arduino UNO R3");
pinMode(6, OUTPUT);
pinMode(9, OUTPUT);

}
void loop() {
// Clears the trigPin condition
digitalWrite(trigPin, LOW);
delayMicroseconds(2);
// Sets the trigPin HIGH (ACTIVE) for 10 microseconds
digitalWrite(trigPin, HIGH);
delayMicroseconds(10);
digitalWrite(trigPin, LOW);
// Reads the echoPin, returns the sound wave travel time in microseconds
duration = pulseIn(echoPin, HIGH);
// Calculating the distance
distance = duration * 0.034 / 2; // Speed of sound wave divided by 2 (go and back)
// Displays the distance on the Serial Monitor
Serial.print("Distance: ");
Serial.print(distance);
Serial.println(" cm");
LEDvol = map( distance, 30, 0, 0, 255);
LEDvol = constrain( LEDvol,0,30);
Motorspeed = map( distance, 30, 0, 0, 255);
Motorspeed = constrain( Motorspeed,0,30);

analogWrite (6, LEDvol);
analogWrite (9, Motorspeed);

Serial.print( "LEDvol:");
Serial.print(LEDvol);
Serial.print( "Motorspeed:");
Serial.print(Motorspeed);

}

Besides that, we learned how to make 3D models. Doing projects is the best way for us to learn and study because we have to do everything ourselves.

Here is the post with our 3D models.

We were inspired by the video Marcela sent us. Below is the video.


Here is the final video for our project:

Recitation 5: WORKOUT

This recitation made sense because it was during the time period of lockdown. It was challenging and time-consuming for me to figure out the coding. Fortunately, I eventually got it to work properly!

The Circuit


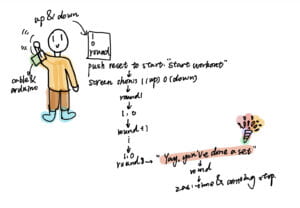
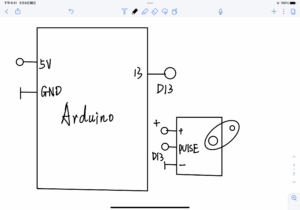
As instructed, I built a tilt switch by combining a tilt sensor and wires and then built the circuit as shown in the diagram.

I uploaded the sketch in order to have the serial monitor show 1 when the tilt sensor is upside down and 0 when it is upside down. it sometimes gives extra variation, reflecting that the process is unstable.
For the next step, I switched to the Serial plotter to look at the graph of the transition.

I then modified the code as given to detect the upside-down transition. In this case, the serial monitor only changes from 0 to 1 instead of floating continuously.
Questions:

At approximately what angle of tilt does it transition between HIGH and LOW?

When the tilt sensor is horizontal.

What else do you notice about its behavior?

The chart fluctuates as the angle approaches the horizontal plane.

What if you tilt the forearm?

The movement will be a little more stable because the change is harder.

What if you hold the wires several centimeters away and tilt them?

I think this is because weight-based changes are rapid. The movement would be a bit more stable.

What if you shake it?

The graphic will fluctuate rapidly.

To depot the tilt switch, I used the millisecond function as instructed to make the graph stable.

WORKOUT 1: BICEPS CURLS

Video of me testing the tilt sensor:

WORKOUT2: JUMPING JACK

For this workout, I did some more obvious movements with my wearable cable. I couldn’t record the movements and the screen at the same time, so I did record them separately. The system recorded the times relatively correctly, but it would incorrectly record some additional times.

Questions:

Can you make changes to the speed of your “jumping jack” to detect it?

Faster speeds will cause more disruption to the system.

What happens if you change the debounce lockout time? What do you need to change to detect one “jumping” exercise?

Changing the lock time to 10 or 90 does not improve stability.

How reliable is the counting? How many extra, or missed, counts happen as a fraction of the number of real exercises done? What do you think would happen to these fractions if you adjust the debouncing time).

This isn’t reliable enough. When I lift my arm, it is easy for extra counts to occur.

WORKOUT 3: START AND STOP TIMING

// constants won't change. They're used here to set pin numbers:
const int buttonPin = 6;    // the number of the pushbutton pin

int buttonState;             // the current reading from the input pin
int lastButtonState;   // the previous reading from the input pin

// the following variables are unsigned longs because the time, measured in
// milliseconds, will quickly become a bigger number than can be stored in an int.
unsigned long lastDebounceTime = 0;  // the last time the output pin was toggled
unsigned long debounceDelay = 50;    // the debounce time; increase if the output flickers

void setup() {
  pinMode(buttonPin, INPUT);  //Set sensor pin as an INPUT pin
  Serial.begin(9600);
}

void loop() {
  // read the state of the sensor:
  int tiltVal = digitalRead(buttonPin);
  
  // If the switch changed, due to noise or pressing:
  if (reading != lastButtonState) {
    // reset the debouncing timer
    lastDebounceTime = millis();
      Serial.println(buttonState);

  }

  if ( (reading != buttonState) && (millis() - lastDebounceTime) > debounceDelay) {
    // whatever the reading is at, it's been there for longer than the debounce
    // delay, so take it as the actual current state:
      buttonState = reading;
  }
  
  // save the reading. Next time through the loop, it'll be the lastButtonState:
  lastButtonState = reading;

 //if you want to use Serial Plotter, add these two lines:
  //Serial.println(buttonState);
  //delay(1);
}


  if(tiltVal== HIGH){
    counter += 1:
    
    if(counter != 8){
      Serial.println(counter);
      delay (1000) ;
    }
      else if(counter=8){
        Serial.println("Yay, you've done a set of curis!!");
        counter = 0;

const int SENSOR_PIN = 6;

int tiltVal;
int prevTiltVal;
int buttonState;
int lastButtonState;
int button;
int prevButton;
int counter = 0;
int pressGoal = 8;
int period = 20000;
long time_now = 0;

unsigned long lastDebounceTime = 0;
unsigned long debounceDelay = 90;

void setup() {
  pinMode(SENSOR_PIN, INPUT_PULLUP);    // Set sensor pin as an INPUT pin
  Serial.begin(9600);
  Serial.println("Start your Workout");
}

void loop() {
  // read the state of the sensor
  tiltVal = digitalRead(SENSOR_PIN);
  int reading = digitalRead(SENSOR_PIN);
// If the switch changed, due to noise or pressing:
  if (reading != lastButtonState) {
    // reset the debouncing timer
    lastDebounceTime = millis();
  }

  if ( (reading != buttonState) && (millis() - lastDebounceTime) > debounceDelay) {
    // whatever the reading is at, it's been there for longer than the debounce
    // delay, so take it as the actual current state:
      buttonState = reading;
  }
  
  // save the reading. Next time through the loop, it'll be the lastButtonState:
  lastButtonState = reading;
  
  // if the tilt sensor value changed, print the new value
  if (tiltVal != prevTiltVal) {
    Serial.println(tiltVal);
  }
  prevTiltVal = tiltVal;

  // for Serial Plotter use
  //Serial.println(tiltVal);

  button = digitalRead(SENSOR_PIN);

  if (button == true && prevButton == false) {
    counter = counter +1;
    Serial.println("time:");
    Serial.println(counter);
  }
  prevButton = button;

  if (counter == pressGoal) {
    Serial.println("Yay, you’ve done a set of curls");
  }

  if(millis() >= time_now + period) {
    time_now += period;
    Serial.println("Stop! Your time is up!");
    exit(0);
  }

  delay(10);

  
}