Final(s) Scream

Concept and Design:

The concept of this interactive media project is to provide students with a creative outlet to vent their frustration from final exams week. The project is a cardboard box wired with an Arduino, a Grove Loudness Sensor, and NeoPixels. The loudness sensor picks up any sound and converts it into an analog value, which is then used to light up the NeoPixels red. Simultaneously, the Arduino software communicates with Processing 4 to open a window that displays a bar in the center of the screen. The bar shows the gradual decrease and increase of the volume based on the analog value from the loudness sensor.

Previous preparatory research and essays explored interactive media projects that used sound as the primary input. These research efforts and essays informed the design of this project by providing inspiration for its core functionality. The understanding of how the users would interact with the project informed the following design decisions:

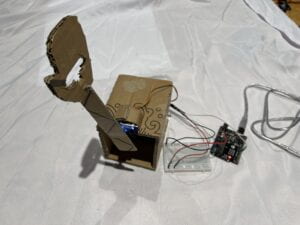
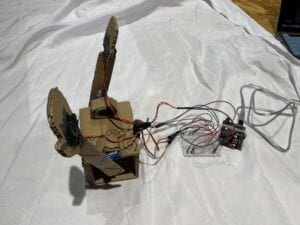
1. The use of a cardboard box as the enclosure: The project’s aim is to provide students with an outlet to express their frustration, and a cardboard box is a familiar and accessible object. The enclosure allows the students to interact with the project in an intimate and tactile way.

2. The NeoPixels to represent the loudness levels: NeoPixels are a popular and visually engaging way to represent sound and were chosen for this project to provide a fun and exciting visual display.

During the user testing session, several adjustments were made to improve the project’s user experience. The user testing process influenced some of the following design decisions:

1. Placement of the Grove Loudness Sensor: Initially, the sensor was placed on the top of the box, which resulted in inconsistent readings. After user testing, the sensor was placed on the side of the box, which provided more accurate readings.

2. Display of the bar in Processing 4: The initial design of the bar was static and did not change in response to the loudness levels. After user testing, the bar was redesigned to show a gradual increase and decrease in volume, which provided a more engaging and dynamic user experience.

These adaptations were effective in improving the project’s user experience and resulted in a more engaging and interactive project.


Fabrication and Production: 

The fabrication and production of an interactive media project can be a challenging and rewarding experience. The goal of this section is to describe the most significant steps in the production process, including the selection of components and materials, the design and fabrication of the physical structure, and the programming of the microcontroller and software. This project was completed by a single person, which adds an extra layer of difficulty to the process.

To create this project, the following components were selected:

– An Arduino board
– A Grove Loudness Sensor
– NeoPixels
– Cardboard
– Wires
– USB cable

The Grove Loudness Sensor was selected for its ability to detect sound and convert it into an analog value. This analog value was used to determine the brightness of the NeoPixels. The NeoPixels were chosen for their ability to create a bright and colorful display, which is essential for an interactive media project. Cardboard was used to create the physical structure of the project because it is lightweight, easy to work with, and can be cut to the desired shape.

The design and fabrication of the physical structure were critical steps in the production process. The box was designed to be compact and easy to transport, with a simple and clean aesthetic. The box was constructed by cutting the cardboard into the desired shape, then gluing the pieces together. The loudness sensor was then mounted inside the box, along with the NeoPixels. The wiring was carefully routed to avoid any potential shorts, and the USB cable was installed to power the Arduino board.

Programming the microcontroller and software was the final step in the production process. The code was written in Arduino and Processing 4. The code was designed to take the analog value from the loudness sensor and map it to the brightness of the NeoPixels. The code also included serial communication between the Arduino and Processing 4 to display the bar graph on the computer screen.

Working alone on this project posed some significant challenges. For instance, it was challenging to hold the pieces together while gluing them. Moreover, programming the microcontroller and software alone could be time-consuming and required a lot of patience. However, these challenges were overcome by careful planning and attention to detail. It was essential to take frequent breaks to avoid frustration and to maintain focus.

The fabrication and production of an interactive media project require careful planning, attention to detail, and perseverance. Working alone added an extra layer of difficulty to the process, but with patience and determination, it was possible to complete this project successfully. The selected components and materials were chosen based on their suitability for the project’s purpose. The design and fabrication of the physical structure were carefully planned to create a compact and visually appealing design. The programming of the microcontroller and software was designed to create an interactive and engaging experience for the user. Overall, this project was a success, and I am proud to have completed it.


Conclusions:

The goal of this project was to create an interactive media project using an Arduino, a Grove Loudness Sensor, and NeoPixels. The project aimed to have the loudness sensor pick up any sound and convert it into an analog value and light up the NeoPixel red based on the said value. In addition, the Arduino software communicated with Processing 4 to open a window that displayed a bar in the center of the screen that showed the gradual decrease and increase of the volume based on the analog value from the loudness sensor.

The project was successful in achieving its stated goals. The audience interacted with the project by making noise to see the response of the NeoPixels and the bar graph in Processing. The project results align with the definition of interaction since the audience had to interact with the project to see a response.

Working on this project alone was challenging, especially when it came to building the physical box and wiring the components together. However, this allowed me to gain valuable experience in problem-solving and time management. If I had more time, I would improve the project by adding more interactivity and visual feedback, such as incorporating different colors for the NeoPixels based on the loudness level.

This project allowed me to learn more about the integration of hardware and software, and how they can be used to create interactive experiences. I am proud of what I have accomplished with this project, and I believe it has value as a prototype for future interactive media projects.

https://drive.google.com/drive/folders/1sijHHCgRAg1_dXmXPcTN4FjJ9vlTAM8D?usp=share_link 

Photos won’t embed for some reason so heres the link with all of the photos

“S.L.A.P.B.O.T” by Gerry Song and Ryan Hiew (Professor Minsky)

“Super Lesioning Advanced Playing slapBox Offense Technology,” also known as “S.L.A.P.B.O.T.” is me and my partner, Ryan Hiew’s, midterm collaboration project. Essentially, we wanted to create a robotic recreation of the commonly played real-life game “slap-bet.” The original game revolved around two people placing both of their respective hands onto the other one. Whoever had their hands placed at the bottom, would try to slap the second person in the back of their hand and the second person would try to react to the slap and move out of the way. We wanted to create this same nostalgic game into a more modern setting and make cold metal and plastic parts slap a person’s hand instead as we thought it would invoke more pain and fear into the player. 

The idea for our project came from a quick brainstorming session that ultimately resulted in us talking about nostalgic mini-games that we used to play anywhere. We got to the subject of the “slap bet” game and we both agreed that it was more fun when each player tried to hurt the other player’s hand as much as possible as it gave the game a sense of thrill. I guess this project was influenced slightly from my group’s research presentation where I played an unfeeling and rude robot assistant. Ryan and I both thought it would be funny to strike fear into people’s minds by making the game way more scary and anxiety-inducing by making the timing random as well as fast while attempting to avoid being slapped by a cold, unfeeling machine. We took the idea a little further by thinking about adding cardboard spikes to the hand of the robot, but we eventually decided that it would probably ruin the aesthetic of the robot as well as having to change the name to “S.T.A.B.B.O.T.”. 

“SLAPBOT” revolves mostly around the aesthetic of the cardboard fingerless hands attached to a cardboard box. Both hands as facing the floor and are attached to a servo motor. Once activated, both hands start flailing up and down as if trying to slap someone. Getting people to actually start the mini-game was the most difficult part of our project as we had so much trouble getting the infrared sensors (the sensors that picked up if someone had been touched by the hands) to work that we did not design the feedback system nor the user design very well. Once we reached the user-testing phase, we had only designed one of the slapping arms with barely any user design or feedback. The project worked fairly well, slapping anyone’s hand that came across it and stopping while printing “HAHA LOSER YOU LOSE” in the serial monitor if the player had been slapped. However, a mere part of the project as well as no feedback other than the serial monitor really hurt the project’s lucidity to the testers.

User testing era SLAPPER: https://youtu.be/sgRPzl4bSXw 


The final part of the project came by too fast. We had originally planned to add sound feedback whenever the player lost as well as another feedback mechanism that would turn on a light when the player lost. However, because of some issues with the code, adding the second arm to the SLAPBOT was much more difficult than expected. We eventually got it to work, but by then there was already barely any time to build and code anything extra. Unfortunately, our only choice was to make it more interesting through a little bit of code. We decided to attach the second arm of the SLAPBOT on the opposite side of the machine and make the slapper into a competition between two players, since the spirit of the original game was competition. Ultimately, this aspect was more of a hinderance than an addition since more than one person pointed out that the project relied too heavily on a two-player mode and could not stand out too much on its own. 

Final version of SLAPBOT: https://youtube.com/shorts/DuSLMNeHxhA?feature=share 

This project could definitely have gone much smoother with the building process. If that had happened, we definitely would have completed a much better user-interface and feedback system as well as making the project much more polished in general. The main problem’s focal point was the lack of time after making the second arm work. If I could do it again, I would focus less on the arms and build/draw the interface better. However, I am still thankful for the project we had built and how it had functioned despite its hiccups. 


Project 1 Documentation

Project Origin and Designs

Our idea for the project originated from a brainstorming session. We had all agreed that it would be interesting to do an interactive performance on the third story of Step 2 of the project, also known as the pandemic story. After deciding the setting, we also brainstormed what kind of interactive project would make living in a pandemic world more bearable. Moreover, the plague in the story would slowly paralyze anybody that is infected, so an interactive design to help them is almost necessary

We ultimately decided on a robot that can be controlled using some kind of… controller. The controller would have to have a small range of motion, as the people using the controller are halfway paralyzed. I believe the original idea of the controller came from my Step 1: Research interactive project: the haptic controller. A haptic controller is basically an interactive controller that responds with the user, giving real time feedback to the user. We ultimately decided to model our haptic controller a little bit off of Stanford Robotics Laboratories’s own haptic controller that was mainly used to control a virtual avatar. However, this controller would be used to control a robot that would do the most mundane tasks for the user.

The problem with the robots however, was that we had to make them as realistic as possible (at least in theory). Robots need to go through multiple stages of testing before they get released into the masses while also needing to improve on its prior model. So we decided that one robot should be an older model and the other should be a new one with better features. And what better features to have on a robot than literal wings. 


Group Dynamic

Getting to work with the group was the best part of the project for me. Interacting with them and having people to bounce my ideas off of while, at the same time, having them pass ideas through me as well. We all basically had the same job but done slightly differently. We all used the cardboard and built different things as well as contributed the storyboarding process, but we had our specific skill sets for these. For example, a teammate suggested the wings, but none of us except her had the artistic capabilities to implement this. 

Rehearsal and Performance

The rehearsing process was the most fun part of the project. We did not exactly have a script to follow, so we just resorted to improvisation. Each of us basically just did what felt right in the given situation. The people controlling the robots made up a random situation for the robots to go through. The robots acted ‘robot-y’ throughout these situations. The actual performance was a rough summation of what we rehearsed. If I were to be very picky about the performance, I would say that we all were a little stiff on stage and could have let loose a bit. Either that or there could have been more of a contrast between robots and the humans, making the humans more lively and the robots more stiff as if they were being controlled. 

Hello world!

Welcome to Web Publishing @ NYU. This is your first post. Edit or delete it, then start creating your site!

Online help is available via the Web Publishing Knowledge Site (wp.nyu.edu/knowledge) and the ServiceLink knowledge base (www.nyu.edu/servicelink). Through ServiceLink, you can find step-by-step instructions, as well as tutorials.

Digital Accessibility

As content creators who create and publish text, images, video, and audio, you must adhere to the NYU Website Accessibility Policy (https://www.nyu.edu/digitalaccessibility/policy) when creating and publishing digital content.

Web Publishing-specific Digital Accessibility Best Practices and examples of how to ensure your content are compliant are available at https://wp.nyu.edu/digitalaccessibility

If you have additional questions, contact the IT Service Desk for assistance. Support is available 24/7/365. For more details, visit www.nyu.edu/it/servicedesk.