Mona Lisa’s Flowers – Fay Guan – Andy Garcia
My previous research led me to understand interaction as a two-way street. Both sides should produce a reaction in response to the other side and this should go back-and-forth and be continuous. Unlearning Language by Lauren Lee McCarthy and Kyle McDonald is a good example of interaction. This installation can detect speech, gestures, and expressions and, upon detection, the machine responds with light, sound, and vibration. The participants are tasked with figuring out how to communicate without being detected. There is continuous mutual response in this installation, making it a very interactive experience. The machine responds to certain behaviors from the participants and the participants respond back by changing the way they communicate.
This idea of mutual response helped me understand interaction and what I wanted out of my project. I think our project is pretty unique, being an interactive 3D painting. In coming up with this idea, I only saw interactive 2D paintings. I think the 3D aspect produces a more inviting and interactive experience. This project can really be for anyone. It is both meant to be admired by those who appreciate art and played with by those who want to be entertained.
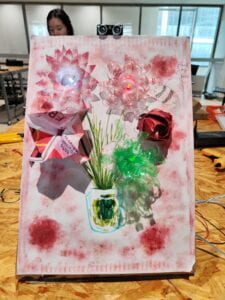
I think our 3D painting is more inviting than a 2D painting. It feels more like something you can touch and play around with. We also wrote the word “touch” on our painting to make it clear to the user that they were welcome to touch it. We made the size and shape of our project appropriate to that of an average painting. We really just used any materials that were accessible to us such as plastic, paper, and cardboard, but I think the everyday materials adds a certain charm and playfulness to our project as well.
The first thing we worked on was crafting the flowers and the painting. To make the plastic flowers, we followed this tutorial found by my partner:
.
To make the paper flowers, we followed this tutorial found by my partner:
I made one plastic flower and one paper flower and drew the main portion of the painting with my markers. My partner made two plastic flowers and one paper flower and painted all the flowers, as well as a background to my drawing, using her makeup. While she was painting, I started working out the technical pieces of our idea.
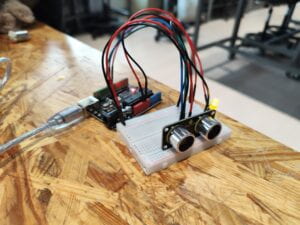
 I first tested our idea with the distance sensor and the fading LED on just the breadboard to make sure our components worked before putting anything into our project. At first, we couldn’t achieve the fading effect, but we discovered that the LED was connected to a digital pin without the line indicating it could be used for analog output so I fixed that. After the code and the wiring all worked to achieve the effect we were looking for, my partner soldered three LEDs to longer wires. At first, she tried to solder multiple LEDs together but they didn’t seem to work so we stuck with single LEDs. Once I tested all three single LEDs and they worked, my partner glued the flowers onto our painting and poked holes in the center of the flowers for the LEDs to go through.
We still needed another interaction so I tested using a temperature sensor to make a servo motor spin. I was successful in doing so so we went with the idea of a spinning flower. My partner carved a holed in our painting to put the flower through but we struggled to secure it.
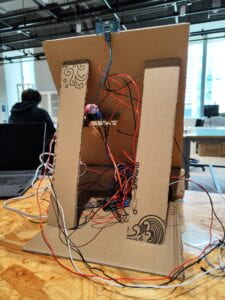
At this stage, we entered the user testing. The overall reaction was positive but our sensors were still on our breadboard and needed to be embedded into our project to make them discoverable while hiding the wires. The interaction was also kind of short. Following the user testing session, I made different lights light up depending on how close the user was to the painting instead of making them light up all at once, which made the interaction slightly longer and more interesting. We put the distance sensor on top of the painting and the temperature sensor was hidden behind the painting where we drew a bee that said, “touch my butt.” To secure the servo motor, we added a ledge and widened the whole so that there would be no resistance when spinning. We also wanted to add more interactive elements but, ultimately, there just wasn’t enough time.
Below is the full code we developed:
temperature = analogRead(tempPin);
Our goal with this project was to make an interactive painting. I think our project results align with my definition of interaction because the 3D painting responds to the user’s actions in different ways. The user is also responding to the painting when discovering these interactions. My audience interacted with the painting in the way that I expected. They sort of played around with the painting to see what would happen. It was confusing for them at first but I think that’s also part of the interaction. The only thing is the temperature sensor with the spinning flower was too hard to understand. Even though the painting gave direction as to where the user should touch, they didn’t know to hold their hand there so it didn’t work as well. If I had more time, I would make that clear. I would also add more interactions because we did want to and just ran out of time. As this was my first time trying to put something together from scratch without directions from the teacher, it was definitely difficult. I’m not a very experienced coder so I put mostly put together codes from examples online and in our class slides. The project was also extremely time consuming and tedious, especially when something small was off. It can be very tedious to find the source of a problem. I think my biggest takeaway is that you have to make things extremely clear for users when developing a product. This was an issue that nearly every project experienced. The creators had to explain their product when they shouldn’t have needed to. I learned that even when you think your product is self-explanatory enough, it oftentimes isn’t because you understand your product too well. It is difficult to view it from the perspective of someone who has never seen it before.

