

Step ONE:
Use one of the computers in #823 and open the green CURA Software using the icon located on the menu at the bottom of the screen.
Load your STL file in Cura Lulzbot (green) by clicking on the icon “LOAD MODEL” located at the upper left of the window. Navigate and find your file on the computer and open it. Or you can also drag your .STL directly into Cura.
Adjust the model before printing if needed by using the transformation tools on the left side of the screen.
MOVE: Clicking one of the arrow heads allows the model to be moved on one axis at a time.
SCALE: Set a specific dimension for the X,Y or Z axis or set a scale percentage in the tool panel. Make sure to tick the “Uniform Scaling” box to preserve the proportions.
ROTATE: Drag on of the rings along the axis. While dragging, the rotate angle is displayed next to the mouse pointer. Press SHIFT for rotating in 45 degrees increments.
DUPLICATE: Add more instances of your model.

Step TWO:
Choose the machine that you are going to use.

Step THREE:
Change the view mode to “layer view” to visualize the print layers of your model and for checking possible problems.

Step FOUR:
Make sure material PLA (Verbatim) is selected and choose one of the profiles for different quality and print speed.
HIGH DETAIL (slow): Try this if you need to print a very detailed and smooth figures such as a sculpture.
STANDARD: Try this if you need to make joints, connection and small parts. This profile is a good trade-off between precision and speed.
HIGH SPEED: Try this if you need to prototype parts in the shortest time possible. Prints will be strong and good looking.

Step FIVE:
Select the Infill percentage.

Step SIX:
Determine whether you need support structures or not.
If overhangs are greater than 45 degrees (with respect to the vertical), they will need support.

Step SEVEN:
Select your build plate adhesion type.

Step EIGHT:
Once you configured all the settings, you can preview the printing time of your model and export the Gcode t the SD card of the 3D printer.

Change or introduce filament
Step ONE:
Turn on the printer and check the 3D printer screen. Turning the knob to navigate and click it to select.
Increase the nozzle temperature to 200 degrees.


Step TWO:
Wait for about 5 min for the temperature to increase. You can check this on the top left corner of the screen.

Step THREE:
Release the clamp and remove the filament.

Step FOUR:
Use the pliers in the 3D print tool box to cut the filament diagonally. Filament cord’s end must be “pointy” for easy entry.

Step FIVE:
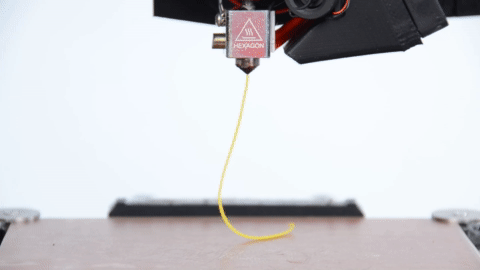
Introduce the filament and push firmly until you can see it coming from the bottom of the nozzle.
*Sometimes filament might be a bit difficult to insert, try wiggling the filament while pushing down.

Step SIX:
Secure the clamp.

Step SEVEN
Insert the SD card into the machine. Make sure the gold pins are facing you when introducing the card.

Step EIGHT:
Select the option “Print From SD” and choose your file to start 3D printing.

Step NINE:
Wait for the 3D printer to initialize and for the first layer to print. This is the most crucial part off the print.
*You can notice that something is going wrong if the first layer of your print is not sticking well to the build platform or the print is deforming and bending.
After the first layer and if everything is going well you can leave do something else but it is good practice to come monitor the printer every 30 min.
