A. Candle Blower – Eric Jiang – Andy Garcia
B. Context and Significance
B.01 Group Project Inspiration/Impact
Our group project was an interactive performance based on a science fiction novel about the plague. The main installation was a cardboard globe through which we interacted with the audience to communicate the global spread of the plague. The group project impacted our midterm project in the following ways. First, our group project did not allow enough time for decoration, which was “unattractive” compared to the projects of other groups at the time. Therefore, my partner and I set aside half a day to decorate our midterm project. Secondly, not all members of our group project were highly engaged in the interaction. So, for our midterm project, we designed an “cake” that required two players to interact and collaborate, the concept and interaction of which is described later in this blog. Most intuitively, of course, my group project entailed making spherical and circular cardboard, as did our midterm project, the former of which gave me the proficiency to prototype the midterm project in a short period of time.
B.02 Previous Projects Analysis
CHLOTHES* by Ty-HX et al.
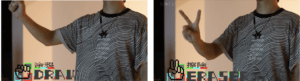
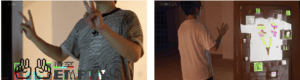
I have previously researched a virtual graffiti project. This interactive art project presents an interactive model that combines virtual graffiti creation with on-site customization. The graffiti interaction seems to be based on gesture recognition technology, using the brand’s clothing as the canvas and the user’s pixelated self-graffiti as the paintbrush to create a live experience. The interaction is created by the user, who expresses their thoughts, emotions, etc. through gesture behavior, which inspires what I think of as interactions that are like visualizations of thoughts. On the surface, it appears to be the creation of a digital garment, but in essence, I think it is the user creating his or her thoughts. The user can create an interactive garment without the use of any objects or external forces, just by standing in front of the screen and waving their hands. This gives the user unlimited possibilities. In addition, the clothing created by the user also conveys information to the user, such as saving the user’s gestures, and this feedback inspires my definition of interaction as a two-way communication. This interactive artwork creates an experience of “self-expression” for the audience, giving them a sense of freedom to express their individuality.
B.03 Our Project Analysis
Our project is to inflate a balloon driven by a candle in some way. Before this, most of the ways to inflate a balloon are blowing up on it directly or using a blower or an air pump directly. However, our attempt to inflate the balloon through the extinguishing of the candle is an indirect way of inflating the balloon, rather than a direct one. That is, ostensibly the user is extinguishing the candle, but actually the user is inflating the balloon. Our project is aimed at any user who has participated in a birthday party, any user who has blown out candles, any user who desires to relax and have fun for a little while, and so on. We want users to feel happy and eager to try our project as soon as they see it, because most people who go to a birthday party or have a birthday cake will want to taste the cake when they see it, and have the urge to blow out the candles when they see them.
C. Conception and Design
C.01 Understanding and Decisions
I think there will be two users involved in the game because in addition to one user interacting on their own, two people working together is also an interaction. They pass information in a certain way, and when there is a common value of information it activates another interaction. Therefore, we designed two microphones instead of one. In addition, one of the less important reasons we used microphone sensors is that it looks like people singing at a party, even though the sensor was meant to simulate candles. Most importantly, our goal for the project was to have users interacting in a happy way, so our design philosophy shifted from health to contests to birthday cakes/party. This guided us to change our prototyping, decorations, and code runs.
C.02 Materials, Form, and Elements
Besides cardboard, we used three colors of acrylic paint, balloons, yellow LEDs, blue clay, white wadding decorations, one air pump, and microphone sensors. The main elements contain birthday, party, and ribbons because the goal of our project is to have users interact in a happy way. The form of the project as a whole is a birthday cake with three separate candles on it. When choosing materials and elements, we referred to real holiday cakes, birthday cakes, the texture and shape of different creams, and the malleability and plasticity of materials (such as wadding and clay). For sensors, we considered using ultrasonic sensors, vibration sensors, and heart rate monitors, none of which were quite right for our project. The reason for rejecting these sensors was that an air pump would not fulfill our interaction requirements, as described later in the fabrication section. We have also used DC motors and fan blades as inputs to manipulate the air pump, but this would have caused some operational difficulties for the user, which would have defeated our project goal of wanting users to interact happily. So we ended up choosing materials, sensors, and elements that fit our project goals without making the user uncomfortable.
C.03 Sketches
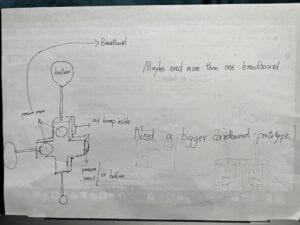
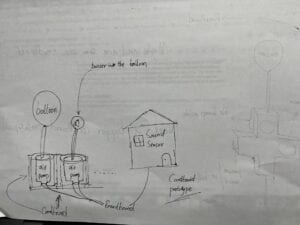
During the proposal phase, I came up with two ideas, both using an air pump as an output to inflate the balloon. One is to visualize distance using ultrasonic sensors. Use this sensor to identify the distance of objects and observe the changes in balloons by moving different objects and distances. The balloon serves as the output and is connected to the breadboard through an air pump. The farther the object sensed by the sensor, the smaller the balloon; The closer the distance, the larger the balloon (alternatively, use pressure sensors instead of ultrasonic sensors to visualize pressure.). The other is to use an air pump to control the balloon and use a sound sensor to detect any sound. If there is continuous sound, control the air pump to continuously inflate. Or identify different tones to fill balloons with different volumes of gas. And place a buzzer inside the balloon and connect it to the circuit, so that the buzzer emits different sounds based on the tone of the external sensor. If the sound stops, control the air pump to deflate. At the same time, this artifact can also simulate heart beat, which is achieved by inflating and deflating the balloon. These two interactions can also be combined, with balloons using different colors (e.g. red balloons represent the heart). In the end, we chose the first sketch about the cardboard shape as the initial plan for our prototype. After user testing, we also added other cardboard prototypes, but did not record more sketches.
D. Fabrication and Production
D.01 Making — Before User Testing
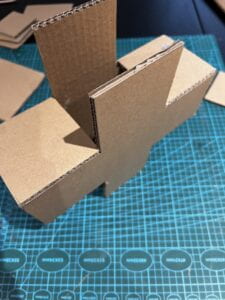
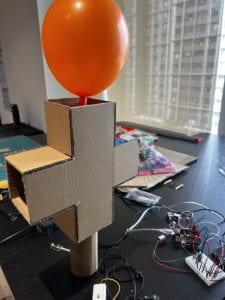
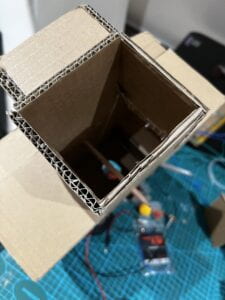
Together we made a model of the cross shape based on sketches and made it possible for the balloon to stand in the middle of the cardboard by means of certain splices. At this very initial stage, our overall idea for the project was still health-related, which is why the prototype was in the shape of a health-related cross. (After that, the idea changed from health to a competition game, and then from a competition game to a fun interaction.)
This video shows our first use of Arduino code to control an air pump (essentially a DC motor) to inflate a balloon.
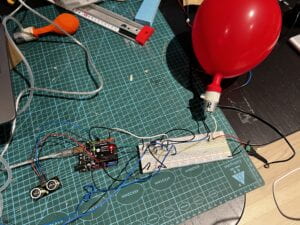
The initial idea of the sensor is to use two of the ultrasonic sensor, vibration sensor, pressure sensor, and heart rate monitor, and when the user makes an action on any two sensors, the balloon will change accordingly. For example, the closer the user’s hand is to the ultrasonic sensor, the bigger the balloon becomes; the heart rate sensor simulates the user’s heartbeat, making the balloon inflate and then deflate in a short period of time, just like a real heart contraction. However, during the preparation process, we found that the air pump could not deflate the balloon effectively, and the heart rate sensor did not work effectively. So, Roman came up with an interesting idea and I was responsible for connecting the circuit.
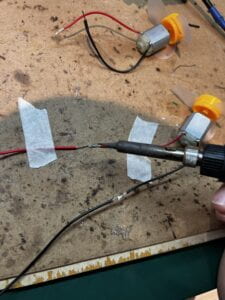
Roman’s idea was to use a DC motor-driven fan blade as an input to control the change of a balloon.We turned it into a balloon blowing contest using two DC motor-based fans: two users flick the fan blades by hand at the same time, and the balloon will only get bigger if both of them rotate its speed to a certain value. We set up a timer, (after the user testing phase, it was suggested that we use a buzzer to act as a timer.) to record the maximum size of the balloon that two users can make larger over a period of time, say 30 seconds. The size was obtained by measuring the diameter with a tape measure. The wires connecting the motors were not long enough, so I soldered the wires from both motors. After that I also soldered the wires of the air pump, the sensors, and the LEDs so that I could make them go through the cardboard candle and cake.
D.02 User Testing
In the user testing session, we were not very well prepared, but we finally finished the test. Different users experienced our project, some thought it was fun, some thought our project could be improved by improving the design and making the fan blades easier to control to improve the sense of interaction, meanwhile, Prof. Andy’s suggestion also produced substantial improvements to our project. Namely, he suggested that we use microphone sensors instead of DC motors and that we could improve our project into a candle blowing game. Combining the professor’s suggestions with the feedback we gathered about the design during user testing, we ended up producing the finished work. The improvement was effective because it gave users feedback while they were participating in the game, instead of only being able to see changes in the balloons as they could before the improvement. On the other hand, the user testing used the item as if two people were competing, but our finished work is more of a celebration, i.e. two people celebrating a birthday together, which makes the user happier.
D.03 Making — After User Testing


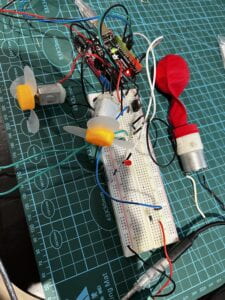
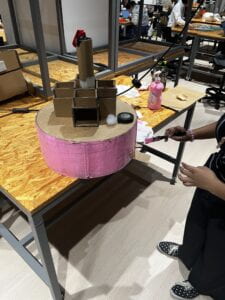
First, I improved the prototype design. On top of the original prototype, I added another layer, which was initially designed to change the placement of the fan and the balloons and thus make it easier for the user to play the game. But later on this design was used for other purposes, namely as a second layer of the cake.

After talking to our professor, I replaced the original DC motor and fan blades with microphone sensors and turned our project into a candle blowing game. The microphone sensors were connected much like the DC motors, but the entire flow design of the game did not change: each user blew into a microphone sensor separately, which served as an input.
I initially tested debugged the code and the video shows me using the microphone sensors to drive the air pump.
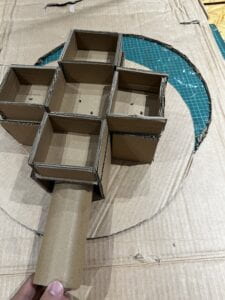
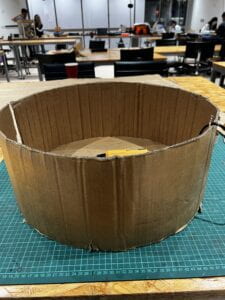
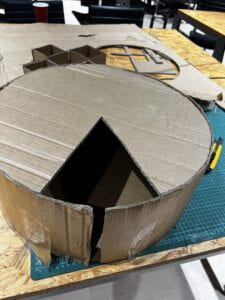
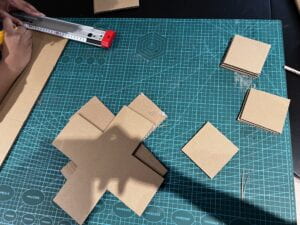
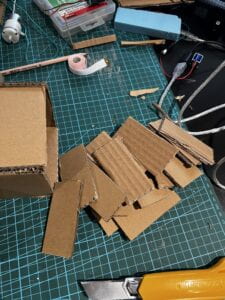
I utilized a larger piece of cardboard to make the bottom and top tier of the cake, with a portion of the bottom cut off to make it easier to put the circuits in and move them around.
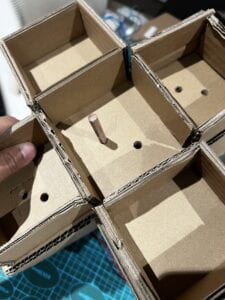

I use certain tools to pierce holes in the different layers through which parts of the circuit’s wires will be connected.
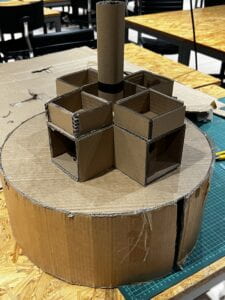
This is my individual prototype of the final cake, with the candles in the center for the balloons and the sides for the two flexible microphones.
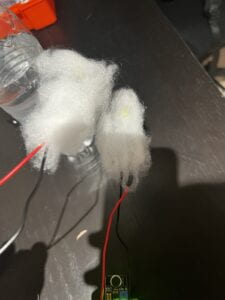
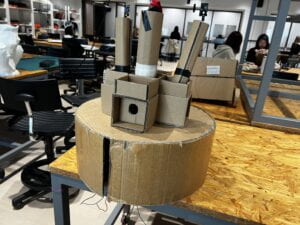
The microphone consists of cardboard, microphone sensors, LEDs and wadding decorations. One of the LEDs I used was yellow and combined with the surrounding wadding to look like a candle flame.
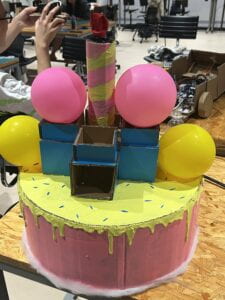
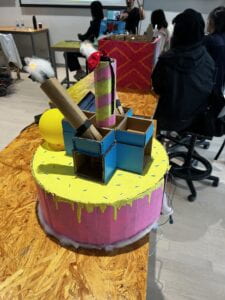
Roman decorated the prototype, she used pink, yellow and blue acrylic paints and simulated the texture of cake buttercream. She also used balloons to match our interactive installation and used paint to create a ribbon effect. The overall expectation lies in our project goals: we want users to be happy, be itching to try, and even hungry when they see our cakes.
D.04 Full Code
float SMOOTHING = 0.5;

int microphone0;
int microphone1;
float smoothed0;
float smoothed1;

/**
* Some of the smoothing code were adapted from the lecture slides found here:
* https://docs.google.com/document/d/18eqDche2Jr6fBVZgD5PnjYvaicLwAgHvyJQ-nhEYxx4/edit#heading=h.6d9udmsyhgu1
*/

long startTime = -1;  // starts out as stopped

void setup() {
  // initialize serial communication at 9600 bits per second:
  Serial.begin(9600);
  // pin 11 connects to
  // base of TIP122
  pinMode(11, OUTPUT);
   pinMode(3, OUTPUT);
    pinMode(4, OUTPUT);

}

void loop() {
  // read the input on analog pin A0:
  int microphone0 = analogRead(A0);
  // print out the value you read:
  //Serial.println(microphone0);
  delay(100);  // delay in between reads for stability

  smoothed0 = smoothed0 * (1.0 - SMOOTHING) + microphone0 * SMOOTHING;

  // read the input on analog pin A1:
  int microphone1 = analogRead(A1);
  // print out the value you read:
  //Serial.println(microphone1);


  smoothed1 = smoothed1 * (1.0 - SMOOTHING) + microphone1 * SMOOTHING;
    Serial.print("smoothed0:  ");
  Serial.print(smoothed0);
      Serial.print("            ");
      Serial.print("smoothed1:  ");
  Serial.println(smoothed1);

  if (smoothed0 >3 && smoothed1 > 3) {
    //turn the airpump ON
    digitalWrite(11, HIGH);
  } else {
    //turn the airpump OFF
    digitalWrite(11, LOW);
  }

  if (smoothed0> 1) {
    //turn the LED0 on
    digitalWrite(3, LOW);
  } else {
    //turn the LED0 OFF
    digitalWrite(3, HIGH);
  }

  if (smoothed1> 1) {
    //turn the LED1 on
    digitalWrite(4, LOW);
  } else {
    //turn the LED1 OFF
    digitalWrite(4, HIGH);
  }


  if (digitalRead(2) == HIGH) {
    startTime = millis();
    tone(8, 1791);    // turn it on
  }

  if (startTime != -1 && millis()-startTime > 15000) {
    noTone(8);       // turn it off
    startTime = -1;  // mark as stopped again
  }

}
D.05 Other Failures
The failure was that when our circuit was standalone, i.e. not put into the cake prototype, it worked fine, but when it was put inside the cake, things like the LEDs didn’t light up, the sensors didn’t work, or the air pump couldn’t be activated. But these problems I solved partly by taping and testing the code under the guidance of our professor, because for the final presentation we still had the problem of the air pump not working. Another failure was that we didn’t have the time and the right code to set a timer, which could be filled with a buzzer. We wanted two users to play for 15 seconds, and when the time was up, the buzzer would sound the “birthday song” tone. I added a buzzer as a timer to the circuit before the final presentation, but it only has one tone, which does not fit our project, and it is manipulated by buttons. If we were more prepared, we would have placed more buttons on the cake as decorative candies and used one of the buttons as a hidden trigger to activate the buzzer.
E. Conclusions
E.01 Project Goals and Results
Our goal is to make the user experience our project with the pleasure of being at a birthday party or sharing a birthday cake with friends. We hope that this interaction will make the user eliminate temporary worries and recall good experiences. My definition of interaction is: an interaction occurs when there is a two-way exchange of information between a person (or machine) and something (a person, machine, product, service, system, environment, etc.). Interaction is ostensibly the structure and content of an object, and is essentially the behavior of the audience. Interaction is a means and a way, like clear thinking being visualized. For example, the audience achieves certain goals through certain behaviors in certain scenarios and with the help of certain media. So, the user is engaging in our candle blowing experience to achieve the goal of pleasuring themselves, and there is a two-way information exchange interaction in this. However, in a way, the user is not visualizing their thinking, which is inconsistent with my definition of interaction. According to my definition of interaction and my expectation of audience reaction, I expected the audience or user to look happy when they blew out the candle and saw the balloon inflate as they exhaled, and to discover how to keep the balloon inflated, or even to blow it up, not through our explanation but on their own! Of course, this didn’t happen due to some unexpected errors and technical reasons. If we had more time, in addition to setting up a reasonable timer and built-in circuitry, I would like to add more colorful balloons so that the user can explore and choose which one they want to inflate, and make the air pump deflate through some electronic components, so that the balloon is not a single movement, but can become more dynamic and flexible. The user can then fully manipulate the balloon to achieve interaction.
E.02 Video of User Interaction
A total of two players are required to participate (here I carry out the two-player task myself). When the players pick up their respective candles, they blow on them, and the microphone sensor next to them senses the blowing up and makes the LEDs go out, otherwise they light up, thus simulating real candles. Due to the bright lights in the studio, the changes in the candles are not very noticeable, but they can be recognized if you look closely. It can be noticed that if only one player is blowing the candle or both players are blowing the candle with different force, there will not be any other reaction. However, when both players blow a certain amount of gas at the same time, the balloon in the center inflates to the rhythm of the player’s blowing up, and at the same time, both of their candles go out. If the value is reached by continuous blowing, the balloon continues to inflate and the candles continue to go out; if the blowing is intermittent, the opposite is true. The balloon is controlled by an 6.0V air pump.
F. Appendix
Some statements about the teamwork:
Our collaboration went well overall, and Roman contributed some very interesting ideas and a pretty nice look to our project. However, the overall prototyping and coding was pretty much done by me alone, and the code was sent to Roman after I finished it and tested it with the professor. She was sometimes out of the studio when I needed work with her together with the prototyping and coding parts. I’m not blaming her for this, as it also had my lack of preparation and I know Roman was sick for about 2 weeks.