
Here is the link to my project
http://wp.nyu.edu/surrealist’s world/
- Surrealist’s World – Emma Song – Andy
CONCEPTION AND DESIGN:
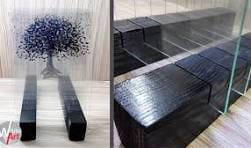
I was inspired by the art of Yves Tanguy, as well as the ideas of surrealism in both art and music that he was a part of. My inspiration came from various places, including layered glass art pieces, as well as the original Tanguy paintings.
This inspired me to create something with layers, that when stacked in front of each other would create a new image.
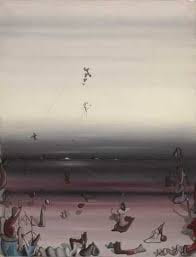
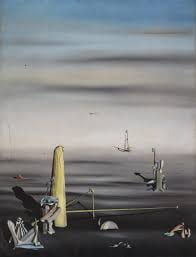
These are some of Tanguy’s paintings, and I was intrigued by the horizontal colors that created the illusion of the foreground and background and the perspective of things getting smaller in the distance. As for the music portion, I have been listening to classical music from the Surrealist era recently: music from composers such as Debussy and Satie. I thought it would be interesting to create an interaction between music and art from the same era, as I thought they would evoke similar feelings in the audience.
During user testing, I didn’t have much completed besides just one panel and one switch, so I had to describe with words to the testers what my plan was for the project. The most common feedback I received was the suggestion to create the clear panels in a larger size so that they would be completely in front of the screen, and the user would look through the panels to see the images on the Macbook screen. However, with other feedback from Professor Andy, I agreed that this wouldn’t be the best choice as it would mean having to look through three layers of plastic to see the images on the screen, and it wouldn’t have the best look. I did get other constructive feedback though, which was to place the box in front of the screen and not off to the side, which would help create a more cohesive interaction as the user plays with the panels while looking at the screen. Another suggestion was the opposite, and to make the box and panels much, much smaller so it wouldn’t seem like the user needs to look through the panels. However, this suggestion was also overridden because it would negate the purpose of creating a “world”, and it would look less like something that the panels were connecting to the screen for, so I ended up keeping the same size. I didn’t have the music section until much later, so my project started out without sound.
- FABRICATION AND PRODUCTION:
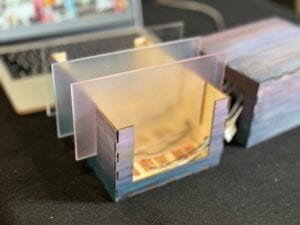
My project started out with the challenge of figuring out the logistics of the matrix. I wanted the sensor for each panel to be unique and trigger something different, but that would require a lot more sensors. I used very simple elements for the tangible part of my project, and started out by making a simple prototype of just one row with cardboard panels.
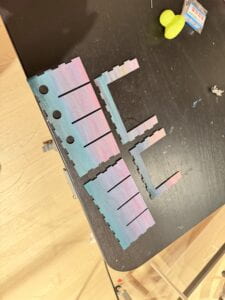
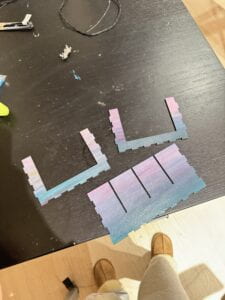
Later, using cuttle, after figuring out the logistics, I started laser cutting the pieces I would need. I created a wooden box to create space that I could insert the panels with. I decided to use acrylic for the panels, but I considered both wood and acrylic sheet for the box itself, as I thought it would look a lot more cohesive if I used all acrylic. However, I decided against it because I thought by using wood, I would be able to paint it and have the colors match the screen aesthetic.
I started with a public template from cuttle, called “Open Box with Finger Joints”. I had some issues with this, because I imported the original box shape SVG without adjusting the parameters in the template beforehand. I ended up having the wrong size of the joints, and had to start over. Measuring out the sizes weren’t too difficult, however I realize that I should have made the slots in the wooden box slightly wider than 3 cm, since that was the exact size of the panels. I originally wanted it to fit perfectly, but later when it was too late I realized they were quite difficult to fit in and push to the bottom. This proved to be an issue, since it was important that the user have an easy time placing the panels in. I was able to fix the problem for the most part, but there were still some occasions where the panel wouldn’t get all the way to the bottom and the image would end up flickering. I tried to fix this by adding foam pieces at the very bottom under the copper tape so that the cushion would allow it to be pressed down better, and this helped a lot.
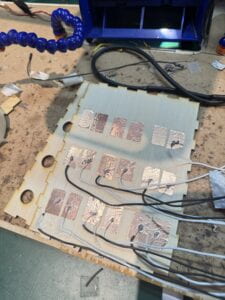
Using wire and copper tape to create switches, I created a matrix of 9 individual open switches, that would be on when they were closed by the copper tape on the 3 panels. I chose this because I wanted a simple way for it to be activated when the panels were placed into their slots. Each panels copper tape had a different placement, so that they could all trigger different images on the screen. Soldering the wires to the copper tape was tedious, but I was able to roughly make it through.
With the coding part, I wanted the images to seem like they were getting smaller in the distance if the user placed the panels farther, so I started by cutting out images and making new scenes in google slides.
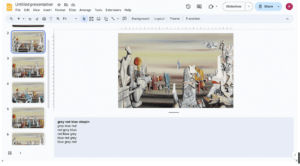
This is an example of one of them. I assigned a song to each order of panels, and made sure that each one had the same placement no matter what order, so it would give the illusion that it was closer or farther away, but in reality it was just getting smaller or bigger. Each of the 9 images was assigned to a switch on my board. I then separated each image, and saved them as separate files.
After this, I tested each of the circuits with copper tape to make sure that my code was working.
Then, I created a distortion affect for the array of all images based on a code I found on Stack Overflow. I found it as a question posed by user Ana F, and adapted it to fit what I wanted it to do. I played around with the speed of the distortion, the amount of fuzz, and tried to make it so that it would have the images still look the most recognizable but also have the ripple moving effect. I tried different versions of it, changing things from the following section:
int numSegments = 100000000; // Number of segments to distort the image
float noiseScale = 0.002; // Scale factor for Perlin noise
float noiseStrength = 40; // Strength of the noise effect
float distortionSpeed = 0.1; // Speed of distortion animation
I played around with the segments/pixels for the noise and speed effects.
Later on, I ended up having to adjust the size of the presentation because the larger the screen was the more pixelated the movement became, and it was not as pleasing to the eye. With the recommendation of Professor Andy, I adjusted the size of the frame, and it had a better, smoother outcome.
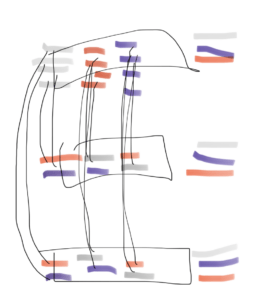
Another consideration was the number of music pieces I would be able to create with the combinations of the three panels I had. I calculated the possibilities using permutations. If using all 3 panels was not required, and even placing just one panel would trigger the music, this would mean there would be 33 total possibilities, and it would be out of my time limit and would take much longer to code for.
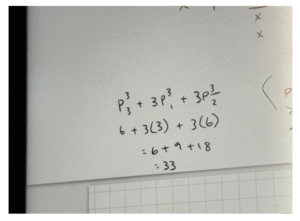
I stuck with the decision to make it so that all 3 panels had to be triggered in order to start the music, so that the total number of possible combinations would be 6. This way, I just chose 6 pieces of music. The music selections were public domain classical music pieces taken from youtube.
- CONCLUSIONS:
The goal for my project was to connect music with different artworks that the user would be able to manipulate. I think I succeeded in connecting the art with the music, and allowing the user to manipulate the perception of their art to how they like. My audience interacted in the way that I intended, which was great. This could be seen as a visually pleasing “record player”, with each panel combination containing different songs. The feedback I got from the final showing was that it could be expanded even more in the future, with more combinations to create even more beautiful scenes. However I think I could have made it an even better experience if I was able to somehow connect the emotion of the artwork to the emotional feel of the music, however, that is different for everyone so it wouldn’t be a feasible task (yet). If I had more time, I would want to tackle the 33 different combinations by using code to assign pieces, and have a larger variety of songs and different genres that would allow for more freedom for the user to express themselves through the interaction, instead of it being a predetermined outcome. I thankfully didn’t have any big setbacks or failures, but from the small mistakes I made I definitely think the lesson I learned was to make sure I allocate enough time. Because I wasn’t rushing to do everything last minute, all the things that could’ve ended up being drastic problems weren’t, as there were easily fixable within the time I had. I’m really proud of what I created in the time I had, since this is something I’m truly passionate about. The first time I saw a Tanguy painting was in the Shanghai Pudong Art Museum, and I was completely captivated. I even did my research project for my core class on Yves Tanguy. My brother inspired my love for classical music too, and all the songs were either recommended by him or were ones I discovered because of him. I’m really glad that I created something that tied my passions together, and also something that I put a lot of effort into on my own. I feel that I really learned a lot from this final project, and definitely more than the midterm project, since I did the final on my own. I think it was a really valuable experience, and something I’m glad I was able to have fun with.
- DISASSEMBLY:
(I already returned my other materials and forgot to take a picture)
- APPENDIX
import processing.serial.*;
import processing.sound.*;

// declare a SoundFile object
SoundFile sound1;
SoundFile sound2;
SoundFile sound3;
SoundFile sound4;
SoundFile sound5;
SoundFile sound6;


Serial serialPort;
int NUM_OF_VALUES_FROM_ARDUINO = 9;
int arduino_values[] = new int[NUM_OF_VALUES_FROM_ARDUINO];

PImage backgroundImg; // Variable to store the background image
PImage grey1; // Variable to store the first image layer
PImage grey2; // Variable to store the second image layer
PImage grey3; // Variable to store the third image layer
PImage red1; // Variable to store
PImage red2; // Variable to store
PImage red3; // Variable to store
PImage blue1; // Variable to store
PImage blue2; // Variable to store
PImage blue3; // Variable to store

int numSegments = 100000000; // Number of segments to distort the image
float noiseScale = 0.002; // Scale factor for Perlin noise
float noiseStrength = 40; // Strength of the noise effect
float distortionSpeed = 0.1; // Speed of distortion animation


boolean drawLayer2 = false; // Flag to control whether to draw the second layer

void setup() {
  size(1270, 750);

  //load sound
  sound1 = new SoundFile(this, "debussyarabesque.mp3");
  sound2 = new SoundFile(this, "chopin.mp3");
  sound3 = new SoundFile(this, "clairedelune.mp3");
  sound4 = new SoundFile(this, "debussyreverie.mp3");
  sound5 = new SoundFile(this, "gymnopedie1.mp3");
  sound6 = new SoundFile(this, "satiejeteveux.mp3");


  // Load background image
  backgroundImg = loadImage("background.png");
  backgroundImg.resize(width, height);

  grey1 = loadImage("grey1.png"); // Load the image "grey1.png"
  grey1.resize(width, height); // Resize grey1 to fit the canvas
  grey2 = loadImage("grey2.png"); // Load the second image "grey2.png"
  grey2.resize(width, height); // Resize grey2 to fit the canvas
  grey3 = loadImage("grey3.png"); // Load the third image "grey3.png"
  grey3.resize(width, height); // Resize grey3 to fit the canvas
  red1 = loadImage("red1.png"); // Load the image "red1.png"
  red1.resize(width, height); // Resize red1 to fit the canvas
  red2 = loadImage("red2.png"); // Load the second image "red2.png"
  red2.resize(width, height); // Resize red2 to fit the canvas
  red3 = loadImage("red3.png"); // Load the third image "red3.png"
  red3.resize(width, height); // Resize red3 to fit the canvas
  blue1 = loadImage("blue1.png"); // Load the image "blue1.png"
  blue1.resize(width, height); // Resize blue1 to fit the canvas
  blue2 = loadImage("blue2.png"); // Load the second image "blue2.png"
  blue2.resize(width, height); // Resize blue2 to fit the canvas
  blue3 = loadImage("blue3.png"); // Load the third image "blue3.png"
  blue3.resize(width, height); // Resize blue3 to fit the canvas

  imageMode(CENTER);
  frameRate(60); // Set the frame rate for animation
  printArray(Serial.list());
  // Put the name of the serial port your Arduino is connected
  // to in the line below - this should be the same as you're
  // using in the "Port" menu in the Arduino IDE
  serialPort = new Serial(this, "/dev/cu.usbmodem101", 9600);
}

void draw() {
  // Draw background image
  PImage distortedBackground = distortImage(backgroundImg, frameCount * 0.2);
  image(distortedBackground, width/2, height/2);

  getSerialData();

  // Draw bottom layer images
  if (arduino_values[6] == 1) {
    drawDistortedImage(grey3);
  }
  if (arduino_values[7] == 1) {
    drawDistortedImage(red3);
  }
  if (arduino_values[8] == 1) {
    drawDistortedImage(blue3);
  }

  // Draw middle layer images
  if (arduino_values[3] == 1) {
    drawDistortedImage(grey2);
  }

  if (arduino_values[4] == 1) {
    drawDistortedImage(red2);
  }
  if (arduino_values[5] == 1) {
    drawDistortedImage(blue2);
  }

  // Draw top layer images
  if (arduino_values[0] == 1) {
    drawDistortedImage(grey1);
  }
  if (arduino_values[1] == 1) {
    drawDistortedImage(red1);
  }
  if (arduino_values[2] == 1) {
    drawDistortedImage(blue1);
  }

  if (arduino_values[0] == 1 && arduino_values[4] == 1 && arduino_values[8] ==1) {
    if (sound2.isPlaying() == false) {
      // start playing it
      sound2.play();
    }
  } else {
    sound2.stop();
  }
  if (arduino_values[1] == 1 && arduino_values[3] == 1 && arduino_values[8] ==1) {
    if (sound4.isPlaying() == false) {
      // start playing it
      sound4.play();
    }
  } else {
    sound4.stop();
  }
  if (arduino_values[1] == 1 && arduino_values[5] == 1 && arduino_values[6] ==1) {
    if (sound3.isPlaying() == false) {
      // start playing it
      sound3.play();
    }
  } else {
    sound3.stop();
  }
  if (arduino_values[2] == 1 && arduino_values[4] == 1 && arduino_values[5] ==1) {
    if (sound6.isPlaying() == false) {
      // start playing it
      sound6.play();
     }
  } else {
    sound6.stop();
  }
  if (arduino_values[2] == 1 && arduino_values[3] == 1 && arduino_values[7] ==1) {
    if (sound1.isPlaying() == false) {
      // start playing it
      sound1.play();
    }
  } else {
    sound1.stop();
  }

  if (arduino_values[0] == 1 && arduino_values[5] == 1 && arduino_values[7] ==1) {
    if (sound5.isPlaying() == false) {
      // start playing it
      sound5.play();
    }
   } else {
    sound5.stop();
  }
}

void getSerialData() {
  while (serialPort.available() > 0) {
    String in = serialPort.readStringUntil(10);  // 10 = '\n'  Linefeed in ASCII
    if (in != null) {
      print("From Arduino: " + in);
      String[] serialInArray = split(trim(in), ",");
      if (serialInArray.length == NUM_OF_VALUES_FROM_ARDUINO) {
        for (int i = 0; i < NUM_OF_VALUES_FROM_ARDUINO; i++) {
          arduino_values[i] = int(serialInArray[i]);
        }
      }
      printArray(arduino_values);
    }
  }
}

void drawDistortedImage(PImage img) {
  PImage distortedImage = distortImage(img, frameCount * distortionSpeed);
  image(distortedImage, width/2, height/2);
}

PImage distortImage(PImage img, float time) {
  PImage result = createImage(img.width, img.height, ARGB);
  result.loadPixels();
  img.loadPixels();

  float segWidth = img.width / numSegments;

  for (int x = 0; x < img.width; x++) {
    for (int y = 0; y < img.height; y++) {
      int index = x + y * img.width;

      // Calculate distortion amount based on Perlin noise and time
      float distortionX = map(noise(x * noiseScale, y * noiseScale, time), 0, 1, -noiseStrength, noiseStrength);
      float distortionY = map(noise(y * noiseScale, x * noiseScale, time), 0, 1, -noiseStrength, noiseStrength);

      // Apply distortion
      int newX = constrain(x + int(distortionX), 0, img.width - 1);
      int newY = constrain(y + int(distortionY), 0, img.height - 1);
      result.pixels[index] = img.pixels[newX + newY * img.width];
    }
  }

  result.updatePixels();
  return result;
}
int button0 = 2;
int buttonState0;

int button1 = 3;
int buttonState1;

int button2 = 4;
int buttonState2;

int button3 = 5;
int buttonState3;

int button4 = 6;
int buttonState4;

int button5 = 7;
int buttonState5;

int button6 = 8;
int buttonState6;

int button7 = 9;
int buttonState7;

int button8 = 10;
int buttonState8;

void setup() {
  Serial.begin(9600);
  pinMode(button0, INPUT);
  pinMode(button1, INPUT);
  pinMode(button2, INPUT);
  pinMode(button3, INPUT);
  pinMode(button4, INPUT);
  pinMode(button5, INPUT);
  pinMode(button6, INPUT);
  pinMode(button7, INPUT);
  pinMode(button8, INPUT);
}

void loop() {
  // to send values to Processing assign the values you want to send
  // this is an example:
   buttonState0 = digitalRead(button0);
   buttonState1 = digitalRead(button1);
   buttonState2 = digitalRead(button2);
   buttonState3 = digitalRead(button3);
   buttonState4 = digitalRead(button4);
   buttonState5 = digitalRead(button5);
   buttonState6 = digitalRead(button6);
   buttonState7 = digitalRead(button7);
   buttonState8 = digitalRead(button8);


  // send the values keeping this format
  Serial.print(buttonState0);
  Serial.print(",");  // put comma between sensor values
  Serial.print(buttonState1);
  Serial.print(",");  // put comma between sensor values
  Serial.print(buttonState2);
  Serial.print(",");  // put comma between sensor values
  Serial.print(buttonState3);
  Serial.print(",");  // put comma between sensor values
  Serial.print(buttonState4);
  Serial.print(",");  // put comma between sensor values
  Serial.print(buttonState5);
  Serial.print(",");  // put comma between sensor values
  Serial.print(buttonState6);
  Serial.print(",");  // put comma between sensor values
  Serial.print(buttonState7);
  Serial.print(",");  // put comma between sensor values
  Serial.print(buttonState8);
  // Serial.print(",");  // put comma between sensor values
  Serial.println();  // add linefeed after sending the last sensor value

  // too fast communication might cause some latency in Processing
  // this delay resolves the issue
  delay(20);

  // end of example sending values
}