HANDS OF MELODY
Deziree Harmon & Jason Tsang
Instructor: Christian Grewell
1. CONTEXT AND SIGNIFICANCE
Prior to beginning this project, we worked with many different forms of interaction inside class. For my group project, our aim was to create an artifact that combines the usage of each of the five senses for an immersive interaction experience. This inspired me when developing my idea because I wanted to create an object that interacts with all of the senses in some way. The overall mission of our project is to be an intersection between tangible gaming playing and digital gaming. In this way, we can use all of the potential of the computer while still allowing for movement, and hands on interaction. This project is intended for anyone that can follow the instructions. It is a puzzle of sorts. If it was to be further developed, perhaps it would include multiple levels and forms of interaction so that it is multiplayer.
2. CONCEPTION AND DESIGN:
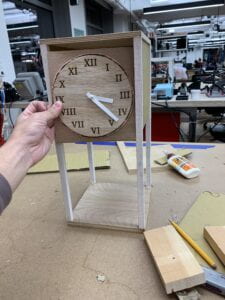
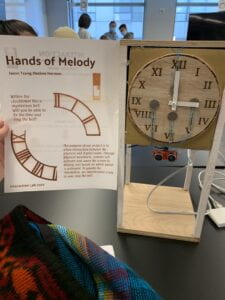
We had to ensure that the project worked effectively and communicated effectively with the user. For this reason, we programmed the serial monitor to give instructions and give distance readings to the user. We were also intentional about designing it so that it was easy for the user to use in regards to how parts move and their size. We used cardboard and wood for the fabrication because the two materials were best for building a structure and also resembling a real grandfather clock. We could have used only cardboard but that would have made the clock less realistic. For the same reason we didn’t use colorful material.
3. FABRICATION AND PRODUCTION:
Our production was broken down into stages.
I. The design stage, in which we drew out sketches and came up with ideas.
In this stage we came up with a lot of potential ideas and planned out the execution. However, things didn’t go quite as planned.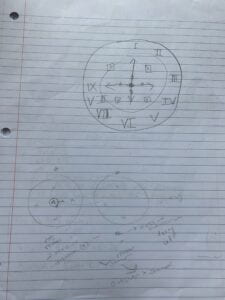
II. In the prototyping stage we started briefly playing with circuits to build ideas on what would work together. Additionally, we laser cut the clock-face.
This was the most difficult stage. While prototyping, we quickly learned what would not be feasible. We initially planned for a clock that had a motor to automatically turn the clock-hands. While prototyping, I contributed by building the circuits step by step and then combining them once I understood them independently. I also designed the clock-face. Here, we learned that there is a lot that we don’t know that made some of our ideas unrealistic. Also, the value of going slow. After doing each circuit independently it was much easier to incorporate them together.
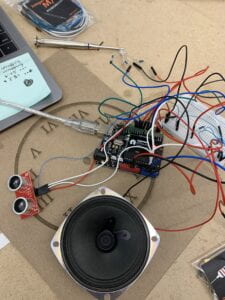
III. In the final production stage we put everything together and made changes for aesthetics and practicality.
My partner built the tower and then we added the circuit in with it. Finally, we had user testing and found small problems with the instructions being unclear and the unreliability of the ultrasonic ranger. As a result, we changed the code to be more clear so that if read, the user would know exactly what to do. We also added a piece for the user to hold so that the sensor would be more functional.
 CONCLUSIONS:
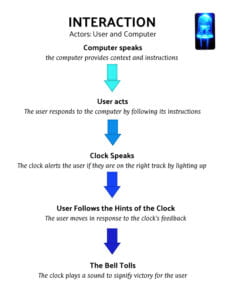
Interaction allows for two actors to cyclically speak and respond to eachother. This game has three actors, the user, computer, and clock. Altogether the project has the intention of allowing for interaction between the digital and tangible realms. If we had more time I would make the game more complex. To do this I would create more factors for the user to the interact with. I would make it have more steps to completion. I would also use paint to make it more aesthetically pleasing. I have learned a lot about how the design process requires patience and perseverance. It was difficult cutting ideas out of the final project. However, at times, it was necessary. A game such as this could be an opportunity for modernized person to person connection. I imagine such interactive games in parks or available for purchase for game nights or even game rooms similar to escape rooms.
USER PRESENTATION
CODE
//BE READY TO READ AND FOLLOW THE INSTRUCTIONS


//WHENEVER YOU ARE READY PRESS THE UPLOAD ARROW


//AFTER THE INSTRUCTIONS THE MONITOR WILL GIVE YOU A DISTANCE READING IN CM


//HOLD THE CARDBOARD CLOCK TO MAKE THE DISTANCE SENSOR MORE ACCURATE


#define fsrpin12 A0
#define fsrpin3 A1
#define fsrpin6 A2
#define fsrpin9 A3

  #define NOTE_C3  131
#define NOTE_CS3 139
#define NOTE_D3  147
#define NOTE_DS3 156
#define NOTE_E3  165
#define NOTE_F3  175
#define NOTE_FS3 185
#define NOTE_G3  196
#define NOTE_GS3 208
#define NOTE_A3  220
#define NOTE_AS3 233
#define NOTE_B3  247
#define NOTE_C4  262
#define NOTE_CS4 277
#define NOTE_D4  294
#define NOTE_DS4 311
#define NOTE_E4  330
#define NOTE_F4  349
#define NOTE_FS4 370
#define NOTE_G4  392
#define NOTE_GS4 415
#define NOTE_A4  440
#define NOTE_AS4 466
#define NOTE_B4  494


//Define variable to store sensor readings:
int fsrreading12; //Variable to store FSR value
int fsrreading3;
int fsrreading6;
int fsrreading9;
const int PIN_RED   = 9; //Red LED on pin 9
const int PIN_GREEN = 11; //Green LED on pin 10
const int PIN_BLUE  = 10; //Blue LED on Pin 11
const int PIN_RED2   = 5;
const int PIN_GREEN2 = 7;
const int PIN_BLUE2  = 6;

  long duration; //duration of sound wave
  int distance; //distance measurement
  int trigPin = 3;
  int echoPin = 2;


int pressure = 10;

 int dx = 10;
 int dy = 50;
 int dz = 55;
 int dX = 56;
 int dY = 75;
//variables to hold our color intensities
int red;
int green;
int blue;

/* This function "Set Color" will set the color of the LED
   rather than doing it over and over in the loop above. */
void setColor(int R, int G, int B) {
  analogWrite(PIN_RED,   R);
  analogWrite(PIN_GREEN, G);
  analogWrite(PIN_BLUE,  B);
}

void setColor2(int R, int G, int B) {
  analogWrite(PIN_RED2,   R);
  analogWrite(PIN_GREEN2, G);
  analogWrite(PIN_BLUE2,  B);
}

int buzzerPin = 0;
void setup() {
  // Begin serial communication at a baud rate of 9600:
  Serial.begin(9600);
  Serial.println("HELLO!, THE BELL TOWER ISN'T AT THE RIGHT TIME. PLEASE FIX THE TIME FOR US!");
  delay(5000);
  Serial. println("IT'S 3:00, HURRY WE NEED THE BELL TO RING! WHEN YOU SET THE TIME CORRECTLY HOLD DOWN ON THE TIME TO LOCK IT IN");
  delay(5000);
  Serial.println("OH, ALSO, ONCE THE LIGHT TURNS BLUE, KEEP HOLDING DOWN AND STEP BACK. YOU HAVE TO GET BACK A CERTAIN DISTANCE SO THAT THE BELL GOES OFF.");

   pinMode(PIN_RED,   OUTPUT);
  pinMode(PIN_GREEN, OUTPUT);
  pinMode(PIN_BLUE,  OUTPUT);
  pinMode(PIN_RED2,   OUTPUT);
  pinMode(PIN_GREEN2, OUTPUT);
  pinMode(PIN_BLUE2,  OUTPUT);
  pinMode(trigPin, OUTPUT); //pin 3 (trig pin) is an output
  pinMode(echoPin, INPUT); //pin 2 (echo) in input

}

void loop() {

  // Read the FSR pin and store the output as fsrreading:
  fsrreading12 = analogRead(fsrpin12);
  fsrreading3 = analogRead(fsrpin3);
  fsrreading6 = analogRead(fsrpin6);
  fsrreading9 = analogRead(fsrpin9);
  // Print the fsrreading in the serial monitor:
  // Print the string "Analog reading = ".
  //Serial.print("Analog reading = ");
  // Print the fsrreading:
 //Serial.println(fsrreading12);
 // Serial.println(fsrreading3);
  // Serial.println(fsrreading6);
//Serial.println(fsrreading9);


  // We can set some threshholds to display how much pressure is roughly applied:
  if (fsrreading12 < 10 and fsrreading3 < 10 and fsrreading6 < 10 and fsrreading9 < 10) {
    //Serial.println(" - No pressure");
    //analogWrite(PIN_RED, 255);
    //analogWrite(PIN_GREEN, 0);
    //analogWrite(PIN_BLUE, 0);
  setColor(200,0, 0);
  } if (fsrreading12 < 10 and fsrreading3 < 10 and fsrreading6 > 10 and fsrreading9 > 10) {

  setColor(0,0, 200);
  } if (fsrreading12 > 10 and fsrreading3 < 10 and fsrreading6 < 10 and fsrreading9 > 10) {
    //Serial.println("");
     setColor(0,200, 0);
  }


  delay(800); //Delay 500 ms.
 digitalWrite(trigPin, LOW); //read sensor
 delayMicroseconds(10);
 digitalWrite(trigPin, HIGH);
 delayMicroseconds(10);
 digitalWrite(trigPin, LOW);

duration = pulseIn(echoPin, HIGH);
distance = duration * 0.034 /2;

 Serial.println(distance);
  if (distance<dy) {
    //Serial.println(" too close");
     setColor2(200,0, 0);
  } if (dy<= distance and  distance <dz) {
     setColor2(0,200, 0);
     Serial.println("a little further");
  } if (dX<=distance and distance < dY) {
     setColor2(0,0, 200);
    // Serial.println("blue");
  } if (distance > dY) { //so all other distance are wrong
    //Serial.println("too far");
     setColor2(200,0,0);
  }
if(fsrreading12 < 10 and fsrreading3 > 10 and fsrreading6 > 10 and fsrreading9 < 10 and dy<= distance and  distance <dz){
  setColor(244,104,232);
  setColor2(244,104,232);
  int melody[] = {
  NOTE_DS4, NOTE_B3, NOTE_CS3, NOTE_FS3, NOTE_FS3, NOTE_CS3, NOTE_DS4, NOTE_B3

};

// note durations: 4 = quarter note, 8 = eighth note, etc.:
int noteDurations[] = {
  4, 4, 4, 2, 4, 4, 4, 2};


  for (int thisNote = 0; thisNote < 8; thisNote++) {

    // to calculate the note duration, take one second divided by the note type.
    //e.g. quarter note = 1000 / 4, eighth note = 1000/8, etc.
    int noteDuration = 1000 / noteDurations[thisNote];
    tone(8, melody[thisNote], noteDuration);

    // to distinguish the notes, set a minimum time between them.
    // the note's duration + 30% seems to work well:
    int pauseBetweenNotes = noteDuration * 1.30;
    delay(pauseBetweenNotes);
  }
  }
  if(fsrreading12 > 10 and fsrreading3 < 10 and fsrreading6 < 10 and fsrreading9 > 10 and dX<=distance and distance < dY){
  int melody[] = {
  NOTE_DS4, NOTE_B3, NOTE_CS3, NOTE_FS3, NOTE_FS4, NOTE_CS3, NOTE_DS3, NOTE_B3
};

// note durations: 4 = quarter note, 8 = eighth note, etc.:
int noteDurations[] = {
  4, 4, 4, 2, 4, 4, 4, 2
};

  for (int thisNote = 0; thisNote < 8; thisNote++) {

    // to calculate the note duration, take one second divided by the note type.
    //e.g. quarter note = 1000 / 4, eighth note = 1000/8, etc.
    int noteDuration = 1000 / noteDurations[thisNote];
    tone(8, melody[thisNote], noteDuration);

    // to distinguish the notes, set a minimum time between them.
    // the note's duration + 30% seems to work well:
    int pauseBetweenNotes = noteDuration * 1.30;
    delay(pauseBetweenNotes);
    // stop the tone playing:
    delay(100);
    Serial.println("THANKS SO MUCH!!");

  }
  }
}
Leave a Reply