CONTEXT AND SIGNIFICANCE:
For my group project, I assembled the Weather Pod – a shower filled with lush greenery, LED screens, and simulated weather. This project had one main problem – that it was extremely unclear to the user how to work the pod. For this project, I wanted to make sure that the user could look at the project and know how it worked without someone telling them. Another thing I learned from my research was the importance of responsiveness. By my definition of interaction, two distinct actors reciprocate exchange between each other. However, how does one of the actors know that their action has been received? In this case, petting the cat gave a visible and audible response – something that was more unclear in the Weather Pod.
The purpose of our project was to try to make a cat that was as realistic as possible to recreate the experience of petting a real-life cat. We decide to pick the most important aspects of the cat and recreate them. We decided that the fabrication was extremely important to our design. In doing this, we wanted no exposed circuits or motors, so the user’s experience was not interrupted. Another important aspect was the cat’s responsiveness. For this, we made it so if the user pets the cat too hard, the cat hisses as a real cat would. However, we could not recreate every element of a real cat, hence why we stuck to a few select aspects.
The project was significant to us because it was intended to serve as a replacement to our cats back home in the US. We also hoped it would help others who cannot see their pets have a little bit of the same experience they would have if their pet were here.
CONCEPTION AND DESIGN:
In what ways did your understanding of how your users were going to interact with your project inform certain design decisions you made? Account for several such decisions. In addition, what form, material or elements did you use? What criteria did you use to select those materials? Why was it/were they best suited to your project purpose, more than any other one/s? What might have been another option? But you rejected it—why?
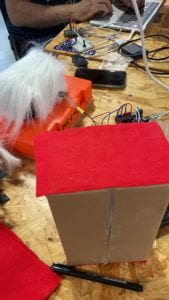
We selected materials that would make the project look realistic, yet still a little cartoony. We used faux fur for the body, head, and tail, completely covering each part so none of the fabrication material was visible. For the box, we wanted to make one that fit the entire body of the cat, so we didn’t have to add arms or legs, apart from two paws that were attached to the box itself. In addition, we also wanted to be able to remove the body and change the circuits inside if needed. We also made covered the box in red felt to make it more appealing to look at, because we wanted the presentation of the project to not distract the user from the functions of the cat. We wanted each part of the cat to be removable from the box so we could change the circuits while also being able to contain them inside. This was done to not take away from the user’s immersion.
FABRICATION AND PRODUCTION:
In this section, describe and assess the most significant steps in your production process, both in terms of failures and successes.
We first started by drafting out our idea. We sketched a rough outline of what we wanted to build and assembled a list of parts we needed.
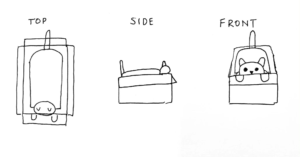
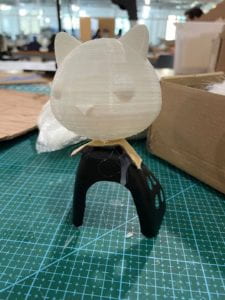
We 3D modeled a cat head in tinkercad, and then began to work on the fabrication of the cat.
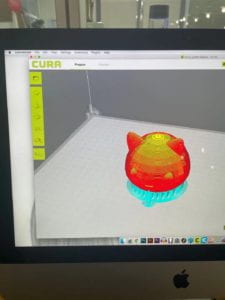
Our steps for fabricating were as such:
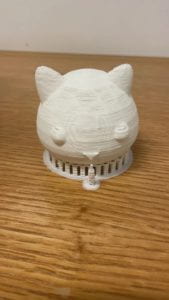
1. 3D print the cat head
This step was very successful. Our model printed perfectly and there were no problems.
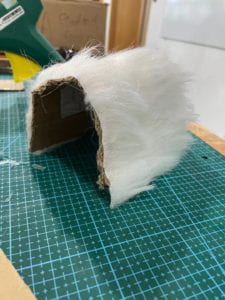
2. Assemble the box, make the body, mount the head on the stand and create the tail
This step also had no problems, apart from Celia burning her finger on hot glue.

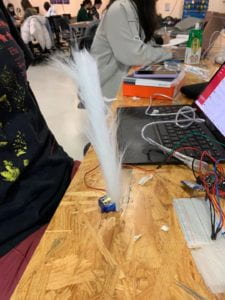
3. Build the first circuit using the FSR sensor and the servo motor
The only problem with this step was mounting the servo to the box since we originally only used tape which broke off. We solved this by hot gluing the motor to the box.
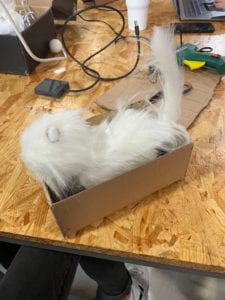
4. Put fur on the head of the cat, and put felt on the box
At this point, there were no problems. However, we could tell at this point that there may be difficulty fitting the entire circuit into the box.
5. Add the MP3 player to the circuit
This step gave us a lot of difficultly. First, we could not figure out how to put the MP3 player actually into the circuit. We asked Rudy for help on this. Second, we needed to get the speaker to play sound, which we also utilized Rudy’s help on. Finally, we needed the circuit to play the sounds that we wanted, which we eventually figured out by reading through the GitHub associated with the MP3 player. Overall, this process took several hours and many different ways of approaching the problem.
6. Add paws to the box and write the code
The paws were easy, but the circuit was extremely difficult to make. Wanted the cat to sit static with the tail moving and no sound, then mild pressure moving the tail more and producing meowing sounds, and finally large pressure moving the tail quickly and producing hissing sounds. However, we struggled to make both the sound play and tail move at the same time. We could make the sound play and the tail move separately, so we knew that there was no problem with the functions individually, only when we put them together. We eventually figured out that we needed to put a certain amount of delay between each function, and got it to work.
Our code ended up being as follows:
/ Define FSR pin:
#define fsrpin A0
//Define variable to store sensor readings:
int fsrreading; //Variable to store FSR value
#include <Servo.h>
#include <Arduino.h>
#include "DYPlayerArduino.h"
#include <SoftwareSerial.h>
// Initialise on software serial port.
SoftwareSerial SoftSerial(10, 11);  //RX TX
DY::Player player(&SoftSerial);
Servo myservo;  // create servo object to control a servo
// twelve servo objects can be created on most boards
int pos = 0;    // variable to store the servo position
void setup() {
  // Begin serial communication at a baud rate of 9600:
  Serial.begin(9600);
   myservo.attach(9);  // attaches the servo on pin 9 to the servo object
     // Also initiate the hardware serial port so we can use it for debug printing
  // to the console..
  Serial.begin(9600);
  Serial.println("Starting the Player...");
  player.begin();
  delay(500);
  player.setPlayingDevice(DY::Device::Sd);
  player.setVolume(30); //
  // player.setCycleMode(DY::PlayMode::Repeat); // Play all and repeat.
}
void loop() {
  player.playSpecified(1);
  int track = 1;
  // Read the FSR pin and store the output as fsrreading:
  fsrreading = analogRead(fsrpin);
  // Print the fsrreading in the serial monitor:
  // Print the string "Analog reading = ".
  Serial.println("Analog reading = ");
  // Print the fsrreading:
  Serial.println(fsrreading);
  // We can set some threshholds to display how much pressure is roughly applied:
  if(fsrreading < 20) {
  //  player.interludeSpecified(player, 1);
  track = 0;
     player.playSpecified(track);
//       for (pos =50; pos <= 85; pos += 1) {
//    myservo.write(pos);
//    delay(10);
//  }
//
//  for (pos = 85; pos >= 50; pos -= 1) {
//    myservo.write(pos);
//    delay(10);
//  }
 myservo.detach();
 // myservo.write(60);
 delay(1700); //
  }
else if (fsrreading > 20 && fsrreading < 80) {
track = 2;
    myservo.attach(9);
    player.playSpecified(track);
   //  player.playSpecified(2);
    for (pos =30; pos <= 75; pos += 1) {
    myservo.write(pos);
    delay(20);
  }
  for (pos = 95; pos >= 50; pos -= 1) {
    myservo.write(pos);
    delay(20);
  }
   delay (300);
  }
else if (fsrreading>80){
  track = 3;
//player.stopInterlude();
  myservo.attach(9);
 player.playSpecified(track);
//    player.playSpecified(3);
    for (pos =20; pos <= 105; pos += 1) {
    myservo.write(pos);
    delay(1);
     player.playSpecified(track);
  }
  for (pos = 105; pos >= 20; pos -= 1) {
    myservo.write(pos);
    delay(1);
  }
  delay (600);
//player.playSpecified(3);
}
//else if(fsrreading < 20) {
//  //  player.interludeSpecified(player, 1);
//  track = 0;
//     player.playSpecified(track);
// }
}
7. Mount the FSR sensor in the cat’s head and connected the circuit to a portable charger so we could hide it inside the cat’s body
We found two main problems in this step. First, that the FSR sensor had trouble being pressed since the fur restricted the amount of pressure it could receive. Also, the portable charger was too big to fit inside the box, so we were forced to put it outside. partially ruining the realism of our project. We fixed the first problem by changing the level of pressure the FSR was activated at. However, the second problem was not fixed. In the future, we would make the box bigger to make it fit a power source.
8. Made the sign that sits around the cat’s head
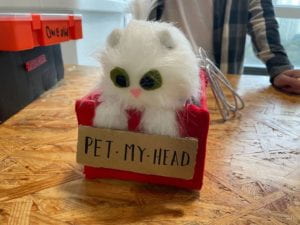
What happened during the User Testing Session? How did your user testing process influence some of your following production decisions? What kind of adaptations did you make? Were they effective? In short, keeping in mind your project goals, how do you account for and justify the various production choices you made for your project? Include sketches and drawings.
During our user testing session, the main criticism we received was that our cat “didn’t do enough”. In order to respond to this, we changed the functions of the cat that used the functions our cat could already do. We wanted the tail to stop moving and the cat to produce sound when at rest. Unfortunately, this wasn’t as easy as we thought. At first, we could get the sound to play but the tail would not stop moving, then we got the tail to move but the sound stopped altogether. Eventually, we figured out that the problem was with the amount of delay involved between our “if” statements, however, it took several hours to finish. This change actually fit with our project goal of making the cat as realistic as possible, so we were happy to include it in our build.
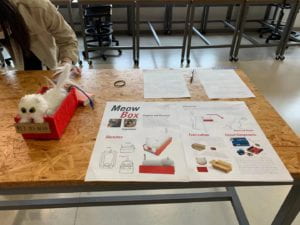
Our final project included these functions, as well as a poster that explained our design process and project functions. However, in our final presentation, we still received the same criticism – we needed to add more functions to the cat. This is a fair point of criticism, since our cat still essentially only does to things – play sound and move its tail.
CONCLUSIONS:
Our main goal was to create a replacement for our cats back home. We created an experience for the user that clearly followed the rules of interaction. The user touches the cat and gets a visible/audible response. Most of our audience reacted well to the project. Since the fur seemed realistic and the cat was cute, it naturally made sense for people to want to touch/pet it. People also enjoyed the responsiveness of the cat. Since they were met with a change of tail movement and sound, people wanted to pet the cat more to see what else it would do. However, the main failure of our project was that it didn’t really do anything else. The cat’s only two functions were to move its tail and produce sound. This led users to quickly lose interest since they would quickly run out of things to do with the project. Another failure we encountered was the use of the FSR sensor. First, the sensor was extremely hard to activate since it only had an extremely small area where it could be pressed. In addition, there was only one on the cat, located inside of the head, so the cat would not respond it its body or paws were touched. In a future model we would improve upon these two aspects by giving the cat more functions, possibly paw movement and head movement, and also adding more FSR sensors so the cat could be pet in multiple areas. Overall, I think we made a good base for a realistic cat, however there is much more that needs to be done in order to make it realistic enough to hold a user’s engagement.
Our goal for this project was fairly simple. We just wanted to create something that could give people the same joy they get from playing with their real pets. In execution, this was difficult since cats are real, living, breathing, animals, and recreating all aspects of them is impossible. We settled on two key aspects in our build – sound, and movement. Our interaction comes from the user petting the cat’s head, and the cat responding with a tail shake and a meow. The hardest part of creating this was coding in the variety of responses the cat can produce. With only three combinations of functions, we still struggled with this step the most, since we found that simultaneous sound and movement were difficult to code. Future models will hopefully include more functions for the user to play with, creating the most realistic cat possible. We just want people to experience the same joy playing with the Meow Box that they do with a real cat.