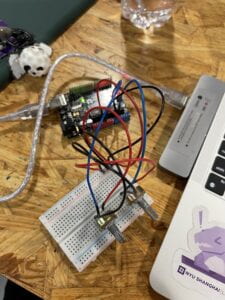
Arduino:
For my Arduino, I used the example code SendMultipleValues as a foundation. For my controller I decided to use a Potentiometer. On my code, it listed that I had two sensor values, but I ended up just using one of them. I wanted my Potentiometer to control the placement horizontally on my Processing screen, and also the shade when it is at a specific range of coordinates. In my opinion this code could be a lot more sophisticated. For example, delete the miles() code and sensorValue2. Since I only used one Potentiometer, those two values are not needed.
CODE:
#include "SerialRecord.h"

// Change this number to send a different number of values
SerialRecord writer(3);


void setup() {
  Serial.begin(9600);
}

void loop() {
  int sensorValue1 = analogRead(A0);
  int sensorValue2 = analogRead(A2);


  writer[0] = millis() % 1024;
  writer[1] = sensorValue1;
  writer[2] = sensorValue2;
  writer.send();

  // This delay slows down the loop, so that it runs less frequently. This
  // prevents it from sending data faster than a Processing sketch that runs at
  // 60 frames per second will process it. It also makes it easier to debug the
  // sketch, because values are received at a slower rate.
  delay(20);
}

Processing:
For Processing I first set a global PImage Variable as Picture. Than I set Picture equal to the picture file I named ahead of time. I first saved the Processing file, I then created a data file within the saved filed. From there I added the picture I wanted to work with into the data file. Furthermore, this code was built on top of the ReceiveMultipleValue example in Processing. Since my picture was too big, I used the resize() function to adjust the size of it. I set an integer value to my serialRecord so that it will connect my Processing with my Arduino. Since I only used one Potentiometer, I just wanted it to shift my picture left or right based on the number on my serialRecord. The y value stayed constant so it would not move up or down. I set value1 as my x value, so whenever the Potentiometer was turned it will be reflected on the position of my picture. To make it a little bit more complex, I added a tint to my picture. So based on the range of my serialRecord, it will have a tint for that range.
CODE:
import processing.serial.*;
import osteele.processing.SerialRecord.*;

PImage Picture;

Serial serialPort;
SerialRecord serialRecord;

void setup() {
  size(800, 800);
  Picture = loadImage("Recitation10.jpg");
  image(Picture, 0, 0);
  Picture.resize(600, 600);
  noStroke();
  fill(102);

  String serialPortName = SerialUtils.findArduinoPort();
  serialPort = new Serial(this, serialPortName, 9600);

  // If the Arduino sketch sends a different number of values, modify the number
  // `2` on the next line to match the number of values that it sends.
  serialRecord = new SerialRecord(this, serialPort, 3);
}

void draw() {
  background(255);

  serialRecord.read();
  int value2 = serialRecord.values[1];
  int value1 = serialRecord.values[2];

  image(Picture, value1, width/2);
  if (value1 < 450) {
    tint(0, 0, 255, 150);
  } else if (value1 >= 450) {
    tint(100, 0, 255, 150);
  } else {
    noTint();
  }


  imageMode(CENTER);
  if (frameCount % 2 == 0) {
    image(Picture, value1, width/2);
  } else {
    image(Picture, value1, height/2);
  }
}