Interaction lab recitation documentation blog post 5


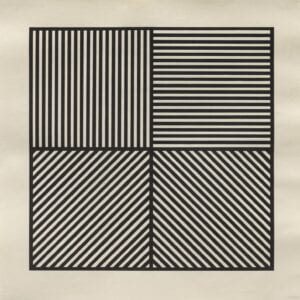
A Square Divided Horizontally and Vertically into Four Equal Parts, Each with a Different Direction of Alternating Parallel Bands of Lines 1982 Sol LeWitt 1928-2007 Purchased 1984 http://www.tate.org.uk/art/work/P77013

Sol LeWitt, A Square Divided Horizontally and Vertically into Four Equal Parts, Each with a Different Direction of Alternating

Found this motif by clicking the link on interaction lab recitation website.
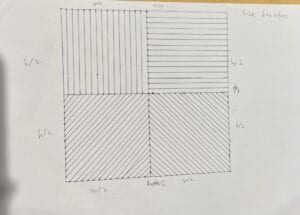
Really like the diagram and thought it would be easier to draw on processing by drawing four rectangle and split equally and draw 15 lines in each.

My rough sketch 

my code:

int s = 20;
strokeWeight(4);
size(600,600);
rect(0,0, width/2,height/2);
rect(width/2,0, width/2,height/2);
rect(0,height/2, width/2,height/2);
rect(width/2,height/2, width/2,height/2);

line(s,0,s,width/2);
line(s*2,0,s*2,width/2);
line(s*3,0,s*3,width/2);
line(s*4,0,s*4,width/2);
line(s*5,0,s*5,width/2);
line(s*6,0,s*6,width/2);
line(s*7,0,s*7,width/2);
line(s*8,0,s*8,width/2);
line(s*9,0,s*9,width/2);
line(s*10,0,s*10,width/2);
line(s*11,0,s*11,width/2);
line(s*12,0,s*12,width/2);
line(s*13,0,s*13,width/2);
line(s*14,0,s*14,width/2);

line(width/2,s,width,s);
line(width/2,s*2,width,s*2);
line(width/2,s*3,width,s*3);
line(width/2,s*4,width,s*4);
line(width/2,s*5,width,s*5);
line(width/2,s*6,width,s*6);
line(width/2,s*7,width,s*7);
line(width/2,s*8,width,s*8);
line(width/2,s*9,width,s*9);
line(width/2,s*10,width,s*10);
line(width/2,s*11,width,s*11);
line(width/2,s*12,width,s*12);
line(width/2,s*13,width,s*13);
line(width/2,s*14,width,s*14);

line(0,height/2 + s,s,width/2);
line(0,height/2 + s*2,s*2,width/2);
line(0,height/2 + s*3,s*3,width/2);
line(0,height/2 + s*4,s*4,width/2);
line(0,height/2 + s*5,s*5,width/2);
line(0,height/2 + s*6,s*6,width/2);
line(0,height/2 + s*7,s*7,width/2);
line(0,height/2 + s*8,s*8,width/2);
line(0,height/2 + s*9,s*9,width/2);
line(0,height/2 + s*10,s*10,width/2);
line(0,height/2 + s*11,s*11,width/2);
line(0,height/2 + s*12,s*12,width/2);
line(0,height/2 + s*13,s*13,width/2);
line(0,height/2 + s*14,s*14,width/2);
line(0,height/2 + s*15,s*15,width/2);

line(s,height,width/2,height/2 + s);
line(s*2,height,width/2,height/2 + s*2);
line(s*3,height,width/2,height/2 + s*3);
line(s*4,height,width/2,height/2 + s*4);
line(s*5,height,width/2,height/2 + s*5);
line(s*6,height,width/2,height/2 + s*6);
line(s*7,height,width/2,height/2 + s*7);
line(s*8,height,width/2,height/2 + s*8);
line(s*9,height,width/2,height/2 + s*9);
line(s*10,height,width/2,height/2 + s*10);
line(s*11,height,width/2,height/2 + s*11);
line(s*12,height,width/2,height/2 + s*12);
line(s*13,height,width/2,height/2 + s*13);
line(s*14,height,width/2,height/2 + s*14);
line(s*15,height,width/2,height/2 + s*15);

line(width/2,height/2,width, height);
line(width/2+s,height/2,width+s, height);
line(width/2+s*2,height/2,width+s*2, height);
line(width/2+s*3,height/2,width+s*3, height);
line(width/2+s*4,height/2,width+s*4, height);
line(width/2+s*5,height/2,width+s*5, height);
line(width/2+s*6,height/2,width+s*6, height);
line(width/2+s*7,height/2,width+s*7, height);
line(width/2+s*8,height/2,width+s*8, height);
line(width/2+s*9,height/2,width+s*9, height);
line(width/2+s*10,height/2,width+s*10, height);
line(width/2+s*11,height/2,width+s*11, height);
line(width/2+s*12,height/2,width+s*12, height);
line(width/2+s*13,height/2,width+s*13, height);
line(width/2+s*14,height/2,width+s*14, height);
line(width/2+s*15,height/2,width+s*15, height);

line(width/2,height/2 + s, width – s, height);
line(width/2,height/2 + s*2, width – s*2, height);
line(width/2,height/2 + s*3, width – s*3, height);
line(width/2,height/2 + s*4, width – s*4, height);
line(width/2,height/2 + s*5, width – s*5, height);
line(width/2,height/2 + s*6, width – s*6, height);
line(width/2,height/2 + s*7, width – s*7, height);
line(width/2,height/2 + s*8, width – s*8, height);
line(width/2,height/2 + s*9, width – s*9, height);
line(width/2,height/2 + s*10, width – s*10, height);
line(width/2,height/2 + s*11, width – s*11, height);
line(width/2,height/2 + s*12, width – s*12, height);
line(width/2,height/2 + s*13, width – s*13, height);
line(width/2,height/2 + s*14, width – s*14, height);
line(width/2,height/2 + s*15, width – s*15, height);
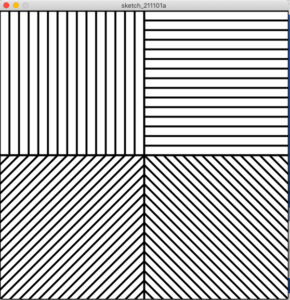
MY SKETCH ON PROCESSING

Interaction lab midterm project individual reflection

Seeing your sound by Angel & Amber -Marcela

  1. CONTEXT AND SIGNIFICANCE

My previous midterm group project was something that shows the interaction between human and machines. Using strings to show the connections between them and his the transformation of emotions are formed. People provide instructions, which it receives and acts upon, triggering my understanding and definition of interaction: two characters communicate with each other, and both have reactions to each other depending on their communication, creating a loop. As a consequence of this research, I’ve decided to make a voice-activated sensor light that can receive people’s instructions and is helpful in daily life.We improved our idea even further to make it more interactive, which means that not only will the light turn on when there is a sound, but it will also change colors according on the varying volumes of individuals supplying the light. It is unique to our project since it is built specifically for deaf impaired persons. It has unique significance for this target group since deaf individuals cannot hear sound or music, thus they may “hear”  their own voice by looking at the various colors in the light.

  1. CONCEPTION AND DESIGN:

In what ways did your understanding of how your users were going to interact with your project inform certain design decisions you made? Account for several such decisions. In addition, what form, material or elements did you use? What criteria did you use to select those materials? Why was it/were they best suited to your project purpose, more than any other one/s? What might have been another option? But you rejected it—why?  

My users will interact with my project by standing within 80 center miters of it and making a sound, causing the light to switch on. They may then speak any things with varying volumes, causing the light to change colors. The volume-based colors are shown below.

To develop my project, I picked an Arduino circuit, a color-changing light belt, and some unique sensors based on my understanding of the interaction between my users and my product. Meanwhile, because it is a light, we needed to give it an aesthetic aspect, so we selected to embellish it with Laser cut out forms.

Finally, in addition to the fundamental components in an Arduino circuit and a light belt, I chose to employ an analog sound sensor to detect user loudness and an Ultrasonic Ranger to measure distance. The criteria were that it had to meet the volume and distance requirements for user engagement with the project. We picked these two sensors directly because they best fit our project’s objectives. We had a particular aim of what sort of mode we wanted, which was to gather data on users’ volume and the distance between the project and the users.

  1. FABRICATION AND PRODUCTION:

Our manufacturing process consists of four major steps:

1. Create the light’s frame and lampshade.

We cut off the frames and used the Laser cut to build the lamp-shade after carefully calculating and creating the designs. The frames and cover were then glued together with 502 glue. This procedure was effective since the lamp-shade was both appealing and stable.

Throughout this procedure, I made sketches of the lamp-shade and its dimensions. And then we cut the frames out and glued them together.

(Sketch)

(Laser cut)

2. Build the circuit and write the code

First, we looked over the equipment on the interaction lab website to figure out how to attach the sound sensor. I was able to attach the sensor using the diagram.

(Circuits shown above)

I knew we had to use the “map” code since we had to convert the loudness signal to the color of the light. After asking our buddies how to code the many colors of the light belt, I learned how the “leds[i]” function and utilized “CHSV” to control different colors. So, here are my codes:

#include <FastLED.h>
#define NUM_LEDS 29
#define DATA_PIN 6

//CRGB leds[NUM_LEDS];
CRGBArray<NUM_LEDS> leds;

//boolean check = false;

void setup() {
  // initialize serial communication at 9600 bits per second:
  Serial.begin(9600);
  pinMode(6, OUTPUT);
  FastLED.addLeds<NEOPIXEL, DATA_PIN>(leds, NUM_LEDS);
}

void loop() {

  //read sensor value
  int sensorValue = analogRead(A0);

  //map sensorValue to color - test the min & max
  int colorValue = map(sensorValue, 65, 120, 0, 360);

  //assign color value to LEDs
  for (int i = 0; i < NUM_LEDS; i++) {
    //leds[i] = CRGB(sensorValue, sensorValue, sensorValue);
    if (sensorValue < 77) {
      leds[i] = CHSV(colorValue, 255, 0); //quiet
    } else {
      leds[i] = CHSV(colorValue, 255, 255); //loud
    }
  }

  //FastLED.setBrightness();

  FastLED.show();

  //print values in monitors
  Serial.println(sensorValue);
  //Serial.println("color="+ colorValue);
  delay(50);
}

After testing the project, we discovered that because there is always noise in the environment, it may light up all the time. As a result, we decided to include another distance sensor-Ultrasonic Ranger-to ensure that the light would only switch on when individuals get close enough.

Code for ultrasonic sensor:

// ---------------------------------------------------------------- //
// Arduino Ultrasoninc Sensor HC-SR04
// Re-writed by Arbi Abdul Jabbaar
// Using Arduino IDE 1.8.7
// Using HC-SR04 Module
// Tested on 17 September 2019
// ---------------------------------------------------------------- //

#define echoPin 2 // attach pin D2 Arduino to pin Echo of HC-SR04
#define trigPin 3 //attach pin D3 Arduino to pin Trig of HC-SR04

// defines variables
long duration; // variable for the duration of sound wave travel
int distance; // variable for the distance measurement

void setup() {
  pinMode(trigPin, OUTPUT); // Sets the trigPin as an OUTPUT
  pinMode(echoPin, INPUT); // Sets the echoPin as an INPUT
  Serial.begin(9600); // // Serial Communication is starting with 9600 of baudrate speed
  Serial.println("Ultrasonic Sensor HC-SR04 Test"); // print some text in Serial Monitor
  Serial.println("with Arduino UNO R3");
}
void loop() {
  // Clears the trigPin condition
  digitalWrite(trigPin, LOW);
  delayMicroseconds(2);
  // Sets the trigPin HIGH (ACTIVE) for 10 microseconds
  digitalWrite(trigPin, HIGH);
  delayMicroseconds(10);
  digitalWrite(trigPin, LOW);
  // Reads the echoPin, returns the sound wave travel time in microseconds
  duration = pulseIn(echoPin, HIGH);
  // Calculating the distance
  distance = duration * 0.034 / 2; // Speed of sound wave divided by 2 (go and back)
  // Displays the distance on the Serial Monitor
  Serial.print("Distance: ");
  Serial.print(distance);
  Serial.println(" cm");
}

After that, we tested it again and discovered that it was insufficiently sensitive, which meant that it would only turn on when we blew or tapped the microphone on the sound sensor. As a result, I approached Marcela for assistance. Finally, we discovered a solution to this problem: calibrate during the first 5 seconds. The sensor could test the minimum and maximum volume using this manner, and as a result, it would map the volume between the sensor in and sensorMax to all of the light’s hues. It was a scientific procedure because it was capable of removing the effects of noise. As a result, below are the final codes.

#include <FastLED.h>
#define NUM_LEDS 29
#define DATA_PIN 6

// variables:
int sensorValue = 0;         // the sensor value
int sensorMin = 1023;        // minimum sensor value
int sensorMax = 0;           // maximum sensor value

//CRGB leds[NUM_LEDS];
CRGBArray<NUM_LEDS> leds;

//boolean check = false;

#define echoPin 2 // attach pin D2 Arduino to pin Echo of HC-SR04
#define trigPin 3 //attach pin D3 Arduino to pin Trig of HC-SR04

// defines variables
long duration; // variable for the duration of sound wave travel
int distance; // variable for the distance measurement

void setup() {
  // initialize serial communication at 9600 bits per second:
  Serial.begin(9600);
  pinMode(6, OUTPUT);
  FastLED.addLeds<NEOPIXEL, DATA_PIN>(leds, NUM_LEDS);

  pinMode(trigPin, OUTPUT); // Sets the trigPin as an OUTPUT
  pinMode(echoPin, INPUT); // Sets the echoPin as an INPUT
  Serial.begin(9600); // // Serial Communication is starting with 9600 of baudrate speed
  //  Serial.println("Ultrasonic Sensor HC-SR04 Test"); // print some text in Serial Monitor
  //  Serial.println("with Arduino UNO R3");

  // calibrate during the first five seconds
  while (millis() < 5000) {
    sensorValue = analogRead(A0);
    Serial.print("callibrating...sec: ");
    Serial.println(millis()/1000);

    // record the maximum sensor value
    if (sensorValue > sensorMax) {
      sensorMax = sensorValue;
    }

    // record the minimum sensor value
    if (sensorValue < sensorMin) {
      sensorMin = sensorValue;
    }
  }
}

void loop() {

  //read sensor value
  int sensorValue = analogRead(A0);
  sensorValue = constrain(sensorValue, sensorMin, sensorMax);

  //map sensorValue to color - test the min & max
  int colorValue = map(sensorValue, sensorMin, sensorMax, 0, 360);


  // Clears the trigPin condition
  digitalWrite(trigPin, LOW);
  delayMicroseconds(2);
  // Sets the trigPin HIGH (ACTIVE) for 10 microseconds
  digitalWrite(trigPin, HIGH);
  delayMicroseconds(10);
  digitalWrite(trigPin, LOW);
  // Reads the echoPin, returns the sound wave travel time in microseconds
  duration = pulseIn(echoPin, HIGH);
  // Calculating the distance
  distance = duration * 0.034 / 2; // Speed of sound wave divided by 2 (go and back)
  // Displays the distance on the Serial Monitor
  Serial.print("Distance: ");
  Serial.print(distance);
  Serial.println(" cm");

  //assign color value to LEDs
  for (int i = 0; i < NUM_LEDS; i++) {
    if (distance < 80) {
      if (sensorValue < sensorMin*1.15) {
       leds[i] = CRGB::Black;
      } else {
        leds[i] = CHSV(colorValue, 255, colorValue); //loud
      }
    } else {
      leds[i] = CRGB::Black;
    }
  }

  //FastLED.setBrightness();
  FastLED.show();

  //print values in monitors
  Serial.println(sensorValue);
  Serial.print("sensorMin: ");
  Serial.println(sensorMin);
  Serial.print("sensorMax: ");
  Serial.println(sensorMax);

  //Serial.println("color="+ colorValue);
  delay(50);
}

Throughout this process, I was responsible for continuing to evaluate how the sensor worked and thinking of ways to improve it. Sensors or switching circuits If the sensor couldn’t work well or wasn’t sensitive enough, I would ask fellows or professors to make improvements. Finally, I was able to make it operate as close to what we desired as possible. My partner and I settled on the distance data and the improvements to the project.

3. User test

During the User Testing Session, I discovered a problem in which users were unsure how to engage with our software, which I had to explain to them. As a result, we decided to include a phony microphone to alert users that they must speak or sing to the project. We chose to design a sketch map-like way since attaching a fake microphone to it was ineffective.

In addition, to show users how changing their volume affects the lights, we added a color map like this:

And we identified the high and low tendency on the diagram so that users knew exactly what they could do to interact with our project  and how the interaction works.

It was effective in my opinion since after making this change, it was evident where the relationship between users and the project was.

All of the decisions I took to develop our project had one fundamental purpose in mind: to make it more interactive and to make the interaction obvious to users, so that we could create a better project that was both useful and entertaining.

4. Designing the poster.

During the process, I wrote the introduction of our project, and my partner designed the poster with Gravit Designing. 

(Model made by Tinkercad)


CONCLUSIONS:

To recap, the purpose of our study was to enable deaf people to “see” the sounds around them. They can perceive varied volumes of sound by interacting with the project’s various colors. I believe the outcome of our project aligned with my concept of interaction, because the audience spoke or made sounds near the microphone and received the reaction of different colors of our project’s light. When you changed the volume, the color changed visibly, and it was interactive. However, when the background noise was really loud, the sensor would detect that as well, and the light would turn on, which was not consistent with user-project interaction.

Finally, the crowd was able to talk to the microphone because I put a sketch map to it, which made it more obvious. They experimented with volume and tone to figure out how the project worked, and they discovered that adjusting the volume caused the color to change. I believe this process was interactive since the audience was attempting to interact with our project and the software was responding. To me, it was a success.

If I had more time to create my project, I would run it through more tests to discover a code that can practically remove background noise and make the sensor more sensitive, making it more entertaining and engaging. I would also increase the brightness of the light.

This method taught me a lot. When the sensor detected more background noises and kept turning on, I understood that there are always circumstances that I overlooked. As a result, when creating a project, I must be careful and considerate. Aside from that, when the code didn’t function and I had to make thousands of changes to it, I realized that coding isn’t only a logical job; I have to consider many other variables and make many changes and test it out, which is also an alterable and flexible task. When the color of the light changed for sure, I realized that producing a project is a task of our whole ability, not only our technical competence.

I learnt that building a project is a test of our whole skill, including not only our capacity to learn new things, such as coding and connecting Arduino, which we accomplished during the process, but also our patience, ability to handle pressure, and tenacity in the face of several failures. Most significantly, I definitely increased hands on building skills!

Include the poster, images, and video(s) of your project in the blog post!

(Poster)

6

RIC Week 6: References and Inspiration

Revised lab report:

https://docs.google.com/document/d/12DKbQJngVQNPNeY2tEFKdphftGEzitLD10-5E7whLJE/edit

Pinterest Link: https://www.pinterest.com/caye88/remade-in-china/

Water Sprinkler
With our Community Garden #2 ideas involving the creation of a hose head to enhance the way people watered their plants, this bottle sprinkler seemed very beneficial. We could simply make a sprinkler head out of a hose, a water bottle, a knife, and tape to greatly extend the range of the hose spray. This, however, may not be the greatest long-term option depending on the quality of the plastic. The plastic may get overly filthy or lose structural integrity over time, resulting in it being tossed into the recycling bin too rapidly, which does not comply to Cradle to Cradle procedures.


Plastic Bag Hammock
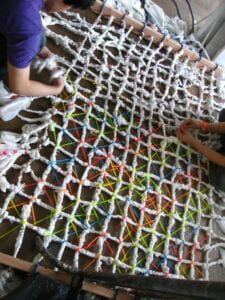
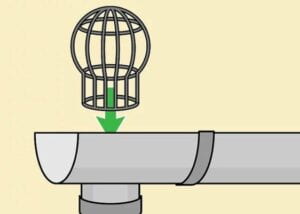
This hammock’s grid design appears to be a great way for creating a water filter for a rain gathering system. This hammock made use of over 600 bags, but we can recreate this braiding process on a smaller scale to build a net that fits within a tube. This net prevents bigger things, such as leaves, from entering the water collection bucket. The braiding process should result in a strong net that does not need to be updated frequently.


Plastic Bottle Greenhouse

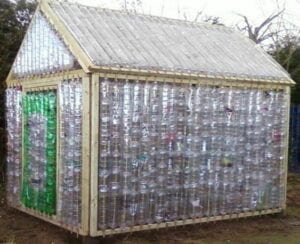
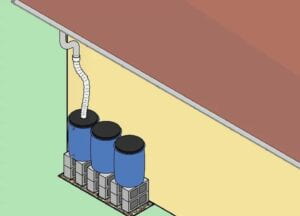
This creative usage of bottles creates walls and a roof for a functional green home. I was really intrigued by the way they piled bottles into vertical rods. A tube would be required to carry water from a rooftop into buckets for a water collection system. If the connection between the tubes is strong enough, this might be an excellent long-term water gathering option.

Source:https://blog.manomano.co.uk/create-a-diy-plastic-bottle-greenhouse/

Learn from China

These knots can be used to secure connections in weaving/crochet work. Instead of yarn or thread, we may cut up plastic bags into thin strips and tie them.

Observe

Plastic bags (water filter net)
 
Water bottles (sprinkler nozzle, water tube, water collection bucket)
 
Straws (water filter net)
 
Plastic food containers (water collection bucket)
 
Shipping packaging (miscellaneous)

Experiment

 
Tube for Water Bottles
Cutting off the bottoms and cutting four slits into the bottles and lining them together to establish a link resulted in a crude tube for water collecting. The two bottles we found were of different forms, yet they might still be connected. The connection was not the strongest, but it may be strengthened by making deeper cuts, melting the plastic, or using tape. We’d cut the tops off other bottles and continue the process to join them.

Interaction lab recitation 4 documentation blog post

This week’s recitation is very intriguing. We have to construct a sketching machine! It’s intriguing to me because it makes art through a machine rather than through people, which prompts the question of whether the crawl generated by the machine is art or not.

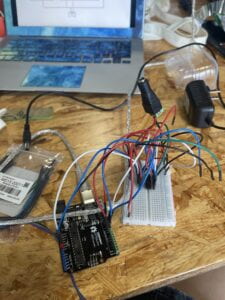
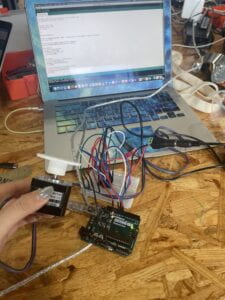
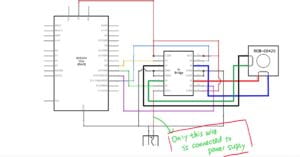
The circuit appeared difficult at first, but after it was obvious that all of the grey lines were linked to ground and virtually all of the red lines were connected to 5V, everything fell into place. However, I made a critical error that almost resulted in the death of my Arduino. I connected all of the red lines to the single Arduino red line, then to both 5V and the power supply, which was a mistake. Step 1 was completed successfully, and step 2 was completed successfully until the motor failed in step 3.

Code:

/*
MotorKnob

A stepper motor follows the turns of a potentiometer
(or other sensor) on analog input 0.

http://www.arduino.cc/en/Reference/Stepper
This example code is in the public domain.
*/

#include <Stepper.h>

// change this to the number of steps on your motor
#define STEPS 200

// create an instance of the stepper class, specifying
// the number of steps of the motor and the pins it’s
// attached to
Stepper stepper(STEPS, 8, 9, 10, 11);

// the previous reading from the analog input
int previous = 0;

void setup() {
// set the speed of the motor to 30 RPMs
stepper.setSpeed(30);
}

void loop() {
// get the sensor value
int val = analogRead(0);

// move a number of steps equal to the change in the
// sensor reading
val = map(val, 0, 1023, 0, 200);
stepper.step(val – previous);

// remember the previous value of the sensor
previous = val;
}


Question 1: What kind of machines would you be interested in building? Add a reflection about the use of actuators, the digital manipulation of art, and the creative process to your blog post.

After reading ART+Science NOW, I would like to build machines that involve the interaction between humans and the LED lights. I want to create something for hearing disability people. It will be a setting that can reflect peoples voice volume. The led will change colors according to the volume. 

The actuator for this machine might be an sound sensor and an LED screen that fills with LEDs. To be more precise, there need to be many infrared distance sensors, which are used to detect people to make sure its the human that’s making sound. 

The Arduino first needs to read what the sensors have detected, which indicates people’s voice. The changing values of some sensors indicate the volume of the voice. The output of the machine is the changes in LEDs lighting. Different people’s voice may influence the LEDs’lighting. The programming of controlling the lighting of the LEDs might be difficult and sophisticated.

I believe the creative process is mostly determined by how the LEDs will vary in response to the data collected by the sensor. It provides a lot of room for innovation. It may be used for commercial marketing or just for enjoyable engagement, for example. The application may be varied, and diverse creations can be filled with a variety of creativity.

Question 2: Choose an art installation mentioned in the reading ART + Science NOW, Stephen Wilson (Kinetics chapter). Post your thoughts about it and make a comparison with the work you did during this recitation. How do you think that the artist selected those specific actuators for his project?

Louis-Philippe Demers and Garry Stewart, Devolution, 2006

This interactive work of art portrays robots as equals to human dancers, as well as demonstrating how human actions affect robot behavior in the context of “ecosystem dynamics.” The connection between humans and robots is similar to what we’ve seen with our sketching machine. However, in our recitation, we viewed our computer as a tool rather than a human being. The actuators in the project demonstrated the beauty of machinery’s rhythm when performing dance. In other words, their erratic mechanical movement contrasted with human dancers’ graceful movement.

RIC week 5: art exhibition documentation

“The Bag”

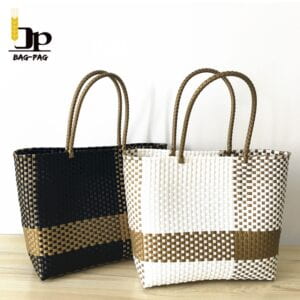
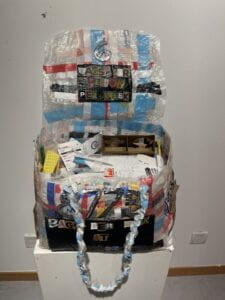
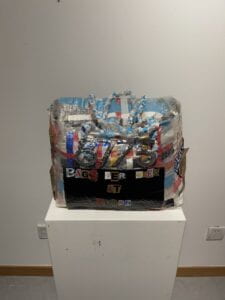
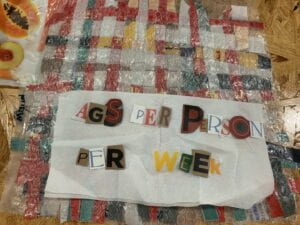
Angel, Lana, and I decided to make a bag out of deconstructed food delivery plastic bags and packaging for our art exhibit. One of the most noticeable aspects of life in China is the food delivery culture. People’s everyday lives are seamlessly intertwined with the ease of ordering meals, yet most people do not consider the quantity of packaging that goes into each delivery, including plastic and paper bags, utensils, containers, and receipts. We amassed a total of about 60 bags after collecting bags from a small sample size of 10 peers over the course of one week, resulting in an average of 6 bags discarded per individual. We calculated that our school community consumes 8775 bags in only one week by multiplying the average number of bags per person by the number of individuals at NYUSH. We wanted to draw attention to this startling discovery through our artwork in order to educate people. To demonstrate the bulk and weight of all the packaging, we chose to load the bag with receipts, plastic utensils, and other packaging trash. We intended to change people’s minds about plastic bags by constructing a labor-intensive and completely functioning bag out of discarded bags.

Process:

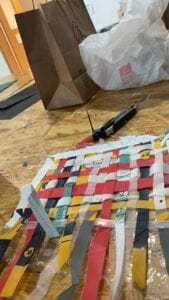
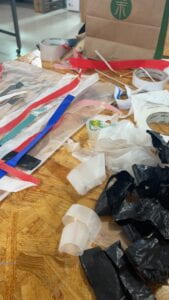
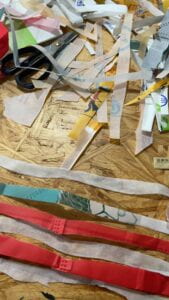
We collected our friends’ and roommates’ food delivery trash over the course of a week. After gathering all our bags and packaging, we proceeded to cut our bags into small strips. Plastic strips were then used to weave into sheets that we fused together in between durable clear plastic and bubble wrap. With 6 of these sheets, we used hot glue to assemble them into the formation of a large tote bag, complete with a snap-closure lid. Handles were made by braiding together remaining strips.

To highlight that the bag was created from food packaging, we ripped off restaurant logos from the bags to decorate the sides. Finally, receipts, cutlery, styrofoam, and excess plastic were stuffed into the bag.

Conclusion:

We wanted to raise awareness about the quantity of packaging that is rapidly discarded with every meal delivery order for this project. The bags we gathered ended up being used for both our supplies and data collecting. With data on our community’s use of plastic bags adorning the bag, we intended to create a powerful and informative statement about how many bags are discarded. We were able to breathe new life into bags that consumers did not hesitate to use again by manufacturing a new plastic bag from discarded bags. We were able to create a strong and visually appealing bag out of other people’s trash, demonstrating that plastic bags can be recycled. 

Improvements:

If we had more time, we would have collected bags from a greater number of people in order to obtain a more accurate statistic. Furthermore, we would have liked to use all 60 bags gathered to create a larger-than-life bag that would clearly demonstrate the amount of plastic collected.

Awareness:

The most difficult aspect of constructing this bag was the painstaking nature of the process. We had to weave our tiny strips one by one, which took a long time. After going through this time-consuming procedure, I can see why recreated items are frequently so expensive. The price includes the work involved in sorting, preparing, and reassembling recyclable materials, as well as fair compensation and quality assurance. This can be a double-edged sword because high prices dissuade many people from buying sustainable items, so they continue to buy non-sustainable products for the sake of convenience.