Interaction Lab Final project individual reflection
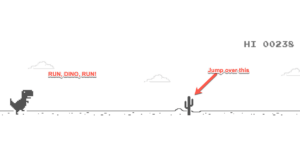
A.Dino Jump – Angel Min Chang – Dino Jump
 (Poster made with Canva)
- CONCEPTION AND DESIGN:
Briefly describe your project’s concept and how your previous preparatory research and the essay lead to its formation. In what ways did your understanding of how your users were going to interact with your project inform certain design decisions you made? Account for several such decisions. What happened during the User Testing Session? How did your user testing process influence some of your following design decisions? What kind of adaptations did you make? Were they effective?
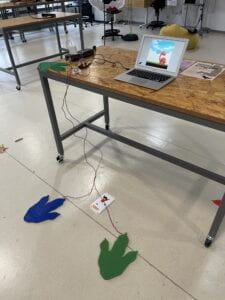
My project concept is quite straightforward. It’s intended to provide those who are too busy with finals with move around an opportunity to exercise by jumping in a fun, throwback setting.
My earlier preparation study and essay have helped me build on how I wanted to recreate the classic game chrome dino jump and how I will combine my understanding of interactivity with the knowledge I received in class for this project.
According to my understanding, interactive means that the user makes action and there is an outcome, a reaction. For my design process, I want to create something that can provide users with a quick response and directly affect the game’s outcome.
So, at first, I considered making a jumping game in which when the user taps the space tab, the item jumps, but throughout the user testing process, I discovered that there was very little interaction. So I considered making something that would elicit people’s activity and perhaps allow them to interact with others while engaging with my project.
The ideal approach is to use the Arduino to make some installation that captures the user’s movement and prints the output to process and affect the final actions. At the same time, I didn’t want it to be simply a single-player game, so I added players, making it a team effort game.
After I made the improvements, I discovered that people like the fact that they could play a simple fun game with their friends. There was no lag while using the Arduino with the conductive tape button. which is what I aimed for at the beginning, because I want to achieve a quick input/output response experience.
- FABRICATION AND PRODUCTION:
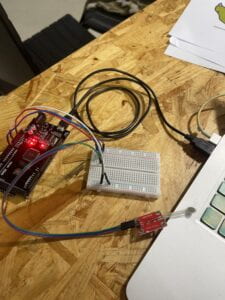
At first, I attempted to utilize a pressure sensor, and I created the code while testing, but only tested it on my hands. The pressure sensor was extremely sensitive, and data was sent from Arduino to processing in record time. The standard was difficult to establish because the sensor just prints outnumber data and various people have varied weights, resulting in varying pressures being sent out to processing. During user testing, I discovered that the pressure sensor is quite easy to break.
(pressure sensor, and video of its lagging)
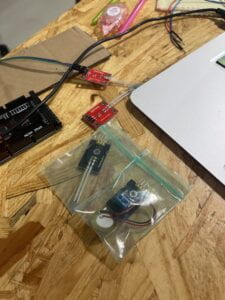
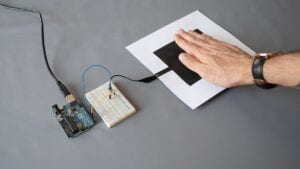
Then, inspired by a classmate, I decided to convert to buttons because buttons simply print out 1 and 0, making it simple to use the code because there are only two variables. So it’s either on or off that controls whether or not the dino jumps.
(button picture)
After changing my mind about using buttons, I laser cut out the shape of dinosaur paws from a wood board.
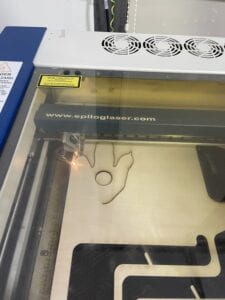
and a circle with a diameter of 30mm, which is exactly how the buttons would fit. Later, I discovered that it was quite difficult to transform it into something that people could step on without destroying the wires of the buttons. In this situation, I’d need to design a sturdy and supporting platform for the buttons, as well as make room for the wiring. Initially, I considered making wood board boxes, but after discussing with Andy, he advised me that it would be unsafe for people to step on and that the box would be easily broken. Finally, I had to come up with a better solution. Later, I sought assistance from Macela, who advised that I build a button out of conductive tape, as we learned in our recitation. (As shown below)
https://images.app.goo.gl/i28GjyEPYT5uRFdc8
Finally, I decided to go with using the conductive tape touchpad and laser cut acrylic 3mm colored material into the shape of dinosaur paws. The acrylic 3mm material would not be too thick, making it unstable or unsafe for people to step up, but it would also be strong enough not to break and handle people’s weight.
I was able to use laser cut after drawing a dinosaur paw on Illustrator with Andy’s assistance.
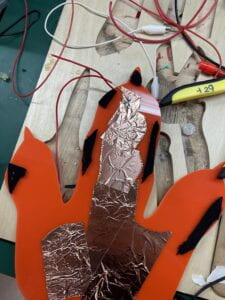
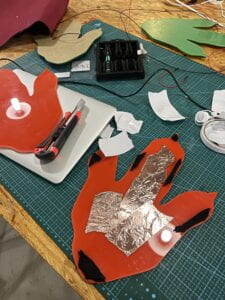
Later, I stuck the foam I found in the fabrication lab in between the two acrylic paw-shaped boards; I just put the foam on the edge to ensure that when pressure is applied to the board, the central part may still touch each other. I applied conductive tape to the center of each acrylic board. The wires were then soldered to the conductive tape. After that, the wires connect to the Arduino.
- CONCLUSIONS:
Begin your conclusion by restating the goals of your project. Did your project achieve its stated goals? Based on the expectations of your audience’s response, how, ultimately, did your audience interact with your project? How do your project results align with your definition of interaction? How would you improve your project if you had more time? What value have you learned from any setbacks and/or failures? What do you take away from your accomplishments?
My project goal was to provide an entertaining experience for the players while also getting them to exercise on a boring and stressful day during the final week.
My project also keeps some traditional characteristics from the dino jump chrome game, which reminds people of their childhood. For example the press space and the dino character which I used the same picture.
In my project, we learned how to utilize Arduino and simple conductive tape to create a push button that can react instantly and print out “a” and “b” that control separate dino jumps in processing. My project appears to have met its goals. During the in-class presentation, one of the comments I received was that my installation was very efficient and reacted quickly when the player jumped. I was delighted that the code worked so effectively to respond so quickly. I am glad I finally settled with the idea of using conductive tape buttons.
My classmates also loved how I turned the game into a collaborative game with our peers. They say that it is less intense and more enjoyable so that people focus on the game rather than the competition.
This project aligns with my understanding of interaction. This is when the player jumps (an input) and the dino would respond with jumping immediately too (output/reaction). My project successfully shows an instance of reacting.
One thing I would do is use a laser cutter to cut out two extra dino paws, making each color a pair, so the player understands what they are supposed to do, which is stand on the dino paws with both feet. In addition, I would adjust the colors of the two dinosaurs to match the color of the dino paws so the player knows which dinosaur they are controlling.


- TECHNICAL DOCUMENTATION:
The background music I found online is called 2-88 FC 马戏团第2. 3 关BGM.mp3 from a Chinese audio website https://www.aigei.com/
The winning sound effect is winning.mp3
The failing sound effect is fail-trombone-03.mp3 both are from https://orangefreesounds.com/
void display () {
fill(#999999);
stroke(255);
strokeWeight(2);
//ellipse(this.x, this.y, this.radius * 2,this.radius*2);
image(img, this.x, this.y, this.radius*2, this.radius*2);
(The ellipse is what I found online for the original code then I switched it to image so I can change the shape easier)
Adruino code:
boolean CanTrigger1 = true;
int Intensity1 = 0;
int pIntensity1 = 0;
int Intensity2 = 0;
int pIntensity2 = 0;
void setup(void) {
Serial.begin(9600);
pinMode(2, INPUT);
pinMode(4, INPUT);
}
void loop(void) {
Intensity1 = digitalRead(2); //
Intensity2 = digitalRead(4); //
if (Intensity1 == 0 && pIntensity1 == 1) {
Serial.write(‘a’);
}
// if (Intensity2 == 0 && pIntensity2 == 1) {
// Serial.write(‘b’);
// }
pIntensity1 = Intensity1;
pIntensity2 = Intensity2;
}
HTML format:
<pre>
<font color=”#00979c”>boolean</font> <font color=”#000000″>CanTrigger1</font> <font color=”#434f54″>=</font> <font color=”#00979c”>true</font><font color=”#000000″>;</font>
<font color=”#00979c”>int</font> <font color=”#000000″>Intensity1</font> <font color=”#434f54″>=</font> <font color=”#000000″>0</font><font color=”#000000″>;</font>
<font color=”#00979c”>int</font> <font color=”#000000″>pIntensity1</font> <font color=”#434f54″>=</font> <font color=”#000000″>0</font><font color=”#000000″>;</font>
<font color=”#00979c”>int</font> <font color=”#000000″>Intensity2</font> <font color=”#434f54″>=</font> <font color=”#000000″>0</font><font color=”#000000″>;</font>
<font color=”#00979c”>int</font> <font color=”#000000″>pIntensity2</font> <font color=”#434f54″>=</font> <font color=”#000000″>0</font><font color=”#000000″>;</font>
<font color=”#00979c”>void</font> <font color=”#5e6d03″>setup</font><font color=”#000000″>(</font><font color=”#00979c”>void</font><font color=”#000000″>)</font> <font color=”#000000″>{</font>
<b><font color=”#d35400″>Serial</font></b><font color=”#434f54″>.</font><font color=”#d35400″>begin</font><font color=”#000000″>(</font><font color=”#000000″>9600</font><font color=”#000000″>)</font><font color=”#000000″>;</font>
<font color=”#d35400″>pinMode</font><font color=”#000000″>(</font><font color=”#000000″>2</font><font color=”#434f54″>,</font> <font color=”#00979c”>INPUT</font><font color=”#000000″>)</font><font color=”#000000″>;</font>
<font color=”#d35400″>pinMode</font><font color=”#000000″>(</font><font color=”#000000″>4</font><font color=”#434f54″>,</font> <font color=”#00979c”>INPUT</font><font color=”#000000″>)</font><font color=”#000000″>;</font>
<font color=”#000000″>}</font>
<font color=”#00979c”>void</font> <font color=”#5e6d03″>loop</font><font color=”#000000″>(</font><font color=”#00979c”>void</font><font color=”#000000″>)</font> <font color=”#000000″>{</font>
<font color=”#000000″>Intensity1</font> <font color=”#434f54″>=</font> <font color=”#d35400″>digitalRead</font><font color=”#000000″>(</font><font color=”#000000″>2</font><font color=”#000000″>)</font><font color=”#000000″>;</font> <font color=”#434f54″>//</font>
<font color=”#000000″>Intensity2</font> <font color=”#434f54″>=</font> <font color=”#d35400″>digitalRead</font><font color=”#000000″>(</font><font color=”#000000″>4</font><font color=”#000000″>)</font><font color=”#000000″>;</font> <font color=”#434f54″>//</font>
<font color=”#5e6d03″>if</font> <font color=”#000000″>(</font><font color=”#000000″>Intensity1</font> <font color=”#434f54″>==</font> <font color=”#000000″>0</font> <font color=”#434f54″>&&</font> <font color=”#000000″>pIntensity1</font> <font color=”#434f54″>==</font> <font color=”#000000″>1</font><font color=”#000000″>)</font> <font color=”#000000″>{</font>
<b><font color=”#d35400″>Serial</font></b><font color=”#434f54″>.</font><font color=”#d35400″>write</font><font color=”#000000″>(</font><font color=”#00979c”>’a'</font><font color=”#000000″>)</font><font color=”#000000″>;</font>
<font color=”#000000″>}</font>
<font color=”#434f54″>// if (Intensity2 == 0 && pIntensity2 == 1) {</font>
<font color=”#434f54″>// Serial.write(‘b’);</font>
<font color=”#434f54″>// }</font>
<font color=”#000000″>pIntensity1</font> <font color=”#434f54″>=</font> <font color=”#000000″>Intensity1</font><font color=”#000000″>;</font>
<font color=”#000000″>pIntensity2</font> <font color=”#434f54″>=</font> <font color=”#000000″>Intensity2</font><font color=”#000000″>;</font>
<font color=”#000000″>}</font>
</pre>
Processing code:
import ddf.minim.*;

Minim minim;
AudioSample yx;
AudioPlayer bgm2;
AudioPlayer bgm;
PImage img;
PImage img2;
boolean flag;
boolean start=false;
int WIN_SCORE=1500;


import processing.serial.*;
//int NUM_OF_VALUES_FROM_ARDUINO = 2;   /** YOU MUST CHANGE THIS ACCORDING TO YOUR PROJECT **/
//int sensorValues[];      /** this array stores values from Arduino **/
//String myString = null;
Serial myPort;  // Create object from Serial class
char val;
char val2;


class Obstacle {
  float x, y, size;
  boolean onScreen;
  color col;
  Obstacle(float x, float size, float horizon, color col) {
    this.x = x;
    this.y = horizon - size;
    this.size = size;
    this.col = col;
    this.onScreen = true;
  }
  void update(float speed) {
    /* check if offscreen */
    this.onScreen = (this.x > -this.size);
    /* movement */
    this.x -= speed;
  }
  void display() {
    fill(this.col);
    stroke(255);
    strokeWeight(2);
    rect(this.x, this.y, this.size, this.size);
  }
  boolean hits(TRex dino) {
    float halfSize = this.size / 2;
    float minimumDistance = halfSize + (dino.radius); // closest before collision
    /* find center coordinates */
    float xCenter = this.x + halfSize;
    float yCenter = this.y + halfSize;
    float distance = dist(xCenter, yCenter, dino.x, dino.y); // calculate distance from centers
    return (distance < minimumDistance); // return result
  }
}

class TRex {
  float x, y, yVelocity, speed, radius;
  boolean onGround;
  TRex(float x, float y, float radius) {
    this.x = x;
    this.y = y;
    this.yVelocity = 0;
    this.speed = 1;
    this.onGround = true;
    this.radius = radius; // size of circle
  }
  void update(float platform) {
    float bottom = this.y + this.radius; // bottom pixel of circle
    float nextBottom = bottom + this.yVelocity; // calculate next frame's bottom
    if (bottom <= platform && nextBottom >= platform) { // next frame will be on platform
      this.yVelocity = 0; // reset velocity
      this.y = platform - this.radius; // don't go past platform
      this.onGround = true;
    } else if (platform - bottom > 1) { // nowhere near platform
      this.yVelocity += this.speed; // increase velocity
      this.onGround = false;
    }
    /* movement */
    this.y += this.yVelocity;
  };
  void jump () {
    this.yVelocity = -(this.radius * 0.7); // jump
    yx.trigger();
  };
  void display () {
    fill(#999999);
    stroke(255);
    strokeWeight(2);
    //ellipse(this.x, this.y, this.radius * 2,this.radius*2);
    image(img, this.x, this.y, this.radius*2, this.radius*2);
  };
}

float horizon;
float obstacleSpeed;
float score;
ArrayList<Obstacle> obstacles;
TRex dino;
TRex dino2;

void setup() {
  fullScreen();
  size(1920, 1080);
  //setupSerial();
  textAlign(CENTER, CENTER);
  imageMode(CENTER);
  img2 = loadImage("dino.jpeg");
  horizon = height - 40;
  obstacleSpeed = 6;
  init();
  textSize(30);
  img=loadImage("kl.png");
  minim = new Minim(this);
  yx=minim.loadSample("yx.wav");
  bgm=minim.loadFile("bgm.mp3");
  bgm2=minim.loadFile("fail-trombone-03.mp3");
  String portName = Serial.list()[0];
  myPort = new Serial(this, "/dev/cu.usbserial-1420", 9600);
  bgm2.loop();
  bgm2.pause();
}
void init() {
  float size = 40;
  dino = new TRex(size * 2, height - horizon, size);
  dino2 = new TRex(size * 3, height - horizon, size);
  obstacles=new ArrayList<Obstacle>();

  score = 0;
  flag=true;
}

void startPage() {
  if (start)return ;
  background(190);
  fill(255);
  circle(width/2, height/2, 100);
  fill(0);
  text("START", width/2, height/2);
  if (mousePressed&&dist(mouseX, mouseY, width/2, height/2)<100) {
    start=true;
    bgm.loop();
  }
}

void draw() {
  background(190);
  //getSerialData();
  //printArray(sensorValues);
  image(img2, width/2, height/2);
  startPage();
  if (!start)return ;
  drawHUD();


  if ( myPort.available() > 0) {  // If data is available,
    val = myPort.readChar();
    println(val);// read it and store it in val
    if (val == 'a'&& dino.onGround)
    {
      dino.jump();
    }

    if (val == 'b'&& dino2.onGround)
    {
      dino2.jump();
    }


    handleLevel(frameCount);
    dino.update(horizon);
    dino2.update(horizon);
    handleObstacles();
    noStroke();
    endGame();
  }
}
/**
 * draws horizon & score
 */
void  drawHUD() {
  /* draw horizon */
  stroke(255);
  strokeWeight(2);
  line(0, horizon, width, horizon);
  /* draw score */
  noStroke();
  text("Score: " + score, width / 2, 30);
  /* draw T-Rex */


  dino.display();
  dino2.display();
}
/**
 * updates, draws, and cleans out the obstacles
 */
void handleObstacles() {

  for (int i = obstacles.size() - 1; i >= 0; i--) {
    if (flag) obstacles.get(i).update(obstacleSpeed);
    obstacles.get(i).display();
    if (obstacles.get(i).hits(dino)) // if there's a collision
    {
      flag=false;
      bgm2.play();
    }
    if (obstacles.get(i).hits(dino2)) // if there's a collision
    {
      flag=false;
      bgm2.play();
    }
    if (!obstacles.get(i).onScreen) // if it's no longer showing
      obstacles.remove(i); // delete from array
  }
}
/**
 * speeds game up, pushes new obstacles, & handles score
 */
void handleLevel(int nn) {
  if (!flag)return ;
  if (nn % 30 == 0) { // every 0.5 seconds
    float n = noise(nn); // noisey
    if (n > 0.58)
      newObstacle(n); // push new obstacle
    if (nn % 120 == 0) // every 2 seconds
      obstacleSpeed *= 1.01; // speed up
  }
  score++;
}
/**
 * pushes random obstacle
 */
void  newObstacle(float n) {
  color col = color(random(255), random(255), random(255));
  float size = random(60) + 40;
  Obstacle obs = new Obstacle(width + size, size, horizon, col);
  obstacles.add(obs);
}
void keyPressed() {
  if (!flag)return ;
  if ((keyCode == UP || keyCode == 32) && dino.onGround) // jump if possible
    dino.jump();
  if ((keyCode == UP || keyCode == 32) && dino2.onGround) // jump if possible
    dino2.jump();
}
void endGame() {

  if (score>=WIN_SCORE)flag=false;
  if (flag)return ;
  //noLoop();
  noStroke();
  textSize(40);
  if (score>=WIN_SCORE)
  {
    text("YOU WIN", width/2, height/2);
  } else {

    text("GAME OVER", width / 2, height / 2);
    textSize(20);
    text("Press \'space\' to restart", width / 2, height / 2 + 20);
    bgm2.play();
    bgm.pause();
  }
  //bgm.rewind();
}
void keyReleased() {
  if ((keyCode == UP || keyCode == 32)&&!start) {
    bgm2.pause();
    start=true;
    bgm.loop();
  }
  if ((keyCode == UP || keyCode == 32)&&!flag) {
    init();
    bgm.loop();
  }
}

//void setupSerial() {
//  printArray(Serial.list());
//  myPort = new Serial(this, Serial.list()[ 3 ], 9600);
//  // WARNING!
//  // You will definitely get an error here.
//  // Change the PORT_INDEX to 0 and try running it again.
//  // And then, check the list of the ports,
//  // find the port "/dev/cu.usbmodem----" or "/dev/tty.usbmodem----"
//  // and replace PORT_INDEX above with the index number of the port.

//  myPort.clear();
//  // Throw out the first reading,
//  // in case we started reading in the middle of a string from the sender.
//  myString = myPort.readStringUntil( 10 );  // 10 = '\n'  Linefeed in ASCII
//  myString = null;

//  sensorValues = new int[NUM_OF_VALUES_FROM_ARDUINO];
//}

//void getSerialData() {
//  while (myPort.available() > 0) {
//    myString = myPort.readStringUntil( 10 ); // 10 = '\n'  Linefeed in ASCII
//    if (myString != null) {
//      String[] serialInArray = split(trim(myString), ",");
//      if (serialInArray.length == NUM_OF_VALUES_FROM_ARDUINO) {
//        for (int i=0; i<serialInArray.length; i++) {
//          sensorValues[i] = int(serialInArray[i]);
//        }
//      }
//    }
//  }
//}
RIC final documentation
Statement of Purpose
This semester, Lana, Jennifer, and I collaborated with Mr. Zhao from Garden No. 2 to create a product for the garden out of discarded plastic materials. We found via multiple conversations and visits to the garden that the most pressing issue the garden was facing was an efficient watering system across the garden.
Mr. Zhao was thinking about placing a rainwater collection system on top of a building’s roof to solve this problem at the time. We initially assumed that developing a new watering system in the garden would be above our ability for this class, so we looked into other options, such as building a fish pond or a watering hose head. However, after receiving feedback from the class, we discovered that these proposals lack feasibility and utility. So, inspired by roof gutter systems, we concluded that installing a comparable gutter to collect rainwater would be the most possible and best fit the needs of the garden. We were challenged with designing a device that would successfully transfer rainfall into a collection bucket while also accommodating the garden’s physical space, despite material and location limits.
We made every effort during the semester to keep these goals in mind and to use them as the driving force behind all of our decisions.
Research and Development
https://www.youtube.com/watch?v=7oEEmDXPRLA
The film we created outlining the process with photos and videos.
Our making process:
We initially thought that attempting to tackle the garden’s watering system would be too complicated for our capabilities. We considered creating a tarp for a fish pond, a foot pumped watering hose, and a spray hose head instead of a full watering system. However, after receiving class feedback, we realized that these ideas were lacking in feasibility and functionality. So, we decided to reconceptualize our idea around the original issue of rain collection. After seeing a similar system using roof gutters that feed into a collection bucket, we were inspired to design our own gutter based on it.
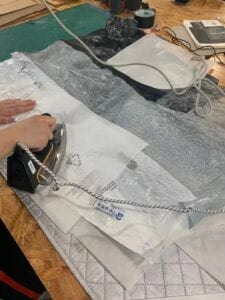
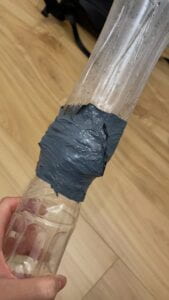
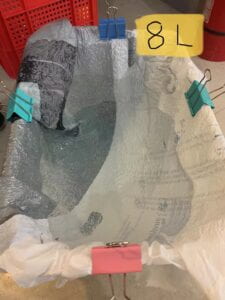
We conducted experiments to determine the best materials to utilize before starting to build the gutter. We initially believed that using water bottles because of their circular form would be great for creating a gutter, however, connecting them without serious leaking proved problematic. We were also discouraged from using water bottles because they are already well recycled. So, inspired by plastic coin purses, we decided to iron layers of plastic bags together to make a malleable sheet that we could mold into a gutter. Ironing plastic bags was a simple approach to achieve a specific thickness while retaining flexibility in making various forms. We cut various plastic bags into flat sheets and pressed the edges together to make a huge tarp. Based on the results of this experiment, we discovered that plastic shipping envelopes were the most durable material to layer and iron. We were able to achieve this by stacking plastic bags on top of one another.
We were able to develop a strong, leak-proof polymer that could hold water. As a result, we determined that layering plastic bags to make a waterproof and malleable sheet would be an excellent material for forming the gutter.
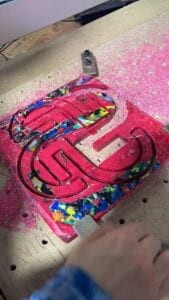
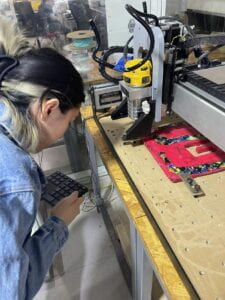
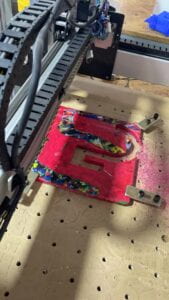
We utilized melted plastic bottle caps to construct a bespoke hanger form to hold the gutter. Shredded bottle caps were placed in a square mold, melted in an oven, pressed to form a flat board, and then carved out with a CNC machine. We began by designing L-shaped hangers to be drilled into the roof and wire-attaching the gutter to the hangers. Mr. Zhao was pleased with the project’s direction after witnessing our initial prototype but suggested we reinforce our gutter material and seek temporary installation techniques rather than drilling into the roof. He suggested that we roll the edges to thicken them so that the gutter would keep a straighter shape with less waning.

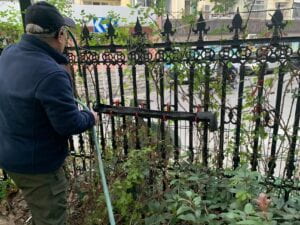
With this feedback, we modified our L-shaped hangers into S-shaped hooks that could hang on the fence while also supporting the gutter. This was a more adaptable alternative, allowing Mr. Zhao to adjust the gutter as he saw fit. We assembled the gutter onto the hooks with snap buttons after stiffening it with additional layers of plastic and folded edges. We discovered that the gutter had stretched upwards from ironing and did not allow for easy water flow after assembly. To rectify the warp, we had to iron the gutter to bend in the opposite way. Water easily flowed out one end after some trial and error. Finally, we were able to install the finished gutter in Garden No. 2.
Me Lana, and Jennifer worked well together as a team, with each of us playing a certain role. Me being the only native Chinese speaker, I assisted with all translations and keeping contact with Mr.Zhao. Lana largely focused on ironing the gutter, while I monitored the fabrication of the S hooks. For our final film, I created the voiceover screenplay, Angel translated it into Chinese, and Lana recorded the voiceover and edited the movie together. Throughout the production process, all three of us collaborated closely on conceptualizing, assembling, and prototyping.

Conclusion
This semester, our team collaborated with Garden No. 2 to build rainwater collecting gutter out of recycled plastic to help with garden watering. Finally, we were able to design a movable and adjustable gutter that successfully channeled water into a collection bucket. We were able to adjust to Mr. Zhao’s requirements by designing a system that could be relocated as needed along the garden fence rather than being permanently installed. Furthermore, by pressing several layers of plastic bags into our gutter material, we were able to transform fragile waste material into a solid, durable, yet malleable material with added usefulness. However, because it did not rain before we finished and delivered our gutter to the garden, we were unable to determine how well it would collect water from the fence. We would have been able to make additional improvements to the gutter’s functionality as a rain collecting system if we had more time to test it in outdoor conditions, such as modifying placement or size. I am most proud of the fact that we were able to share our work with the community and observe the immediate impact of our efforts. Knowing that our gutter would not only assist to alleviate the garden’s watering problem but would also serve as a reminder to neighborhood members about the importance of reducing plastic waste made it all the more enjoyable to deliver our work to Mr. Zhao. Hearing his encouraging and validating remarks in support of our idea validated all of our efforts. It warmed my heart to know that we had developed a pleasant relationship with him throughout the semester. Throughout the semester, I maintained close contact with members of our community and kept the group members informed. I learned that I was a fantastic communicator. Because of my bilingual advantages, translation is not difficult for me. At the same time, I was taken aback by the quantity of translation work required on my part.
This is a fantastic opportunity for me, and I am grateful. I can make good use of my skills and make a major contribution to teamwork.
I learned from our tight teamwork that open communication is the key to a successful group endeavor. Everyone was actively involved and motivated to achieve the established goals, which made teamwork much easier. Maintaining regular communication with Mr. Zhao was also essential in order to design something that would be valuable to him, such as switching our installation from drilling to hanging.
If we had more time, I’d like to see how effective our gutter is in collecting rainwater, as opposed to merely water directed into the gutter from a hose. We would have been able to incorporate these critical aspects from testing in real-world situations to produce something even more useful for Mr. Zhao and the garden. I would advise people working on similar projects to maintain active participation within the group so that you can work as an efficient unit. I would also advise them to be open to diverse points of view and to not be scared to try new approaches.
RIC final presentation powerpoint
https://docs.google.com/presentation/d/1BECvsVSQI_fFBIRm1M48whAbnTxVfzQcd46IY5ug59A/edit?usp=sharing
RIC Final Reflection
Personal Growth
Strengths
This semester’s interactions with team and community members highlighted strengths and weaknesses about myself that I had not previously examined. In terms of strengths, I noticed that I am rather quiet when working in a team and that I prefer to follow everyone’s decisions. This time, I stepped outside of my comfort zone because I am fluent in Chinese and our community members only speak Chinese. As a result, I took full responsibility for communication with the community member. Throughout the semester, I kept in close contact with our community members and kept the group members up to date. I discovered that I was a really effective communicator. The translation is not tough for me because of my bilingual advantages. But, at the same time, I was shocked by the amount of translation work involved in my part.
This is a very precise opportunity for me, and I am grateful for it. I can make effective use of my abilities and contribute significantly to teamwork.
Weaknesses
In terms of weaknesses, I think my hands-on ability is not strong enough to help our team members, because this is actually my first semester in ima courses, and it is also the first time I have been exposed to Frabucation Lab, 3D printers, CNC machines, everything is new for me They are all too new and I have never used them, so I need to ask for help every time I want to use them. I understand that this may be a burden for others, but I am grateful to Andy for helping out there every time.
Civic Engagement
Working on this semester-long project with the same group for a real-life application taught me how to emphasize strong communication within my group and with a member of our community. Open communication with my team was essential to ensure that everyone was on the same page and working toward the same goal. We were able to set clear objectives each time we met and collaborate to find efficient answers to the various difficulties we encountered. We were able to address different perspectives and prevent misunderstandings thanks to open communication, which resulted in a very easy collaboration.
It was critical to have open communication with our community members in order to create something that he could genuinely use. Mr. Zhao first agreed when we asked if we might drill through the roof to install our gutter. As a result, we proceeded to build L-shaped hangers based on this concept. However, when we checked a second time to ensure that drilling was allowed, Mr. Zhao recommended alternative means of installation that would not be permanent fasteners. This adjustment was a turning point in our design process, requiring us to go over other possibilities that Mr. Zhao preferred. Considering real-world constraints and concerns was critical in developing a product that could address real-world challenges, making the ultimate outcome of our project much more relevant.
Academic Learning
Working with the community on environmental problems was a good fit since learning about plastic trash and its negative impacts goes a long way when we can apply it in the real world. It is not enough to simply read about plastic pollution; we must apply this information to effect genuine change in the way society views plastic, beginning with our own neighborhood. Involving the community in our projects should have opened their eyes to new methods to repurpose plastic, so that our education also taught them. Showing them our extensive process in constructing these rebuilt projects can alter their impression of the worth of plastic trash, making them less likely to discard things so carelessly. The more individuals who participate in the discussion on environmental waste, the more we can raise awareness of our collective influence and start making tiny adjustments in our behaviors.
Interaction Lab Recitation 9: Media & Controls
Documentation
- Document your work on your blog, detail how your process of building the circuits and writing the code went. Any success? Any failures? What did you learn?
- Use this week’s reading, Computer Vision for Artist and Designers, as inspiration to write a reflection about the ways in which technology was used in your recitation project.
Through the improvement of computer technology and the combination of people’s ideas, more and more people can use new technologies to create new things and apply them in different fields. Like what says in the article”The result is a proliferation of new practitioners with an abundance of new application ideas, and the incorporation of computer vision techniques into the design vocabularies of novel artworks, games, home automation systems, and other areas.” In both of my interaction projects, I have used computer technology combined with new application ideas. For example, for my midterm project, I used Arduino coding to collect sounds that can turn into data and affect the colors of the lights. And for my final project, I am going to design an exciting interactive game. by using java processing to draw out the game layout I will use the Arduino sensor to collect human movements.
RIC Week 12: Prototype Final Progress
We proceeded to adjust our design to better accommodate the garden after having Mr. Zhao try out our prototype. This week’s goals were to redesign our original L-shaped hangers into S-shaped hooks for the garden fence and to strengthen our gutter material.
The top rung of the fence was 2.25cm wide, while the middle rung was 1.5cm wide. We designed the hook’s opening to be 2.5cm wide so that the gutter could be placed on either the top or middle rung. The semi-circle gutter support was then designed with a half-circumference of 15cm. The middle rung of the fence has open sections that are 25cm apart. So, with a 1m long gutter, we determined that 4 hooks were required. We increased the heights of each hook by 1cm increments to hang the gutter at a decline so that water could flow out one side. We were able to cut all four hooks out of a 26x26x1.5cm polypropylene melted plastic board using the CNC. We then went to the garden to see how well the hooks fit on the fence and discovered that it was a good fit.
RIC week 11 Prototype Presentation Feedback
We presented our prototype to our community members by using a presentation: of our research, material testing, and prototype development. After our presentation, we asked him the following questions.
Questions and Feedback
1.What ways do you think the water collection system can be improved?
Mr. Zhao expressed his satisfaction of the method, stating that it has been relatively effective thus far. He did, however, point out that the gutter material is rather thin and will most likely not be strong enough to hold much water. He suggested thickening the gutter to give it more strength and make it less flexible. He later suggested that curling the gutter edges will strengthen the sides.
2.We initially thought of attaching the system to the side of the roof, however this would make it a permanent fixture that would be hard to remove. Instead, we are now thinking about hanging it on the side of the fence. Do you think this would be a suitable location to collect water?
Mr. Zhao agreed that it would be best not to drill it into the roof and suggested that the gutter be installed on the fence. He told us that depending on how much rain falls, the fence might gather a lot of water, making it an excellent site. He appreciated our concept of hanging the gutter with S-shaped hooks rather than drilling it and advised that we position it on the second rung of the ladder.
The next steps will be to design the “S” shape structures based on the fence’s measurements (images of the design are included in the presentation), cut out the design in hard melted-together plastic, and reinforce the plastic tarp with all-black plastic bags to make it more aesthetic, professional, and strong.
Finally, answer these two questions:
What did you learn about working with the community from today’s discussion (not including the design part)?
I’ve learned that in order to deliver the best solution or a new design that is valuable to community members, we need more than simply the technology and materials utilized in the manufacturing process. However, understanding of people’s needs is also important. And this aspect requires a lot of communication, time, people’s attitudes, and their willingness to contribute; I also felt really needed during this process due to language barriers. My community member is only fluent in Chinese. And my group members do not speak Chinese as well as I do. As a result, I played a significant role in communicating, updating, exchanging ideas, and scheduling meetings on both sides. I was surprised by how powerful my duty was.
How are you going to apply the lessons to future collaborations?
Working with this community has taught me how to put myself in the shoes of others to empathize with and understand their needs, even if their lives are very different from mine and they speak a different language. I can still try to put myself in their shoes to understand their problems and find solutions to them. To build these attributes, I’ve learnt to use patience, trust, and empathy. I can utilize these skills in future partnerships to try to comprehend the needs of others, even if I don’t immediately relate to those needs. This can apply to dealing with businesses, individuals, or communities.
Interaction Lab final project essay
Project Name: Dino Jump
(Source:https://images.app.goo.gl/jDDjq9kwgw6KQhvz6)
- PROJECT STATEMENT OF PURPOSE *
My goal with this project is to provide everyone with a great gaming experience. It’s a fun way for people of all ages to pass the time. It allows people to have fun while exercising (jumping) and possibly competing with their friends.
- PROJECT PLAN *
First, I need to use Processing to lay up the entire game sketch, which will consist of four parts.
The first is the dino, which the player will control. I need to figure out how big I want it to be and what form what color I want it to be. Then I’ll draw the track which is a horizontal continuous line where the dinosaur will be running. And then there are the roadblocks. Finally, there is a sign that states who the winner is or when the player runs into the roadblocks and it says that the player failed. Then I’d have to make a scoreboard that showed how many seconds the player had lasted. At the same time, I will use processing to insert sound effect whenever the dino jumps or bump into the roadblocks.
I’d have to input codes for the Arduino component in order to send data to processing. I’ll need to create a big button for input so that the Arduino can process it and transfer the data to Processing to control the dino’s hopping.
(Source:https://images.app.goo.gl/59xaFL5qzWMU8FnD6)
- CONTEXT AND SIGNIFICANCE *
My previous study served as the foundation for my project because my concept was inspired by the Google Dino Jump game. The basic concept remains the same; mine simply adds a bit more interaction as well as Arduino.
My project corresponds to my definition of interaction because it requires the user to jump in order for the dino to jump. This implies that there is an input and an output. Another reaction is triggered by one movement. The interaction is reciprocal. This is how I define interaction.
Since my project is based on an already existing game. I am going to develop more using what I learned recently in class. Which are Arduino and processing.
I can use Arduino to link to a sensor or a larger button instead of the computer’s basic up and down taps. I can use Processing to create a different version of the dino from the one on Google. I could also use processing to add sound effects and other visual effects, such as inserting a video when the winner is announced.
My initiative does not target a certain audience, thus it is open to everyone who wants to participate. Because it is simple, entertaining, and engaging. People can participate by jumping, making it an easy and enjoyable exercise.
After successfully completing the game, I may add more game levels, raise the speed and complexity, and intensify the exercise. It could then evolve into a challenging interactive exercise game. It might be used later at the fitness center or, for example, B- at our school.
RIC week 9 prototype
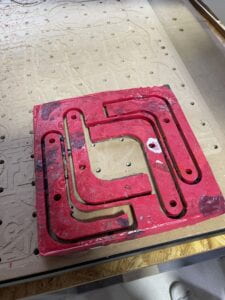
We used the CNC this week to cut our new plastic material into four hangers to hold our gutter in place. These L-shaped hangers are 2cm wide and have two holes cut into them. We wanted to be able to thread wire or plastic through the holes and under the gutter plastic to keep it semi-circular and support its weight. The plastic board became dislodged from the holds while being cut on the CNC, and the last of the four hangers was cut abnormally as the CNC malfunctioned. The bottom of this hanger was cut thinner as a result of this, but it is still usable because the top section that holds the gutter was unaffected. It will be able to be nailed into the wall in the same way that the other hangers are.