“Dial”
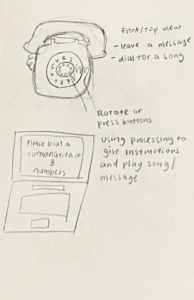
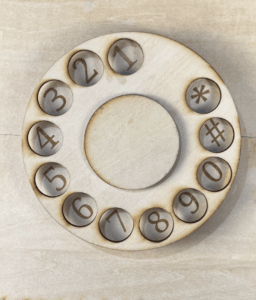
For my final project, I created a rotary phone with a functioning dial that allows people to speak into it and leave a message. The reasoning behind the creation of this project was that I wanted to create an item that could promote interaction between people during the stressful time of finals. My intention for the use of this phone is for each user to leave a nice or encouraging message for the next person. I also choose to create a rotary or “retro” phone to remind people of the ways that technology has changed and advanced and bring back the phone that does just as it was originally intended to do: aid and allow people to communicate with each other.
The first thing I did when I started to work on the project was making a cardboard prototype of it so that I could get the shape, size, and proportions right before I laser cut it. It took two iterations of a cardboard phone until I was satisfied with the pieces and began to create a diagram of them to be cut.
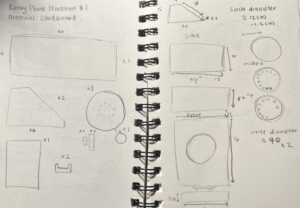
Then, a spent a very long time working on the sketch for laser cutting before cutting out the pieces for the first iteration of my phone.
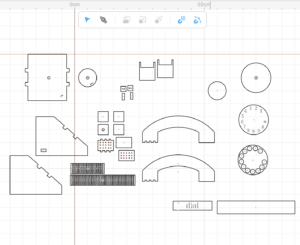
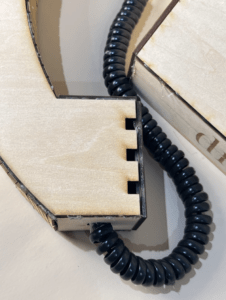
I cut the phone out using 3mm plywood, used a wooden peg so the dial could turn, and a rubber band to create tension so the dial would snap back into place. I soldered a tilt sensor to two long wires and after testing it out using Arduino, hot glued it to the back of the dial. This process was very frustrating because I had to repeat it multiple times as the tilt sensor legs were very fragile and broke off many times. However, it turned out well as the addition of the tilt sensor allowed the “start record” function to be automized as once the dial was turned the tilt sensor values would change sending the message to Processing to start recording. In Processing, the code had three major components, “start record,” “stop record,” and “play recording” the “start record” function was controlled by the tilt sensor while the stop and play recording functions were both controlled by key presses. The final touch I added was inserting a mini USB microphone into the handheld phone portion so that even if people spoke quietly, their message could still be picked up. Then, because many people were struggling to hear the messages played back on my computer, I borrowed a Bluetooth speaker that I put at the back of my phone so that all messages could be clearly heard. I glued the cord of the USB microphone to a curly phone cord so that it would resemble an actual rotary phone better and it ended up looking great.
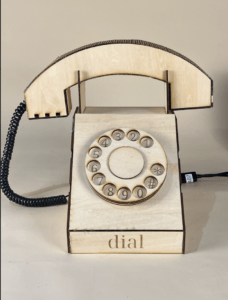
After people interacted with my project, although I feel that it was successful in that it allowed people to connect with each other, it did not work out as I expected. My intentions were for people to communicate with the next user or leave a nice message to them. However, understandably, most people who used the phone just said things like “hi” or “hello.” This leads me to think that it would be a good idea to create a sign or instruction stating “Leave a nice message to the next person.” Working on this project helped me realize that even if things aren’t able to turn out how I originally imagined, it is still possible to try something different and still get good results.
Appendix:
Video Demonstration:
https://drive.google.com/file/d/1driivq6bnkTNXSQqUiL4Sn10IcMCNJWw/view?usp=sharing
https://drive.google.com/file/d/1ah4QkgjPDgq-Ywt4bd3m-NjQd7CrUft1/view?usp=sharing
Arduino Code:
Processing Code:
import processing.sound.*;
import java.util.Arrays;
import processing.serial.*;

Serial serialPort;

int NUM_OF_VALUES_FROM_ARDUINO = 1;
int arduino_values[] = new int [NUM_OF_VALUES_FROM_ARDUINO];

AudioIn input;
Waveform waveform;
AudioSample sample;

// allocate a buffer for up to a 10 second sample
int maxSampleSize = 44100 * 10;
// when we started recording
int startTime;

// previous value of tilt sensor
float sensorValue;
float previousValue = 0;

// flag to indicate if recording is in progress
boolean recording = false;

void setup() {
  size(100, 400);
  noStroke();
  input = new AudioIn(this, 0);
  // initialize serial communication with Arduino
  serialPort = new Serial(this, "/dev/cu.usbmodem101", 9600);
}

void draw() {

  getSerialData();
  // read serial data from Arduino
  sensorValue = arduino_values[0];

  // check if tilt sensor value changes from 1 to 0
  if (sensorValue != previousValue && sensorValue ==1 && recording == false ) {
    // start recording
      recording = true;
    println("Starting recording");
    waveform = new Waveform(this, maxSampleSize);
    waveform.input(input);
    startTime = millis();

  }
  // store the current value as the previous value
}


void keyPressed() {
  if (key == 'b') {     // stop record
    if (recording) {
      previousValue = sensorValue;
      int stopTime = millis();
      float[] samples = waveform.analyze();

      // figure out which samples we want to copy from the waveform
      int startSample = maxSampleSize - floor((stopTime-startTime) * 44.1);
      if (startSample < 0) {
        startSample = 0;
      }
      println(startSample + " samples");

      // copy them into an audio sample
      sample = new AudioSample(this, Arrays.copyOfRange(samples, startSample, maxSampleSize));
      println("Stopping recording");
      recording = false;
    }
  }

  if (key == 'c') {
    if (sample != null) {
      sample.play();
      println("Playing recording");
    }
  }
}


void getSerialData() {
  while (serialPort.available() > 0) {
    String in = serialPort.readStringUntil( 10 );  // 10 = '\n'  Linefeed in ASCII
    if (in != null) {
      print("From Arduino: " + in);
      String[] serialInArray = split(trim(in), ",");
      if (serialInArray.length == NUM_OF_VALUES_FROM_ARDUINO) {
        for (int i=0; i<serialInArray.length; i++) {
          arduino_values[i] = int(serialInArray[i]);
        }
      }
    }
  }
}