Context and Significance
The previous research that I did for the Group Project inspired the design for my Midterm Project because it allowed me to define interaction and see different ways that people interact with objects and experiences. For my project, my partner and I redesigned the skeeball machine, which is usually commonly found in US arcades. The aspect that we added to it was the “singing” part which meant that rather than getting points for successfully getting the ball into a hole, the user would hear a different melody depending on the hole they scored in. The purpose of this project is to allow users to experience something fun and different; the target audience is everyone as participation does not require prior knowledge or skill.
Conception and Design
We started the project by drawing a diagram to give us an idea of what we wanted the completed artifact to look like.
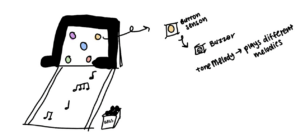
In the diagram, I imagined placing a button sensor underneath each hole so that when the ball hit the button a melody would play on the buzzer. However, after discussing with my partner we realized that there are too many chances for error if we use a button sensor such as the position the ball lands on and the sensitivity of the sensor. After discussion, we decided to use a light sensor and make the opening for the hole just big enough for the ball to land in so that it is guaranteed that there will be a response to the ball landing in the hole.
We found a reference model for a cardboard skeeball machine as well as a YouTube video tutorial for making it which made our process exponentially easier as we wouldn’t have to figure out measurements on our own.
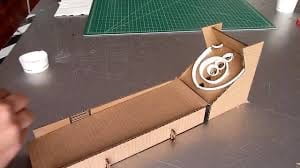
https://www.youtube.com/watch?v=U2mgRPg_nl0
Fabrication and Production
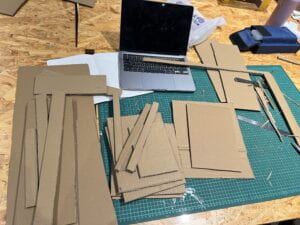
We started the fabrication process by building the cardboard skeeball machine. Since we followed a YouTube video, we were able to follow the measurements used in the video and cut out pieces of cardboard accordingly. Then, we had to hot glue each piece together which took a lot more teamwork than expected. As one of us was hot gluing, the other had to carefully hold the pieces together so that they would dry in the correct position. There were many times when my partner and I had to take apart the pieces and re-glue them because they were crooked or mispositioned.
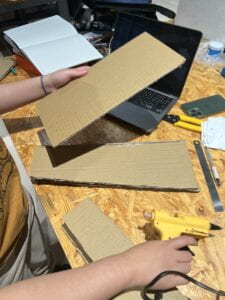
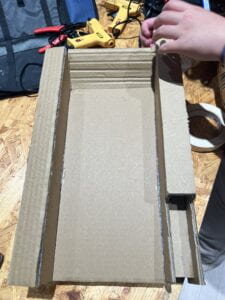
After creating the skeeball machine, we had to consider what material to make our balls out of. The problem we faced was that the ball had to be just the right size to fit into the ball dispenser area of our machine. This eliminated using any type of premade ball. After considering using paper, cardboard, and tape, I realized that we could use air dry clay because it is easily pliable and does not take too long to dry meaning that we could test them as we went along. We bought the clay and shaped them into balls and they ended up working well. Then, we called it a night and decided to work on the coding for the project the next day.
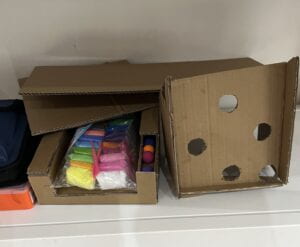
After discussing how we wanted the skeeball machine to work (once the ball blocks the sensor a melody plays), my partner started on the coding. She used a conditional where if the sensor sensed that it was dark, a melody would play.
/*
AnalogReadSerial
Reads an analog input on pin 0, prints the result to the Serial Monitor.
Graphical representation is available using Serial Plotter (Tools > Serial Plotter menu).
Attach the center pin of a potentiometer to pin A0, and the outside pins to +5V and ground.
This example code is in the public domain.
https://www.arduino.cc/en/Tutorial/BuiltInExamples/AnalogReadSerial
*/
// the setup routine runs once when you press reset:
const int buzzer = 8; // buzzer to arduino pin 8
const int sensor = A0; // sensor to arduino pin A0
const int sensor2 = A1; // sensor2 to arduino pin A1
const int sensor3 = A2; // sensor3 to aruino pin A2
const int sensor4 = A3; // sensor4 to arduino pin A3
const int dark = 70; //set dark parameters
void setup() {
// initialize serial communication at 9600 bits per second:
Serial.begin(9600);
Serial.println(“BOOT”);
pinMode(buzzer, OUTPUT); // Set buzzer – pin 8 as an output
}
// the loop routine runs over and over again forever:
void loop() {
// read the input on analog pin 0:
int sensorValue = analogRead(sensor);
// print out the value you read:
Serial.print(“1st sensor: “);
Serial.println(sensorValue);
//delay(1); // delay in between reads for stability
// read the input on analog pin 1:
int sensor2Value = analogRead(sensor2);
// print out the value you read:
Serial.print(” 2nd sensor: “);
Serial.println(sensor2Value);
//delay(1); // delay in between reads for stability
// read the input on analog pin 2:
int sensor3Value = analogRead(sensor3);
// print out the value you read:
Serial.print(” 3rd sensor: “);
Serial.println(sensor3Value);
//delay(10); // delay in between reads for stability
// read the input on analog pin 3:
int sensor4Value = analogRead(sensor4);
// print out the value you read:
Serial.print(” 4th sensor: “);
Serial.println(sensor4Value);
delay(25); // delay in between reads for stability
if (sensorValue < dark) {
tone(buzzer, 500);
Serial.println(“buzzer because 1”);
}
// else{
// noTone (buzzer); // Send 1KHz sound signal
// }
else if (sensor2Value < dark) {
tone(buzzer, 500);
Serial.println(“buzzer because 2”);
}
else if (sensor3Value < dark) {
tone(buzzer, 500);
Serial.println(“buzzer because 3”);
}
else if (sensor4Value < dark) {
tone(buzzer, 500);
Serial.println(“buzzer because 3”);
}
else {
noTone(buzzer); // Send 1KHz sound signal
}
}
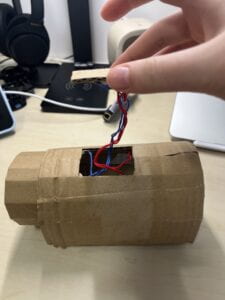
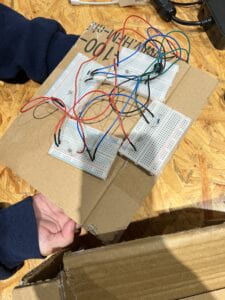
We then taped the breadboards to the piece of cardboard that is meant to act as a backing for the “scoring” portion of the machine. We carefully positioned each breadboard so that the light sensors were in the middle of the hole and were not blocked by any shadows from the cardboard.
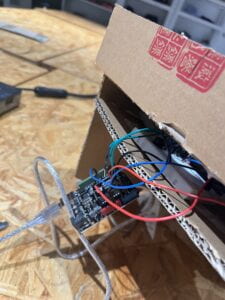
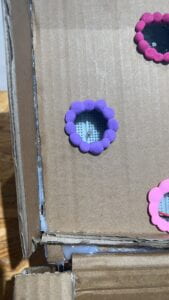
Finally, we created small clay balls around the holes to act as decoration and our prototype was ready for user testing.
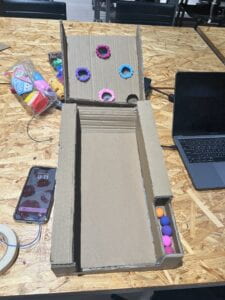
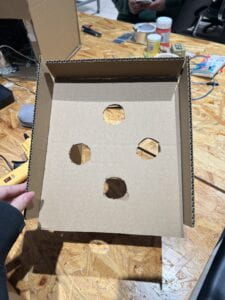
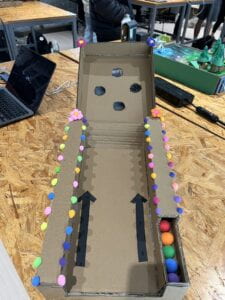
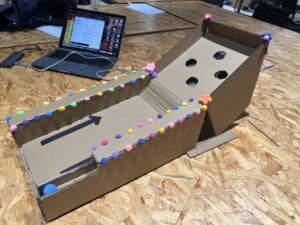
During user testing, I received a lot of helpful feedback. For example, although skeeball is a common game in the US, many international peers and professors have not seen or played it before and it caused them some confusion. I was suggested to include arrows on the area where the balls are supposed to be slid up so that people know they are supposed to use it as a slope. We created arrows using electric tape in the final artifact. I was also suggested that each hole should correspond to a different melody so that there was more of an objective to the game as well as that the clay around the holes should be removed so that it is easier for the user to get the ball in. We took all of this feedback into consideration when creating the final artifact. We created a new “scoring area” with cleaner holes and removed the clay. We also altered the coding so that each sensor corresponded to a melody with different notes.
Final Code:
const int buzzer = 8; // buzzer to arduino pin 8
//const int sensor = A0; // sensor to arduino pin A0
const int sensor2 = A1; // sensor2 to arduino pin A1
const int sensor3 = A2; // sensor3 to aruino pin A2
const int sensor4 = A3; // sensor4 to arduino pin A3
const int sensor5 = A0;
const int dark = 20; //set dark parameters
int noteDuration;
#define NOTE_B0 31
#define NOTE_C1 33
#define NOTE_CS1 35
#define NOTE_D1 37
#define NOTE_DS1 39
#define NOTE_E1 41
#define NOTE_F1 44
#define NOTE_FS1 46
#define NOTE_G1 49
#define NOTE_GS1 52
#define NOTE_A1 55
#define NOTE_AS1 58
#define NOTE_B1 62
#define NOTE_C2 65
#define NOTE_CS2 69
#define NOTE_D2 73
#define NOTE_DS2 78
#define NOTE_E2 82
#define NOTE_F2 87
#define NOTE_FS2 93
#define NOTE_G2 98
#define NOTE_GS2 104
#define NOTE_A2 110
#define NOTE_AS2 117
#define NOTE_B2 123
#define NOTE_C3 131
#define NOTE_CS3 139
#define NOTE_D3 147
#define NOTE_DS3 156
#define NOTE_E3 165
#define NOTE_F3 175
#define NOTE_FS3 185
#define NOTE_G3 196
#define NOTE_GS3 208
#define NOTE_A3 220
#define NOTE_AS3 233
#define NOTE_B3 247
#define NOTE_C4 262
#define NOTE_CS4 277
#define NOTE_D4 294
#define NOTE_DS4 311
#define NOTE_E4 330
#define NOTE_F4 349
#define NOTE_FS4 370
#define NOTE_G4 392
#define NOTE_GS4 415
#define NOTE_A4 440
#define NOTE_AS4 466
#define NOTE_B4 494
#define NOTE_C5 523
#define NOTE_CS5 554
#define NOTE_D5 587
#define NOTE_DS5 622
#define NOTE_E5 659
#define NOTE_F5 698
#define NOTE_FS5 740
#define NOTE_G5 784
#define NOTE_GS5 831
#define NOTE_A5 880
#define NOTE_AS5 932
#define NOTE_B5 988
#define NOTE_C6 1047
#define NOTE_CS6 1109
#define NOTE_D6 1175
#define NOTE_DS6 1245
#define NOTE_E6 1319
#define NOTE_F6 1397
#define NOTE_FS6 1480
#define NOTE_G6 1568
#define NOTE_GS6 1661
#define NOTE_A6 1760
#define NOTE_AS6 1865
#define NOTE_B6 1976
#define NOTE_C7 2093
#define NOTE_CS7 2217
#define NOTE_D7 2349
#define NOTE_DS7 2489
#define NOTE_E7 2637
#define NOTE_F7 2794
#define NOTE_FS7 2960
#define NOTE_G7 3136
#define NOTE_GS7 3322
#define NOTE_A7 3520
#define NOTE_AS7 3729
#define NOTE_B7 3951
#define NOTE_C8 4186
#define NOTE_CS8 4435
#define NOTE_D8 4699
#define NOTE_DS8 4978
int button5melody[] = {
NOTE_C4, NOTE_G3, NOTE_G3, NOTE_A3, NOTE_G3, 0, NOTE_B3, NOTE_C4
};
int button2melody[] = {
NOTE_E4, NOTE_D4, NOTE_C3, NOTE_D4, NOTE_E4, 0, NOTE_E4, NOTE_E4
};
int button3melody[] = {
NOTE_E5, NOTE_A6, NOTE_B6, NOTE_G6, NOTE_B5, 0, NOTE_C6, NOTE_D6
};
int button4melody[] = {
NOTE_F5, NOTE_G5, NOTE_D4, NOTE_B4, NOTE_F5, 0, NOTE_A5, NOTE_F5
};
int noteDurations[] = {
4, 8, 8, 4, 4, 4, 4, 4
};
void setup() {
Serial.begin(9600);
pinMode(buzzer, OUTPUT);
}
void loop() {
int sensor5Value = analogRead(sensor5);
Serial.print(“1st sensor: “);
Serial.println(sensor5Value);
delay(1);
int sensor2Value = analogRead(sensor2);
Serial.print(” 2nd sensor: “);
int sensor3Value = analogRead(sensor3);
Serial.print(” 3rd sensor: “);
int sensor4Value = analogRead(sensor4);
Serial.print(” 4th sensor: “);
delay(25);
// if (sensorValue < dark) {
// //iterate over the notes of the melody
// for (int thisNote = 0; thisNote < 8; thisNote++) {
// int noteDuration1 = 1000 / noteDurations[thisNote];
// //to calculate the note duration, take one second. Divided by the note type
// tone(8, button1melody[thisNote], noteDuration1);
// //stop the tone playing
// int pauseBetweenNotes1 = noteDuration1 * 1.30;
// delay(pauseBetweenNotes1);
// noTone(8);
// }
// } else {
// noTone(buzzer); // Send 1KHz sound signal
// }
if (sensor2Value < dark) {
//iterate over the notes of the melody
for (int thisNote = 0; thisNote < 8; thisNote++) {
int noteDuration2 = 1000 / noteDurations[thisNote];
//to calculate the note duration, take one second. Divided by the note type
tone(8, button2melody[thisNote], noteDuration2);
//stop the tone playing
int pauseBetweenNotes2 = noteDuration2 * 1.30;
delay(pauseBetweenNotes2);
noTone(8);
}
} else {
noTone(buzzer); // Send 1KHz sound signal
}
if (sensor3Value < dark) {
//iterate over the notes of the melody
for (int thisNote = 0; thisNote < 8; thisNote++) {
int noteDuration3 = 1000 / noteDurations[thisNote];
//to calculate the note duration, take one second. Divided by the note type
tone(8, button3melody[thisNote], noteDuration3);
//stop the tone playing
int pauseBetweenNotes3 = noteDuration3 * 1.30;
delay(pauseBetweenNotes3);
noTone(8);
}
} else {
noTone(buzzer); // Send 1KHz sound signal
}
if (sensor4Value < dark) {
//iterate over the notes of the melody
for (int thisNote = 0; thisNote < 8; thisNote++) {
int noteDuration4 = 1000 / noteDurations[thisNote];
//to calculate the note duration, take one second. Divided by the note type
tone(8, button4melody[thisNote], noteDuration4);
//stop the tone playing
int pauseBetweenNotes4 = noteDuration4 * 1.30;
delay(pauseBetweenNotes4);
noTone(8);
}
} else {
noTone(buzzer); // Send 1KHz sound signal
}
if (sensor5Value < dark) {
//iterate over the notes of the melody
for (int thisNote = 0; thisNote < 8; thisNote++) {
int noteDuration5 = 1000 / noteDurations[thisNote];
//to calculate the note duration, take one second. Divided by the note type
tone(8, button5melody[thisNote], noteDuration5);
//stop the tone playing
int pauseBetweenNotes5 = noteDuration5 * 1.30;
delay(pauseBetweenNotes5);
noTone(8);
}
} else {
noTone(buzzer); // Send 1KHz sound signal
}
}
We tested the game to make sure that everything was working then moved up to decorating. We employed the large amount of air-dry clay that was left over t0make colorful decorations.
Conclusions
The project worked well in achieving our goal which was to allow people to have fun experiencing something that does not take too much thinking or effort. It also aligns well with my definition of interaction which is that an action leads to a corresponding reaction. I think that users interacted well with the artifact, they took many tries to get the ball into the hole and were interested in finding out what would happen if they had achieved their goal. From this experience, I learned that teamwork is very valuable and important as I don’t think that I would have been able to complete the project on my own. In addition, I learned about the importance of not making assumptions as well as listening to feedback. If I were given more time, I would make the skeeball machine bigger so that players can more easily interact with it and understand what is meant to be done without instruction. However, I think that what my partner and I were able to make in the time given was very impressive already and it worked just how I imagined it. I feel very accomplished that we were able to take an idea and a sketch and make it into something tangible and interactive.
