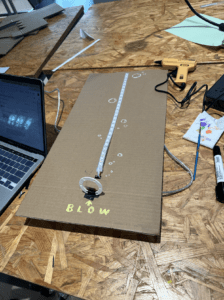
The name of our midterm project is “Blow and Glow”, literally a device that glows when you blow on the corresponding sensor. IMG_3215 IMG_3214 IMG_3213. IMG_3211
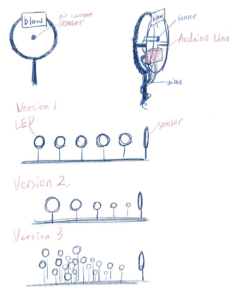
 I always like a device with beautiful lights, and when I was looking for inspirations online, I came across this device that is consisted of many bubble shaped LEDs that will light up when someone blows into the sensor (see citation). It’s hard to say what the purpose of the device is just by looking at it, but it certainly leaves a deep impression. I then showed it to my partner and we decided we could recreate a similar device, as you can see here in the picture of the sketch we drew for the design. But I also saw a problem at this stage (which is also a question our professor proposed based on our proposal): how are we going to make the device more interactive?
In order to do that, me and my partner decides that beside from simply the LEDs glowing, we could also add a buzzer, so that when the user blows long enough to light up the last LED, there will be sound or music to indicate a “success”. But to do that, we need to get a sensor that would allow the LEDs to light up one by one based on the breath blown. After some searching online, we finally found an air current sensor that is digital and sensitive enough to work the way we want. However, the delivery couldn’t arrive on time before user testing and we had to turn to other sensors available at hand. The LEDs were also tricky as we want theme able to change colors and be brighter than those that comes with the Arduino kit. Thanks to our wonderful professor who provided us with multiple solutions to the problems, we then used a Humidity Sensor as alternative and used the strip LEDs for the color-changing lights.
I first tried to work with the Flex Sensor, hoping that by sticking sth on top of it, it could also work as something the user can blow onto. I was afraid that the sensor would not be flexible enough and would be too hard to bend if simply blowing at it. It turns out that this method is doable as you see in the video IMG_3213 , and it also works fine when I later added a LED for for testing IMG_3214 , inspired by our previous in-class project of controlling the brightness of the LED with the potentiometer, to see if this could also work as a sensor that does the same thing. And it works. I then tried to play with the Trip LED which I’ve never worked with before, to see how I can make it light up and maybe show different colors in different combinations. It was also a great success as shown in the videos here IMG_3211, IMG_3215 . My partner later came to work on putting the sensor and the LEDs together, but we then realized the Flex Sensor can’t do a good job in lighting up the LEDs one by one, it could only function like a switch, so we then turned to the Humidity Sensor. To our surprise, this sensor works extremely well, except that it may take a while for the lights to reset and it could also be affected by the weather, but other than that, it was almost perfect. So we eventually abandoned the plan for the air current sensor we bought and the Flex Sensor and settled on the Humidity Sensor.
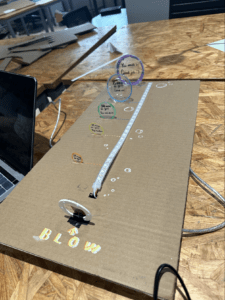
After the user testing, we received many constructive advice that would make the device even more interactive and closer to our original design in the prompt. We then decided on coding the Strip LED into different colors when it reaches certain length, and then added little marks next to the LED in according colors at the place where the color will change. To make up for the sphere elements that we didn’t use for the LED like we planned in the prompt, we design the marks in different sizes of circles to resemble the look of a bubble like here in the pictures.


To conclude the process of making this project, I would say our device is quite interactive, especially compared with the device that gave us the inspiration. It was interesting to experiment with different sensors witness the development of the project from scratch to the finished piece. Here is a video of a user’s interaction with the final project: IMG_3274
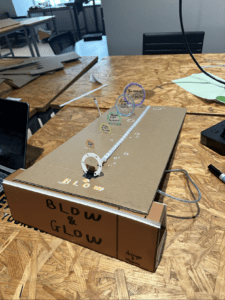
And here is a picture of the finished piece:
Citation to the inspiration device:
Yang Liu & Lu Yang. Bubble Magician, 21 August 2019, http://dancewithlight.com.cn/view/315. 2 October 2023.IMG_3209IMG_3209 IMG_3211 IMG_3213 IMG_3214 IMG_3215 IMG_3274
Full code of the project:
#include <FastLED.h>
#include “pitches.h”
#define NUM_LEDS 27 // How many leds on your strip?
#define DATA_PIN 3
CRGB leds[NUM_LEDS];
int value;
int mapped;
int melody[] = {
NOTE_C3, NOTE_D3, NOTE_E3, NOTE_F3, 0, NOTE_G3
};
// note durations: 4 = quarter note, 8 = eighth note, etc.:
int noteDurations[] = {
8, 8, 8, 4, 4, 4
};
int normalD = 250;
void setup() {
Serial.begin(9600); //Begin serial communication
FastLED.addLeds<NEOPIXEL, DATA_PIN>(leds, NUM_LEDS);
FastLED.setBrightness(50);
}
void loop() {
value = analogRead(A0); // Read and save analog value from potentiometer
Serial.print(“Value: “);
Serial.println(value);
mapped = map(constrain(value, 500, 900), 500, 900, 0, NUM_LEDS);
Serial.print(“Mapped: “);
Serial.println(mapped); //P rint value
for (int i = 0; i < mapped; i = i + 1) {
if(i >= 0 && i < 3) {
for (int i = 0; i < mapped; i = i + 1) {
leds[i]=CRGB(255, 0, 0);
}
tone(8, melody[0], normalD);
}
if(i >= 3 && i < 7) {
for (int i = 0; i < mapped; i = i + 1) {
leds[i]=CRGB(255, 85, 0);
}
tone(8, melody[1], normalD);
}
if(i >= 7 && i < 12) {
for (int i = 0; i < mapped; i = i + 1) {
leds[i]=CRGB(255, 255, 0);
}
tone(8, melody[2], normalD);
}
if(i >= 12 && i < 18) {
for (int i = 0; i < mapped; i = i + 1) {
leds[i]=CRGB(0, 255, 0);
}
tone(8, melody[3], normalD);
}
if(i >= 18 && i < 26) {
for (int i = 0; i < mapped; i = i + 1) {
leds[i]=CRGB(26, 103, 240);
}
tone(8, melody[5], normalD);
}
if(i == 26) {
for (int i = 0; i < mapped; i = i + 1) {
leds[i]=CRGB(127, 0, 127);
}
}
}
for (int i = mapped; i < NUM_LEDS; i = i + 1) {
leds[i] = CRGB(0, 0, 0);
}
FastLED.show();
if (leds[NUM_LEDS – 1] == CRGB(127, 0, 127)) {
for (int thisNote = 0; thisNote < 6; thisNote++) {
int noteDuration = 1000 / noteDurations[thisNote];
tone(8, melody[thisNote], noteDuration);
int pauseBetweenNotes = noteDuration * 1.30;
delay(pauseBetweenNotes);
noTone(8);
}
}
delay(10);
}