Midterm Project Report
Singing Skee Ball – Malaine Atienza & Michelle Huang – Margaret Minsky
1. Context and Significance
For our project, we chose to recreate a well-known arcade game in the United States of America which is Skee-Ball. The mechanics of the game includes rolling a ball over an inclined stage which is connected to a set of holes that the ball can get into. Each hole has its own level of difficulty thus, they would usually have different corresponding prizes. Our version of a skee ball machine includes the basic mechanic of rolling a ball on an inclined surface to shoot it into a set of ball receivers or holes connected to that plane. However, this time, to establish differences between each hole, we chose to add light sensors that could help play different sounds in each hole if the ball goes in them. Wanting to find out what sound each hole can make provides the players with some motivation to keep playing the game. It is intended for those who would want to engage in friendly competitions with their peers or for those who would simply want to spend time with others. Making the skee ball machine with cardboard was challenging since we had to figure out how to ensure it could support itself, have the basic features of a skee ball machine (slanted surface and holes), and how we could add circuits to the back of the holes. However, the experience we have from the previous group project in handling cardboard made the process much easier than it would have been without that experience.
2. Conception and Design
The most tricky part of our project was choosing what sensor to use to trigger the sounds and figuring out how we were going to assemble the circuit with the buzzer. My partner’s initial plan in her project proposal was to use a button, however, buttons required a lot of pressure to be pressed which would be hard to work with given the limited materials we had to make the machine and balls. After that, we thought of using touch sensors as well which were more sensitive than buttons. The problem with these however was that pressure must be applied in both the front and back of the touch sensor for it to work. The surface of the sensor was quite small too which provided a risk of the ball not landing in the middle of the sensor which would not allow the buzzer to produce a sound. Thus, after asking for our professor’s opinion on what sensor to use, we decided to stick with a light sensor instead. This sensor was sensitive enough for our project to work as the ball would make intense shadows once they land on the holes which could instantly trigger the buzzer.
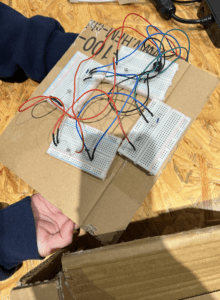
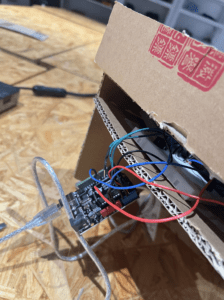
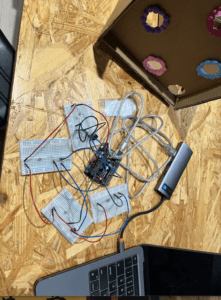
Since my partner and I are from different recitation sessions, we had to make sure that we could create a circuit that would work with only one Arduino. Because of that, we created a circuit composed of four breadboards, one for each sensor. To get ground and 5V distributed to all breadboards, we ended up connecting those wires to each other. Thus, we ended up with this circuit for our project:
3. Fabrication and Production
Initial sketch design:
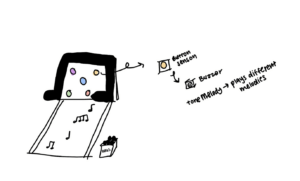
Our production process was composed of three major steps:
1. Production of the cardboard machine


To make the production process much faster and easier, we looked for a video tutorial on how to make a skee ball machine out of cardboard. However, we had to omit some features that were included in the original video, like a ball return, to ensure that we would have enough space for the circuits at the back. It would have also been better if we could have made the machine much bigger however, we thought that we were strictly limited to the two pieces of cardboard we were initially given. Thus we ended up with a much smaller version of a skee ball machine.
link to the video: https://www.youtube.com/watch?v=U2mgRPg_nl0
2. Creation of the circuit
To conserve materials, ground and 5V were distributed among each breadboard by connecting them to other breadboards. A 1K resistor was also used to prevent damage in the circuit, but its lower resistance allowed the light sensors to be sensitive to changes in light as much as possible. The buzzer and light sensors also had their own separate circuits and were just connected with code to better control their functions.
3. Coding
const int buzzer = 8; // buzzer to arduino pin 8

//const int sensor = A0; // sensor to arduino pin A0

const int sensor2 = A1; // sensor2 to arduino pin A1

const int sensor3 = A2; // sensor3 to aruino pin A2

const int sensor4 = A3; // sensor4 to arduino pin A3

const int sensor5 = A0;

const int dark = 20; //set dark parameters

int noteDuration;

#define NOTE_B0 31

#define NOTE_C1 33

#define NOTE_CS1 35

#define NOTE_D1 37

#define NOTE_DS1 39

#define NOTE_E1 41

#define NOTE_F1 44

#define NOTE_FS1 46

#define NOTE_G1 49

#define NOTE_GS1 52

#define NOTE_A1 55

#define NOTE_AS1 58

#define NOTE_B1 62

#define NOTE_C2 65

#define NOTE_CS2 69

#define NOTE_D2 73

#define NOTE_DS2 78

#define NOTE_E2 82

#define NOTE_F2 87

#define NOTE_FS2 93

#define NOTE_G2 98

#define NOTE_GS2 104

#define NOTE_A2 110

#define NOTE_AS2 117

#define NOTE_B2 123

#define NOTE_C3 131

#define NOTE_CS3 139

#define NOTE_D3 147

#define NOTE_DS3 156

#define NOTE_E3 165

#define NOTE_F3 175

#define NOTE_FS3 185

#define NOTE_G3 196

#define NOTE_GS3 208

#define NOTE_A3 220

#define NOTE_AS3 233

#define NOTE_B3 247

#define NOTE_C4 262

#define NOTE_CS4 277

#define NOTE_D4 294

#define NOTE_DS4 311

#define NOTE_E4 330

#define NOTE_F4 349

#define NOTE_FS4 370

#define NOTE_G4 392

#define NOTE_GS4 415

#define NOTE_A4 440

#define NOTE_AS4 466

#define NOTE_B4 494

#define NOTE_C5 523

#define NOTE_CS5 554

#define NOTE_D5 587

#define NOTE_DS5 622

#define NOTE_E5 659

#define NOTE_F5 698

#define NOTE_FS5 740

#define NOTE_G5 784

#define NOTE_GS5 831

#define NOTE_A5 880

#define NOTE_AS5 932

#define NOTE_B5 988

#define NOTE_C6 1047

#define NOTE_CS6 1109

#define NOTE_D6 1175

#define NOTE_DS6 1245

#define NOTE_E6 1319

#define NOTE_F6 1397

#define NOTE_FS6 1480

#define NOTE_G6 1568

#define NOTE_GS6 1661

#define NOTE_A6 1760

#define NOTE_AS6 1865

#define NOTE_B6 1976

#define NOTE_C7 2093

#define NOTE_CS7 2217

#define NOTE_D7 2349

#define NOTE_DS7 2489

#define NOTE_E7 2637

#define NOTE_F7 2794

#define NOTE_FS7 2960

#define NOTE_G7 3136

#define NOTE_GS7 3322

#define NOTE_A7 3520

#define NOTE_AS7 3729

#define NOTE_B7 3951

#define NOTE_C8 4186

#define NOTE_CS8 4435

#define NOTE_D8 4699

#define NOTE_DS8 4978

int button5melody[] = {

NOTE_C4, NOTE_G3, NOTE_G3, NOTE_A3, NOTE_G3, 0, NOTE_B3, NOTE_C4

};

int button2melody[] = {

NOTE_E4, NOTE_D4, NOTE_C3, NOTE_D4, NOTE_E4, 0, NOTE_E4, NOTE_E4

};

int button3melody[] = {

NOTE_E5, NOTE_A6, NOTE_B6, NOTE_G6, NOTE_B5, 0, NOTE_C6, NOTE_D6

};

int button4melody[] = {

NOTE_F5, NOTE_G5, NOTE_D4, NOTE_B4, NOTE_F5, 0, NOTE_A5, NOTE_F5

};

int noteDurations[] = {

4, 8, 8, 4, 4, 4, 4, 4

};

void setup() {

Serial.begin(9600);

pinMode(buzzer, OUTPUT);

}

void loop() {

int sensor5Value = analogRead(sensor5);

Serial.print("1st sensor: ");

Serial.println(sensor5Value);

delay(1);

int sensor2Value = analogRead(sensor2);

Serial.print(" 2nd sensor: ");

int sensor3Value = analogRead(sensor3);

Serial.print(" 3rd sensor: ");

int sensor4Value = analogRead(sensor4);

Serial.print(" 4th sensor: ");

delay(25);

// if (sensorValue < dark) {

// //iterate over the notes of the melody

// for (int thisNote = 0; thisNote < 8; thisNote++) {

// int noteDuration1 = 1000 / noteDurations[thisNote];

// //to calculate the note duration, take one second. Divided by the note type

// tone(8, button1melody[thisNote], noteDuration1);

// //stop the tone playing

// int pauseBetweenNotes1 = noteDuration1 * 1.30;

// delay(pauseBetweenNotes1);

// noTone(8);

// }

// } else {

// noTone(buzzer); // Send 1KHz sound signal

// }

if (sensor2Value < dark) {

//iterate over the notes of the melody

for (int thisNote = 0; thisNote < 8; thisNote++) {

int noteDuration2 = 1000 / noteDurations[thisNote];

//to calculate the note duration, take one second. Divided by the note type

tone(8, button2melody[thisNote], noteDuration2);

//stop the tone playing

int pauseBetweenNotes2 = noteDuration2 * 1.30;

delay(pauseBetweenNotes2);

noTone(8);

}

} else {

noTone(buzzer); // Send 1KHz sound signal

}

if (sensor3Value < dark) {

//iterate over the notes of the melody

for (int thisNote = 0; thisNote < 8; thisNote++) {

int noteDuration3 = 1000 / noteDurations[thisNote];

//to calculate the note duration, take one second. Divided by the note type

tone(8, button3melody[thisNote], noteDuration3);

//stop the tone playing

int pauseBetweenNotes3 = noteDuration3 * 1.30;

delay(pauseBetweenNotes3);

noTone(8);

}

} else {

noTone(buzzer); // Send 1KHz sound signal

}

if (sensor4Value < dark) {

//iterate over the notes of the melody

for (int thisNote = 0; thisNote < 8; thisNote++) {

int noteDuration4 = 1000 / noteDurations[thisNote];

//to calculate the note duration, take one second. Divided by the note type

tone(8, button4melody[thisNote], noteDuration4);

//stop the tone playing

int pauseBetweenNotes4 = noteDuration4 * 1.30;

delay(pauseBetweenNotes4);

noTone(8);

}

} else {

noTone(buzzer); // Send 1KHz sound signal

}

if (sensor5Value < dark) {

//iterate over the notes of the melody

for (int thisNote = 0; thisNote < 8; thisNote++) {

int noteDuration5 = 1000 / noteDurations[thisNote];

//to calculate the note duration, take one second. Divided by the note type

tone(8, button5melody[thisNote], noteDuration5);

//stop the tone playing

int pauseBetweenNotes5 = noteDuration5 * 1.30;

delay(pauseBetweenNotes5);

noTone(8);

}

} else {

noTone(buzzer); // Send 1KHz sound signal

}
}
The code starts off by establishing all the variables that would be used throughout the code. This included a long list of notes which allowed us to change the melody of the buzzer when each sensor was activated.
User-Testing Session Feedback
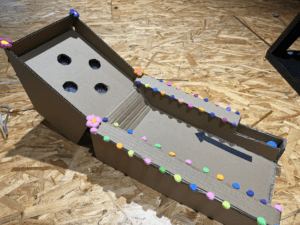
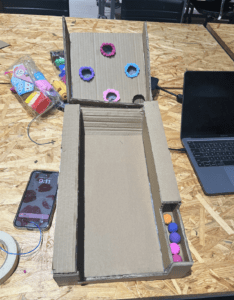
Our most common observation was that our users were confused about how to get the balls into the holes. Some of them tried to throw the balls into the holes instead of rolling them while some also tried flicking them in. Thus, we decided to add arrows on the slanted platform in our final prototype as a sign that the ball must be rolled upwards. At first, we also had decorative borders on each hole, however, we found that it made it harder for the balls to go into the holes so we removed them. A border was also initially placed between the platform and the holes to keep the balls from rolling down too much. However, we found that this also made it harder for our users to get the balls in so we also removed it.
User-Testing Prototype:
4. Conclusions
The goal of the project was to create a skee ball machine that would make different melodies depending on which hole the ball ends up going into. I believe we were able to successfully create a machine with this feature. I would call a machine to be interactive if its user could control an aspect of it or control its results. With that said, I believe our project fits into my definition of interaction since they have the ability to control what happens in the game: they can get the balls to roll in the set of holes by rolling them upward. The mechanism also elicits a response from the machine, the different sounds per hole, which I believe further strengthens the interaction between the user and machine.
However, if we were given more time to improve it, I would first enlarge the machine so that our users could be more comfortable with swinging their arms to roll the ball up since that is how the game is supposed to be played. Next, I would have added melodies of well-known songs in each hole, like nursery rhymes maybe to make it simple, just to strike some sort of familiarity with the users of our project. Lastly, I would add a feature that could keep track of the players’ scores to make it a much better experience for them when competing with their peers.
If there was anything I learned throughout this whole process, it would be patience. Getting the code to work especially took a very long time to do. A lot of times, we would try to refine the code and go over it a couple of times, only for it to fail because of a very small detail we overlooked. This also taught me to be more meticulous with the details of my work and to be more careful.
5. Annex