
Final Project Report
Control Your World – Malaine Atienza – Margaret Minsky
Conception and Design
For this project, I wanted to create a mini-environment where users are immersed in a world where they can control its functions. Many people feel helpless as they feel as if everything happening in their environment is out of their control. But, what if it suddenly was? What if we can suddenly control different functions in our environment like the color of the sky, and create wind with a simple movement of a hand? This was the concept I wanted to introduce in my final project.
Thinking of the theme and what mechanisms to use for the project was a bit challenging. For that, I started with one interaction aspect at a time to develop the environment. The first thing I wanted to add was a light-changing LED strip at the ceiling based on the hand-swaying movement of the user. This movement would be tracked by a distance sensor. This way, the colors on the ceiling of the environment would change depending on the distance of the user’s hand from the sensor. After that, I thought of what else is usually produced when you sway or fan your hand from side to side. I thought of wind and so, with the help of Processing, I included a feature where if the sensor detects an object that is nearer than the distance from the other side of the box, a wind sound would play. These two functions were all I had when I presented my work in progress during the user testing. One comment I received was to add a feature that shows the effect of wind on the environment. For that, I thought of adding waves. The waves are made with pieces of painted cardboard that are attached to the propellor of a micro servo. The movement of the micro servo was also controlled by values received by the distance sensor, and so, the “waves” would also be controlled with the users’ hand movement.
Fabrication and Production
1. Initial Sketch
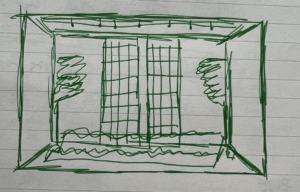
2. Lights
At first, I wanted to add individual LEDs as the light in the ceiling of my project, as seen in my initial sketch, to mimic stars in the night sky. However, I eventually realized that doing so would require multiple breadboards which would make the top look bulky. It would also be difficult to place them without crowding the top. Thus, I opted to use a Neopixel strip instead to line the ceiling. With that, I encountered the problem of thinking of a way to place the Neopixel strip on its ceiling. Because of the strip’s shell, it was very hard to bend it around the corners of the ceiling. And so, I had to get a strip that was already de-shelled which made it easier to line the ceiling with lights. To further make the lights visible, I also included strings of clear beads that hung from the ceiling which reflected the light from the strip.
To connect the strip to the Arduino, the pin to which it was connected was declared at the beginning of the code. To change the colors depending on the distance of the user’s hand from the sensor, the if function was used, with a certain distance as the condition.
3. Sensor
Since I had a lot of open space in my environment, I wanted to use a sensor that would work, even in an open space. I wanted to use something that would not require my users to have to touch something, but rather, I wanted the interaction to take place as soon as they place their hands in the environment. Because of that, I opted for a distance sensor. When I was first building the circuit for the sensor, I directly attached it to the sensor and planned to create a ledge for the breadboard at the side of the box. Later on, I changed the jumper wires to M/M wires which made the sensor more flexible and much easier to work with.
4. Waves
For the waves, I wanted the mechanism to occupy the bottom of the environment, providing enough space for the user’s hand to freely move on top of it. To mimic the movement, I used pieces of cardboard that were glued to be triangle-shaped. These were also painted to look more like waves. On one side, the propellor of the micro servo was attached which allowed the whole cardboard piece to move according to the micro servo’s movement. The connection between the micro servo and sensor was established by declaring the pin it was attached to at the beginning of the code. To only make the motor move once the user’s hand is detected by the motor, the if function was used with a certain distance as a conditional.
5. Laser-Cutting
I intended to add laser-cutting to my project by making a scenery with it. I was able to add two “buildings” in the background, although I would have added trees as well but I was not able to due to the printer breaking down.
6. Sound
The wind sound was added using Processing by declaring the same port used in Arduino, the name of the sound file, and using the void getSerialData() function which allows Processing to receive data from Arduino.
Conclusions
I define an interactive object as something that could be changed based on its user’s actions. I believe my project aligns with that definition of mine as with the movement of the user’s hand, the color of my environment can be changed, a wind sound can be produced, and a wave mechanism can be seen. If I could improve my project, I would add more laser-cut designs in the background. I was unable to add more before the project presentation as the machine was out of service. Per my professors’ and classmates’ feedback, I would recreate it on a much larger scale to fully immerse its users. I would also create more changes in sound based on the distance of one’s hand from the sensor. For example, the sound gets louder if an object is closer to it and softer as it goes farther. Or, I could also use the sound of a very calm wind on one side and stronger wind on the other.
From this project, I learned to be creative while also being practical. Being too unrealistic in the ideation process could only get you confused later on when you are actually building your project. Thus, one must also always remember to have a plan of action for every idea one would think of. Another is to be detail-oriented. One of the reasons why my codes would not cork multiple times was because of a small detail I forgot to add or change. Thus, I learned the importance of paying attention to the smallest details of a project, no matter how large it may be.
Appendix
Gallery


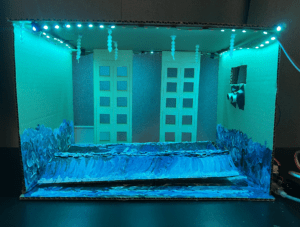
Final Project
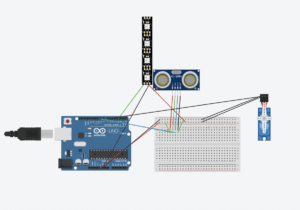
Circuit
Code
Arduino
/*

Ultrasonic Sensor HC-SR04 and Arduino Tutorial

by Dejan Nedelkovski,

www.HowToMechatronics.com

*/

// defines pins numbers

#include <FastLED.h>

#define NUM_LEDS 80 // How many leds on your strip?

#define DATA_PIN 3

#include <Servo.h>

Servo myservo;

CRGB leds[NUM_LEDS];

//float SMOOTHING = 0.05;

const int trigPin = 9;

const int echoPin = 10;

const int distance1 = 10;

int servoPin = 7;

Servo Servo1;

//float smoothed;

// defines variables

long duration;

int distance;

void setup() {

pinMode(trigPin, OUTPUT); // Sets the trigPin as an Output

pinMode(echoPin, INPUT); // Sets the echoPin as an Input

FastLED.addLeds<NEOPIXEL, DATA_PIN>(leds, NUM_LEDS);

FastLED.setBrightness(200);

Servo1.attach(servoPin);

Serial.begin(9600); // Starts the serial communication


}

void loop() {

// Clears the trigPin

digitalWrite(trigPin, LOW);

delayMicroseconds(2);

// Sets the trigPin on HIGH state for 10 micro seconds

digitalWrite(trigPin, HIGH);

delayMicroseconds(10);

digitalWrite(trigPin, LOW);

// Reads the echoPin, returns the sound wave travel time in microseconds

duration = pulseIn(echoPin, HIGH);

Serial.println(distance);

// Calculating the distance

distance = duration * 0.034 / 2;

if(distance < 20){

Servo1.write(30);

delay(300);

}

else{

Servo1.write(0);

delay(200);

}


if(distance < distance1){

for(int i = 0; i < NUM_LEDS; i=i+1){

leds[i] = CRGB(20, 0, 150);

}

FastLED.show();


}


if(distance > 10 && distance < 20){

for(int i = 0; i < NUM_LEDS; i++){

leds[i] = CRGB(0, 20, 200);

}

FastLED.show();


}

if(distance > 20 && distance < 30){

for(int i = 0; i < NUM_LEDS; i++){

leds[i] = CRGB(0, 200, 100);

}

FastLED.show();


}

}
import processing.serial.*;
import processing.sound.*;

SoundFile sound;
Serial serialPort;

int NUM_OF_VALUES_FROM_ARDUINO = 1;  /* CHANGE THIS ACCORDING TO YOUR PROJECT */

/* This array stores values from Arduino */
int arduino_values[] = new int[NUM_OF_VALUES_FROM_ARDUINO];


void setup() {
  size(500, 500);
  background(0);

  printArray(Serial.list());
  // put the name of the serial port your Arduino is connected
  // to in the line below - this should be the same as you're
  // using in the "Port" menu in the Arduino IDE
  serialPort = new Serial(this, "/dev/cu.usbmodem112301", 9600);

  sound = new SoundFile(this, "wind.mp3");
  sound.loop();
}

void draw() {
  background(0);
  stroke(255);
  fill(255);

  // receive the values from Arduino
  getSerialData();

  if (arduino_values[0] < 33) {
    background(255, 0, 0);
    sound.amp(1.0);
  } else {
    sound.amp(0.0);
  }

  // use the values like this:
  //float x = map(arduino_values[0], 0, 1023, 0, width);
  //float y = map(arduino_values[1], 0, 1023, 0, height);

  //rectMode(CENTER);
  //rect(width/2, height/2, x, y);
}


// the helper function below receives the values from Arduino
// in the "arduino_values" array from a connected Arduino
// running the "serial_AtoP_arduino" sketch
// (You won't need to change this code.)

void getSerialData() {
  while (serialPort.available() > 0) {
    String in = serialPort.readStringUntil( 10 );  // 10 = '\n'  Linefeed in ASCII
    if (in != null) {
      print("From Arduino: " + in);
      String[] serialInArray = split(trim(in), ",");
      if (serialInArray.length == NUM_OF_VALUES_FROM_ARDUINO) {
        for (int i=0; i<serialInArray.length; i++) {
          arduino_values[i] = int(serialInArray[i]);
        }
      }
    }
  }
}