- PROJECT TITLE – YOUR NAME – YOUR INSTRUCTOR’S NAME
Project title: Theatre of Shadows
My name: Wanyu (Kitty) Chen
Instructor name: Inmi Lee
- CONTEXT AND SIGNIFICANCE
Our inspiration of this project comes from shadow plays, a kind of Chinese traditional performing art. In the traditional shadow plays, professional actors hide behind the screen and use wooden sticks to control the movement of the shadow puppets. This is usually not very approachable to our lives. Therefore, we decided to do a project to let people experience shadow plays by themselves. Some previous research and group projects inspired our midterm project. For instance, the sensor exploration in Recitation 3 inspired the choice of our sensors, and the mechanism in Recitation 5 inspired the curtain system of our project (will be mentioned in the “FABRICATION AND PRODUCTION” section). We also found a project similar to our idea: Quanzhou Puppet Interactive Robot by Chao Gao. It included a robotic arm, which could manipulate Quanzhou traditional puppets under human instructions, and realize the interaction between humans and robots. This example confirmed the feasibility of our idea and deepened our understanding of interaction. We agreed that interaction refers to the influence between two or more entities, where they engage with and affect each other. Interaction emphasizes action and reaction – this common understanding constantly reminded us that our projects should give users strong feedback. What makes our project unique was that it gave users a large degree of autonomy. Users could freely personalize the puppet’s posture, the color of the light, and the stories behind their shadow play. They could also experience performing shadow plays and appreciating shadow plays at the same time. The intended user of our project was everyone, no matter whether they have a deep understanding on shadow play or not. This project provided them with a new insight to this kind of Chinese traditional play as well as Chinese traditional culture.
- CONCEPTION AND DESIGN
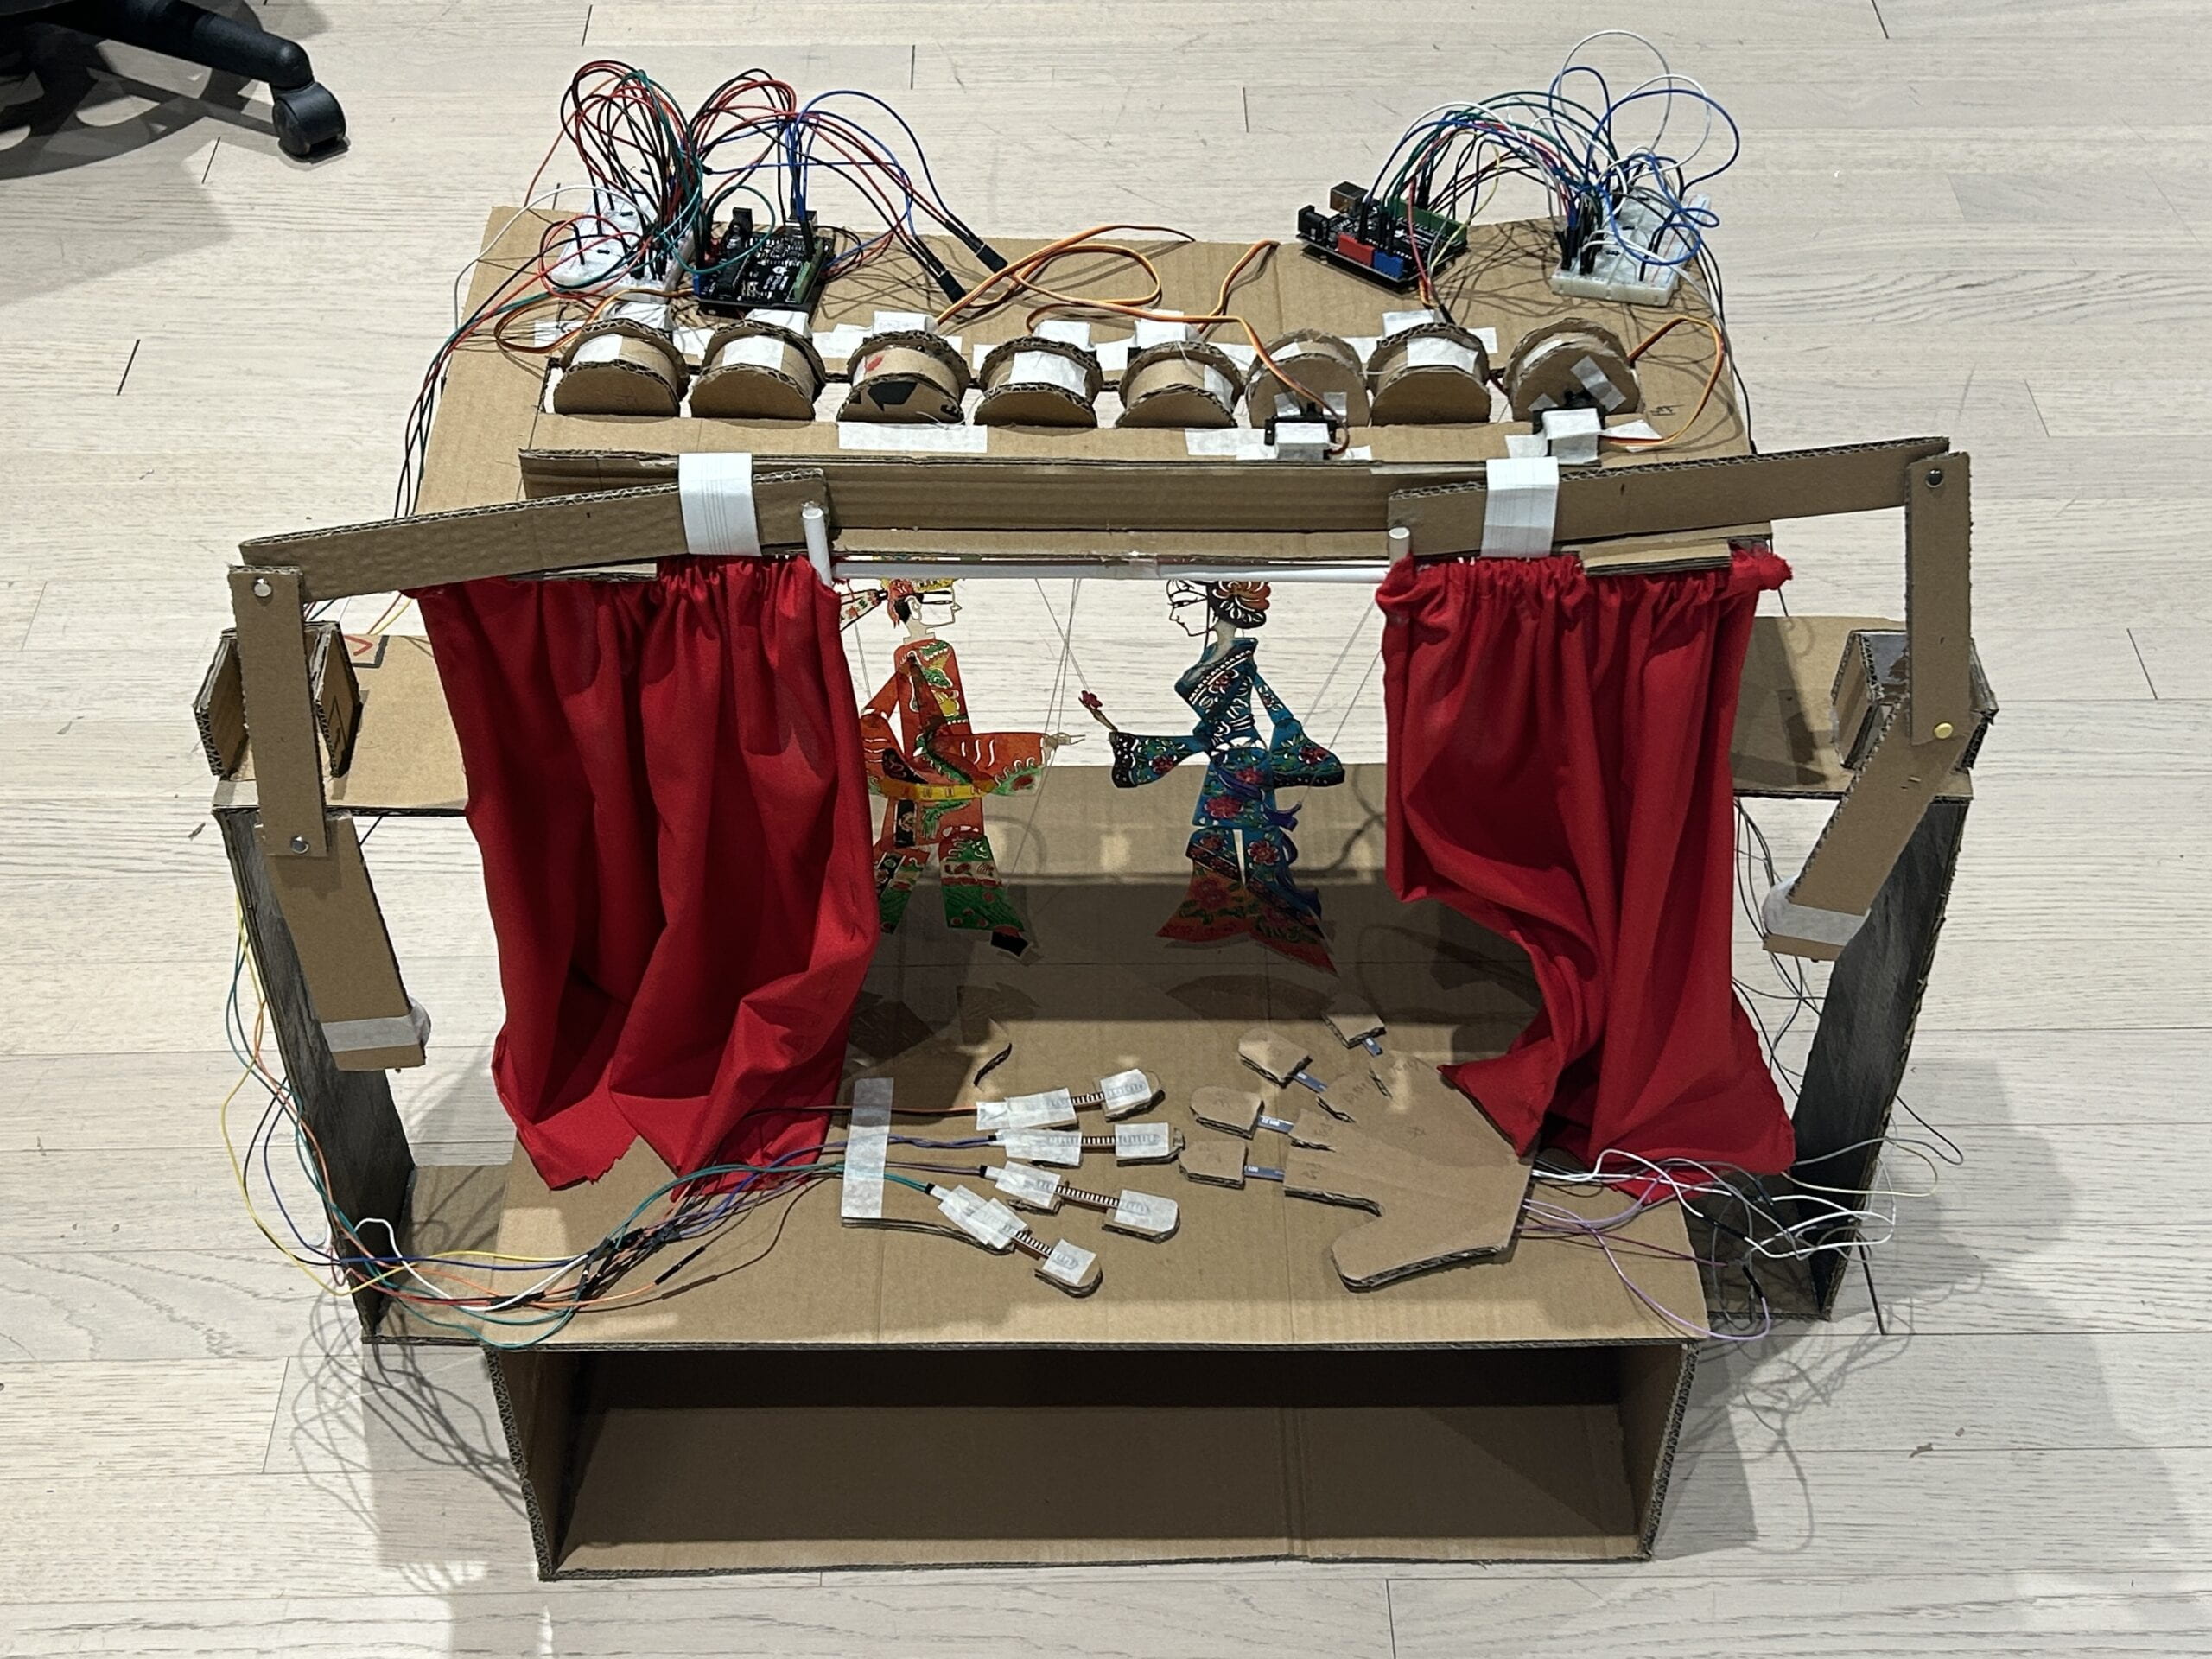
We hoped the users could interact with our projects in various ways: by pushing a slider they could open and close the curtains; by pressing a button they could change the color of the light; by moving their fingers they could move the puppets. Therefore, we designed a pair of gloves with flex sensors to read their finger movements (this also implied the users to wear gloves to interact). We placed the slider on the left-hand side, and posted “open” and “close” signs to remind users. We also placed the button just beside the slider, because this allowed users to discover it more intuitively. However, for the button, we did not post a sign to instruct users its functions, because we wanted the users to try it by themselves. Overall, we planned to build a stage. The criteria we used to select the materials were functional, accessible, and (if this material was used on the surface) good-looking. We built the structure out of cardboard because it is a plentiful, easy-to-divide material that has some stiffness. We used red cloth to decorate the surface because we wanted our project to have the feel of a traditional Chinese theater. We could have used cardboard painted with red color, but we felt that red cloth was better because its soft properties gave the project a sense of fluidity. At the same time, it could completely cover the messy wires. For the screen, we used translucent rice paper. Its translucent feature allowed the shadow of the puppet to be reflected on the screen when the light was illuminated from behind, while other debris could not be seen. We used colorful transparent plastic pieces to achieve the conversion of different colors of the light.
- FABRICATION AND PRODUCTION
We basically did everything together, while I was responsible more for coding and Emily was responsible more for handwork. The production process of our project can mainly be divided into several steps: framing the stage, building the curtain system, the puppet system, and the light system. To frame the stage, we carefully decided the size of the whole project, and determined the size of each piece of cardboard. Then, we started cutting cardboard and stuck them together to form the structure of the stage.

After we framed the stage, we started to build the curtain system. To make the curtain move, we made it a track using paper straws. The idea of driving the curtains actually came from the mechanism in Recitation 5. In Recitation 5 we used two long cardboard strips to connect the rotating stepper motor and the object, and made the object move linearly. We planned to use stepper motors to linearly drive the curtains as well. Initially, we used the same mechanism as in Recitation 5. After many attempts, we found that the mechanism in recitation 5 could only move a short distance, which was not enough for the curtains to fully open. Then we discovered that the main things to realize the linear movement were the cardboard strips with rivets, not the cardboards on the sides. Therefore, we stuck a long cardboard strip (the first strip) on to a stepper motor, and used a rivet to connect it with another cardboard strips (the second strip), and finally used another rivet to connect the second strip with the third strip (which made sure the curtains stayed on their tracks). We did so on the other side of the curtain. In order to make the third cardboard strips drive the curtains, we tried cardboards and strings, and finally found that using paper straws to connect them was the best way. Then we wrote two separate codes for the two stepper motors, but in this case we found that the two sides of the curtain could not open at the same time (the left side opened first, and the right side opened next.) This was not the effect we wanted. Thus, we asked the professors for help. After a code that could make the stepper motors rotate in opposite directions simultaneously, we found that the curtain could opened effectively but could not be closed in the way we want. Ultimately, we decided to have both stepper motors execute the same code and rotate in the same direction, and have the left stepper motor face the back to ensure the curtains open to both sides at the same time. (The code will be mentioned later with the light system.)


Then, we came to the puppet system. We planned to connect the puppet with servos using strings, and made a pair of gloves with flex sensors which could control the servos and the puppets’ movements. Considering that the servo’s own rotation could not pull the strings significantly, we cut cardboards to make some wheels and stuck them onto the servo. In this way, a simple pulley structure was formed. When the servo rotated, the strings could be rolled up by the wheel, pulling the puppets’ limbs at the same time. Next, we hung the puppet using a small piece of string suspended from the puppet’s head. Then we fastened one end of a string to the wheel and the other end to the puppet’s limbs. After that we connected the circuit and simulated reading the flex sensor to roughly write the code. According to the puppet’s movements, we gradually adjusted the length of the string and the specific values in the code.


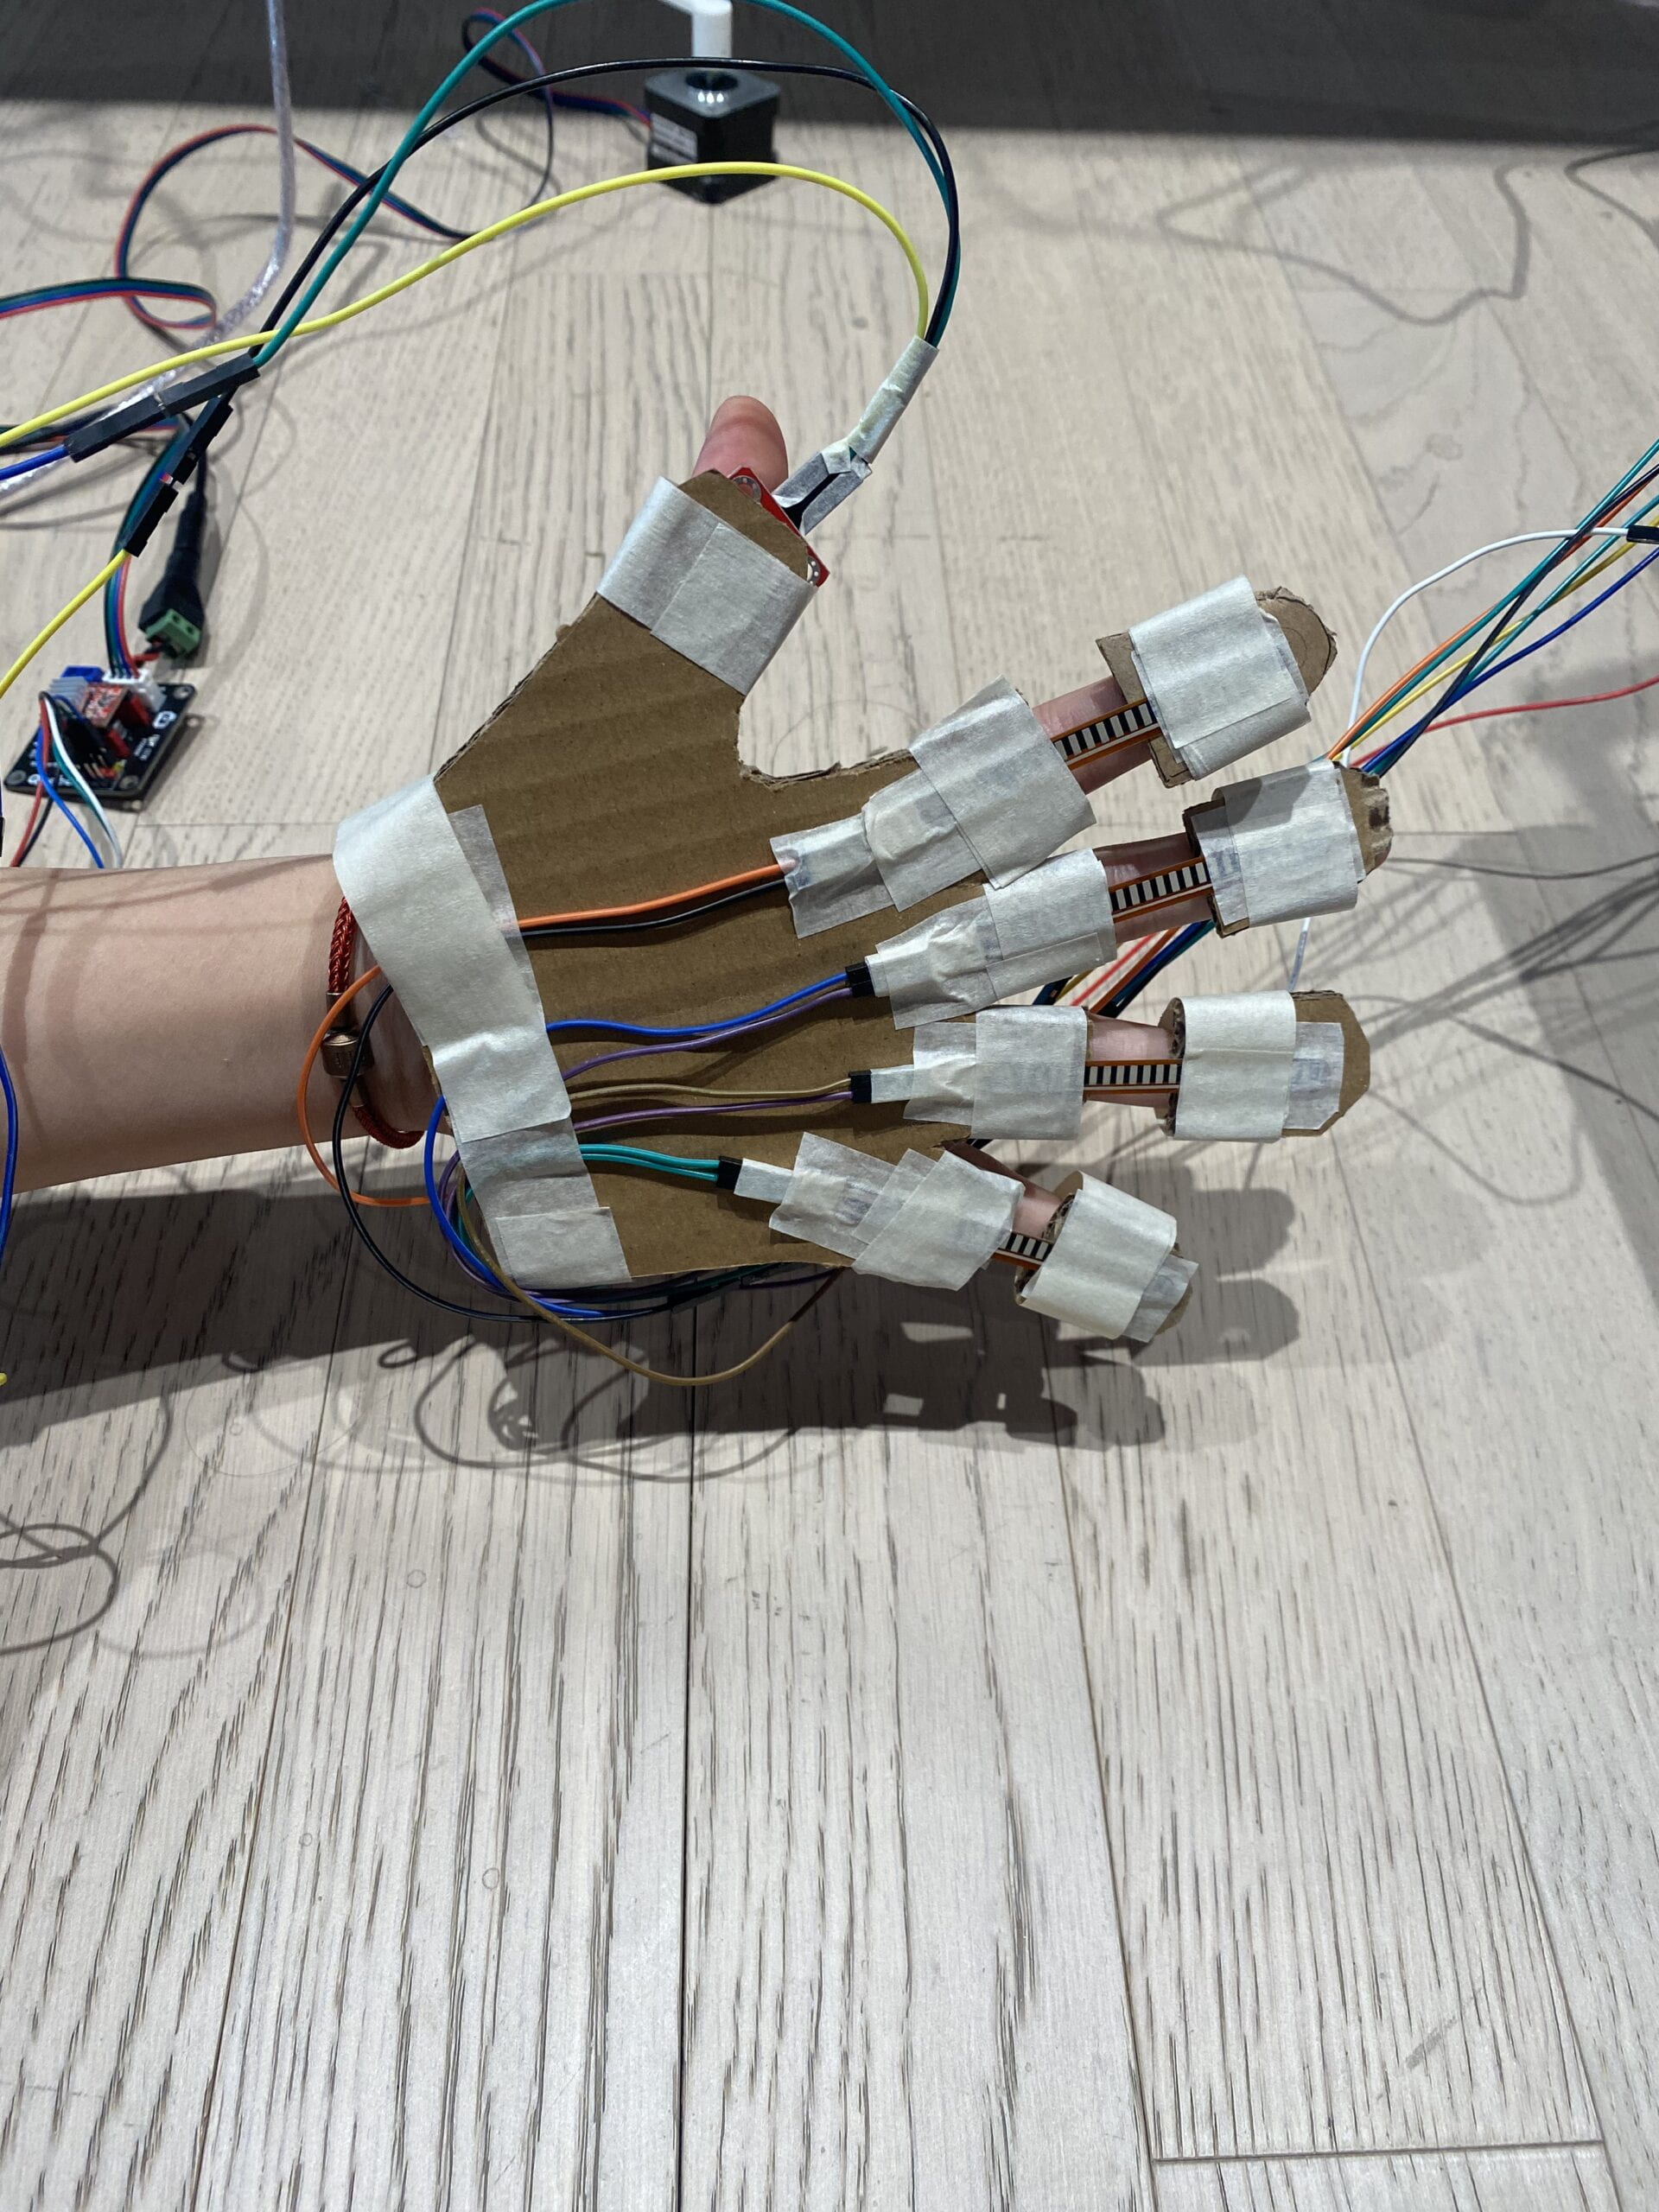
As for the gloves, we cut cardboard into the shape of a hand, with the fingertips separated from the palm and connected by bend sensors. In this way, when the users bent their finger, the flex sensor value would change. We also pasted a touch sensor that controlled the curtain to the inside of the gloves, which created the effect of opening the curtain as soon as the user puts on the glove.


// code for the male puppet
#include <Servo.h>
Servo servo1;
Servo servo2;
Servo servo3;
Servo servo4;
int val1;
int val2;
int val3;
int val4;
void setup() {
servo1.attach(9);
servo2.attach(10);
servo3.attach(11);
servo4.attach(12);
Serial.begin(9600);
}
void loop() {
val1 = analogRead(A0);
delay(10);
val1 = map(val1, 50, 100, 0, 180);
val1 = constrain(val1, 0, 180);
servo1.write(val1);
Serial.println(val1);
val2 = analogRead(A1);
delay(10);
val2 = map(val2, 170, 230, 0, 90);
val2 = constrain(val2, 0, 90);
servo2.write(val2);
Serial.println(val2);
val3 = analogRead(A2);
delay(10);
val3 = map(val3, 30, 40, 0, 90);
val3 = constrain(val3, 0, 90);
servo3.write(val3);
Serial.println(val3);
val4 = analogRead(A3);
delay(10);
val4 = map(val4, 130, 190, 0, 180);
val4 = constrain(val4, 0, 180);
servo4.write(val4);
Serial.println(val4);
}
// code for the female puppet
#include <Servo.h>
Servo servo1;
Servo servo2;
Servo servo3;
Servo servo4;
int val1;
int val2;
int val3;
int val4;
void setup() {
servo1.attach(9);
servo2.attach(10);
servo3.attach(11);
servo4.attach(12);
Serial.begin(9600);
}
void loop() {
val1 = analogRead(A0);
delay(10);
val1 = map(val1, 170, 300, 0, 180);
val1 = constrain(val1, 0, 180);
servo1.write(val1);
Serial.println(val1);
val2 = analogRead(A1);
delay(10);
val2 = map(val2, 270, 310, 0, 180);
val2 = constrain(val2, 0, 180);
servo2.write(val2);
Serial.println(val2);
val3 = analogRead(A2);
delay(10);
val3 = map(val3, 230, 290 , 0, 180);
val3 = constrain(val3, 0, 180);
servo3.write(val3);
Serial.println(val3);
val4 = analogRead(A3);
delay(10);
val4 = map(val4, 260, 300, 0, 180);
val4 = constrain(val4, 0, 180);
servo4.write(val4);
Serial.println(val4);
}
Finally, we built the light system. We cut some colorful transparent plastic sheets into pieces, and pasted them overlappingly onto a stepper motor. Thus, the three colors (red, yellow, and blue) could create a colorful effect. We set the stepper motor under the stage to ensure that the light can pass through these colorful plastic pieces. Then, we connected the circuit and wrote a code for the stepper motor to rotate 90 degrees when the button is pressed. Then, we attached the screen and adjust it. Last but not least, we checked the connection of all circuits once again, and organized the wires. We taped red cloth to the surface as decoration (and to cover up the wires).


// based on ConstantSpeed example
// stepper 1 controls the light
// stepper 2 and stepper 3 control the curtain
#include <AccelStepper.h>
// Stepper motor 1
int DIR_PIN1 = 2;
int STEP_PIN1 = 3;
int EN_PIN1 = 4;
int val1; //big button
int pos;
AccelStepper stepper1(AccelStepper::DRIVER, STEP_PIN1, DIR_PIN1);
// Stepper motor 2 (left)
int DIR_PIN2 = 8;
int STEP_PIN2 = 9;
int EN_PIN2 = 10;
AccelStepper stepper2(AccelStepper::DRIVER, STEP_PIN2, DIR_PIN2);
void setup() {
Serial.begin(9600);
// Stepper motor 1
pinMode(EN_PIN1, OUTPUT);
digitalWrite(EN_PIN1, LOW);
stepper1.setMaxSpeed(10000);
stepper1.setAcceleration(5000);
// Stepper Motor 2
pinMode(EN_PIN2, OUTPUT);
digitalWrite(EN_PIN2, LOW);
stepper2.setMaxSpeed(1000);
stepper2.setAcceleration(5000);
}
void loop() {
// read the big button
val1 = digitalRead(7);
Serial.println(val1);
// Stepper Motor 1
if (val1 == 1) {
pos+=50;
stepper1.runToNewPosition(pos);
delay(10);
}
int val2 = analogRead(A0);
Serial.println(val2);
// Stepper Motor 2 & 3
if (0< val2 && val2 < 400) {
stepper2.runToNewPosition(800);
} else {
stepper2.runToNewPosition(0);
}
}
During the user testing session, users found difficulties in moving and bending their fingers in cardboard gloves. The flex sensors under the gloves were not sensitive enough to make the puppets move freely; but the touch sensors in the gloves were so sensitive that they kept making the curtains open and closed. Also, the users tended to press the big red button for light changing at first because it was so obvious that they thought it was an “on” button. In order to deal with these problems, we changed our cardboard gloves into real fabric gloves, and placed the flex sensors on the gloves. In this way, the elasticity of the fabric allowed everyone to put on the gloves properly, and the flex sensors were bent to a greater extent, allowing for larger readings, making the movement of the puppet more obvious. We replaced the touch sensors with a slider, which made the curtains more stable. In addition, we changed the big red button into a small white one and placed it next to the slider, making it less noticeable and misleading. In general, I think the adaptions were quite effective. The gloves and the curtains functioned well, and the users tended to notice the button after they opened the curtain.


The goal of our project is to let the users experience shadow play freely, and the production choices contributed to reaching our goal. The opening of the curtains on the stage (as a sign of starting shadow play) gave users the immersive feeling of a theater. The changing colors of the lights add diversity and dramatic atmosphere to the experience. The fabric gloves allow users to comfortably move their fingers and freely control the puppets.
- CONCLUSIONS
The goal of our project was to let everybody experience shadow plays freely, and make Chinese traditional shadow plays approachable to our lives. I think the project generally align with our definition of interaction. We provided users with feedbacks like the opening and closing of the curtains, the changing of lights, and the movements of the puppets. Ultimately, the users interacted with our projects by pushing the slider to open the curtains, exploring the colors of the lights, moving their fingers to control the puppet, trying to figure out which finger controls which puppet’s limb and creating some stories. However, there were aspects that were not fully align with our definition of interaction — sometimes the feedback may create confusion and affect the engagement. For example, the puppets may jitter due to unstable readings. If we had more time, we will improve our project by making the puppets’ movements more stable and adjusting the curtain system to make it open wider and close more smoothly. We will also play some music to create an immersive atmosphere as well as covering the noise of the servos. In addition, we will draw a guide about some common puppet poses in shadow plays, and add a buzzer which can play a short piece of celebratory music after the user successfully moves the puppet into those poses. These improvements can make our project more entertaining and interactive. We learned a lot from the failures and accomplishments of this project. We encountered countless setbacks when we were doing this project. Technically, we learned that it is always a right decision to check the connection of the circuits when it does not work; and solving problems requires constant attempts. In mentality, don’t despair immediately when encountering a major difficulty, because one never knows how many such difficulties will be waiting in the future. After repeated failures, our mind states became calmer and we gained more courage to solve all the difficulties. From our accomplishments, we have become more proficient in skills such as coding, connecting circuits, cutting cardboard and so on. We also found that a project needs continuous improvement to achieve its goals, and it is meaningful to persevere in a right direction.


videos:
- DISASSEMBLY

- APPENDIX


Last but not least, I would like to express my most sincere thanks to Professor Inmi, Professor Andy, Professor Gottfried, and Professor Rodolfo for their great help. Many thanks for the LAs and fellows in Interaction Lab for their support. A special thanks to Emily for being the best and most supportive partner, who encouraged me and helped me for countless times. I am also grateful for our friends who stayed with us over night, Chenhan, Jenny and Ariel; and everyone who helped and encouraged us.