Recitation 8: Johnny
Exercise 1: Make a Processing Etch A Sketch
For this exercise’s first part, using the potentiometer to control the X-position and Y-position is relatively easy, and the most important thing to remember is to put the map function so that the value will suit the screen size and put the background(0) at the very beginning part of the draw loop. If you don’t do this, you will find out that the previous circle didn’t vanish, thus making the canvas looking messy. Here is the video showing the position of the circle when I am rotating the potentiometer.
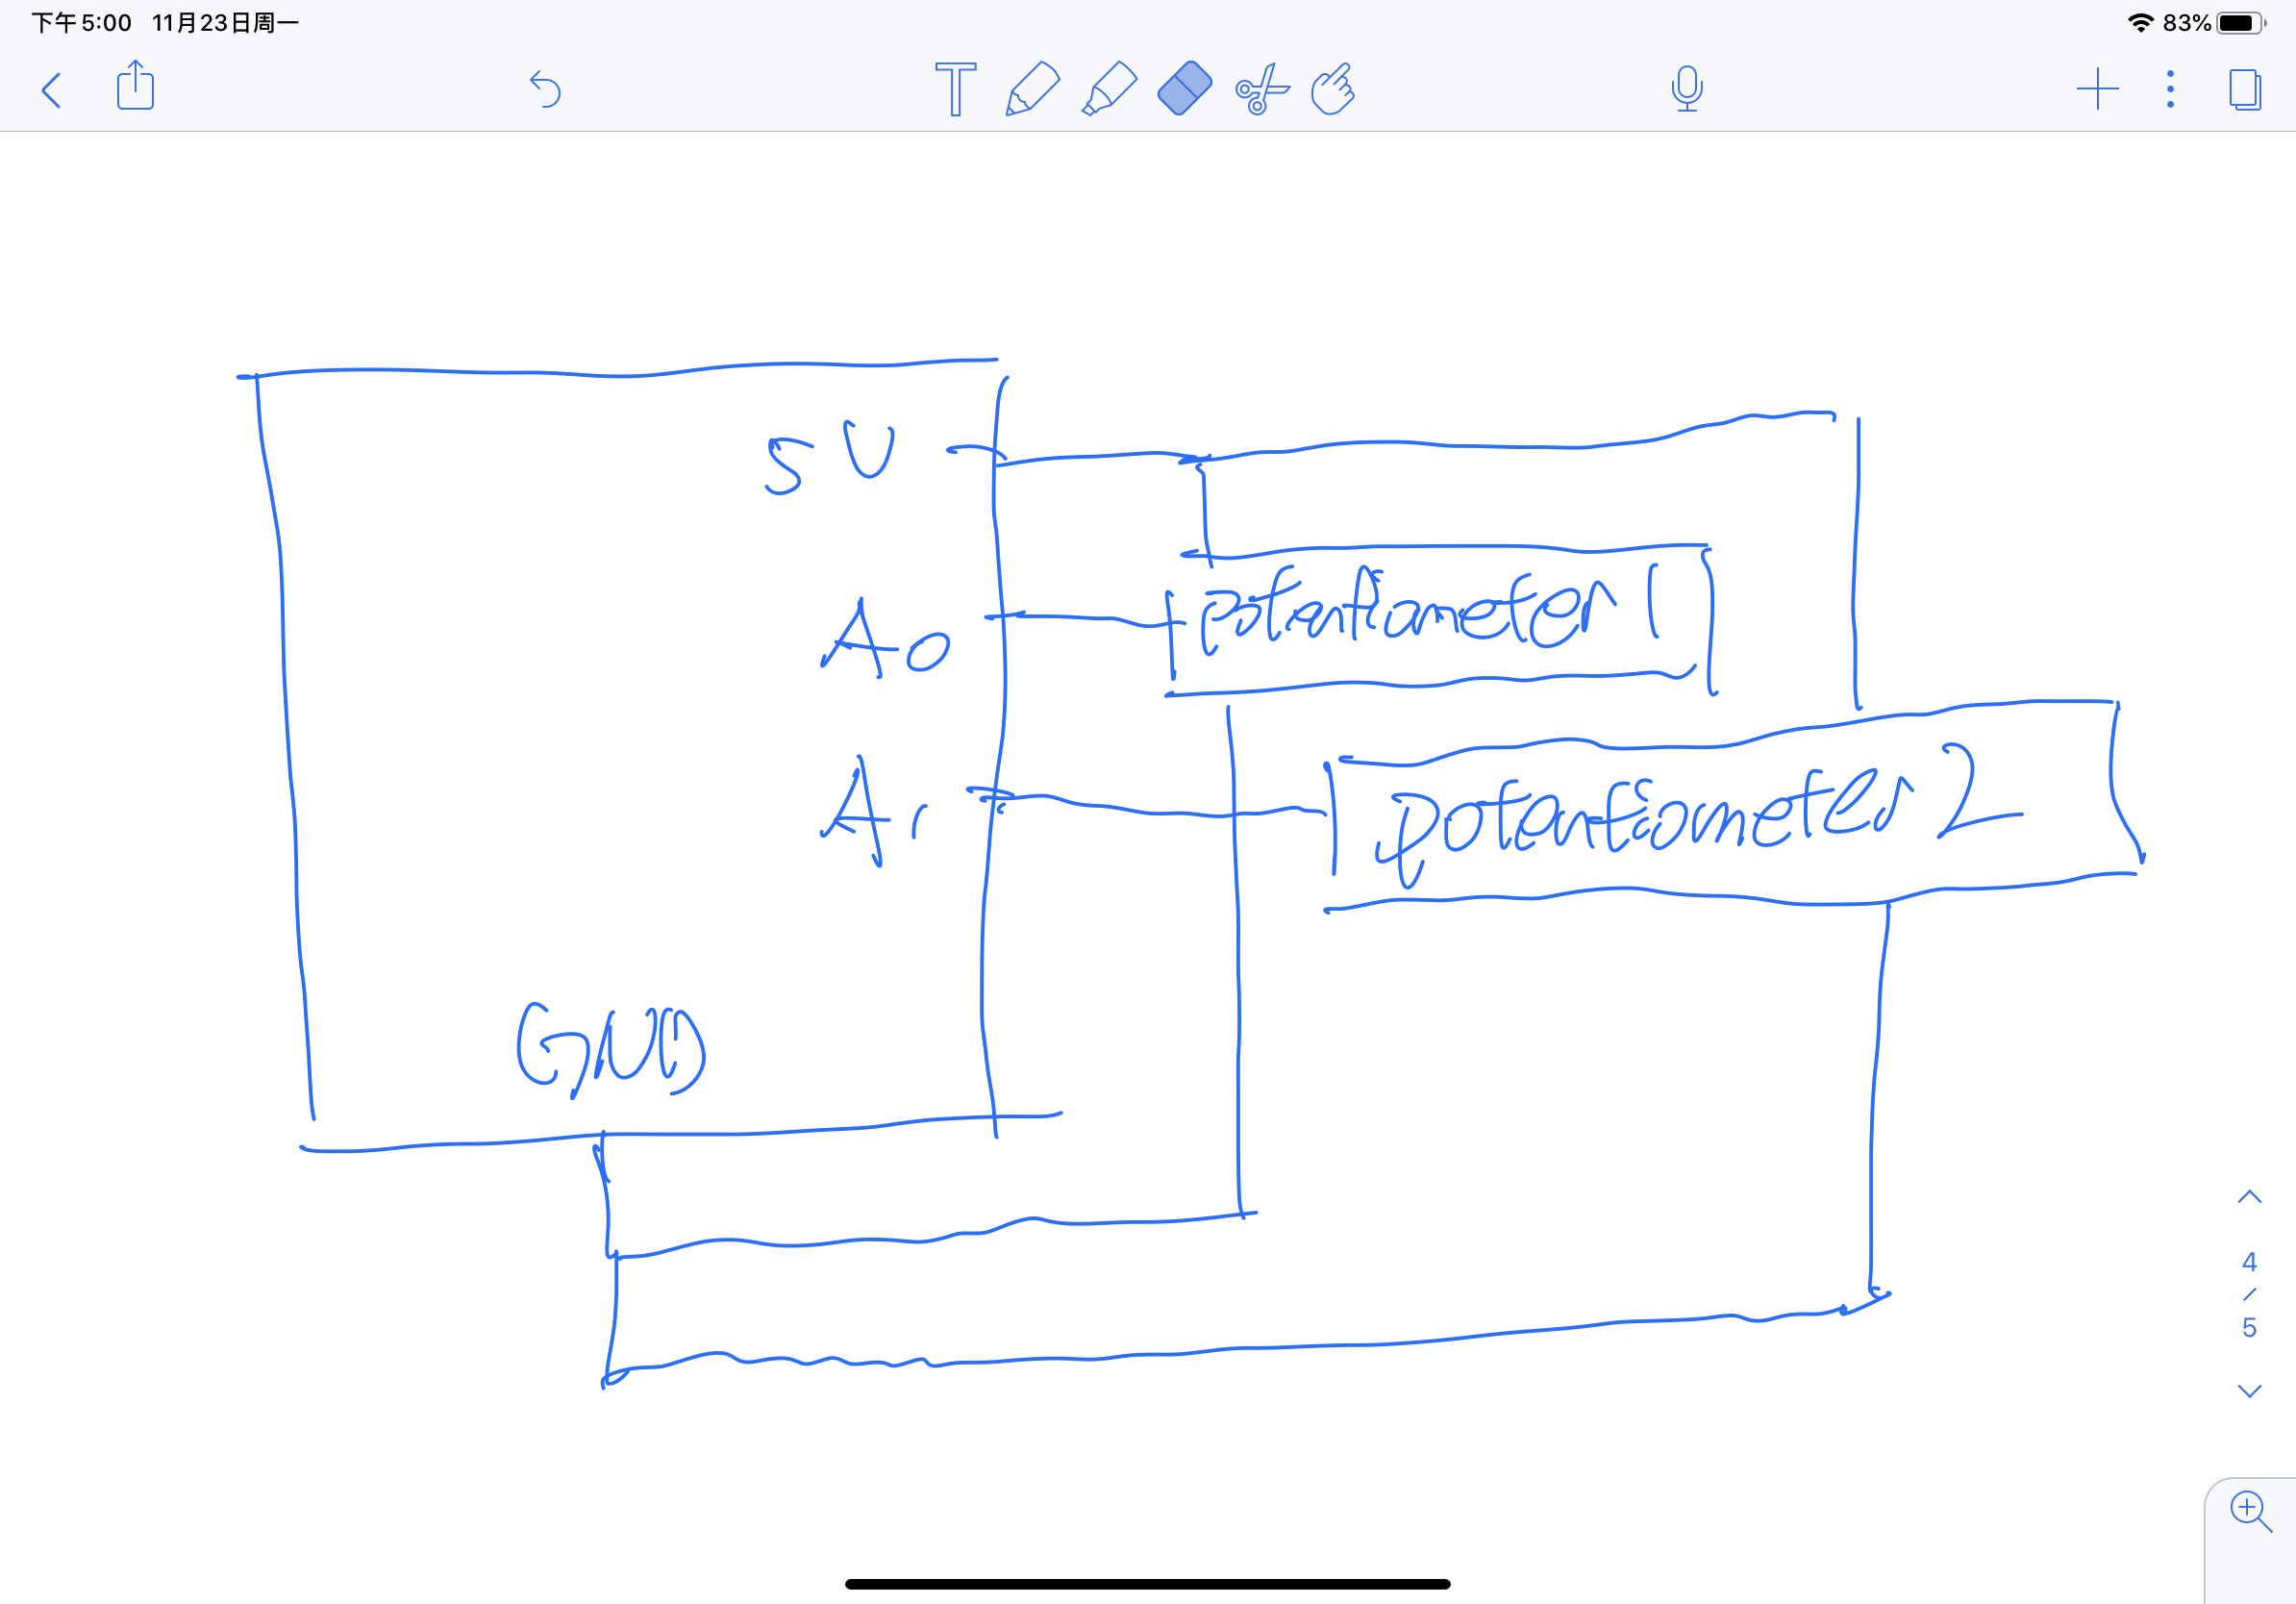
The next part is to draw lines instead of using an ellipse. To do that, I have found that I need one more array to store the previous position of X and Y, similar to the pmouseX and pmouseY. The schematic is the same as the one in the first step.

After drawing the line, I need to give the previous X-position and Y-position a new value so that they can keep updating. This is the short video showing how it works when I am rotating the potentiometer.
This is the code for the 1st exercise.
This is the Arduino part.
void setup() {
  Serial.begin(9600);
}

void loop() {
  int sensor1 = map(analogRead(A0),0,1023,0,500);
  int sensor2 = map(analogRead(A1),0,1023,0,500);
  Serial.print(sensor1);
  Serial.print(",");
  Serial.print(sensor2);
  Serial.println();
  delay(100);
}
This is the processing part.
import processing.serial.*;
String myString = null;
Serial myPort;
int NUM_OF_VALUES = 2;
int[] sensorValues;
int[] lastValues = new int[2];
void setup() {
  size(500, 500);
  background(255);
  setupSerial();
  lastValues[0] = 0;
  lastValues[1] = 0;
}
void draw() {
  updateSerial();
  printArray(sensorValues);
  strokeWeight(5);
  stroke(0);
  line(lastValues[0], lastValues[1], sensorValues[0], sensorValues[1]);
  lastValues[0] = sensorValues[0];
  lastValues[1] = sensorValues[1];
}
void setupSerial() {
  printArray(Serial.list());
  myPort = new Serial(this, Serial.list()[ 3 ], 9600);
  myPort.clear();
  myString = myPort.readStringUntil( 10 );
  myString = null;

  sensorValues = new int[2];
}
void updateSerial() {
  while (myPort.available() > 0) {
    myString = myPort.readStringUntil( 10 );
    if (myString != null) {
      String[] serialInArray = split(trim(myString), ",");
      if (serialInArray.length == NUM_OF_VALUES) {
        for (int i=0; i<serialInArray.length; i++) {
          sensorValues[i] = int(serialInArray[i]);
        }
      }
    }
  }
}
In this part, the most takeaway is to use an array to store the previous position and then update it at the end of the draw loop. And the interaction is you map the values of rotating the potentiometer and then send it to the processing. It will remember the previous 2 values and draw the line based on those and the present value.
Exercise 2: Make a musical instrument with Arduino
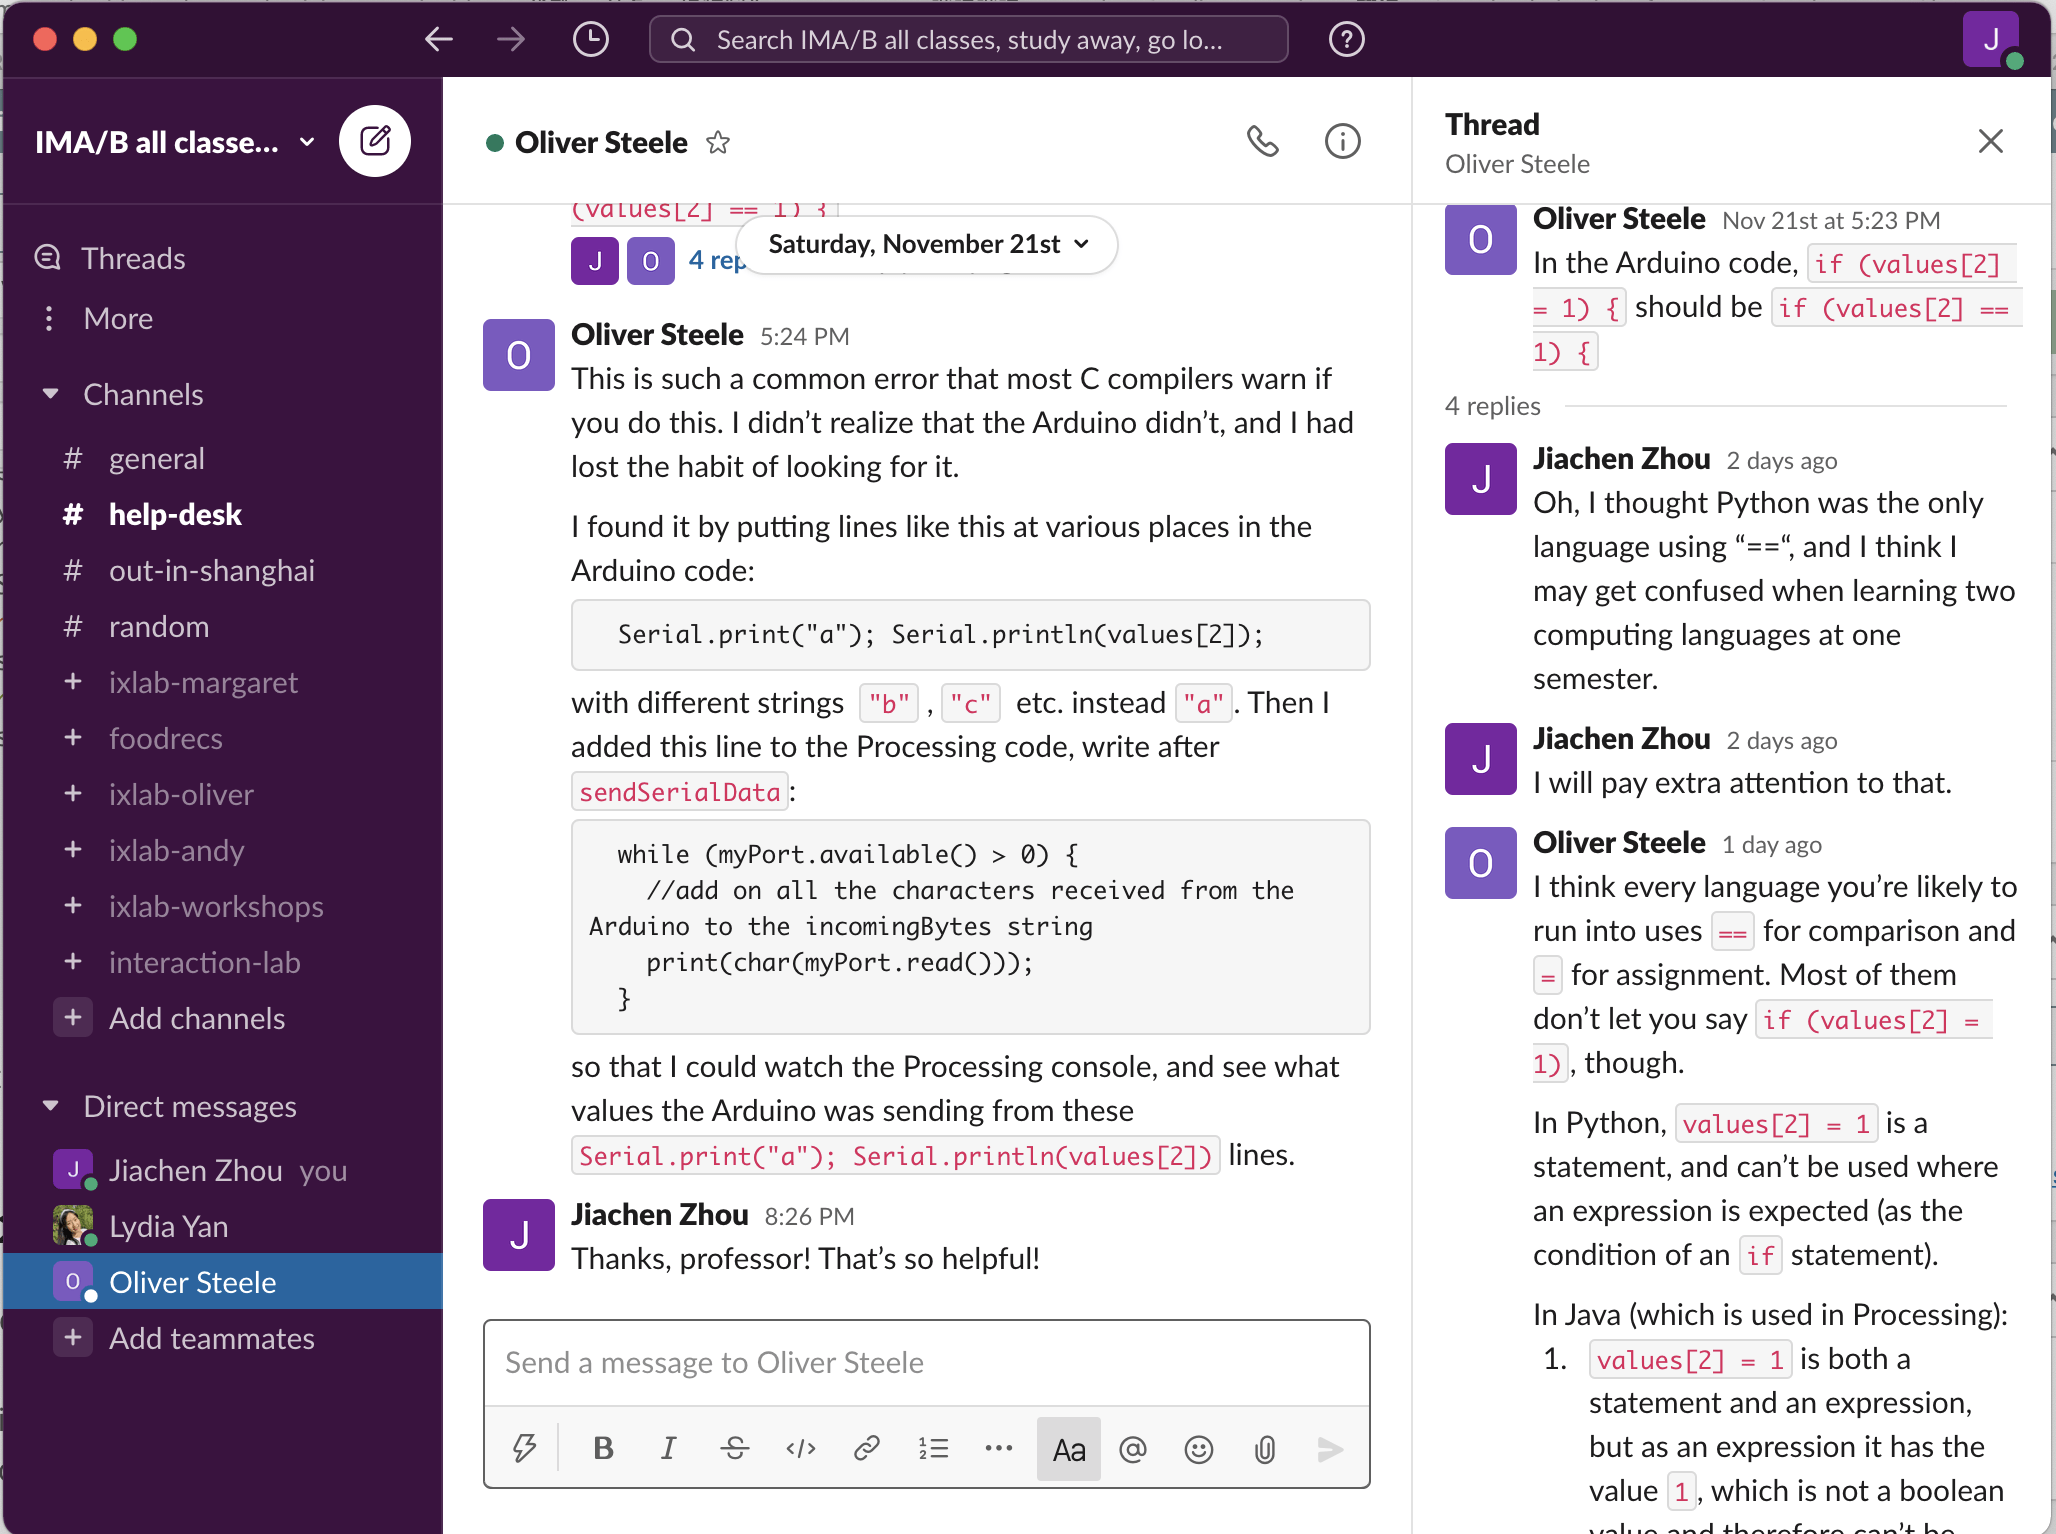
For this exercise, I have encountered one big obstacle during the recitation, but actually, this error is very stupid and hard to detective. During the weekend, Professor Oliver has helped me to find the error and I have learned lots of useful skills in how to debug things. And this is the screenshot of we discussing it.
I think the most important takeaway in this one is to use another variable called condition to remember the condition of whether the key is pressed. And also, tone(pin-number,0) doesn’t stand for no noise, Notone() is the function which can achieve the goal. Here is the video of me playing with it.
This is the Arduino code.
#define NUM_OF_VALUES 3   /** YOU MUST CHANGE THIS ACCORDING TO YOUR PROJECT **/


/** DO NOT REMOVE THESE **/
int tempValue = 0;
int valueIndex = 0;

/* This is the array of values storing the data from Processing. */
int values[NUM_OF_VALUES];


void setup() {
  Serial.begin(9600);
  pinMode(12, OUTPUT);
  pinMode(13, OUTPUT);
  values[2] = 0;


}

void loop() {
  getSerialData();
  digitalWrite(13, values[2]);
  if (values[2] == 1) {

    tone(12, values[0]);

  } else {
    noTone(12);
  }
  // add your code here
  // use elements in the values array
  // values[0]
  // values[1]


}


//recieve serial data from Processing
void getSerialData() {
  if (Serial.available()) {
    char c = Serial.read();
    //switch - case checks the value of the variable in the switch function
    //in this case, the char c, then runs one of the cases that fit the value of the variable
    //for more information, visit the reference page: https://www.arduino.cc/en/Reference/SwitchCase
    switch (c) {
      //if the char c from Processing is a number between 0 and 9
      case '0'...'9':
        //save the value of char c to tempValue
        //but simultaneously rearrange the existing values saved in tempValue
        //for the digits received through char c to remain coherent
        //if this does not make sense and would like to know more, send an email to me!
        tempValue = tempValue * 10 + c - '0';
        break;
      //if the char c from Processing is a comma
      //indicating that the following values of char c is for the next element in the values array
      case ',':
        values[valueIndex] = tempValue;
        //reset tempValue value
        tempValue = 0;
        //increment valuesIndex by 1
        valueIndex++;
        break;
      //if the char c from Processing is character 'n'
      //which signals that it is the end of data
      case 'n':
        //save the tempValue
        //this will b the last element in the values array
        values[valueIndex] = tempValue;
        //reset tempValue and valueIndex values
        //to clear out the values array for the next round of readings from Processing
        tempValue = 0;
        valueIndex = 0;
        break;
      //if the char c from Processing is character 'e'
      //it is signalling for the Arduino to send Processing the elements saved in the values array
      //this case is triggered and processed by the echoSerialData function in the Processing sketch
      case 'e': // to echo
        for (int i = 0; i < NUM_OF_VALUES; i++) {
          Serial.print(values[i]);
          if (i < NUM_OF_VALUES - 1) {
            Serial.print(',');
          }
          else {
            Serial.println();
          }
        }
        break;
    }
  }
}
This is the processing code.
int condition = 0;
import processing.serial.*;

int NUM_OF_VALUES = 3;  /** YOU MUST CHANGE THIS ACCORDING TO YOUR PROJECT **/


Serial myPort;
String myString;

// This is the array of values you might want to send to Arduino.
int values[] = new int[3];

void setup() {
  size(500, 500);
  background(0);

  printArray(Serial.list());
  myPort = new Serial(this, Serial.list()[ 3 ], 9600);
  // check the list of the ports,
  // find the port "/dev/cu.usbmodem----" or "/dev/tty.usbmodem----"
  // and replace PORT_INDEX above with the index of the port

  myPort.clear();
  // Throw out the first reading,
  // in case we started reading in the middle of a string from the sender.
  myString = myPort.readStringUntil( 10 );  // 10 = '\n'  Linefeed in ASCII
  myString = null;
}


void draw() {
  background(0);
  int x = mouseX;
  int y = mouseY;

  circle(x, y, 10);
  if (keyPressed == true) {
    // changes the values
    values[0]=x;
    values[1]=y;

    condition = 1;
    values[2] = condition;
  } else {
    condition = 0;
    values[2] = condition;

  }
  fill(255);


  // sends the values to Arduino.

  sendSerialData();

  // This causess the communication to become slow and unstable.
  // You might want to comment this out when everything is ready.
  // The parameter 200 is the frequency of echoing.
  // The higher this number, the slower the program will be
  // but the higher this number, the more stable it will be.
  echoSerialData(200);
}

void sendSerialData() {
  printArray(values);
  String data = "";
  for (int i=0; i<values.length; i++) {
    data += values[i];
    //if i is less than the index number of the last element in the values array
    if (i < values.length-1) {
      data += ","; // add splitter character "," between each values element
    }
    //if it is the last element in the values array
    else {
      data += "n"; // add the end of data character "n"
    }
  }
  //write to Arduino
  myPort.write(data);
}


void echoSerialData(int frequency) {
  //write character 'e' at the given frequency
  //to request Arduino to send back the values array
  if (frameCount % frequency == 0) myPort.write('e');

  String incomingBytes = "";
  while (myPort.available() > 0) {
    //add on all the characters received from the Arduino to the incomingBytes string
    incomingBytes += char(myPort.read());
  }
  //print what Arduino sent back to Processing
  print( incomingBytes );
}
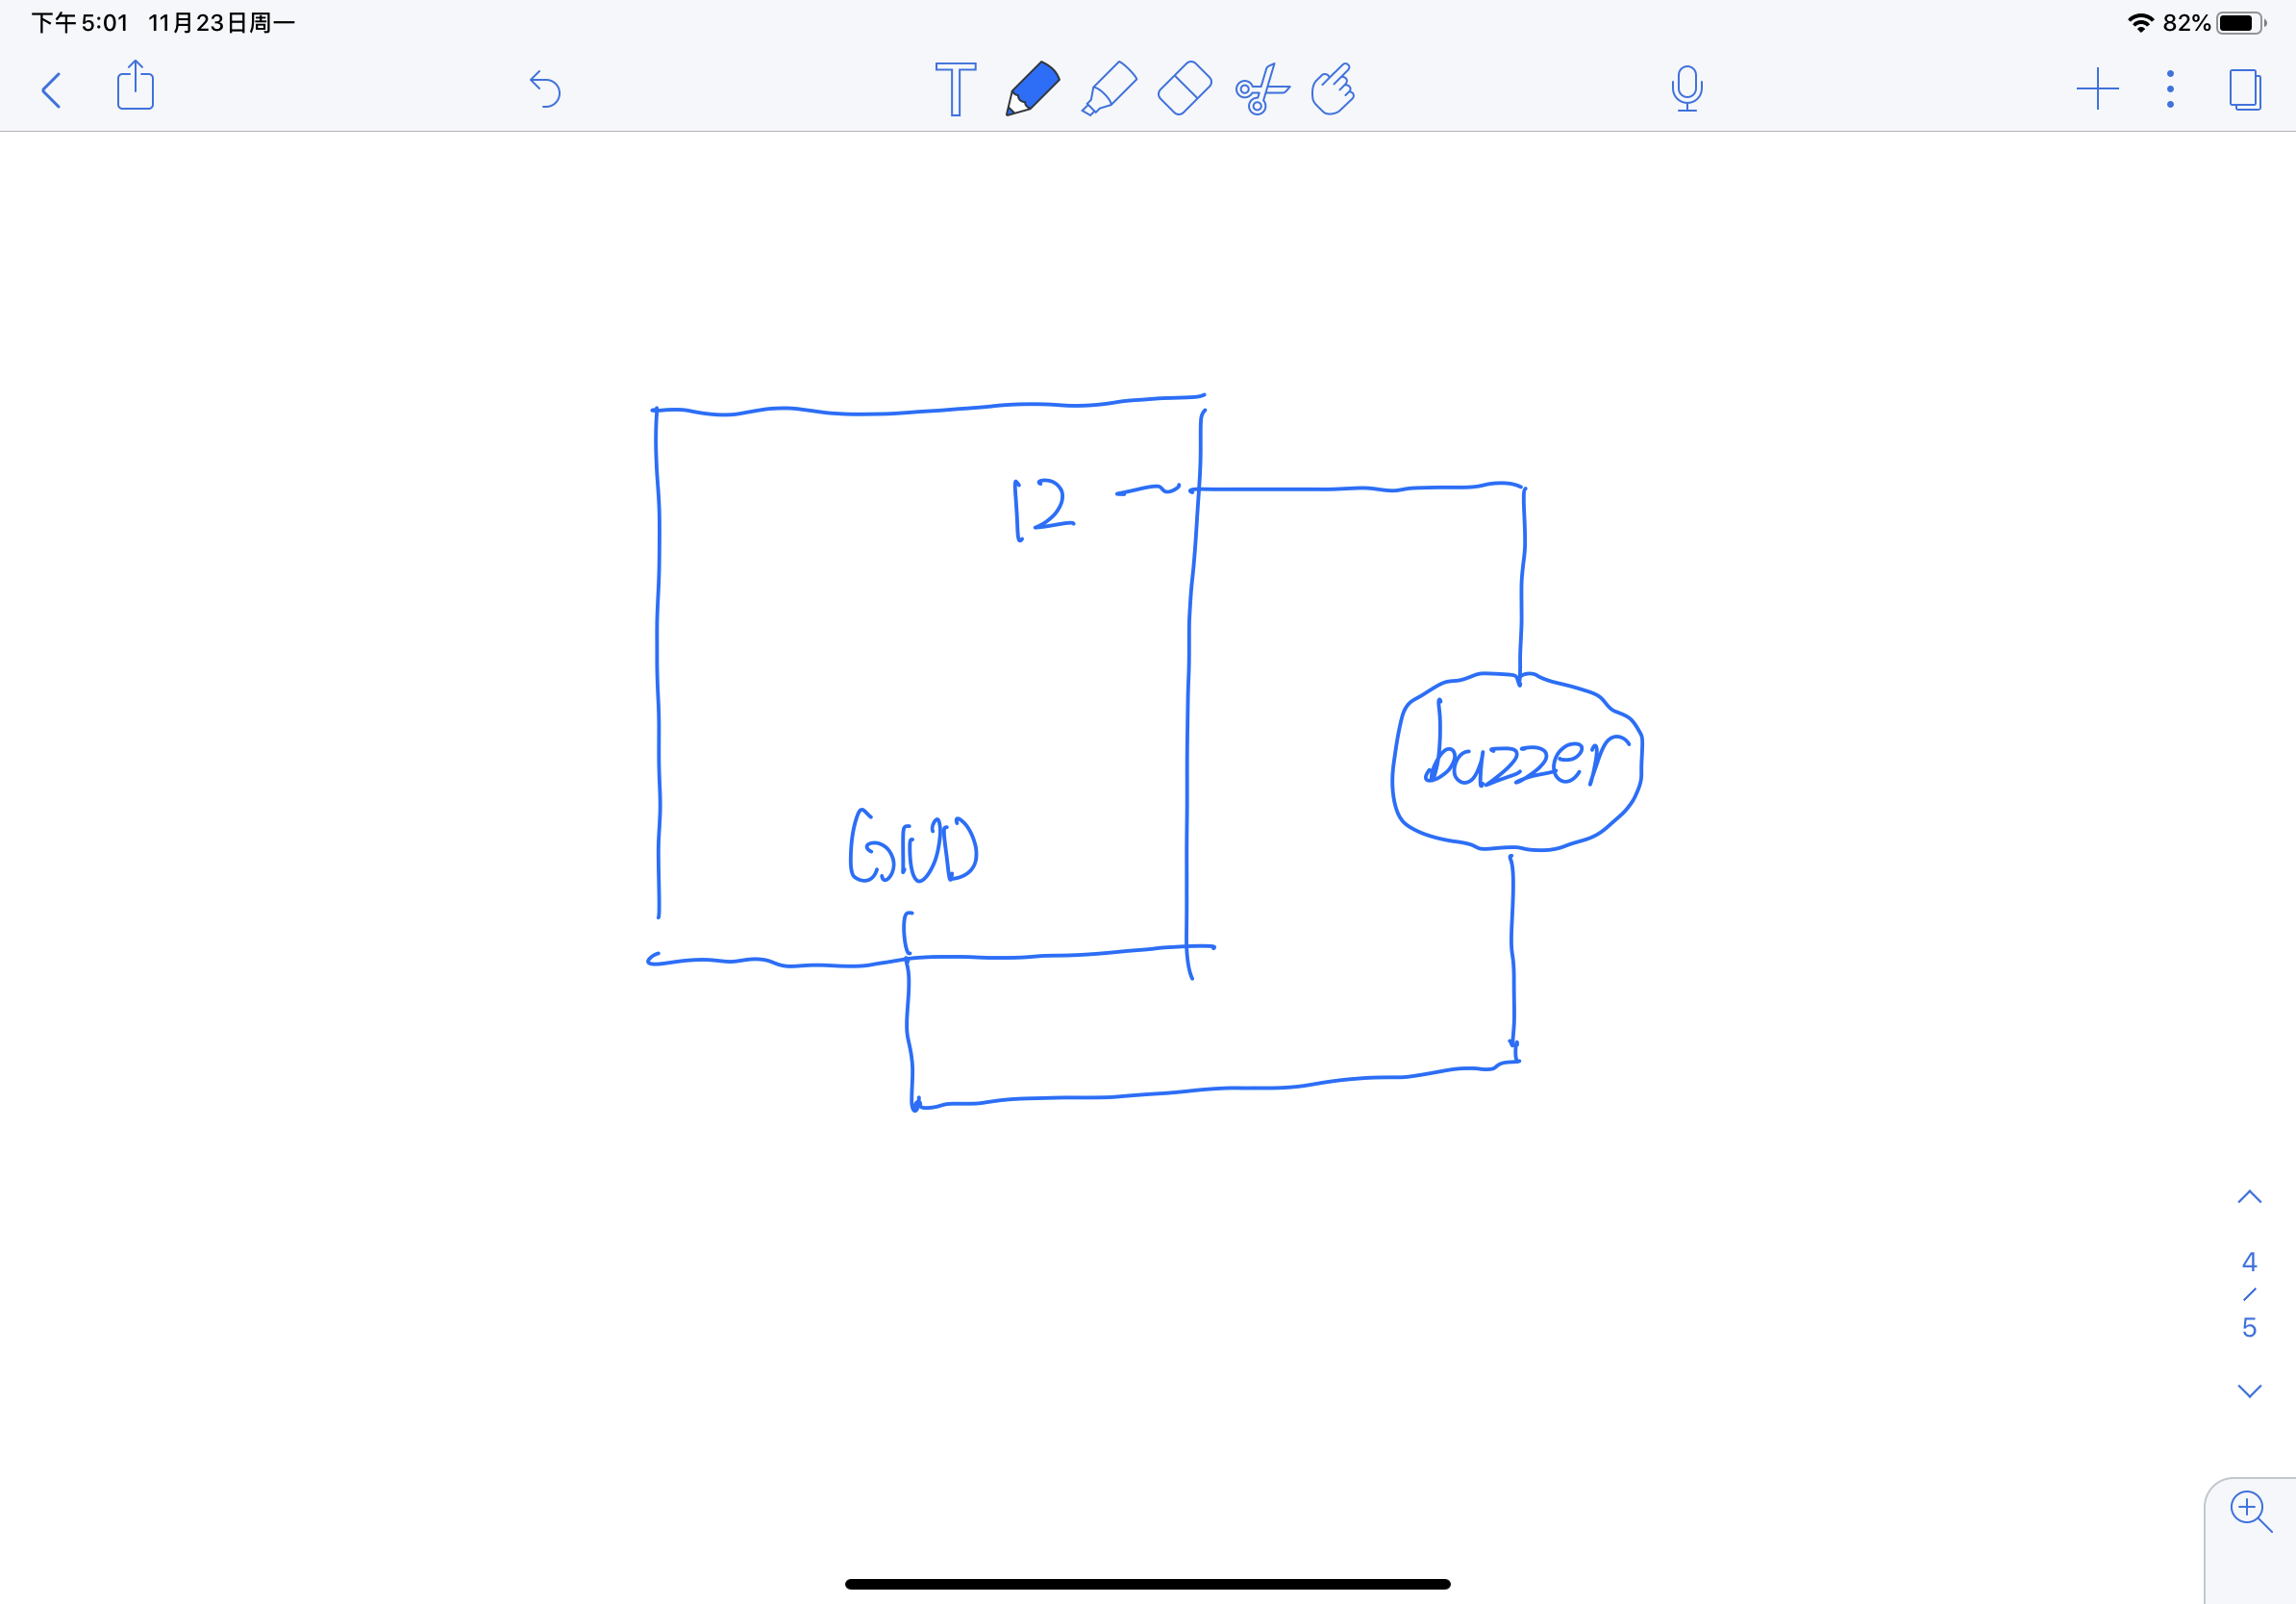
Here is my schematic, and it is really straight forward.

In this exercise, the interaction is that when you move your mouse on the canvas, the X-position and Y-position will be tracked and the values of them will be transported to the Arduino. And by using the tone function, I can change the frequency of the buzzer.
Additional Homework
This one is relatively easy compared with the last week’s. To reach the consequence that it will remember the current state by pushing the button once, I use an accumulator to keep track of the total number of times you push the button. If the total number is odd, it will send back a 0 to the processing. Otherwise, the total is even, it will send back a 1 to the processing. Based on these values, processing will react whether to hide the pattern or to exhibit it. The interaction is controlling whether the pattern is visible by pushing the buttons. Here is the video of how it works.
This is the Arduino code.
int lastButtonState1 = 0;
int buttonPushCounter1 = 0;
int lastButtonState2 = 0;
int buttonPushCounter2 = 0;
int condition1;
int condition2;
void setup() {
  pinMode(2, INPUT);
  pinMode(3, INPUT);
  Serial.begin(9600);
}

void loop() {
  int pot1 = digitalRead(2);
  int pot2 = digitalRead(3);
  if (pot1 != lastButtonState1) {
    if (pot1 == HIGH) {
      buttonPushCounter1++;
    }

  }
  lastButtonState1 = pot1;
  if (pot2 != lastButtonState2) {
    if (pot2 == HIGH) {
      buttonPushCounter2++;
    }

  }
  lastButtonState2 = pot2;


  Serial.print(buttonPushCounter1 % 2);
  Serial.print(",");
  Serial.print(buttonPushCounter2 % 2);
  Serial.println();

}
This is the processing code.
import processing.serial.*;

String myString = null;
Serial myPort;
int NUM_OF_VALUES = 2;   /** YOU MUST CHANGE THIS ACCORDING TO YOUR PROJECT **/
int[] sensorValues;      /** this array stores values from Arduino **/


void setup() {
  size(500, 500);
  background(0);
  setupSerial();

  //frameRate(60);
}


void draw() {
  printArray(sensorValues);
  background(0);
    updateSerial();
    if (sensorValues[0] ==1) {
    pushMatrix();
    translate(width*0.8, height*0.5);
    rotate(frameCount/200.0);
    star(0, 0, 30, 70, 5);
    popMatrix();
  }
  if (sensorValues[1] ==1) {
    // use the values like this!
    // sensorValues[0]

    // add your code

    //
    pushMatrix();
    translate(width*0.2, height*0.3);
    rotate(frameCount/-100.0);
    star(0, 0, 80, 100, 40);
    popMatrix();
  }
}

void star(float x, float y, float radius1, float radius2, int npoints) {
  float angle = TWO_PI / npoints;
  float halfAngle = angle/2.0;
  beginShape();
  for (float a = 0; a < TWO_PI; a += angle) {
    float sx = x + cos(a) * radius2;
    float sy = y + sin(a) * radius2;
    vertex(sx, sy);
    sx = x + cos(a+halfAngle) * radius1;
    sy = y + sin(a+halfAngle) * radius1;
    vertex(sx, sy);
  }
  endShape(CLOSE);
}

void setupSerial() {
  printArray(Serial.list());
  myPort = new Serial(this, Serial.list()[ 3 ], 9600);
  // WARNING!
  // You will definitely get an error here.
  // Change the PORT_INDEX to 0 and try running it again.
  // And then, check the list of the ports,
  // find the port "/dev/cu.usbmodem----" or "/dev/tty.usbmodem----"
  // and replace PORT_INDEX above with the index number of the port.

  myPort.clear();
  // Throw out the first reading,
  // in case we started reading in the middle of a string from the sender.
  myString = myPort.readStringUntil( 10 );  // 10 = '\n'  Linefeed in ASCII
  myString = null;

  sensorValues = new int[ NUM_OF_VALUES ];
}


void updateSerial() {
  while (myPort.available() > 0) {
    myString = myPort.readStringUntil( 10 ); // 10 = '\n'  Linefeed in ASCII
    if (myString != null) {
      String[] serialInArray = split(trim(myString), ",");
      if (serialInArray.length == NUM_OF_VALUES) {
        for (int i=0; i<serialInArray.length; i++) {
          sensorValues[i] = int(serialInArray[i]);
        }
      }
    }
  }
}
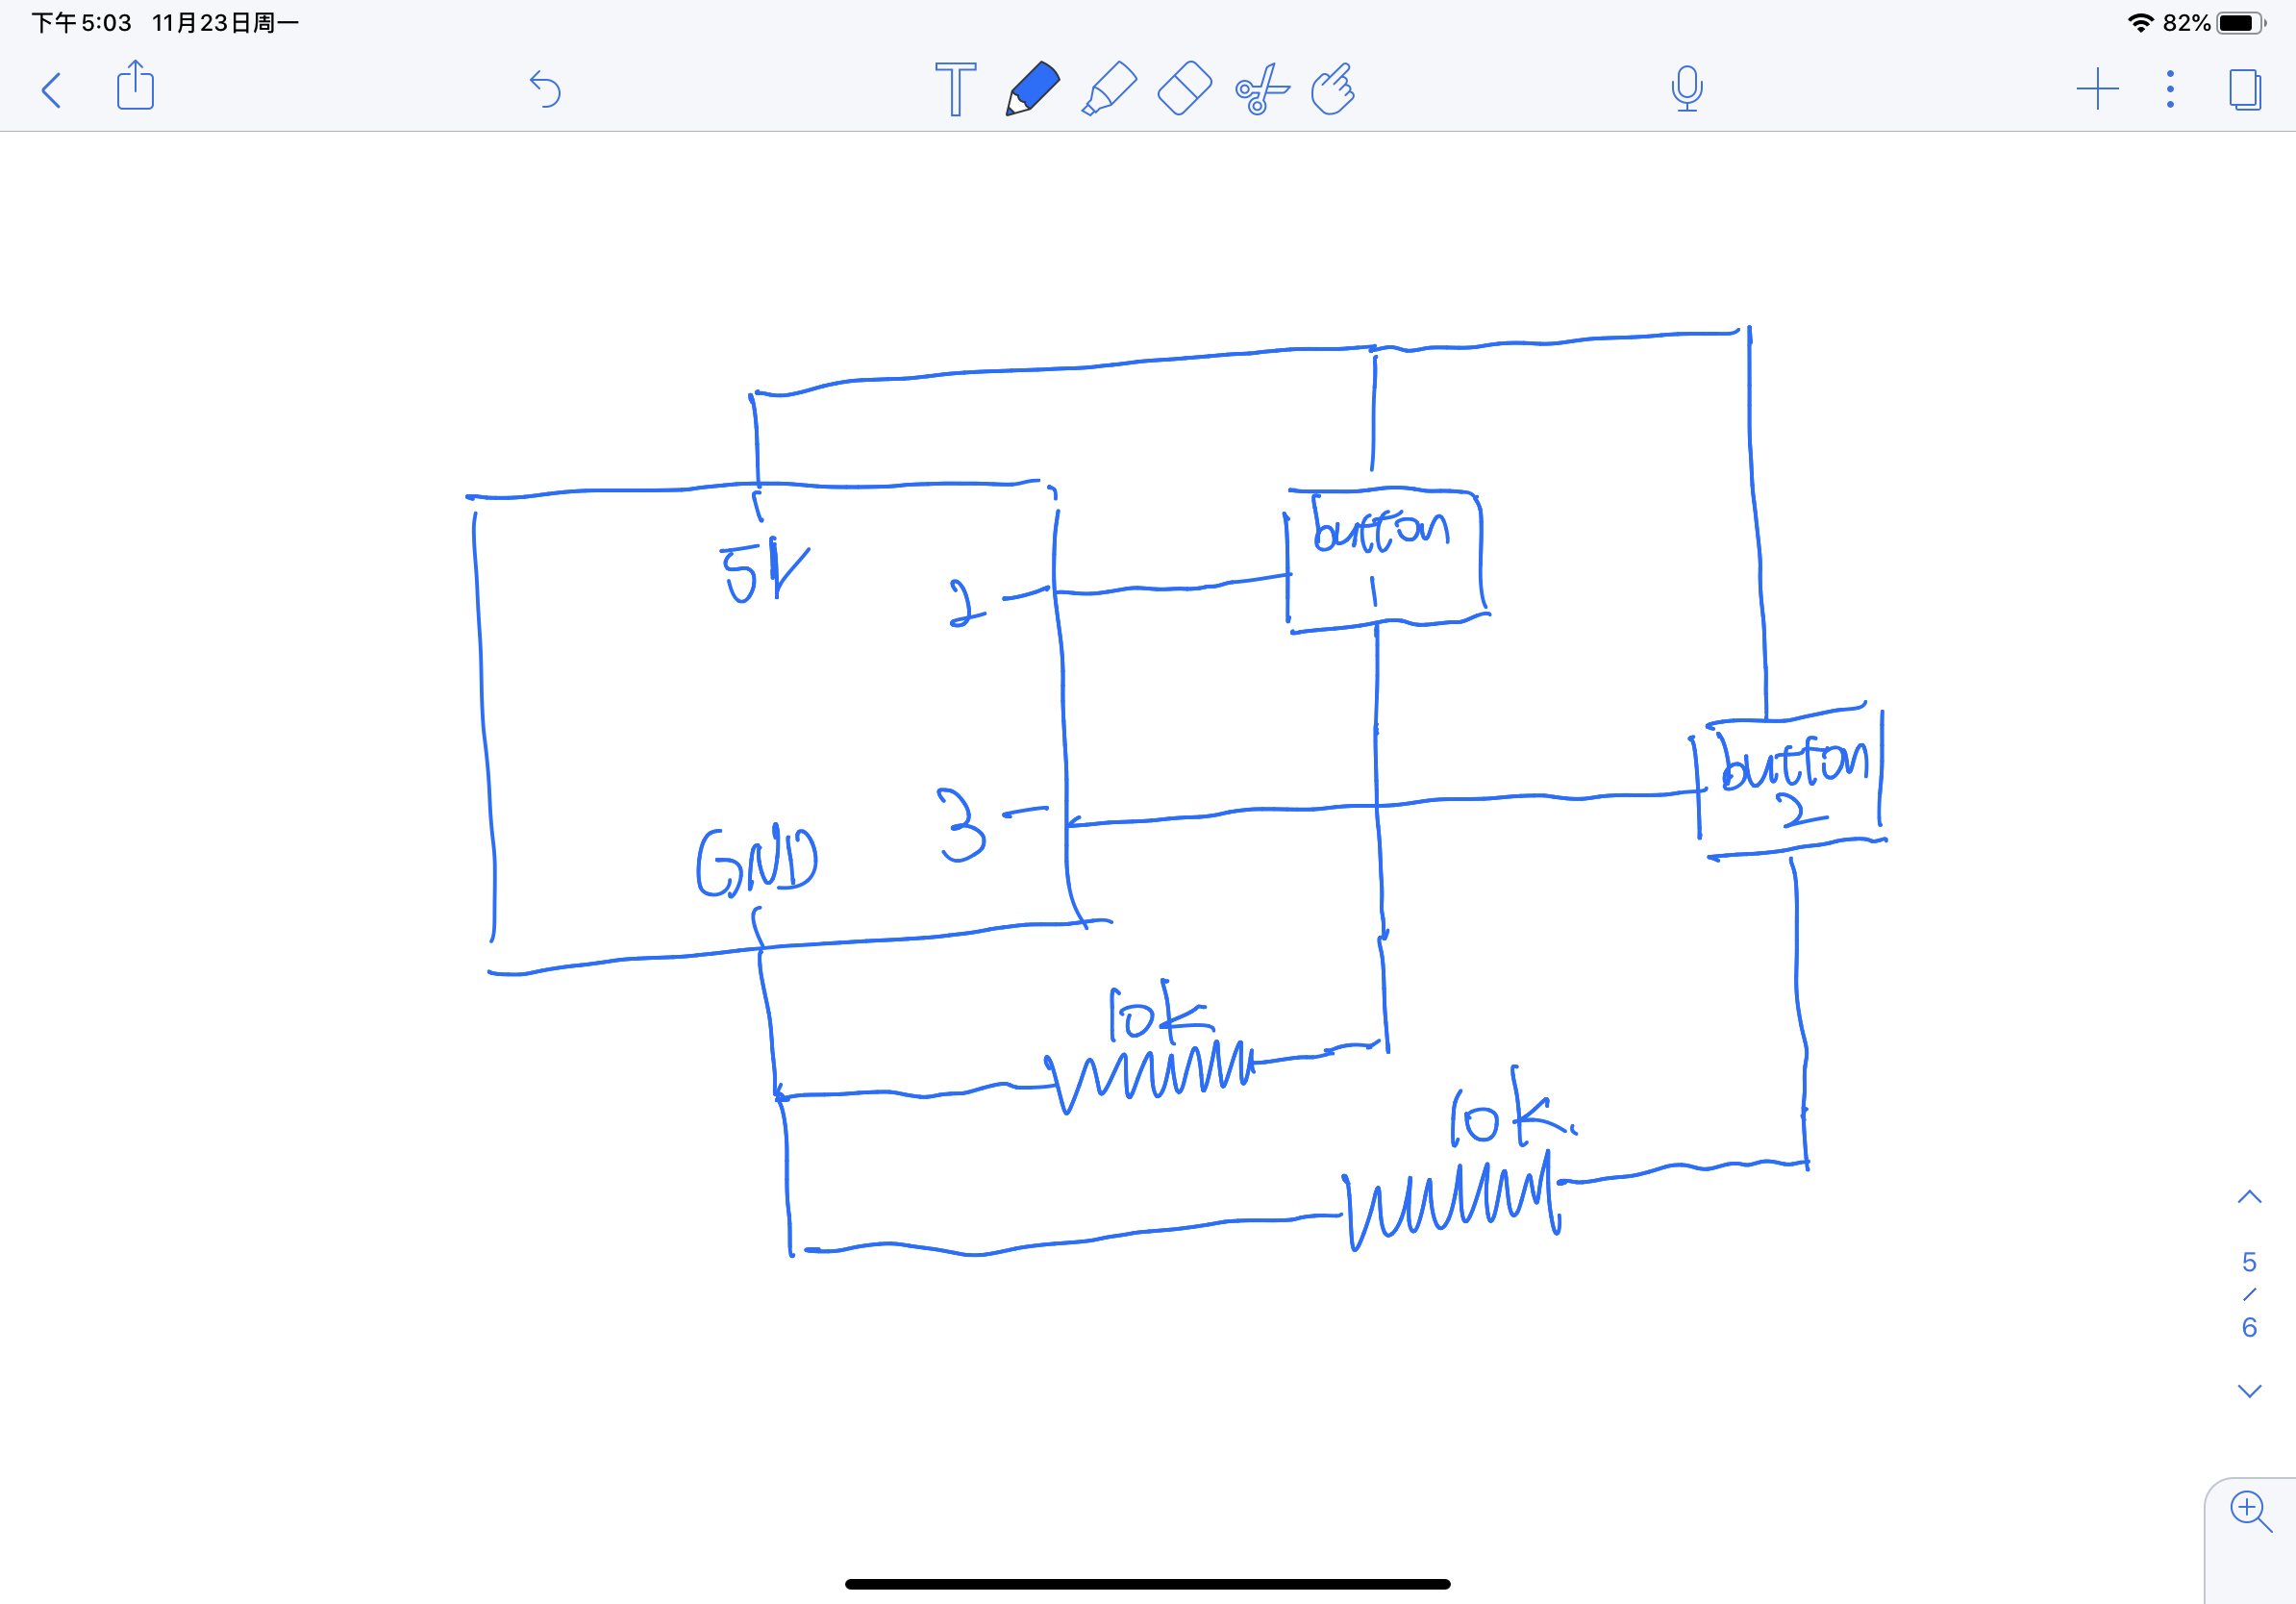
Here is my schematic.

The most important takeaway for me in this additional homework is that in Java when you use an integer divided by another integer, the answer will still be an integer. It is different in languages like python, they have // to represent the exact division, while in Java, // means comments. So if you want to make the result a float type value, you will also need to make an integer divided by a float type value. In this homework, this part embodies the rotating part. If I write FrameCount/100, the whole image will slow down and the animation will not be as smooth as I use t FrameCount/100.0. And I think this is something worth remembering and paying attention to.

