Link & Turn
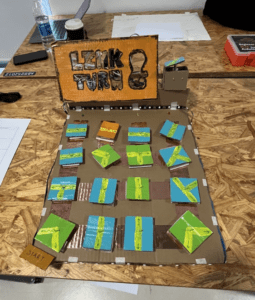
Link & Turn is an interactive puzzle in which you must turn puzzle pieces in order to link lines and create circuits. Our project is based off the concepts of connecting lines on different games found on mobile apps, but rather than a program we wanted to create the physical version of this. Link & Turn is designed to stimulate intuitive thinking through a rather satisfying game to play.
Inspiration
Color Line App
The game offers Numberlink puzzles, each of which consists of a grid of squares with some of the squares colored with different colored dots. To connect dots of the same color by drawing “pipes” between them, the goal is to fill the full grid with pipes. Pipes may not, however, cross. Size of the grid, which can range from 5×5 to 14×14 squares, affects difficulty. (Google Play)
Mazes & More App
A timeless puzzle game like Mazes & More is ideal for a quick mental break. It is made to be a surprisingly easy solo game that is navigated through amusing 2D retro labyrinths by swiping or tapping. Play a short game, test your mettle with 450 labyrinths, and rise to the position of maze king. (Apple Store Preview)

 Linko
Linko
The game Linko is about connecting broken lines too form “circuits”. The puzzle game Linko is really straightforward and peaceful. To play Linko, all you need is your phone and one finger. Anyone can enjoy Linko because it is not challenging or complicated, regardless of age or gender. Relax and move as if you were navigating a straightforward maze. (Apple Store Preview)
Initial Sketches
Anya’s Sketches:
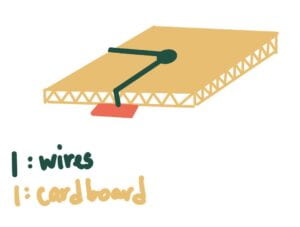
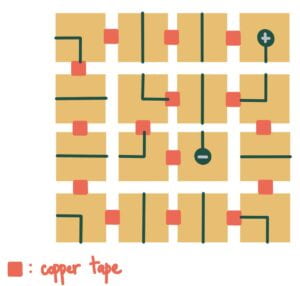
Anya’s sketches illustrates a puzzle where we utilized copper tape on the bottom of the piece of cardboard aligned with wire in order to create the circuits by connecting a ground to the start of the first puzzle piece and the 5V to the last piece, so when connected there would be a circuit and lights would light up. The way the cardboard pieces would work is that they would turn by twisting them.
My Sketch:
On the other hand, my sketch illustrated a different idea where the cardboard pieces would be standing and function like a hinge where toothpicks would be used in order to create that effect. In this sketch, the cardboard would also be lighted with copper tape to create the circuit.
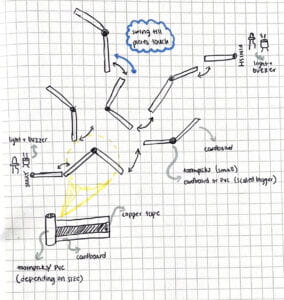
Due to logistics and functionality, Anya and I decided to prototype her sketch.
Prototyping
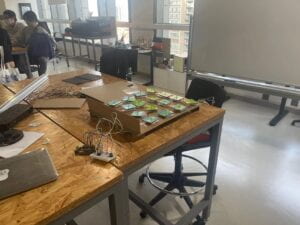
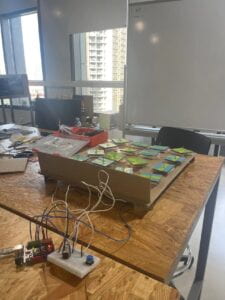
Since unfortunately I was locked down in a quarantine at the start of the midterm, Anya was responsible for creating most of the prototypes. Here are some videos she sent me. We went with her original design where pieces of wire would be within the cardboard and when those came in contact with the copper tape they would allow the circuit to function. The toothpicks would be used as the handles to turn the cardboard pieces.
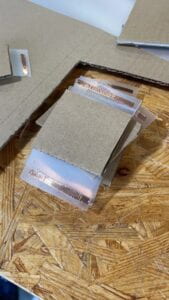
Upon repeatedly testing Anya’s prototype, and once I returned from my quarantine, we realized that the metal wire idea was inefficient and was not functioning 100% of the time as it should. After almost scrapping the entire project, we approached Professor Andy to see what we could do about this issue since primarily the circuit wasn’t forming because of bad contact between the wire and the copper tape. What he thought we could do is too create a kind of spring mechanism where the bottom of the cardboard would have constant pressure on the copper tape. The way we did this was to use a piece of plastic laminate that was springy when it was bent, or in other words would always want to spring upwards when we put pressure on it. We stuck the copper tape to these pieces of plastic and that created the perfect contact with the copper tape of the circuit which allowed the circuit to function 100% of the time.
Progress Pics:
Presentation
Essentially, what we presented was Anya’s original prototype but with only 4 pieces of our new spring mechanism since we were running out of time. Since our project was rather incomplete, we got lots of feedback.
Feedback from professors & peers:
- Interaction Lab User Testing Notes
- Thicker lines/ be painted better
- Instructions should be more clear
- Led should be lighter
- Start point should be clear
- Brighter LED (big ones)
- Paint which orientation it should go in.
- Have a reward
- Conceal the copper
Improving the Project
Upon receiving all this feedback we decided we needed to make some changes. First off all we needed code because we had yet to incorporate that into our project.
First, Anya and I reached how to code LED lights and asked our friend & peer Daniel about them since he was also using them for his midterm and since he was kind enough to help we figured out that in order to connect them to the breadboard we needed a 5V power source to turn them on. Now that we had all of our connections on the breadboard ready, we coded the specific pattern we wanted to code on the LED’s when the user solved the puzzle or each specific circuit.
int redLED = 11;
int yellowLED = 9;
int whiteLED = 6;
int greenLED = 5;
int buzzer = 3;
int redState = -1;
int yellowState = -1;
int whiteState = -1;
int greenState = -1;
void setup() {
pinMode(11, OUTPUT);
pinMode(9, OUTPUT);
pinMode(6, OUTPUT);
pinMode(5, OUTPUT);
pinMode(3, OUTPUT);
pinMode(11, INPUT_PULLUP);
pinMode(9, INPUT_PULLUP);
pinMode(6, INPUT_PULLUP);
pinMode(5, INPUT_PULLUP);
pinMode(3, INPUT_PULLUP);
Serial.begin(9600);
}
void loop() {
digitalWrite(redLED, HIGH);
redState= digitalRead(redLED);
Serial.println(redState);
if (redState == 0){
tone(buzzer, 800);
delay(1000);
noTone(buzzer);
}
else{
noTone(buzzer);
}
digitalWrite(redLED, LOW);
digitalWrite(yellowLED, HIGH);
yellowState = digitalRead(yellowLED);
Serial.println(yellowState);
if (yellowState == 0){
tone(buzzer, 600);
delay(1000);
noTone(buzzer);
}
else{
noTone(buzzer);
}
digitalWrite(yellowLED, LOW);
digitalWrite(whiteLED, HIGH);
whiteState = digitalRead(whiteLED);
Serial.println(whiteState);
if (whiteState == 0){
tone(buzzer, 400);
delay(1000);
noTone(buzzer);
}
else{
noTone(buzzer);
}
digitalWrite(whiteLED, LOW);
digitalWrite(greenLED, HIGH);
greenState = digitalRead(greenLED);
Serial.println(greenState);
if (greenState == 0){
tone(buzzer, 200);
delay(1000);
noTone(buzzer);
}
else{
noTone(buzzer);
}
digitalWrite(greenLED, LOW);
}
Now that this code was ready, we decided that a fun feature would be to add the song Pirates of the Caribbean to the end of the circuit once the user solved the puzzle since Anya found a code for the specific audio tones online so Anya added this code to our end celebration. Here’s our code:
const int songspeed = 1.5; //Change to 2 for a slower version of the song, the bigger the number the slower the song
//*****************************************
#define NOTE_C4 262 //Defining note frequency
#define NOTE_D4 294
#define NOTE_E4 330
#define NOTE_F4 349
#define NOTE_G4 392
#define NOTE_A4 440
#define NOTE_B4 494
#define NOTE_C5 523
#define NOTE_D5 587
#define NOTE_E5 659
#define NOTE_F5 698
#define NOTE_G5 784
#define NOTE_A5 880
#define NOTE_B5 988
//*****************************************
int notes[] = { //Note of the song, 0 is a rest/pulse
NOTE_E4, NOTE_G4, NOTE_A4, NOTE_A4, 0,
NOTE_A4, NOTE_B4, NOTE_C5, NOTE_C5, 0,
NOTE_C5, NOTE_D5, NOTE_B4, NOTE_B4, 0,
NOTE_A4, NOTE_G4, NOTE_A4, 0,
NOTE_E4, NOTE_G4, NOTE_A4, NOTE_A4, 0,
NOTE_A4, NOTE_B4, NOTE_C5, NOTE_C5, 0,
NOTE_C5, NOTE_D5, NOTE_B4, NOTE_B4, 0,
NOTE_A4, NOTE_G4, NOTE_A4, 0,
NOTE_E4, NOTE_G4, NOTE_A4, NOTE_A4, 0,
NOTE_A4, NOTE_C5, NOTE_D5, NOTE_D5, 0,
NOTE_D5, NOTE_E5, NOTE_F5, NOTE_F5, 0,
NOTE_E5, NOTE_D5, NOTE_E5, NOTE_A4, 0,
NOTE_A4, NOTE_B4, NOTE_C5, NOTE_C5, 0,
NOTE_D5, NOTE_E5, NOTE_A4, 0,
NOTE_A4, NOTE_C5, NOTE_B4, NOTE_B4, 0,
NOTE_C5, NOTE_A4, NOTE_B4, 0,
NOTE_A4, NOTE_A4,
//Repeat of first part
NOTE_A4, NOTE_B4, NOTE_C5, NOTE_C5, 0,
NOTE_C5, NOTE_D5, NOTE_B4, NOTE_B4, 0,
NOTE_A4, NOTE_G4, NOTE_A4, 0,
NOTE_E4, NOTE_G4, NOTE_A4, NOTE_A4, 0,
NOTE_A4, NOTE_B4, NOTE_C5, NOTE_C5, 0,
NOTE_C5, NOTE_D5, NOTE_B4, NOTE_B4, 0,
NOTE_A4, NOTE_G4, NOTE_A4, 0,
NOTE_E4, NOTE_G4, NOTE_A4, NOTE_A4, 0,
NOTE_A4, NOTE_C5, NOTE_D5, NOTE_D5, 0,
NOTE_D5, NOTE_E5, NOTE_F5, NOTE_F5, 0,
NOTE_E5, NOTE_D5, NOTE_E5, NOTE_A4, 0,
NOTE_A4, NOTE_B4, NOTE_C5, NOTE_C5, 0,
NOTE_D5, NOTE_E5, NOTE_A4, 0,
NOTE_A4, NOTE_C5, NOTE_B4, NOTE_B4, 0,
NOTE_C5, NOTE_A4, NOTE_B4, 0,
//End of Repeat
NOTE_E5, 0, 0, NOTE_F5, 0, 0,
NOTE_E5, NOTE_E5, 0, NOTE_G5, 0, NOTE_E5, NOTE_D5, 0, 0,
NOTE_D5, 0, 0, NOTE_C5, 0, 0,
NOTE_B4, NOTE_C5, 0, NOTE_B4, 0, NOTE_A4,
NOTE_E5, 0, 0, NOTE_F5, 0, 0,
NOTE_E5, NOTE_E5, 0, NOTE_G5, 0, NOTE_E5, NOTE_D5, 0, 0,
NOTE_D5, 0, 0, NOTE_C5, 0, 0,
NOTE_B4, NOTE_C5, 0, NOTE_B4, 0, NOTE_A4
};
//*****************************************
int duration[] = { //duration of each note (in ms) Quarter Note is set to 250 ms
125, 125, 250, 125, 125,
125, 125, 250, 125, 125,
125, 125, 250, 125, 125,
125, 125, 375, 125,
125, 125, 250, 125, 125,
125, 125, 250, 125, 125,
125, 125, 250, 125, 125,
125, 125, 375, 125,
125, 125, 250, 125, 125,
125, 125, 250, 125, 125,
125, 125, 250, 125, 125,
125, 125, 125, 250, 125,
125, 125, 250, 125, 125,
250, 125, 250, 125,
125, 125, 250, 125, 125,
125, 125, 375, 375,
250, 125,
//Rpeat of First Part
125, 125, 250, 125, 125,
125, 125, 250, 125, 125,
125, 125, 375, 125,
125, 125, 250, 125, 125,
125, 125, 250, 125, 125,
125, 125, 250, 125, 125,
125, 125, 375, 125,
125, 125, 250, 125, 125,
125, 125, 250, 125, 125,
125, 125, 250, 125, 125,
125, 125, 125, 250, 125,
125, 125, 250, 125, 125,
250, 125, 250, 125,
125, 125, 250, 125, 125,
125, 125, 375, 375,
//End of Repeat
250, 125, 375, 250, 125, 375,
125, 125, 125, 125, 125, 125, 125, 125, 375,
250, 125, 375, 250, 125, 375,
125, 125, 125, 125, 125, 500,
250, 125, 375, 250, 125, 375,
125, 125, 125, 125, 125, 125, 125, 125, 375,
250, 125, 375, 250, 125, 375,
125, 125, 125, 125, 125, 500
};
After this we added everything together in the code and we got:
int redLED = 11;
int yellowLED = 9;
int whiteLED = 6;
int greenLED = 5;
int buzzer = 3;
int redState = -1;
int yellowState = -1;
int whiteState = -1;
int greenState = -1;
void setup() {
pinMode(11, OUTPUT);
pinMode(9, OUTPUT);
pinMode(6, OUTPUT);
pinMode(5, OUTPUT);
pinMode(3, OUTPUT);
pinMode(11, INPUT_PULLUP);
pinMode(9, INPUT_PULLUP);
pinMode(6, INPUT_PULLUP);
pinMode(5, INPUT_PULLUP);
pinMode(3, INPUT_PULLUP);
Serial.begin(9600);
}
void loop() {
digitalWrite(redLED, HIGH);
redState= digitalRead(redLED);
Serial.println(redState);
if (redState == 0){
tone(buzzer, 800);
delay(1000);
noTone(buzzer);
}
else{
noTone(buzzer);
}
digitalWrite(redLED, LOW);
digitalWrite(yellowLED, HIGH);
yellowState = digitalRead(yellowLED);
Serial.println(yellowState);
if (yellowState == 0){
tone(buzzer, 600);
delay(1000);
noTone(buzzer);
}
else{
noTone(buzzer);
}
digitalWrite(yellowLED, LOW);
digitalWrite(whiteLED, HIGH);
whiteState = digitalRead(whiteLED);
Serial.println(whiteState);
if (whiteState == 0){
tone(buzzer, 400);
delay(1000);
noTone(buzzer);
}
else{
noTone(buzzer);
}
digitalWrite(whiteLED, LOW);
digitalWrite(greenLED, HIGH);
greenState = digitalRead(greenLED);
Serial.println(greenState);
if (greenState == 0){
tone(buzzer, 200);
delay(1000);
noTone(buzzer);
}
else{
noTone(buzzer);
}
if (redState == 0 && yellowState == 0 && whiteState == 1 && greenState == 0){
for (int i=0;i<203;i++){
int wait = duration[i] * songspeed;
tone(buzzer,notes[i],wait);
delay(wait);
}
}
digitalWrite(greenLED, LOW);
}
CONDITION FOR THE SONG
if (redState == 0 && yellowState == 0 && whiteState == 1 && greenState == 0){
when the states == 0 means they are connected
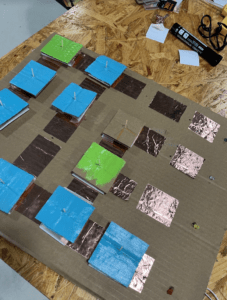
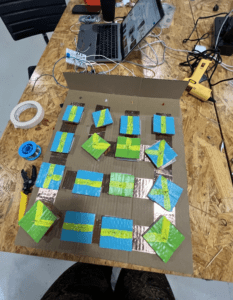
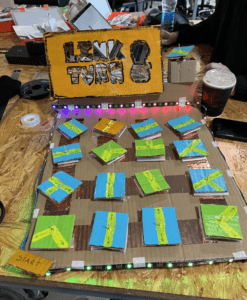
Upon testing we realized there were quite a few glitches and 30 minutes before our final presentation we tried running a code that was working perfectly 10 minutes before but for some reason it was no longer functioning in the way that our LED light strip was not lighting up at all whatsoever. In order to solve this issue, which we didn’t know what it was, we literally checked every single thing about the game. We replaced a plastic tape for a paper one that may have interfered with the copper plates of the LED strip, we checked our wiring (which turns out it was fine), we switched our Arduino since some of our other peers had burnt theirs during their prototype trials (it wasn’t that), we re-sautered the small LED bulbs in case the connection wasn’t strong enough, and finally we checked our code a million times. In the end we never really knew what when wrong, but what we did was run an older version of our code which worked and we went with that. Here’s the code:
const int songspeed = 1.5; //Change to 2 for a slower version of the song, the bigger the number the slower the song
//*****************************************
#define NOTE_C4 262 //Defining note frequency
#define NOTE_D4 294
#define NOTE_E4 330
#define NOTE_F4 349
#define NOTE_G4 392
#define NOTE_A4 440
#define NOTE_B4 494
#define NOTE_C5 523
#define NOTE_D5 587
#define NOTE_E5 659
#define NOTE_F5 698
#define NOTE_G5 784
#define NOTE_A5 880
#define NOTE_B5 988
//*****************************************
int notes[] = { //Note of the song, 0 is a rest/pulse
NOTE_E4, NOTE_G4, NOTE_A4, NOTE_A4, 0,
NOTE_A4, NOTE_B4, NOTE_C5, NOTE_C5, 0,
NOTE_C5, NOTE_D5, NOTE_B4, NOTE_B4, 0,
NOTE_A4, NOTE_G4, NOTE_A4, 0,
NOTE_E4, NOTE_G4, NOTE_A4, NOTE_A4, 0,
NOTE_A4, NOTE_B4, NOTE_C5, NOTE_C5, 0,
NOTE_C5, NOTE_D5, NOTE_B4, NOTE_B4, 0,
NOTE_A4, NOTE_G4, NOTE_A4, 0,
NOTE_E4, NOTE_G4, NOTE_A4, NOTE_A4, 0,
NOTE_A4, NOTE_C5, NOTE_D5, NOTE_D5, 0,
NOTE_D5, NOTE_E5, NOTE_F5, NOTE_F5, 0,
NOTE_E5, NOTE_D5, NOTE_E5, NOTE_A4, 0,
NOTE_A4, NOTE_B4, NOTE_C5, NOTE_C5, 0,
NOTE_D5, NOTE_E5, NOTE_A4, 0,
NOTE_A4, NOTE_C5, NOTE_B4, NOTE_B4, 0,
NOTE_C5, NOTE_A4, NOTE_B4, 0,
NOTE_A4, NOTE_A4,
//Repeat of first part
NOTE_A4, NOTE_B4, NOTE_C5, NOTE_C5, 0,
NOTE_C5, NOTE_D5, NOTE_B4, NOTE_B4, 0,
NOTE_A4, NOTE_G4, NOTE_A4, 0,
NOTE_E4, NOTE_G4, NOTE_A4, NOTE_A4, 0,
NOTE_A4, NOTE_B4, NOTE_C5, NOTE_C5, 0,
NOTE_C5, NOTE_D5, NOTE_B4, NOTE_B4, 0,
NOTE_A4, NOTE_G4, NOTE_A4, 0,
NOTE_E4, NOTE_G4, NOTE_A4, NOTE_A4, 0,
NOTE_A4, NOTE_C5, NOTE_D5, NOTE_D5, 0,
NOTE_D5, NOTE_E5, NOTE_F5, NOTE_F5, 0,
NOTE_E5, NOTE_D5, NOTE_E5, NOTE_A4, 0,
NOTE_A4, NOTE_B4, NOTE_C5, NOTE_C5, 0,
NOTE_D5, NOTE_E5, NOTE_A4, 0,
NOTE_A4, NOTE_C5, NOTE_B4, NOTE_B4, 0,
NOTE_C5, NOTE_A4, NOTE_B4, 0,
//End of Repeat
NOTE_E5, 0, 0, NOTE_F5, 0, 0,
NOTE_E5, NOTE_E5, 0, NOTE_G5, 0, NOTE_E5, NOTE_D5, 0, 0,
NOTE_D5, 0, 0, NOTE_C5, 0, 0,
NOTE_B4, NOTE_C5, 0, NOTE_B4, 0, NOTE_A4,
NOTE_E5, 0, 0, NOTE_F5, 0, 0,
NOTE_E5, NOTE_E5, 0, NOTE_G5, 0, NOTE_E5, NOTE_D5, 0, 0,
NOTE_D5, 0, 0, NOTE_C5, 0, 0,
NOTE_B4, NOTE_C5, 0, NOTE_B4, 0, NOTE_A4
};
//*****************************************
int duration[] = { //duration of each note (in ms) Quarter Note is set to 250 ms
125, 125, 250, 125, 125,
125, 125, 250, 125, 125,
125, 125, 250, 125, 125,
125, 125, 375, 125,
125, 125, 250, 125, 125,
125, 125, 250, 125, 125,
125, 125, 250, 125, 125,
125, 125, 375, 125,
125, 125, 250, 125, 125,
125, 125, 250, 125, 125,
125, 125, 250, 125, 125,
125, 125, 125, 250, 125,
125, 125, 250, 125, 125,
250, 125, 250, 125,
125, 125, 250, 125, 125,
125, 125, 375, 375,
250, 125,
//Rpeat of First Part
125, 125, 250, 125, 125,
125, 125, 250, 125, 125,
125, 125, 375, 125,
125, 125, 250, 125, 125,
125, 125, 250, 125, 125,
125, 125, 250, 125, 125,
125, 125, 375, 125,
125, 125, 250, 125, 125,
125, 125, 250, 125, 125,
125, 125, 250, 125, 125,
125, 125, 125, 250, 125,
125, 125, 250, 125, 125,
250, 125, 250, 125,
125, 125, 250, 125, 125,
125, 125, 375, 375,
//End of Repeat
250, 125, 375, 250, 125, 375,
125, 125, 125, 125, 125, 125, 125, 125, 375,
250, 125, 375, 250, 125, 375,
125, 125, 125, 125, 125, 500,
250, 125, 375, 250, 125, 375,
125, 125, 125, 125, 125, 125, 125, 125, 375,
250, 125, 375, 250, 125, 375,
125, 125, 125, 125, 125, 500
};
int redLED = 12;
int yellowLED = 13;
int whiteLED = 6;
int greenLED = 5;
int buzzer = 3;
int redState = -1;
int yellowState = -1;
int whiteState = -1;
int greenState = -1;
//definitions for the LEDS
#include <FastLED.h>
#define LED_PIN 10
#define NUM_LEDS 54
#define BRIGHTNESS 64
#define LED_TYPE WS2811
#define COLOR_ORDER GRB
CRGB leds[NUM_LEDS];
#define UPDATES_PER_SECOND 100
CRGBPalette16 currentPalette;
TBlendType currentBlending;
extern CRGBPalette16 myRedWhiteBluePalette;
extern const TProgmemPalette16 myRedWhiteBluePalette_p PROGMEM;
void setup() {
//pinMode(redLED, OUTPUT);
//pinMode(yellowLED, OUTPUT);
//pinMode(whiteLED, OUTPUT);
//pinMode(greenLED, OUTPUT);
//pinMode(buzzer, OUTPUT);
pinMode(redLED, INPUT_PULLUP);
pinMode(yellowLED, INPUT_PULLUP);
pinMode(whiteLED, INPUT_PULLUP);
pinMode(greenLED, INPUT_PULLUP);
pinMode(buzzer, INPUT_PULLUP);
Serial.begin(9600);
delay( 3000 ); // power-up safety delay
FastLED.addLeds<WS2812, LED_PIN, RGB>(leds, NUM_LEDS);
FastLED.setBrightness( BRIGHTNESS );
currentPalette = RainbowStripeColors_p;
currentBlending = LINEARBLEND;
}
void loop() {
digitalWrite(redLED, LOW);
digitalWrite(yellowLED, LOW);
digitalWrite(whiteLED, LOW);
digitalWrite(greenLED, LOW);
redState= digitalRead(redLED);
Serial.print(“red “);
Serial.println(redState);
if (redState == 0){
//digitalWrite(redLED, HIGH);
leds[43] = CRGB(0,255,0);
leds[42] = CRGB(0,255,0);
FastLED.show();
tone(buzzer, 800);
delay(1000);
noTone(buzzer);
//digitalWrite(redLED, LOW);
}
else{
noTone(buzzer);
leds[43] = CRGB(0,0,0);
leds[42] = CRGB(0,0,0);
FastLED.show();
}
yellowState = digitalRead(yellowLED);
Serial.print(“yellow “);
Serial.println(yellowState);
if (digitalRead(yellowLED) == 0){
//digitalWrite(yellowLED, HIGH);
tone(buzzer, 600);
leds[46] = CRGB(255, 255 ,0);
leds[45] = CRGB(255, 255, 0);
FastLED.show();
delay(1000);
noTone(buzzer);
//digitalWrite(yellowLED, LOW);
}
else{
noTone(buzzer);
leds[46] = CRGB(0,0,0);
leds[45] = CRGB(0,0,0);
FastLED.show();
}
whiteState = digitalRead(whiteLED);
Serial.print(“white “);
Serial.println(whiteState);
if (whiteState == 0){
//digitalWrite(whiteLED, HIGH);
leds[48] = CRGB(255,255,255);
leds[49] = CRGB(255,255,255);
FastLED.show();
tone(buzzer, 400);
delay(1000);
noTone(buzzer);
//digitalWrite(whiteLED, LOW);
}
else{
noTone(buzzer);
leds[48] = CRGB(0,0,0);
leds[49] = CRGB(0,0,0);
FastLED.show();
}
greenState = digitalRead(greenLED);
Serial.print(“green “);
Serial.println(greenState);
if (greenState == 0){
//digitalWrite(greenLED, HIGH);
leds[51] = CRGB(255,0,0);
leds[52] = CRGB(255,0,0);
FastLED.show();
tone(buzzer, 200);
delay(1000);
noTone(buzzer);
//digitalWrite(greenLED, LOW);
}
else{
noTone(buzzer);
leds[51] = CRGB(0,0,0);
leds[52] = CRGB(0,0,0);
FastLED.show();
}
if (redState == 0 && yellowState == 0 && whiteState == 0 && greenState == 0){
int color = 0;
for (int i=0;i<203;i++){
int k = 0;
uint8_t brightness = 255;
int wait = duration[i] * songspeed;
tone(buzzer,notes[i],wait);
delay(wait);
if (i < 56){
leds[i] = CHSV(color, 255, 255); /* The higher the value 4 the less fade there is and vice versa */
color+=4;
FastLED.show();
}
else if (i – 56 < 56){
leds[i-56] = CHSV(color, 255, 255); /* The higher the value 4 the less fade there is and vice versa */
color+=4;
FastLED.show();
}
else if (i < 112 < 56){
leds[i-112] = CHSV(color, 255, 255); /* The higher the value 4 the less fade there is and vice versa */
color+=4;
FastLED.show();
}
else {
leds[i-168] = CHSV(color, 255, 255); /* The higher the value 4 the less fade there is and vice versa */
color+=4;
FastLED.show();
}
}
}
}
//leds[2] = CRGB(0,255,0);
//leds[3] = CRGB(0,0,255);
// leds[4] = CRGB(0,0,255);
// leds[5] = CRGB(0,0,255);
// leds[6] = CRGB(0,0,0);
+ sweep for the motor from the examples
Final Product
Even though our project had its flaws, I’m super proud of everything Anya where able to achieve despite all of the difficulties we had at the beginning. If I could improve anything it would probably improve the code (which Anya did most of) and perhaps the user friendly-ness of the project as a whole. Other than that, I’m still super proud of the hard work we did!
Citations:
“Connect the Dots – Color Line – Apps on Google Play.” Google, Google, https://play.google.com/store/apps/details?id=com.happydream.flow.connectdots&hl=en_US&gl=US.
Kim, Kyung-Hun. “Linko – Relaxing Loop.” App Store, 12 Mar. 2022, https://apps.apple.com/us/app/linko-relaxing-loop/id1608997896.
Solitaire, Mahjong and Sudoku Company. “Mazes & More: Classic Maze.” App Store, 7 June 2016, https://apps.apple.com/us/app/mazes-more-classic-labyrinth/id1115189251.
Leave a Reply