
General Instructions
- Book a training here <add link here> before using the 3D printers.
- Maximum of 3 hour prints during the day, 6 hours at night.
- Leave names and print time on the tags.
- Watch the print for the ENTIRE first layer to make sure everything is running properly.
Health and Safety
For your safety please keep your fingers away from the printer while it is printing/starting a print. While the nozzle will get really hot and the bed will get warm, the biggest risk is getting your clothing, hair, or fingers caught in the moving parts.
Machines

These printers are a bit harder to work with as they have many sensors that sometimes get tripped by the smallest error. However, this means they need much less calibration than the Prusa printers. But they work like any other FDM printer.

These are our most popular printers by far. They work like any other FDM printer but require a bit of calibration at the beginning of every print.
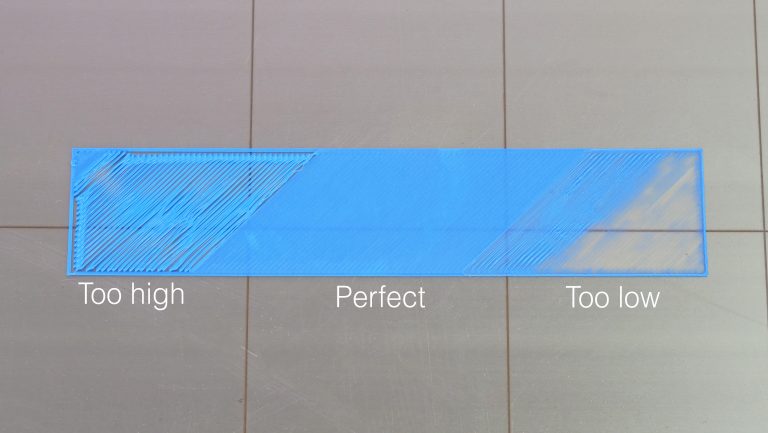
- Calibrate Z-offset before every print.
- *note: it can be helpful to add a Skirt (recommended for every print) or Brim (recommended to specifically help print/bed adhesion – explained below under recommended Cura settings) in your Cura settings to give you a chance to calibrate the nozzle distance from the bed before your model starts printing.

The Creality Belt is special because it has an “infinite Z axis”.
This printer uses a special slicing software called Creality Slicer (Creality’s version of Cura). Make sure to set the printer profile to Creality 3DPrintMill.
This 3D printer prints at a 45° angle which makes overhangs a problem of the past. This does mean, however, that you have to be mindful of the orientation of your model when printing it and the direction of overhangs/layer lines when designing it (shown below).

Materials and Softwares
Material: PLA
Recommended Cura settings:
- Nozzle Temp: 200°C
- Bed Temp: 60°C
- Travel Speed: 30-40 mm/s
- You can always turn this up after the first layer but if your speed is much faster in the first layer the chances that your print will fail are much higher.
- Layer Height: 0.2mm
- Larger layer heights reduce print time but smaller layer heights create fewer steps in the layering process leading to higher-quality prints. 0.2mm is recommended for the prototyping phase while 0.1mm is recommended for the final product (but this will double the print time so keep that in mind).
- Wall Thickness: 0.8mm
- This number should always be a multiple of 0.4 as that is the diameter of the nozzles installed on all our printers. 0.8mm means the walls are 2 layer lines thick.
- Top/Bottom Thickness: 0.8mm (same as walls)
- Retraction: Enabled
- Retraction Speed: 35mm/s
- Cooling: Enabled
- Support: Enabled (if your model has overhangs larger than 45° – These will be highlighted in red when you import your model into Cura)
- Build Plate Adhesion: Skirt
- A Brim or Raft is recommended if your model doesn’t have a lot of surface area touching the build plate (the print bed).
- Rafts are pretty hardcore, they print an entire plastic biscuit for the model to be printed on to help with adhesion. Meanwhile, Brims just add a bit of width to each area of your model touching the build plate.
- A Brim or Raft is recommended if your model doesn’t have a lot of surface area touching the build plate (the print bed).

Resources
• < add information here>