Categories
Risography

p5.RISO

Printing with p5.riso.js

p5.riso.js is a p5 library for riso printing. It means you can use p5 to create graphics and prepare the color layers for printing. p5.riso object extends the p5 graphics object so that all the graphics functions can be used from the library. 

Categories
Risography

RISO Color

The Print Lab has six ink drums with the colors: BLACK, BLUE, GREEN, RED, YELLOW, FLUORESCENT PINK, FLUORESCENT ORANGE.

Color chart source – Illinois.edu

Categories
Risography

Risograph About Page

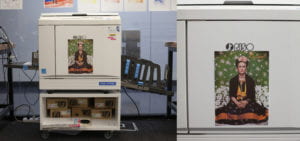
Meet Frida, the IDM Print Lab’s Risograph!

The Risograph is a stencil duplicator. Think of it as a cross between screen printing and photocopying. The RISO prints one color at a time in bright, vibrant colors. It is ideal for posters, graphic prints, zines, comics, and other graphic arts.

The RISO in the lab is a single drum, only printing one color at a time.

To get a sense of how the RISO works watch the video below. 

Categories
Risography

Installation Process

Installing the printer software

  • MAC

      • Download the drivers from the MAC driver for duplicator:
      • http://downloadcenter-alb-954167057.us-east-2.elb.amazonaws.com/DLCenter/Search.aspx
      • Category: Duplicator
      • Model: MAC Driver for Duplicator
      • Install the driver named: CD117Q.zip
      • Extract zip folder
      • MacOSX > SF 9 Series > SF 9x5xU Series Installer
      • Product Serial Number: xxxxxxxx
      • Plug in USB cord onto your computer
      • Then select the RISO KAGAKU CORPORATION SF 9x5xU Series as a printer when sending files to print
        • If it does not show up automatically, add the printer manually by going into Settings > Printers & Scanners > + (sign) > RISO KAGAKU CORPORATION SF 9x5xU Series
  • Windows

    • Category: Duplicator
    • Model: SF9x5x_SF5xxx series
    • Language: (select language)
    • Install the driver named:
Categories
Risography

Loading Ink Drum


  • Turn machine on by moving the black switch on the right side of the machine
    • If the machine is on but seems to be asleep, press the Wake-Up button to the right of the keyboard

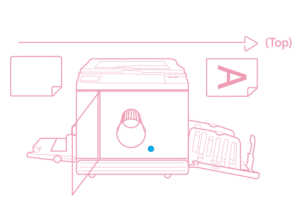
  • Open door
  • Make sure blue light for the “Print Cylinder Release Button” is on.
    • If not, press that button

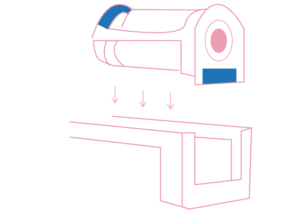
  • Pull the blue handle of the ink drum
  • Hold ink drum by blue parts, place carefully on the floor
  • Open container for the other ink and, holding the new drum by the blue parts, place it on the machine. Place old ink drum inside the hard case and put it away. Close ink drum and close machine door.


Categories
Risography

Paper Guidlines

Paper Sizes

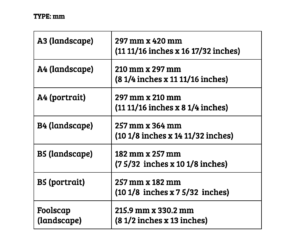
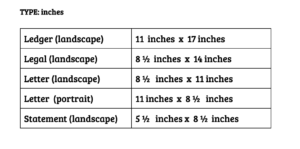
  • The Riso can print on the custom paper sizes above. The largest size is tabloid size. For small sizes, we recommend printing on letter and cutting it down.
  • IDM does not provide paper. Paper must be sourced by the student.

Paper Purchasing

Paper Types

  • Unsealed/uncoated papers must be used as the paper needs to be able to absorb the ink.
  • Some examples of good paper types are: vellum, offset, and Hi-Bulk. Newsprints, kraft, and construction papers
  • Riso Inks may smudge after the prints have dried (technically, the ink never really sets).  
  • For more detailed information on paper types for Riso click here.

Paper Tray

  • Press blue button to lower paper tray.
  • Remember the desired paper size.
  • Move blue handles on both sides up and move the metal part outward
  • Place paper on the tray
  • move the metal part outward to adjust the width to your chosen paper dimensions and move both handles down (locking them in place)
  • The machine will automatically bring the paper tray up once it begins printing