In this recitation, we used the NeoPixel Led strip to create light animations for our chosen.
Task #1: Test the NeoPixel
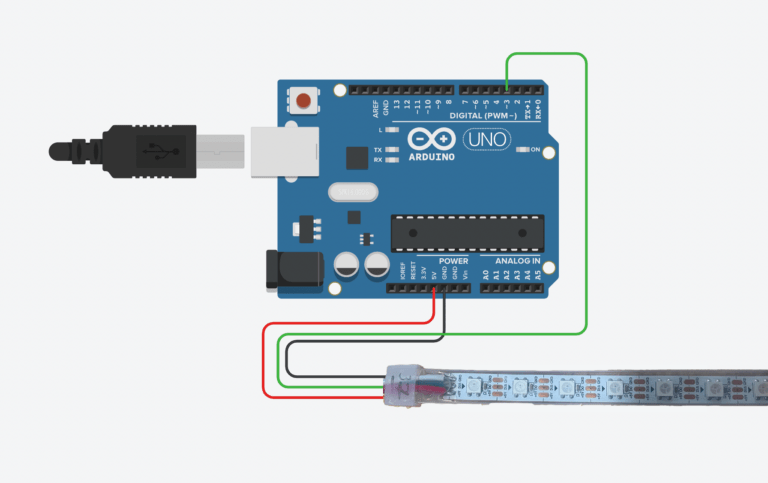
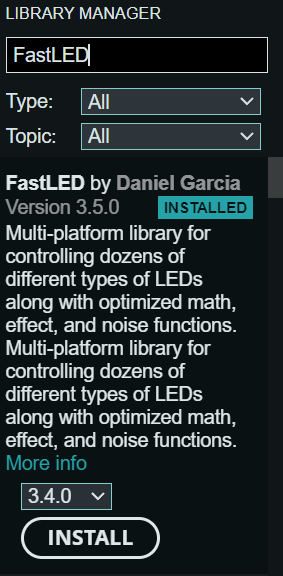
The first step is to test whether our NeoPixel and coding worked. Wiring up the components as the schematic, we then downloaded the Arduino library needed for controlling the NeoPixel. 


Then, we sent the FastLED/Blink code via Arduino IDE to ensure everything worked perfectly.
Task #2: Use your computer to light up NeoPixels
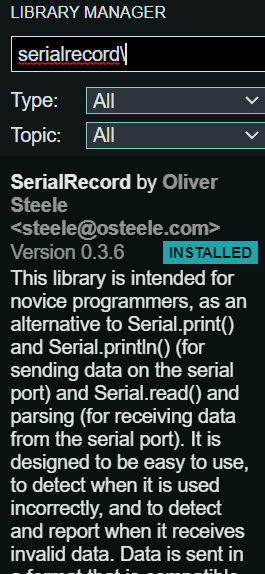
After testing, we downloaded the SerialRecord library into the Arduino IDE.

And we coded the Arduino to be in the “data-receiving” mode so that the Arduino could receive data later from Processing and light up specific LEDs accordingly.
/* This is a code example for Arduino, to be used on Recitation 7
  You need to have  installed SerialRecord and FastLED libraries.
  It requires NeoPixel WS2812 at pin 3
  Interaction Lab
  IMA NYU Shanghai
  2022 Fall
*/

#include "SerialRecord.h"
#include

#define NUM_LEDS 60  // How many leds in your strip?
#define DATA_PIN 3   // Which pin are you connecting Arduino to Data In?
CRGB leds[NUM_LEDS];

// Change this number to the number of values you want to receive
SerialRecord reader(4);

void setup() {
 Serial.begin(9600);
 FastLED.addLeds<NEOPIXEL, DATA_PIN>(leds, NUM_LEDS);  // Initialize
 FastLED.setBrightness(10); // BEWARE: external power for full (255)
 //further info at https://learn.adafruit.com/adafruit-neopixel-uberguide/powering-neopixels
}


void loop() {
 if (reader.read()) {
   int n = reader[0];
   int r = reader[1];
   int g = reader[2];
   int b = reader[3];

   leds[reader[0]] = CRGB(reader[1], reader[2], reader[3]);  //  Prepare the color information using CRGB( Red, Green, Blue
   FastLED.show();  //  Pass the information of color to the LED
 }
}
Here, I typed into some values to check whether NeoPixel could be changed.
Then, we launched Processing and coded it in the same format as we did in the Arduino IDE so that it could function perfectly.
/* This is a code example for Processing, to be used on Recitation 7
  You need to have installed the SerialRecord library.

  Interaction Lab
  IMA NYU Shanghai
  2022 Fall
*/

import processing.serial.*;
import osteele.processing.SerialRecord.*;

Serial serialPort;
SerialRecord serialRecord;

int W;         //width of the tiles
int NUM = 60;  //amount of pixels
int[] r = new int[NUM]; //red of each tile
int[] g = new int[NUM]; //red of each tile
int[] b = new int[NUM]; //red of each tile

void setup() {
  size(600, 200);
  W = width/NUM;


  // You can use this syntax and change COM3 for your serial port
  // printArray(Serial.list());
  // serialPort = new Serial(this, "COM3", 9600);
  // in MacOS it looks like "/dev/cu.usbmodem1101"
  //or you can try to use this instead:

  String serialPortName = SerialUtils.findArduinoPort();
  serialPort = new Serial(this, serialPortName, 9600);
  serialRecord = new SerialRecord(this, serialPort, 4);
  serialRecord.logToCanvas(false);
  rectMode(CENTER);
}

void draw() {
  background(0);
  for (int i=0; i<NUM; i ++) {
    fill(r[i], g[i], b[i]);
    rect(i * W + W/2, height/2, 10, 10);
  }

 if (mousePressed == true) {
    int n = floor(constrain(mouseX/W , 0, NUM-1));

    r[n] = floor(random(255));
    g[n] = floor(random(255));
    b[n] = floor(random(255));

    serialRecord.values[0] = n;     // which pixel we change (0-59)
    serialRecord.values[1] = r[n];  // how much red (0-255)
    serialRecord.values[2] = g[n];  // how much green (0-255)
    serialRecord.values[3] = b[n];  // how much blue (0-255)
    serialRecord.send();            // send it!
  }
}
However, this is only a raw sketch or a code prototype. To test the code, we modified the code so that we could use the mouse to control the light. This step is fundamental for setting the music as the determinant of the lights later.
/* This is a code example for Processing, to be used on Recitation 7
  You need to have installed the SerialRecord library.

  Interaction Lab
  IMA NYU Shanghai
  2022 Fall
*/

import processing.serial.*;
import osteele.processing.SerialRecord.*;

Serial serialPort;
SerialRecord serialRecord;

int W;         //width of the tiles
int NUM = 60;  //amount of pixels
int[] r = new int[NUM]; //red of each tile
int[] g = new int[NUM]; //red of each tile
int[] b = new int[NUM]; //red of each tile

void setup() {
  size(600, 200);
  W = width/NUM;


  // You can use this syntax and change COM3 for your serial port
  // printArray(Serial.list());
  // serialPort = new Serial(this, "COM3", 9600);
  // in MacOS it looks like "/dev/cu.usbmodem1101"
  //or you can try to use this instead:

  String serialPortName = SerialUtils.findArduinoPort();
  serialPort = new Serial(this, serialPortName, 9600);
  serialRecord = new SerialRecord(this, serialPort, 4);
  serialRecord.logToCanvas(false);
  rectMode(CENTER);
}

void draw() {
  background(0);
  for (int i=0; i<NUM; i ++) {
    fill(r[i], g[i], b[i]);
    rect(i * W + W/2, height/2, 10, 10);
  }

 if (mousePressed == true) {
    int n = floor(constrain(mouseX/W , 0, NUM-1));

    r[n] = floor(random(255));
    g[n] = floor(random(255));
    b[n] = floor(random(255));

    serialRecord.values[0] = n;     // which pixel we change (0-59)
    serialRecord.values[1] = r[n];  // how much red (0-255)
    serialRecord.values[2] = g[n];  // how much green (0-255)
    serialRecord.values[3] = b[n];  // how much blue (0-255)
    serialRecord.send();            // send it!
  }

}
Task #3: Add Music!
Now, it is the final step that makes the little program dynamic and fascinating. What we did first was to download a set of codes that will analyze the volume of a piece of the audio and transform it to a variable that later can be used to create the visual effects of the lights.
import processing.sound.*;

SoundFile sample;
Amplitude analysis;

void setup() {
  size(640, 480);

  // load and play a sound file in a loop
  sample = new SoundFile(this, "beat.aiff");
  sample.loop();

  // create the Amplitude analysis object
  analysis = new Amplitude(this);
  // analyze the playing sound file
  analysis.input(sample);
}

void draw() {
  println(analysis.analyze());
  background(125, 255, 125);
  noStroke();
  fill(255, 0, 150);

  // analyze the audio for its volume level
  float volume = analysis.analyze();

  // volume is a number between 0.0 and 1.0
  // map the volume value to a useful scale
  float diameter = map(volume, 0, 1, 0, width);
  // draw a circle based on the microphone amplitude (volume)
  circle(width/2, height/2, diameter);
}
Then I replaced the audio with one of my favorite songs called “This Hell” by Rina Sawayama. I asked Professor Haider to help me modify some parts of the code so that the NeoPixel could respond to the song and generate dynamic visual effects.
import processing.sound.*;
SoundFile sample;
Amplitude analysis;

import processing.serial.*;
import osteele.processing.SerialRecord.*;
Serial serialPort;
SerialRecord serialRecord;
int W;         //width of the tiles
int NUM = 60;  //amount of pixels
int[] r = new int[NUM]; //red of each tile
int[] g = new int[NUM]; //red of each tile
int[] b = new int[NUM]; //red of each tile
int lastN;

void setup() {
  size(640, 480);
  W = width/NUM;
  // load and play a sound file in a loop
  sample = new SoundFile(this, "Rina Sawayama - This Hell.mp3");
  sample.loop();

  // create the Amplitude analysis object
  analysis = new Amplitude(this);
  // analyze the playing sound file
  analysis.input(sample);

  String serialPortName = SerialUtils.findArduinoPort();
  serialPort = new Serial(this, serialPortName, 9600);
  serialRecord = new SerialRecord(this, serialPort, 4);
  serialRecord.logToCanvas(false);
}

void draw() {
  println(analysis.analyze());
  background(255, 171, 225);
  noStroke();
  fill(255, 230, 247);

  // analyze the audio for its volume level
  float volume = analysis.analyze();

  // volume is a number between 0.0 and 1.0
  // map the volume value to a useful scale
  float diameter = map(volume, 0, 1, 0, width);
  // draw a circle based on the microphone amplitude (volume)
  circle(width/2, height/2, diameter);

  int n = floor(constrain(volume*55, 0, NUM-1));

  r[n] = floor(random(255));
  g[n] = floor(random(255));
  b[n] = floor(random(255));

  serialRecord.values[0] = lastN;     // which pixel we change (0-59)
  serialRecord.values[1] = 0;  // how much red (0-255)
  serialRecord.values[2] = 0;  // how much green (0-255)
  serialRecord.values[3] = 0;  // how much blue (0-255)
  serialRecord.send();            // send it!
  serialRecord.values[0] = n;     // which pixel we change (0-59)
  serialRecord.values[1] = r[n];  // how much red (0-255)
  serialRecord.values[2] = g[n];  // how much green (0-255)
  serialRecord.values[3] = b[n];  // how much blue (0-255)
  serialRecord.send();
  lastN=n;// send it!
}
Look! I successfully visualized my favorite song!
I also asked Professor Haider to help me add time as a variable to change the visual effect along with the song, but due to the limited time, I did not make it happen during the recitation. I will post my code here, though, for future reference.
import processing.sound.*;
SoundFile sample;
Amplitude analysis;

import processing.serial.*;
import osteele.processing.SerialRecord.*;
Serial serialPort;
SerialRecord serialRecord;
int W;         //width of the tiles
int NUM = 60;  //amount of pixels
int[] r = new int[NUM]; //red of each tile
int[] g = new int[NUM]; //red of each tile
int[] b = new int[NUM]; //red of each tile
int lastN;
void setup() {
  size(640, 480);
  W = width/NUM;
  // load and play a sound file in a loop
  sample = new SoundFile(this, "Rina Sawayama - This Hell.mp3");
  sample.loop();

  // create the Amplitude analysis object
  analysis = new Amplitude(this);
  // analyze the playing sound file
  analysis.input(sample);

  String serialPortName = SerialUtils.findArduinoPort();
  serialPort = new Serial(this, serialPortName, 9600);
  serialRecord = new SerialRecord(this, serialPort, 4);
  serialRecord.logToCanvas(false);
}

void draw() {
  println(analysis.analyze());

  long t = millis();
  if (t < 1500) { background(155); } else if ((t>=1500) && t<3000) {
    background(255);
  } else {
    background(55);
  }

  //background(255, 171, 225);
  noStroke();
  fill(255, 230, 247);

  // analyze the audio for its volume level
  float volume = analysis.analyze();

  // volume is a number between 0.0 and 1.0
  // map the volume value to a useful scale
  float diameter = map(volume, 0, 1, 0, width);
  // draw a circle based on the microphone amplitude (volume)

  circle(width/2, height/2, diameter);

  int n = floor(constrain(volume*55, 0, NUM-1));

//  r[n] = floor(random(255));
//  g[n] = floor(random(255));
//  b[n] = floor(random(255));

  long t2 = millis();
  if (t2 < 5000) {
    r[n] = 255;
    g[n] = 0;
    b[n] = 0;
  } else  {
    r[n] = 0;
    g[n] = 0;
    b[n] = 255;
  }


  serialRecord.values[0] = lastN;     // which pixel we change (0-59)
  serialRecord.values[1] = 0;  // how much red (0-255)
  serialRecord.values[2] = 0;  // how much green (0-255)
  serialRecord.values[3] = 0;  // how much blue (0-255)
  serialRecord.send();            // send it!
  serialRecord.values[0] = n;     // which pixel we change (0-59)
  serialRecord.values[1] = r[n];  // how much red (0-255)
  serialRecord.values[2] = g[n];  // how much green (0-255)
  serialRecord.values[3] = b[n];  // how much blue (0-255)
  serialRecord.send();
  lastN=n;// send it!
}