Recitation 2: Arduino Basics
Equipment
 An Arduino kit
Circuit 1: Fade
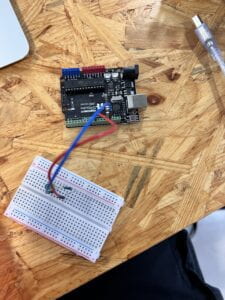 In order to build up this circuit, I went to the Arduino website (https://docs.arduino.cc/built-in-examples/basics/Fade) to see the diagram of it. I was given a kit of Arduino earlier. Then I assembled the circuit with two pieces of wire, a 200ohm resistor, and an LED on a breadboard. The two pieces of wire were connected to pin nine and the ground pin, forming a complete circuit.
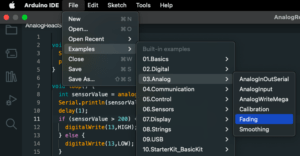 After the build-up, I launched Arduino IDE to access the code for fading. I found it in the example as the picture shows. And then, I uploaded it to Arduino to let it do its job.
Here is the result:
Circuit 2: toneMelody
For this circuit, I checked out this website(https://docs.arduino.cc/built-in-examples/digital/toneMelody) to find the schematic. This is a simpler circuit. All I need to do is replace the resistor and LED with a buzzer. Then I uploaded the code found in Arduino IDE > File > Examples > 02.Digital > toneMelody.
Circuit 3: Speed Game
Here comes the hardest circuit I have built in my life(I have built up five.) We needed to build up a game where two competitors must push their button switches as often as possible in a limited time. Then, the LED on the winner’s side would be lit, and the buzzer would produce a melody.
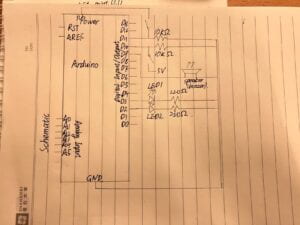
This task requires teamwork. So, I separated the circuit into two parts, and we both needed to assemble a side of the circuit to build up faster. However, this is not a good decision. Since we needed to start our job simultaneously on a small breadboard, it was hard for one person to assemble when the other was doing so.
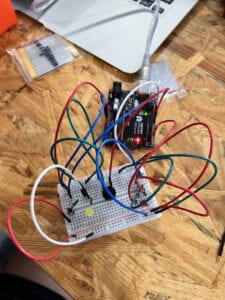
The construction was done. We check out the layout of the circuit. Everything was good–we did a good job. We have successfully built up such a complicated circuit in a short time.
Then I copied the code to the Arduino IDE to run the program. The computer finished the compiling and uploading. That’s when things went wrong. There readed “READY,” “SET,” and “GO” on the screen. It appeared to be nothing wrong with our code and our circuit. But no matter how we pushed the button, the LEDs would not be lit, and the buzzer never made a sound.
We then thought maybe this was something wrong with the circuit. After a thorough examination, we didn’t find any out-of-place wires or components. It took so long that the recitation was almost over when we finished the examination and still had no clue.
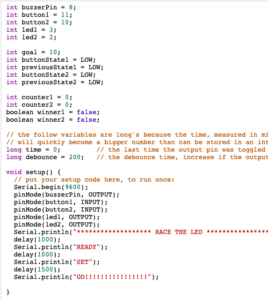
LA Iris then came up to us and checked us. She took a little time to make sure the circuit was good. And then, she checked the code I copied. It turned out that I didn’t copy the whole code into the IDE, but just a small segment of it.
I re-entered the complete code and reran it. This time it worked! And Iris helped us take a video of the game we were playing on the circuit. Thank you, Iris!
Questions
- Question 1: Propose another kind of creative button you could use in Circuit 3 to make the game more interactive. Explain why this button would make this game more interactive.
I think I would use multiple button switches connected with different traces. Each of the buttons will have an LED with it. The competitor must push the buttons whose LEDs are lit by the computer to win the game. Also, the computer has to generate different combinations of button switches randomly. This involves more thinking processes for each competitor and the computer.
- Question 2: Why did we use a 10 kOhm resistor with each push button?
The resistor here provides a connection to Ground and ensures we read LOW when the button is not pressed.
- Question 3: In the book Getting Started with Arduino there is a clear description about the “Arduino Way” in chapter 2. Find a project that you find interesting that can be used as an example for these kind of projects. Cite it in adequate manner, include a picture, and explain the reasons that you chose it.
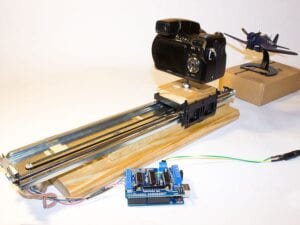 The Arduino way I am most interested in is to recycle old or used materials to create something new. So I chose a camera slider created by Guiye Perez Bongiovanni(Arduino Project Hub). It was built with the cart of an old printer. The reason I chose this project is it is very environmental-friendly and at a low cost because the material used is easy to find and exceedingly cheap, which means it is a good example to follow for us beginners.
Work Cited
- Bongiovanni, Guiye Perez. “Slider Built with Recycled Printer Cart.” Arduino Project Hub2, 22 Apr. 2019, https://create.arduino.cc/projecthub/Guiye_Perez_Bongiovanni/slider-built-with-recycled-printer-cart-88c4e5?ref=search&ref_id=recycle&offset=4.