
Worry Blower
Gwangun Kim
Rodolfo Cossovich
Video Documentation:
Youtube Link: https://youtu.be/4JWqhuAtCIQ
Conception and Design
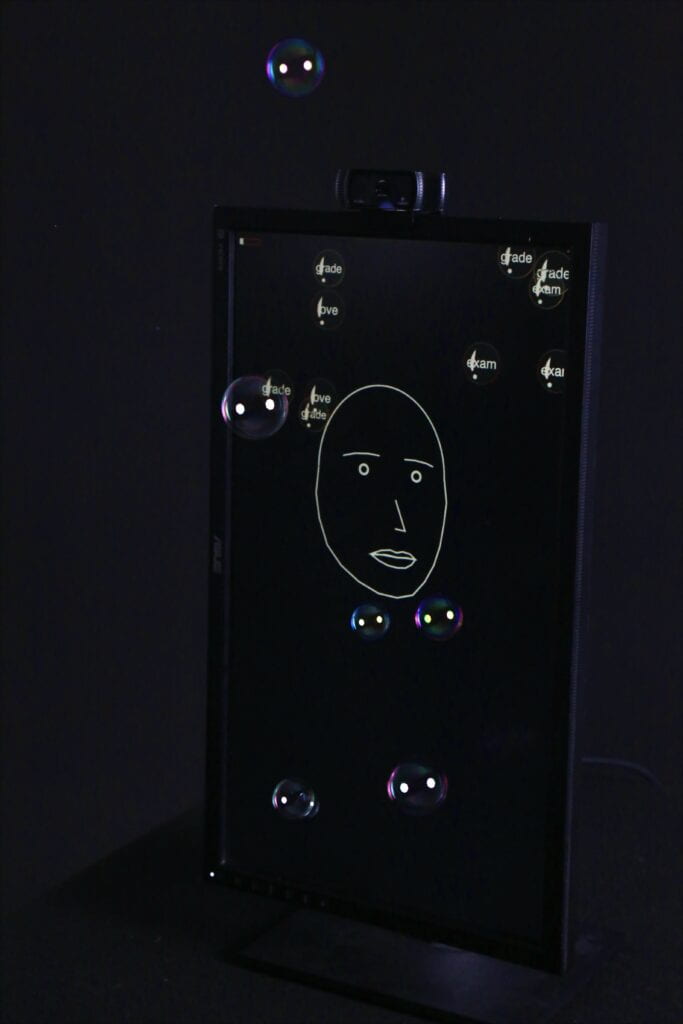
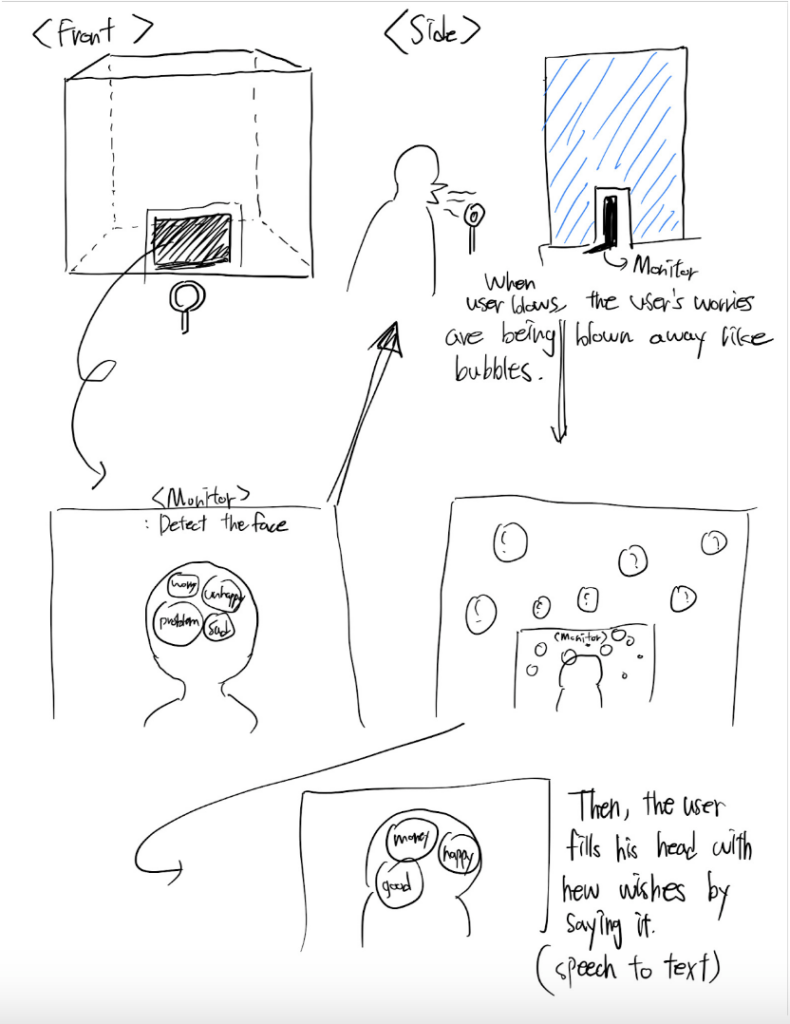
The Worry Blower is an interactive art piece that literally blows away worries. We thought our worries as the things that disappear over time, which resembled the idea of bubbles popping and disappearing over time. Thus, we planned to use Processing to create bubbles containing people’s worries on the screen and use Arduino to blow them away.
The process is as follows:
- The screen reads the user’s face and displays it.
- The user speaks their worries.
- The worries are written on bubbles.
- After speaking a certain number of words and surpassing a certain threshold by shouting, the fan turns on.
- The bubbles on the screen shrink, and the fan blows bubbles out.
The most crucial goal for us was how “random” of an experience we could create. Inspired by Studio Moniker(the one I researched for 2nd Reading&Analysis assignment), which focused on creating randomness not just with device manipulation, but with personal gestures like facial expressions and hand movements, we decided to use facial expression and speech-to-text technology on the screen in order to create a pure random interaction.
To convey the idea of bubbles with worries coming out into the real world and disappearing, we decided to place the bubble machine behind the monitor. We also decided to shape the microphone like a bubble wand to encourage a motion of blowing bubbles when looking at the screen.
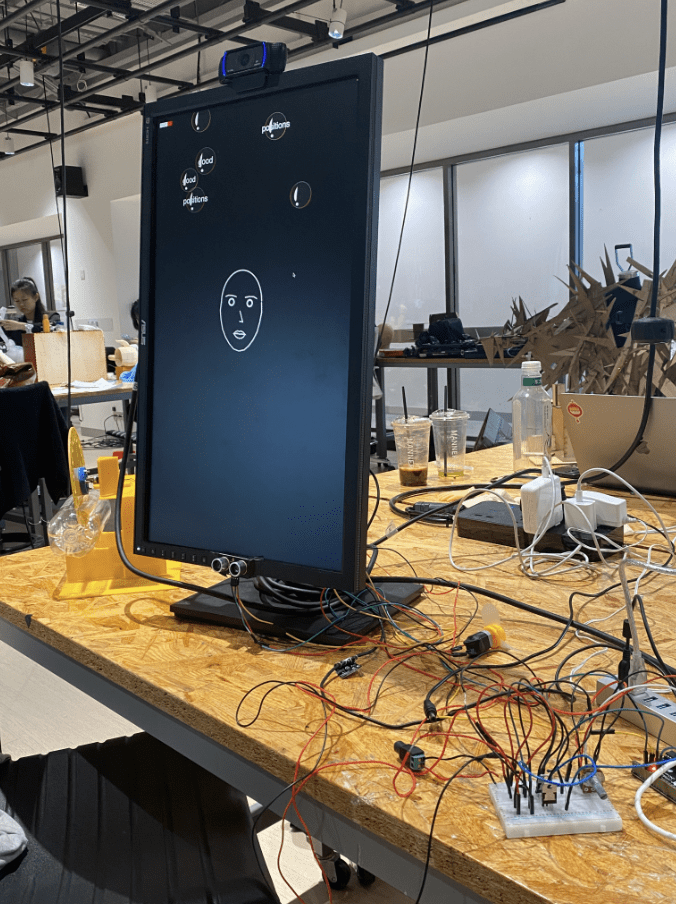
In user testing, following Professor Rudi’s feedback, we borrowed a vertical monitor for setting up the device and decided not to cover the glass box. By increasing the scale, we were able to create a more noticeable and engaging project. We didn’t accommodate the feedback to place the bubble machine separately because we needed to portray bubbles transitioning from the screen to reality.

Fabrication and Production
We decided to proceed with the project in three main stages: Bubble Machine Construction (Arduino), Screen Implementation (Processing/P5), and Combination.
1) For the Bubble Machine, we referred to the tutorial in the following video.
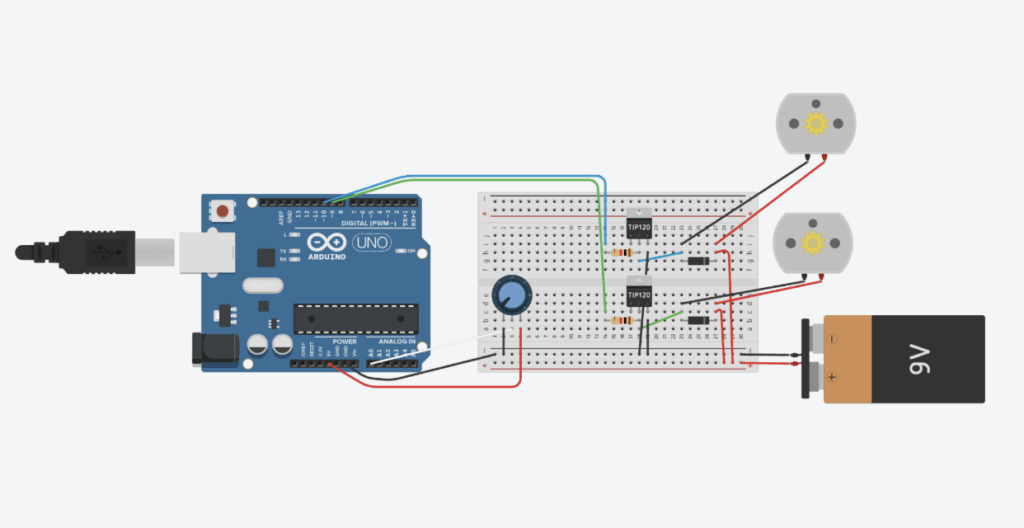
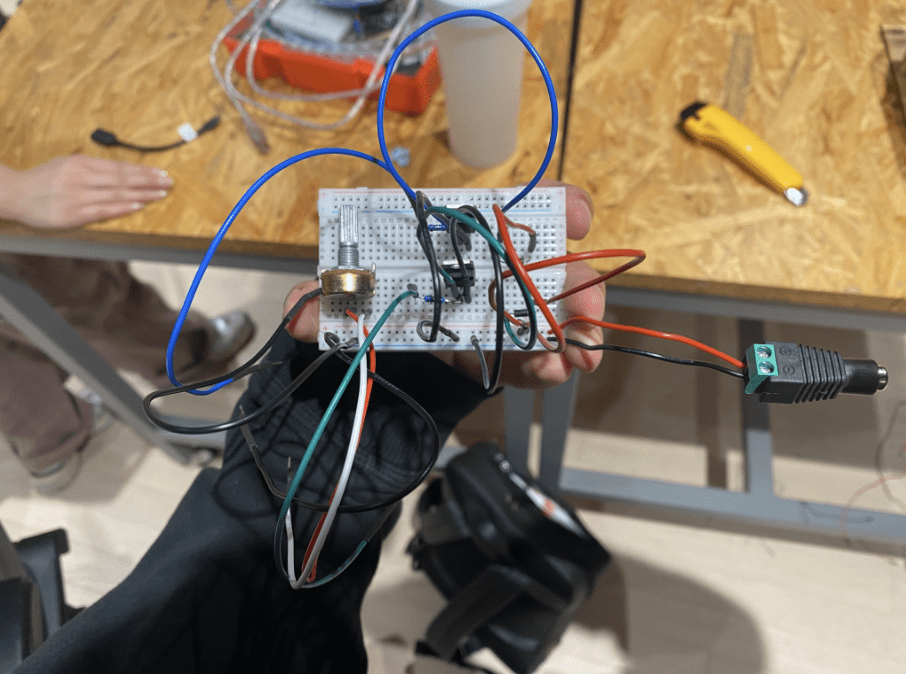
Since we needed to rotate a large disk with a small motor, we decided to use a motor with torque outside instead of a simple DC motor. The circuit and code for Arduino are as follows:
int analogValue = 0;

int pot = A0;
int motor = 10;
int fanmotor = 9;

void setup()
{
 pinMode(pot, INPUT);
 pinMode(motor, OUTPUT);
 pinMode(fanmotor,OUTPUT);
  Serial.begin(9600);
}

void loop()
{
   analogValue = analogRead(pot);
   Serial.println(analogValue);
   analogWrite(motor, map(analogValue, 0, 1023, 0, 20));
   delay(10); // Delay a little bit to improve simulation performance
   analogWrite(fanmotor, map(analogValue, 0, 1023, 0, 255));
   delay(10); // Delay a little bit to improve simulation performance
}
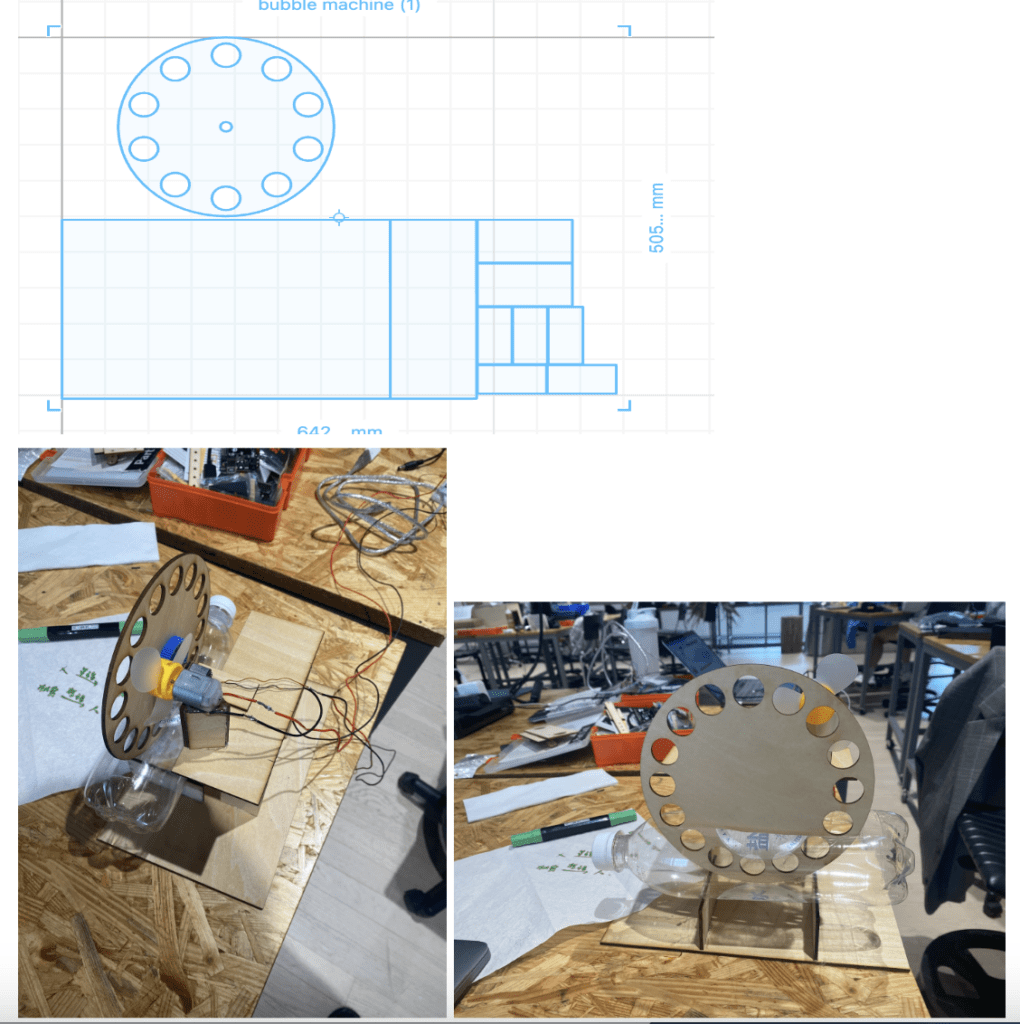
Before controlling the motors with the microphone, at this stage, we controlled the motors’ speed with the potentiometer. (Since the concept of microphone’s making analog values is similar to the concept of a potentiometer) So, this was the initial appearance of the bubble machine(We used the laser-cutting machine to design.):
Test Video of Bubble Machine:
In the early version, we faced difficulties in making bubbles due to oversized holes and a small number of circles. The next version included making holes in the center of the disk to make it stronger with screws and increasing the number and decreasing the size of the circles to facilitate bubble production.
![]()
2) For the screen interface, we intended to implement the screen interface using Processing, but we couldn’t find references to assist with the desired face recognition and speech-to-text features, and it seemed too complicated to achieve. Instead, we decided to use P5, the language we had used in a creative coding lab last semester (with the professor’s permission). Since Cassie had previous experience with face recognition and speech-to-text from the last semester’s project, the work went smoothly. For facial recognition, we referred to the following reference.
https://kylemcdonald.github.io/cv-examples/FaceTracking/
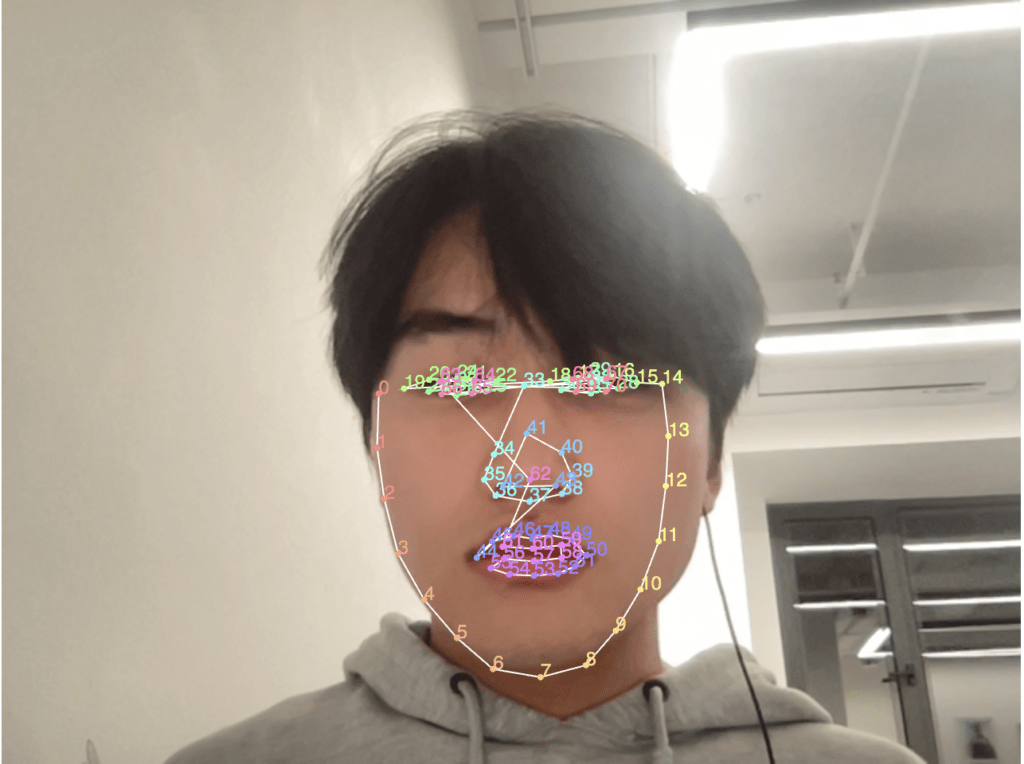
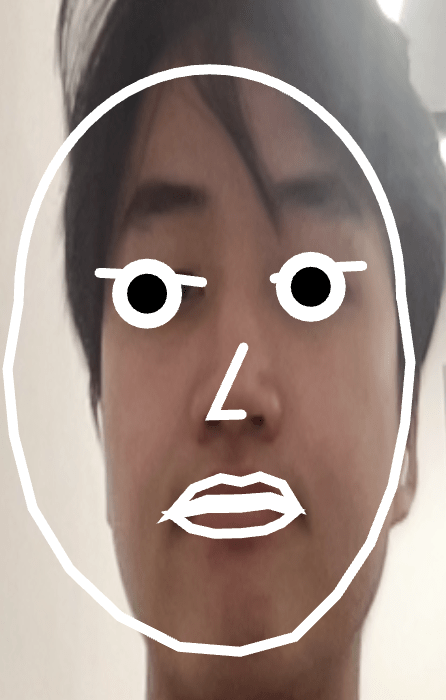
Based on the Brightness Index data by the author of the reference, we created filters that adjust eyebrows, eyes, nose, mouth, and the overall face shape accordingly.
class Head {
  constructor(positions) {
    this.positions = positions;
  }

  display() {

    //cheek
    noFill();
    stroke(255);
    drawingContext.strokeStyle = "white";
    strokeWeight(5);
    beginShape();
    for (var i = 0; i <= 14; i++) {
      vertex(this.positions[i][0], this.positions[i][1]);
    }

    //head
    arc(
      (this.positions[0][0] + this.positions[14][0]) / 2,
      (this.positions[14][1] + this.positions[0][1]) / 2,
      this.positions[14][0] - this.positions[0][0],
      (this.positions[14][0] - this.positions[0][0]) * 1.2,
      PI,
      0,
      OPEN
    );
    vertex(this.positions[14][0], this.positions[14][1]);
    endShape();

    //left eyebrow
    beginShape();
    for (var i = 19; i <= 22; i++) {
      vertex(this.positions[i][0], this.positions[i][1]);
    }
    endShape();

    //right eyebrow
    beginShape();
    for (var i = 15; i <= 18; i++) {
      vertex(this.positions[i][0], this.positions[i][1]);
    }
    endShape();

    //left eye
    fill(255);
    circle(this.positions[27][0], this.positions[27][1], 30);
    //right eye
    circle(this.positions[32][0], this.positions[32][1], 30);
    fill(0);
    circle(this.positions[27][0], this.positions[27][1], 25);
    //right eye
    circle(this.positions[32][0], this.positions[32][1], 25);
    noFill();

    //nose
    beginShape();
    //for (let i = 41; i <= 43; i++) {
    vertex(this.positions[41][0], this.positions[41][1] - 1);
    vertex(this.positions[42][0], this.positions[42][1] - 1);
    vertex(
      (this.positions[43][0] + this.positions[42][0]) / 2,
      this.positions[43][1] - 1
    );
    //}
    endShape();

    //mouth
    //fill("rgba(164,28,28,0.75)");
    //upper lip
    beginShape();
    for (let i = 44; i <= 50; i++) {
      vertex(this.positions[i][0], this.positions[i][1] - 1);
    }
    vertex(this.positions[59][0], this.positions[59][1] + 1);
    vertex(this.positions[60][0], this.positions[60][1] + 1);
    vertex(this.positions[61][0], this.positions[61][1] + 1);
    endShape(CLOSE);
    stroke(255);

    //bottom lip
    beginShape();
    //fill("rgba(164,28,28,0.75)"); //(208,9,9)(171,0,0,150)
    vertex(this.positions[44][0], this.positions[44][1]);
    vertex(this.positions[56][0], this.positions[56][1]);
    vertex(this.positions[57][0], this.positions[57][1]);
    vertex(this.positions[58][0], this.positions[58][1]);

    for (let i = 50; i <= 55; i++) {
      vertex(this.positions[i][0], this.positions[i][1] + 2);
    }
    endShape(CLOSE);
  }
For speech recognition, we used p5.speech.js and received the sentences spoken by the user through “myRec = new p5.SpeechRec(“en-US”)”. Then, we applied the parseResult() function to the received sentences, which will be called every time a word/phrase is detected.
function parseResult() {
  // myRec.resultString is the current result
  text(myRec.resultString, 25, 25);
  //console.log(myRec.resultString);

  // grab the most recent word (the word on the right side of the string)
  let wordArray = myRec.resultString.split(" ");
  mostRecentWord = wordArray[wordArray.length - 1];
  console.log(mostRecentWord);
}
For bubble creation, we referred to the part Cassie used in the last creative coding project to make it capable of containing worries, and we made it shrink in size when a sound surpassing the threshold is made. The code for the bubble is as follows. (You can go to the link below to see the rest of the code)
if (theHead.positions) {
      if (mostRecentWord && frameCount % 100 == 0) {
        bubbles.push(new Bubble());
      }
      for (let i = 0; i < bubbles.length; i++) { let p = bubbles[i]; p.move(); p.display(); } theHead.display(); while (bubbles.length > num_of_bubbles) {
        bubbles.splice(0, 1);
      }

      if (bubbles.length > num_of_bubbles / 2) {
        //webserial read and write data
        if (volumeSize > shoutVolumeThreshold) {
          console.log(volumeSize);
          serial.write(volumeSize);
          for (let i = 0; i < bubbles.length; i++) {
            let p = bubbles[i];
            p.blow();
            if (p.dia < 0) {
              bubbles.splice(i, 1);
              i--;
            }
          }
        }
        else{
          //console.log(volumeSize);
          serial.write(volumeSize);
        }
        fill(255);
        //ellipse(100, 100, volumeSize, volumeSize);
      }
    }
The most challenging part was p5’s serial communication. We tried to use the p5.serialcontrol application, but following Professor Rudi’s advice, we used the traditional way to send p5 data to Arduino. We tried many references available online, but Arduino kept failing to read the data. Fortunately, we found the solution in the last reference we consulted. With the following tutorials, we succeeded in serial communication. Although the traditional way took a lot of time, delving deeper into the code made us feel closer to understanding how this communication principle basically works.
This is how we get data from Arduino in p5. It is affected a lot by the data type. We tried Byte() and Int() instead of Number(), but only Number() work:
function serialEvent() {
  inData = Number(serial.read());
  //console.log(inData);
}
This is how the p5 writes data to Arduino:
if (volumeSize > shoutVolumeThreshold) {
          console.log(volumeSize);
          serial.write(volumeSize);
          for (let i = 0; i < bubbles.length; i++) {
            let p = bubbles[i];
            p.blow();
            if (p.dia < 0) {
              bubbles.splice(i, 1);
              i--;
            }
          }
        }
        else{
          //console.log(volumeSize);
          serial.write(volumeSize);
        }
Finally, by modifying the Arduino code as follows, we were able to successfully combine p5 and Arduino. This is the final version of Arduino code:
int analogValue = 0;
int distanceValue = 0;
int motor = 10;
int fanmotor = 9;
const int trigPin = 5;
const int echoPin = 6;
float duration, distance;
int incomingData;

void setup(){

 pinMode(A0, INPUT);
 pinMode(motor, OUTPUT);
 pinMode(fanmotor,OUTPUT);
 //pinMode(trigPin, OUTPUT);
 //pinMode(echoPin, INPUT);
 Serial.begin(9600);
}

void loop()
{                                                                                                                                                                                                           );
 if (Serial.available()>0){
   incomingData = Serial.parseInt();
   if (incomingData > 0){
     //Serial.write(incomingData);
     incomingData = map(incomingData, 0, 100, 0, 255);
     analogWrite(fanmotor, incomingData);
     analogWrite(motor, 15);
   }
 }
 delay(1);
}
Test Video(fan is highly reactive to the magnitude of voice):
This is the overall code snippet of the screen interface:
https://editor.p5js.org/GwangunKim/sketches/rBIeNsvXT
Conclusions
Interaction Video:
Our primary goal was to create an interaction that feels truly random. While our project might seem like a simple interaction where users speak their worries and shout to blow them away, achieving identical results among users is nearly impossible. Each user’s face is recognized differently, they express different worries, and bubbles of random sizes are generated in real-time. In this regard, our project achieved our goal. As expected, users voiced their own worries with words such as grades, finals, and graduation when asked “What are your worries?” and engaged in the interaction by shouting to blow away their worries. Here, I thought relieving stress through shouting would be effective, it seemed like watching the beautiful bubbles from the bubble machine relieved stress even more. Although there were moments, including the final presentation, where smooth communication between p5 and Arduino didn’t occur, I believe these were mistakes that happened as we ventured beyond well-optimized communication like Arduino-Processing and tried new methods.
Through continued user testing, we may need to adjust the fan motor and threshold values or further develop Arduino-p5 communication to optimize it. Additionally, for those who feel embarrassed to speak about their worries (as worries are deeply personal), I think we could create another interaction by attaching ear-shaped models to the monitor and utilizing another sensor to recognize whispers, thus acknowledging and relieving their stress in a more quite discreet manner. In terms of this final project, I realized that we could create engaging interactions using creative coding for visual stimuli and Arduino mechanisms for sensory stimulation. It feels like we provided users with an experience where they could “journey” through our artwork in their own way.
Disassembly
(Kit / Recycle&Residual / Return)
Appendix
Reference
Bubble Machine:
1.https://www.youtube.com/watch?v=CWFRqQhGa6w(mechanism)
2.https://forum.arduino.cc/t/running-two-motors-in-a-loop/967922(dc motor control)
3.https://docs.google.com/presentation/d/1riWKSLQ8dvxT7iRjQZRR9aIbOMKsuxgG1sxSNWiaHiM/edit#slide=id.g2bd96f4d727_0_45(controlling motors)
P5 Facial/Audio Recognition
1.https://itp.nyu.edu/physcomp/labs/labs-serial-communication/two-way-duplex-serial-communication-using-p5js/(p5 serial control we used)
2.https://kylemcdonald.github.io/cv-examples/(facial recognition)
3.https://github.com/kylemcdonald/AppropriatingNewTechnologies/wiki/Week-2(facial recognition 2)
4.https://florianschulz.info/stt/(Speech to text library with google chrome)
5.https://processing.org/reference/libraries/sound/AudioIn.html(aduio lib)
6.http://learningprocessing.com/examples/chp20/example-20-09-mic-input(mic input)
7.https://github.com/p5-serial/p5.serialserver(another p5 serial control)
8.https://www.youtube.com/watch?v=MtO1nDoM41Y(arduino to p5)
9.https://www.youtube.com/watch?v=MtO1nDoM41Y(two way communication)
10.https://www.youtube.com/watch?v=EA3-k9mnLHs(Processing facial recognition)