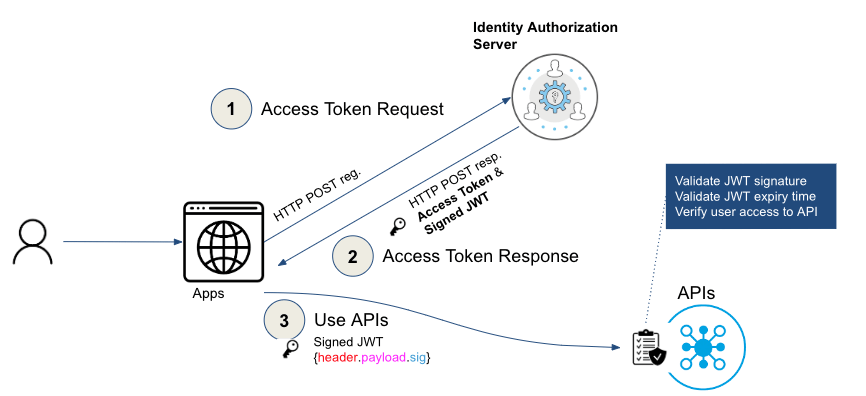
We are excited to share the success of our recent implementation of JSON Web Tokens (JWTs) for API authentication and authorization. This new technology has enabled us to provide our users with a more secure and efficient authentication process, and we are thrilled with the results.
However, we wanted to give you a heads up about an upcoming change to our API authentication. To continue improving the security and standardization of our API, we will be deprecating the use of existing Access Tokens by December 22, 2023. From that point forward, the only allowed authentication token for our API will be JWTs.
We want to reassure you that we will be providing resources and documentation to help you make the necessary changes before the deadline. Additionally, until December 22, 2023, both Access Tokens and JWTs will work, giving you ample time to make the transition.
We understand that this change may require some adjustments, but we believe that it is necessary to ensure the highest levels of security and reliability for our API. We appreciate your understanding and support, and we are committed to providing you with the best possible API services.
Thank you for your continued support!
FAQ’s
What is JWT (JSON Web Token)?
JWT (JSON Web Token) is a standard for securely transmitting information between parties as a JSON object. It is used to authenticate and authorize users or services on the web.
A JWT consists of three parts:
- Header: contains metadata about the type of token and the hashing algorithm used.
- Payload: contains the claims (user or application information) that are transmitted with the token.
- Signature: is a hash of the header, payload, and a secret key. The signature is used to verify the authenticity of the token.
![]()
How to use JWT token to authenticate with APIs?
Here are the step-by-step instructions for using the JWT Token (id_token) in place of the Access Token (access_token) for authorization:
- Generate a token as you always do, ensuring that the payload contains both the access_token and id_token.
Example Token Response
{
“scope”: “openid”,
“token_type”: “Bearer”,
“expires_in”:3600,
“refresh_token”: “7edfa156a31be246a6a6ba7bdsfsdfs7”,
“id_token”:“eyJhbGciOiJSUzI1NiIsIng1. eyJleHAiOjE1MzQ4NzU0OTEsInN1YdzFWTVRD. mbTZizeKLFrmpTYWUmpji96S”,
“access_token”: “d003b3c61747b4929ba3ec0fasdfsdfdsf”
} - In the API invocation header, select the id_token instead of the access_token as the authorization bearer.
Invoking API Using JWT Token
curl -k -H “Authorization: Bearer [id_token]” “https://esb.nyu.edu/identity/api/[netid]”
- Use this new authorization header in all subsequent requests to the API.

