Lab 1: Intro to Asynchronous Serial Communications
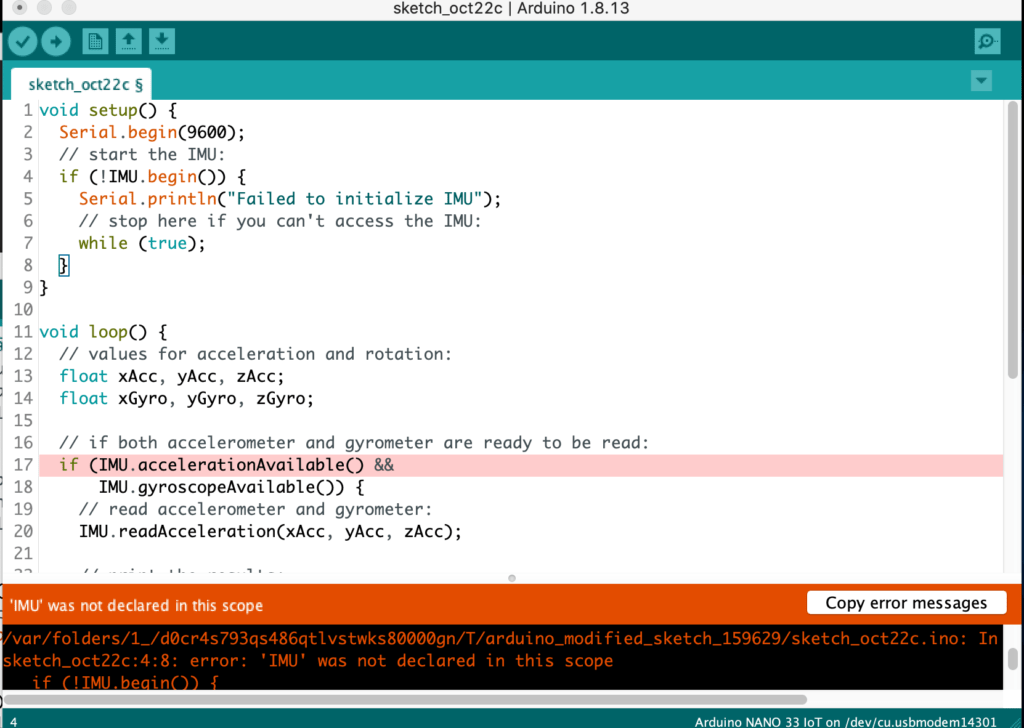
Overall. no issues working with Arduino although more practice and experimentation will be beneficial to understanding the concepts from this and the following labs. I did, however, run into an issue getting the code to work for reading the Nano’s onboard accelerometer instead of using an external one. The code provided stated the following:

I do nMeed more practice with understanding handshake and call and response.
Lab 2: Serial Input to P5.js
Tried again with a fresh mind and was able to get it working.
Insert video 1A (Fig. 13 related video)
After Fig. 13, within the “What’s Happening Here” section, the text states:
“You may be wondering why you’re mapping the sensor value or dividing it by 4 in the Arduino sketch above. That’s because in order to send the sensor value as a single byte, it must be between 0 and 255, or no more than 28 bits.”
Where are we dividing the sensor value by 4?
ANSWER: within map, we are mapping the sensor value from 0-1023 to 0-255. 255 is right 1/4th of 1023.
Tried adding delay(100) to the loop. Which loop?
Tried adding within draw, received error noting delay is not defined.
Tried adding to graphData() after if statement, same response.
Where do I add the delay to effect the loop?
ANSWER: Add to the Arduino sketch not p5.js
2C: ASCII
Added println(inData) and received error: printlin is not defined then my computer started overheating and the browser was working hard (spinning). Had to restart browser.
Changed println(inData) to console.log(inData) and it worked. There was a definite delay though.
Screen Recording 2020-10-20 at 10.34.55 AM
Lab 3: Serial Input to P5.js
3A: LED
I was able to get the LED to respond to the movement of the mouse as well as if I typed 0 though 9. The LED changed it’s brightness as expected.
I did have to edit the code in function keyPressed(){…} as the && signs were showing up as && which caused an error.
Also tried the speaker for this lab but used a 220Ω resistor instead of the 100Ω requested in the setup.
3B: ASCII encoded numeric string
Tried this part with the speaker setup and was able to get it to work. H produced a tone and L ended the tone.
Running the code through p5.js using H and L worked!
3C: Processing ASCII-Encoded Strings With Arduino
I don’t really understand this part. I was able to add numeric strings into the serial monitor and the speaker beeped a few times before it stopped taking input/making sound.
I am not sure exactly what is happening with his lab.
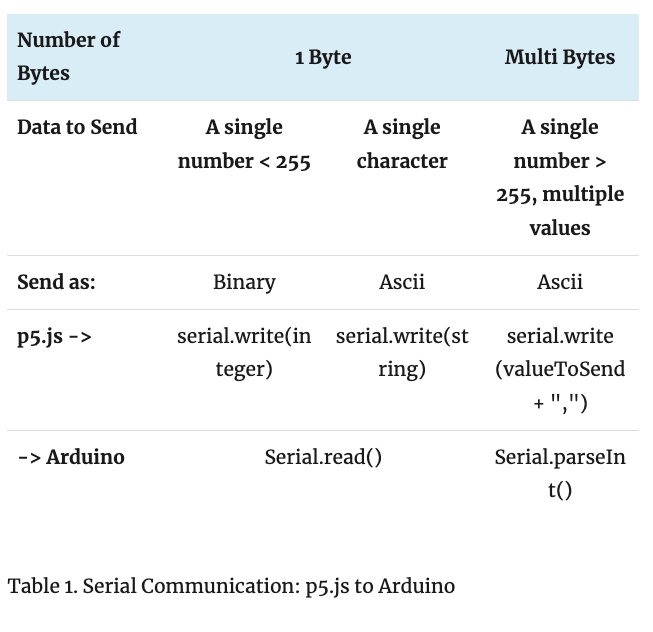
I would like to get further examples of using Table 1. Serial Communication: p5.js to Arduino (below) as I think it might help to clarify any confusion.
