In this recitation, my partner and I created circuits with a new sensor, an ultrasonic ranger. Without the given schematics and instructions to follow, we successfully created two functioning circuits and discovered the fun of writing codes.
Question 1:
What did you intend to assemble in the recitation exercise? If your sensor/actuator combination were to be used for pragmatic purposes, who would use it, why would they use it, and how could it be used?
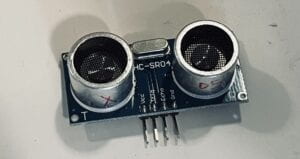
In the recitation, we focused on the exploration of using an ultrasonic ranger. First, we successfully connected the ultrasonic ranger to Arduino according to the provided schematics. The serial monitor then showed the changes in the data.
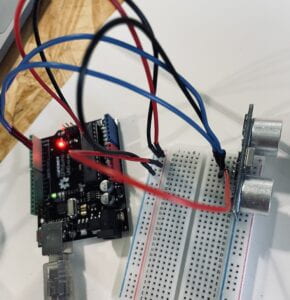
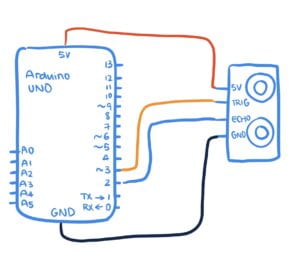
Here is the code:
#define echoPin 2 // attach pin D2 Arduino to pin Echo of HC-SR04
#define trigPin 3 //attach pin D3 Arduino to pin Trig of HC-SR04

// defines variables
long duration; // variable for the duration of sound wave travel
int distance; // variable for the distance measurement

void setup() {
  pinMode(trigPin, OUTPUT); // Sets the trigPin as an OUTPUT
  pinMode(echoPin, INPUT); // Sets the echoPin as an INPUT
  Serial.begin(9600); // // Serial Communication is starting with 9600 of baudrate speed
  Serial.println("Ultrasonic Sensor HC-SR04 Test"); // print some text in Serial Monitor
  Serial.println("with Arduino UNO R3");
}
void loop() {
  // Clears the trigPin condition
  digitalWrite(trigPin, LOW);
  delayMicroseconds(2);
  // Sets the trigPin HIGH (ACTIVE) for 10 microseconds
  digitalWrite(trigPin, HIGH);
  delayMicroseconds(10);
  digitalWrite(trigPin, LOW);
  // Reads the echoPin, returns the sound wave travel time in microseconds
  duration = pulseIn(echoPin, HIGH);
  // Calculating the distance
  distance = duration * 0.034 / 2; // Speed of sound wave divided by 2 (go and back)
  // Displays the distance on the Serial Monitor
  Serial.print("Distance: ");
  Serial.print(distance);
  Serial.println(" cm");
}
Circuit 1: Musical Scale
After testing the ultrasonic ranger as an input in our circuit, we connected the buzzer to be the output.
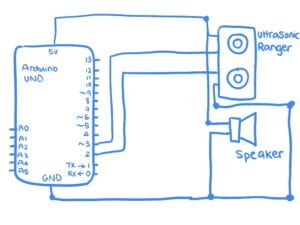
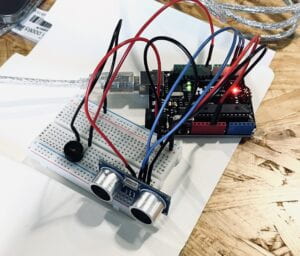
In this circuit, we want to create a musical scale where the speaker plays each note when an object enters a certain distance from the ultrasonic ranger. We can even create a short melody playing with distance. Based on the initial code, we added the void playFreq(double freqHz, int durationMs) {} that is used in the speed game circuit in the last recitation and a set of conditions in which we define the sound frequency played in each range of distance.
Here is our first testing:
However, the first attempt was not successful. When the censored object was close to the ultrasonic ranger, the speaker still made the first two notes of the musical scale. Yet, when the object moved further, the scale started to mess up. We asked Rudi for help and realized that we have up our “void playFreq(double freqHz, int durationMs) {}” inside “void loop {}.” We cannot put a block of code starting with “void” in another same block of code. After we moved our “void playFreq” out, the circuit ran much better.
After all the changes, here is our final code:
#define echoPin 2 // attach pin D2 Arduino to pin Echo of HC-SR04
#define trigPin 3 //attach pin D3 Arduino to pin Trig of HC-SR04

// defines variables
long duration; // variable for the duration of sound wave travel
int distance; // variable for the distance measurement
int buzzerPin = 9;

void setup() {
  pinMode(trigPin, OUTPUT); // Sets the trigPin as an OUTPUT
  pinMode(echoPin, INPUT); // Sets the echoPin as an INPUT
  Serial.begin(9600); // // Serial Communication is starting with 9600 of baudrate speed
  Serial.println("Ultrasonic Sensor HC-SR04 Test"); // print some text in Serial Monitor
  Serial.println("with Arduino UNO R3");
  pinMode(buzzerPin, OUTPUT);
}
void loop() {
  // Clears the trigPin condition
  digitalWrite(trigPin, LOW);
  delayMicroseconds(2);
  // Sets the trigPin HIGH (ACTIVE) for 10 microseconds
  digitalWrite(trigPin, HIGH);
  delayMicroseconds(10);
  digitalWrite(trigPin, LOW);
  // Reads the echoPin, returns the sound wave travel time in microseconds
  duration = pulseIn(echoPin, HIGH);
  // Calculating the distance
  distance = duration * 0.034 / 2; // Speed of sound wave divided by 2 (go and back)
  // Displays the distance on the Serial Monitor
  Serial.print("Distance: ");
  Serial.print(distance);
  Serial.println(" cm");


  if(distance > 3 && distance < 8){
    playFreq(261, 100);
  }else if(distance > 8 && distance < 13){
    playFreq(293, 100);
  }else if(distance > 14 && distance < 18){
    playFreq(329,100);
  }else if(distance > 19 && distance < 23){
    playFreq(349,100);
  }else if(distance > 24 && distance < 28){
    playFreq(392,100);
  }else if(distance > 29 && distance < 33){
    playFreq(440,100);
  }else if(distance > 34 && distance < 38){
    playFreq(493,100);
  }else if(distance > 39 && distance < 43){
    playFreq(523,100);
  }else if(distance > 44 && distance < 48){
    playFreq(587,100);
  }else if(distance > 49 && distance < 53){
    playFreq(659,100);
  }else if(distance > 54 && distance < 58){
    playFreq(698,100);
  }
}

void playFreq(double freqHz, int durationMs) {
  //Calculate the period in microseconds
  int periodMicro = int((1 / freqHz) * 1000000);
  int halfPeriod = periodMicro / 2;

  //store start time
  long startTime = millis();

  //(millis() - startTime) is elapsed play time
  while ((millis() - startTime) < durationMs) {
    digitalWrite(buzzerPin, HIGH);
    delayMicroseconds(halfPeriod);
    digitalWrite(buzzerPin, LOW);
    delayMicroseconds(halfPeriod);
  }
}
Circuit 2: Parking Sound
Thinking of the combination of sound and distance, we were reminded of the sound while parking a car. We want to create a continuous beeping sound: the closer the object is to the ultrasonic ranger, the more packed the beeping sound is. If this sensor combination is used for pragmatic purposes, it will be used in cars while parking. All car drivers use this device to have a sense of distance between the vehicle and the surrounding objects to avoid scratches.
Maintaining the same hardware connection, we made some further changes to the code. We defined three sets of sound representing “far”, “medium”, and “close”. One set of sound consisted repeating codes of sound frequency.
Here is our first testing:
Again, the first testing did not go well. The most significant issue was the sound that is supposed to be played only in the “close” range kept going when we had already moved the censored object to the “medium” and “far” range. It only stopped and changed to the other corresponding sound when it finished playing the entire set of sound frequencies in the code that we defined for each distance range. One of the fellows gave us a suggestion to delete the repeating lines of frequency codes because the computer can repetitively read one single line of code in “void {}.” As soon as we deleted the unnecessary parts, the circuit ran just as we imagined. The coding was also much more straightforward to follow.
Here is our second testing:
Here is our final code:
#define echoPin 2 // attach pin D2 Arduino to pin Echo of HC-SR04
#define trigPin 3 //attach pin D3 Arduino to pin Trig of HC-SR04

// defines variables
long duration; // variable for the duration of sound wave travel
int distance; // variable for the distance measurement
int buzzerPin = 9;

void setup() {
  pinMode(trigPin, OUTPUT); // Sets the trigPin as an OUTPUT
  pinMode(echoPin, INPUT); // Sets the echoPin as an INPUT
  Serial.begin(9600); // // Serial Communication is starting with 9600 of baudrate speed
  Serial.println("Ultrasonic Sensor HC-SR04 Test"); // print some text in Serial Monitor
  Serial.println("with Arduino UNO R3");
  pinMode(buzzerPin, OUTPUT);
}


void playFreq(double freqHz, int durationMs) {
  //Calculate the period in microseconds
  int periodMicro = int((1 / freqHz) * 1000000);
  int halfPeriod = periodMicro / 2;

  //store start time
  long startTime = millis();

  //(millis() - startTime) is elapsed play time
  while ((millis() - startTime) < durationMs) {
    digitalWrite(buzzerPin, HIGH);
    delayMicroseconds(halfPeriod);
    digitalWrite(buzzerPin, LOW);
    delayMicroseconds(halfPeriod);
  }
}

void playMelodyFar() {
  playFreq(262, 400);
  delay(1000);
}

void playMelodyMedium() {
  playFreq(262, 200);
  delay(500);
}

void playMelodyClose() {
  playFreq(262, 100);
  delay(200);
}

void loop() {
  // Clears the trigPin condition
  digitalWrite(trigPin, LOW);
  delayMicroseconds(2);
  // Sets the trigPin HIGH (ACTIVE) for 10 microseconds
  digitalWrite(trigPin, HIGH);
  delayMicroseconds(10);
  digitalWrite(trigPin, LOW);
  // Reads the echoPin, returns the sound wave travel time in microseconds
  duration = pulseIn(echoPin, HIGH);
  // Calculating the distance
  distance = duration * 0.034 / 2; // Speed of sound wave divided by 2 (go and back)
  // Displays the distance on the Serial Monitor
  Serial.print("Distance: ");
  Serial.print(distance);
  Serial.println(" cm");

  if(distance > 3 && distance < 18){
    playMelodyClose();
  }else if(distance > 19 && distance < 28){
    playMelodyMedium();
  }else if(distance > 29 && distance < 38){
    playMelodyFar();
  }
}
Question 2:
Code is often compared to following a recipe or tutorial. Why do you think that is?
I think that is because code is the instruction that we use as a medium to tell what we want the computer to do. It is a recipe or tutorial transferring human language to coding language, which the computer can understand.
For example, in Arduino coding, we use void setup {} to initiate the definitions and void loop {} to tell the computer circularly goes through the block of code. Through these fixed instructions, the computer knows what exactly to do.
Question 3:
In The Language of New Media, Manovich describes the influence of computers on new media. In what ways do you believe the computer influences our human behaviors?
In The Language of New Media, Monavich introduced five key differences between the old and new media. Based on this distinction, I concluded the massive influence computer has on human behaviors in a few ways.
- Numerical Representation
As “computers are composed of digital code” (Monavich, 27), all the continuous data used in the old media are digitalized into discrete data to coordinate with the computer numerical representation. Unavoidably, contemporary communication requires discrete units, such as the transition from the continuous spectrum of colors in the old media era to the series of discontinuous terms for representing colors today. Language can divide reality. The world we perceived before as “red, yellow, blue, grey, etc.” has been reduced to “#FF0000, #FFFF00, #0000FF, #808080, etc.”. If we create a digital art piece, then the colors are all selected through these codes instead of physically mixing colors on pallets as the artists did in oil painting.
- Automation
The computer allows “the automation of many operations involved in media creation, manipulation, and access.” (Monavich, 32) With the property of automation, “human intentionality can be removed from the creative process, at least in part” (Monavich, 32). The computer can essentially replace human work or simplify the complicated digital working process. Computers can understand to a certain extent, especially in “high-level” automation of media creation, and be considered artificial intelligence (AI). With the involvement of this aspect, the human production system has transferred from artisan labor to automized factory system with the central control of a computer. After the technology of assembly lines was introduced during the Industrial Revolution, modern media followed similar cores and focused on mass production and mass standardization. Working productivity has been significantly raised, and human beings are increasingly relying on automized computers.
Citation
Team, The Arduino. “Ping Ultrasonic Range Finder.” Arduino, www.arduino.cc/en/Tutorial/BuiltInExamples/Ping.
Jabbaar, Arbi Abdul. “Ultrasonic Sensor Hc-sr04 with Arduino Tutorial.” Arduino Project Hub, 17 Sept. 2019, create.arduino.cc/projecthub/abdularbi17/ultrasonic-sensor-hc-sr04-with-arduino-tutorial-327ff6.
“Principles of New Media.” The Language of New Media, by Lev Manovich, MIT Press, Cambridge, 2000, pp. 27–48.

Marcela Godoy
pretty great job documenting Crystal!
Marcela Godoy
I really like your circuit diagrams 🙂