Let’s start with some basic Pd chops so we can then learn some computer music theory:
CONTROL
1.1 Pd windows
When you open Pd, you should get a window like this one:
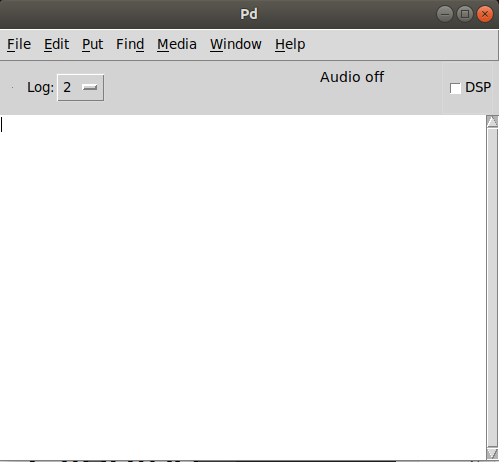
This is the Pd Console and we use it to read messages that Pd sends us, or to print messages into it. These messages are useful to debug our programs, that is, to figure out if things are running properly.
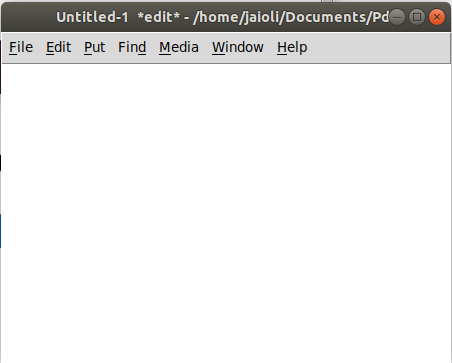
Programs in Pd are created in documents we call “patches”, and in order to create a new program we need to create a new patch by clicking on the menu “File/New” or using the command “Ctl+N” (cmd+N in Mac…). It is useful to learn all these commands to patch more effectively. You should get a window like this one:
 1.2 Edit/Run Mode
This blank window is an empty patch. Patches can be in “edit mode” or in “run mode”. To create and edit a program we need to be in “edit mode”, to switch between modes you need to click on the menu “Edit/Edit Mode”; if it is in edit mode already, then a check will appear beside the menu option.  You can also switch between modes by using the command “Ctl+E” (In all future cases, Mac users should replace Ctl with Cmd).
You’ll notice that your pointer changes shape (Mac users may need to move the mouse around to see the the shape change). In Run mode, your pointer will look like a classic mouse arrow (right image), but in edit mode it will look like a hand (left image).
1.3 Creating Programs: your first object

To create a program we’ll need to put some boxes in our patch and connect them in some way. To do this we need to be in Edit mode. Once in edit mode, go to the menu “Put/Object”, or type “Ctl+1”. This will create a rectangle made of blue dashed lines. This rectangle will move with your mouse and it is your job to place it by clicking somewhere on the canvas of the patch. Once you click, the object will stop moving, but will remain in a dashed blue line. Click on the object so we can call our first object by typing “print”. After you type this word, you’ll need to click outside the object for it to be created. At this point, your rectangle should have black solid lines. If your object does not have solid black lines it is because you probably made a mistake.
I encourage you to make a mistake intentionally to see what happens. Click on the object and type “printt” instead. Your object’s box should have dashed black lines and in the console you’ll see the message “printt … couldn’t create”. This is because Pd doesn’t have an object called “printt” in its database, so it cannot create it.
 1.4 Creating Programs: interacting with objects.
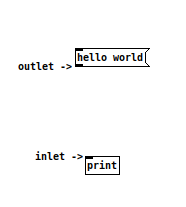
Once you have created an object, in this case “print”, you can create things to interact with that object. In this case we will create a message box using “ctl+2” or the menu “Put/Message”. Place the message anywhere in the canvas and write the classic “Hello world” in the message box. You’ll notice that not only your print object has a thicker line on its top left corner, but your message box has these thick lines on both the top left and bottom left corners. These are inlets (top) and outlets (bottom) which allow us to connect boxes together to create programs.
 In order to connect objects together, you need to place your mouse pointer at the outlet of a box, in this case, the hello world message box, and you’ll notice that the mouse pointer changes shape. In some operating systems you’ll see a big circle, while in this snapshot from ubuntu Linux, you can see a small circle beside your arrow. Once this shape shows up, click on the object and with out releasing, draw a line towards the inlet of another box, in this case, the print object. The result should be a patch that connects the message box and the object with a line as shown below:
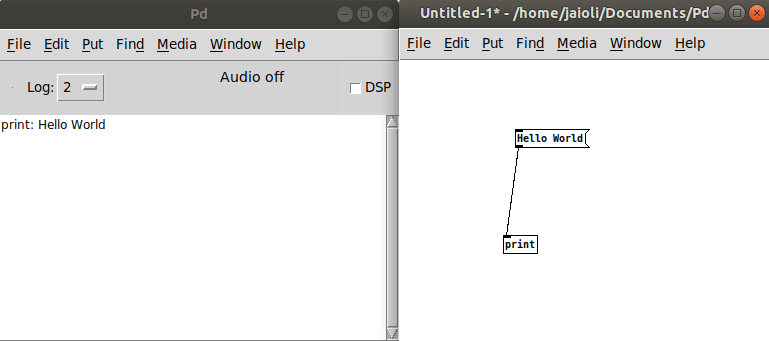
We are now ready to test our first program: Place your patch side by side your main console (ctl+R), go to run mode (ctl+E), and click on the message box. You can save your first program with the menu “File/Save” or typing “Ctl+S”
1.5 More Boxes
As you may have guessed there other types of boxes in Pd as well as various graphical objects. We’ll now introduce a few that are useful to know immediately. Copy the image of the patch below into a new patch. As a reminder to create a new object you type ctl+1, for a message box ctl+2, a number box ctl+3, a symbol box ctl+4, and a comment box ctl+5; bang objects are ctl+shift+B and Toggle boxes ctl+shift+T. After some experimentation you’ll notice that in edit mode you can move and edit the contents of object, message and comment boxes, as well as move number and symbol boxes. In run mode, you can click on message boxes to send their contents out their outlets; you can click and drag number boxes to change their value, shift+click and drag to change their value with a decimal point, and click, type and “return/enter” to set a specific value; while you cannot change the contents of objects or comment boxes:
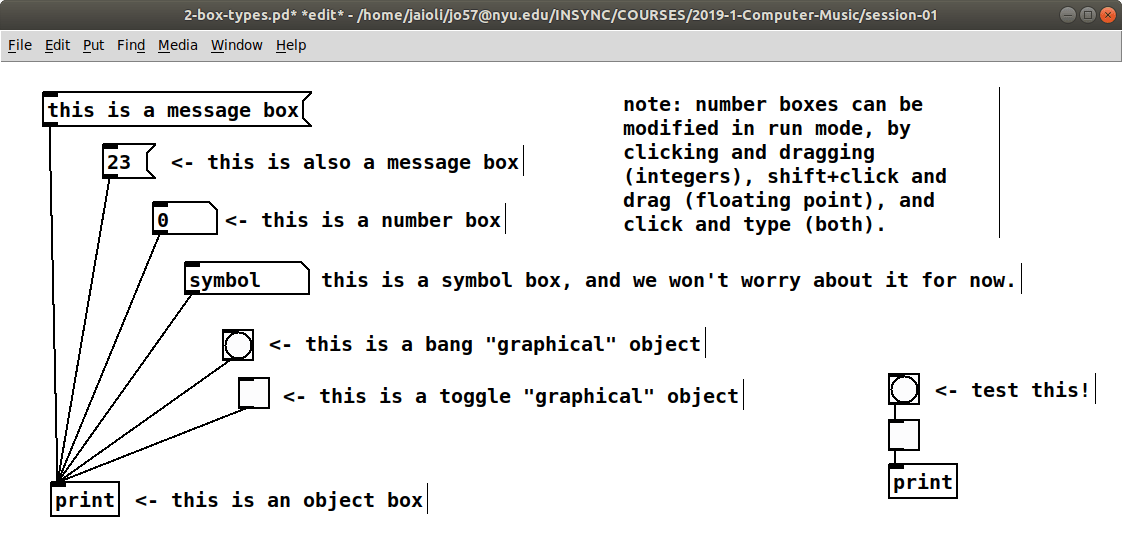
A few notes on bangs and toggles. Bang is a special kind of object in pd which means “do what you have to do”. You can use a bang object to make something happen or to visually gauge whether a bang has been received. For example connect a bang to your hello world message and click on the bang to send the message. We will see many examples of this as we move forward. A toggle is another special kind of graphical object in Pd which when banged or clicked toggles between 0 and 1, and displays this value visually. You can also send a toggle a non zero number and it will let it through.
 1.6 Deleting objects and connections
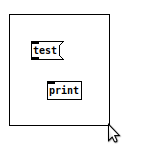
In edit mode, you can delete boxes and connections in various ways. To delete a number box, click on it and then type delete. In the case of objects and messages however, if you click on them, you are positioned to edit their content rather than to delete them. So in order to delete them you need to select them by clicking and dragging around them (some people call this “to lasso them”) as shown on the image on the right, and then hit the delete key.
To delete a connection, you need to place your mouse on top of the connection, click on it, and then delete it. You’ll notice that upon placing your mouse pointer above a connection you’ll get an x shaped cursor, as shown on the image on the left.
1.7 Hot and Cold Inlets
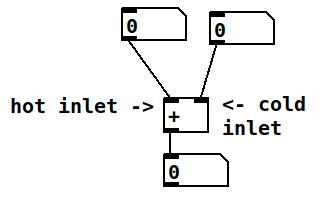 Let’s create a basic adding program. Create a new object called “+” and connect two number boxes, one to each inlet and then connect the outlet of the + object to a third number box. In run mode, change the value of the right inlet’s number box and see if the number box outputs anything. The correct result is that the + object doesn’t output anything. This is because the right inlet is what we call a “cold” inlet. This means that the only action taken by the + object when receiving an input value in its cold inlet is that it stores it in its memory. However, when you input a value in the left, or hot inlet, the object does not only store its value in memory, but it also executes the objects function immediately. At this point you should see the correct addition coming out of the outlet.
There is a way to execute the object without sending a value using a bang. If you send a bang to the hot inlet, the object will compute using whatever values it has stored in memory. Also, it is great practice to use a print object to debug, especially if the output value can repeat itself and you cannot visually gauge if it has changed.
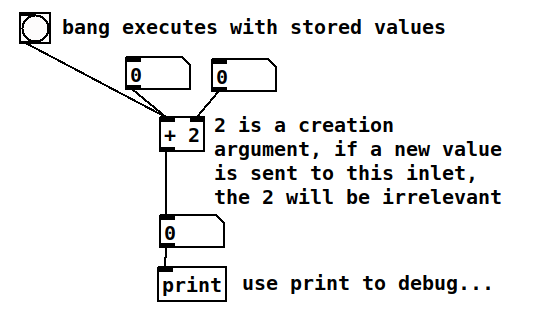 “+” objects can have a creation argument by typing “+ 2” when you create them. In that case, 2 is the creation argument and it is equivalent to storing a value in the cold inlet. If a new value is set in the cold inlet, this value will be overwritten and become irrelevant.
1.8 Trigger and order of execution
The underlying concept to cold and hot inlets is that of “order of execution”. Computers do one thing at a time, even when we think or perceive many things are happening “at the same time”. So in an operation we generally store in memory and then add. As mentioned earlier, cold inlets store, and hot inlets store and immediately execute. We can also execute by sending a bang to the hot inlet using stored values.
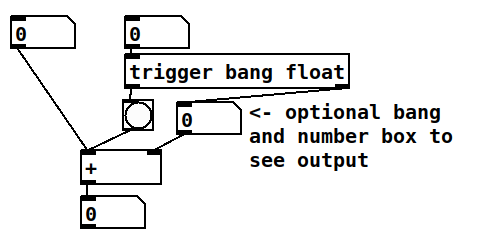
These features allow us to use a special kind of object called trigger. Create a trigger object and check it’s help file by right-clicking on the object and choosing “help”. As you can see trigger does two things. First, it converts the input type to the output type specified in the object’s creation arguments, and Second it outputs these new types in right to left order of execution. A common conversion type is to convert a number (also known as a float) to a bang. In the case below, we are converting a number to a number and a number to a bang, in that order. Thus, as soon as a number is sent to trigger, trigger outputs a float first on the right outlet and immediately after, it outputs a bang. The result is that we now have a hot-hot adding program.
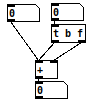 As it is the case with many objects, there is an abbreviated way to call these objects, and in this patch on the right, we have the same patch as above except in a more concise way. As you’ll notice it is not necessary to draw an actual bang graphical object for a bang to be sent, and it is not necessary to have a number box, between trigger’s second outlet and the cold inlet of the “+” object.
AUDIO
1.9 First audio

To finish our first Pd Session, let’s do a brief introduction to audio. Create a number box, then below it, create a new object called “osc~” and below it another new object called “dac~”. Try to make this patch~ without using your mouse using only the shortcuts ctl+3 and ctl+1. Switch to Run mode and introduce a value such as 440 in your number box. You should now hear a sound. If you don’t it is possible that your audio isn’t configured and you need to do so following the instructions here, or your computer’s audio volume is down or muted, or, most probably, that your DSP isn’t on. As mentioned earlier, to compute audio, you need to click on the checkbox by the “DSP” sign in the main Pd Console. When you click on it, you should see a message saying “audio on”. You can also go to the menu “media/audio on” or use the shortcut “ctl+/”.
“dac~” means digital to analog converter; it is a piece of software that converts the digital numbers that pd produces into the analog voltages that drive your speakers, or that come out of the output jacks of your sound card. Any time that you need to send audio out of pd, you do it using “dac~”. “osc~” is a sine wave oscillator, meaning that it produces a waveform that has the shape of a sine function. It’s hot inlet allows us to control its frequency in Hertz (Hz). Try different numbers and see what are the minimum and maximum frequencies you can hear, if you are human, your should start hearing things around 20/30Hz and you should stop hearing sounds somewhere between 15 and 20 KHz, that is, between 15,000 and 20,000Hz, depending on your age, the younger you are, the bigger your range.
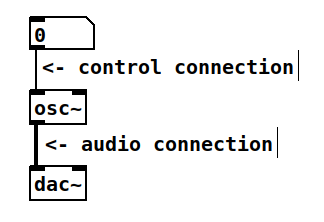 Finally, if you space things around, you’ll notice that the cords connecting going in and coming out of the number box have different widths. The incoming connection is a control connection. Control connections only pass information when a control object sends it. In other words, when you see a number box, it is not sending information constantly to the next object, but only when it receives it from another object or when you input it. Audio connections on the other hand, have a double width and they send information any time your “DSP” is on. They compute numbers for each sample of the sample rate specified in your audio settings. If your sample rate is 44,100 Hz, then you are computing a numbers that are spaced 0.0000227 seconds apart in time, which is a great resolution.
It is important to know that you cannot send an audio outlet’s output to a control object’s inlet. Audio objects on the other hand often receive both audio and control inputs.