Again, let’s begin introducing a few new control objects before we continue with our audio theory.
CONTROL 
3.1 Lines
We have worked on numbers and controlled them manually or through a counter. There is a way to create line segments using the “line” object. This means that we can ask this object to gradually change from one value to another over a period of time. In other words, instead of going from 0 to 1 in x seconds, we’d get something along the lines of 0, 0.05, 0.1, 0.15, 0.2, 0.25, 0.3, 0.35, 0.4, and so on, until the target value is reached. The resolution of this line depends on various factors and we’ll explore them later. In order to get a line segment, you need to specify a target and time to get to this target. Line will take as a starting point, the last value it had when the message was sent. If you send a float, line will jump immediately to the new value.
Notice that in this case we always send our target time pairs to the first inlet. The other inlets are not cold in the sense we learnt earlier, but they are used to set the next time for a ramp (2nd inlet) and time resolution (3rd inlet).
 3.2 Metro
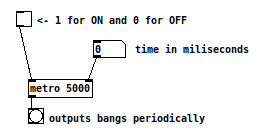
We have used metro already intuitively in the last session, but we will introduce it again, now formally. Metro outputs bangs periodically when it receives the message “1” and stops when it receives a “0”; thus you can use a toggle for turning it on and off. You can set the inter-bang period in milliseconds with a creation argument or by sending a number to the cold inlet. Check the help file for so many other possibilities with metro. 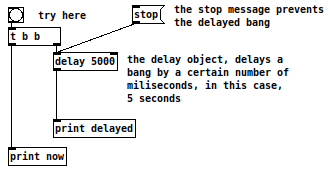
3.3 Delay
Finally, let’s see how the “delay” object works. You can set a delay time in milliseconds with a creation argument or by sending a float to the 2nd or “cold” inlet. If you send a bang to the first or hot inlet it will be delayed by the delay time. Copy the patch on the right and test it watching the console. Take a note that the “stop” message will stop the delay object from sending the delayed bang.
What do you think happens if you connect the delayed bang back to delay’s hot inlet?
AUDIO
3.4 Properties of a Sine Wave
We have seen how the period of a periodic wave helps us to calculate its frequency. We have also seen the relationship between frequency and sample rate. To change the frequency of a sine wave generated by the “osc~” object you need to send the frequency in Hz to the hot inlet. To control the phase of a sine wave you can set it on the right inlet of osc~. This will set the phase of the repeating waveform; any new input will reset the phase. However, let’s not worry about phase just yet as it is not a determinant factor in the techniques we are seeing now.
brief explanation of a sine wave:
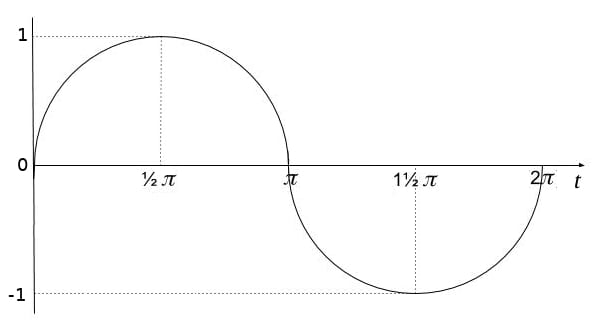
If f is the frequency, ø is the phase, and A is the amplitude, a sine wave is defined as: F(ω) = A * sin ( f(ω) + ø) where ω is the angle drawn by a rotating line as shown below and the frequency is the speed at which this line rotates: 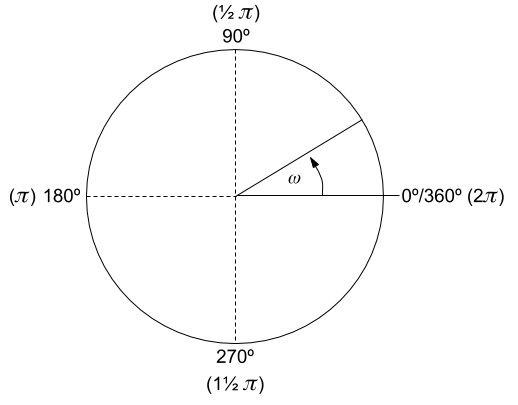 As this line rotates around a center, it cycles from 0 to 360°, or from 0 to 2π radians.
 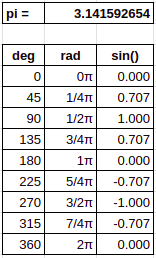 To calculate the values of the sine wave, we measure ω in radians instead of degrees, thus 0° is 0 radians, 90° is 1/2π radians, 180° is π radians, 270° is 3/2π radians, and 360° is 2π radians. The sine of these angles shows a function that grows from 0 (at 0°), to 1 (at 90°), back to 0 (at 180°), then to -1 (at 270°), and finally back to 0 (at 360 or 0°). As a consequence, the following sine function is drawn:
3.5 Amplitude
As explained above, a sine wave is defined as:
F(ω) = A * sin ( f(ω) + ø)
Thus amplitude (A) determines how much a waveform pushes up and down, thus translating into smaller or larger movements in a speaker diaphragm and therefore creating larger or smaller sound pressure levels that reach our ear. Amplitude is a word that is related to many other words such as loudness or intensity, and the very common volume. In the following sessions we will talk about amplitude in a couple ways, but generally, we will refer to peak amplitude. Peak amplitude refers to the maximum absolute amplitude a waveform can reach.
3.6 Amplitude: constants
 As seen above, sine waves conveniently produce a waveform that ranges in value between 1 and -1 (peak amplitude = 1!) over time and this makes it easy to control it’s amplitude. In order to multiply signals we need to work with the “*~” object which can multiply a signal coming into its hot inlet times another signal or control value coming in to its right inlet. As you well know, x*1=x and x*0=0; in other words anything times zero is zero and anything times one stays the same. Therefore the patch on the right will turn signals on and off as you click on the toggle because it is multiplying the signal times 1, giving you the signal as a result, and multiplying the signal times zero, will give you a constant zero signal.
 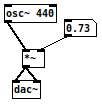 You can multiply a signal, by non-zero constants as well. As explained earlier, anything multiplied times one stays the same, therefore if you multiply a sine wave times a constant between 0 and 1, you’ll obtain a scaled version of that signal. This is true because the sine wave waveform has a peak amplitude of 1, that is, one that ranges in value between 1 and -1, so multiplying this signal times 0.73 for example, will give you a waveform of peak amplitude 0.73, ranging in value between 0.73 and -0.73.
3.7 Amplitude: lines and envelopes
Although multiplying a signal times a constant value allows us fixed control of amplitude, me might want to vary the amplitude of signals over time. To do this, we need to use a line object, only in this case, we need to use the audio version, which is the “line~” object. As explained earlier, “line” objects create ramps to a value over a period of time and “line~” objects do the same thing except with audio resolution, that is, they produce a number for every sample in the sample rate. At this resolution then, the “*~” object has the job of multiplying the sine wave outputted by “osc~” times the output of the “line~” object. Thus, at a specific moment in time, the “*~” object multiples each sample of signal a (“osc~” in this case) times each sample of signal b (“line~” in this case). As a result we can obtain time varying amplitudes such as those shown below. There are three vertical examples where the top array is a 110Hz sine wave, the middle array is a line segment, and the lower array is the result of the multiplication of the above graphs. Example a) shows an attack going from 0 to 1 over 80 milliseconds. Example b) shows a decay going from 1 to 0 over 60 milliseconds. Example c) shows a variation from 0.8 to 0.3 over 30 milliseconds. 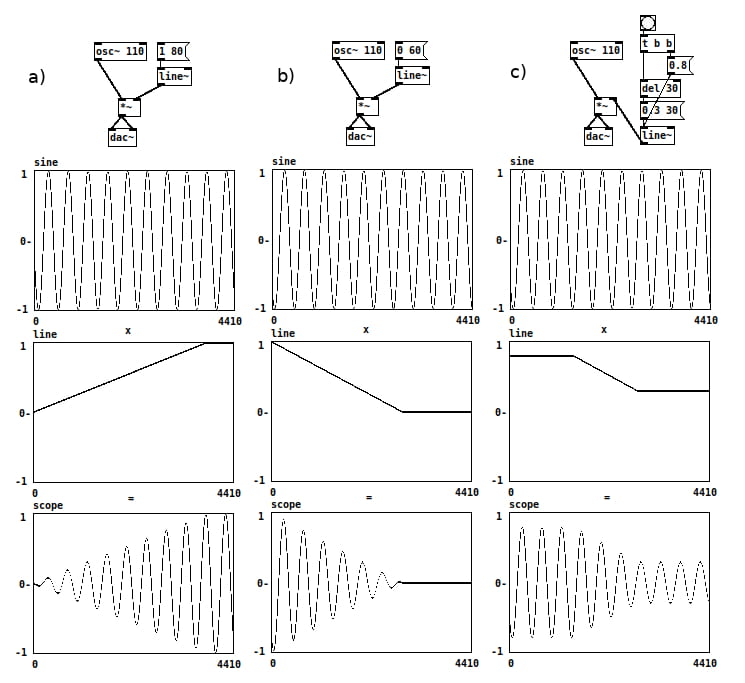 3.8 roughness, clicks and pops
Every time there is a discontinuity in the signal we hear a click or pop. In truth, because we are talking about a digital signal, all samples are discontinuous, and some wave forms we’ll see coming up, such as a sawtooth or a square wave are defined by their discontinuities (which may often lead to aliasing). However, the perception of pops and clicks surfaces when a signal has an unexpected or non-periodic discontinuity such as the ones shown below:  The discontinuities shown above will produce pops. You can test this in the accompanying patches for session 3 called “4.amplitude-discontinuities”. However, smaller discontinuities will create smaller pops and if generated in sequence can produce a kind of noise called zipper noise, which we often describe as roughness. This happens when we use objects that do not have audio rate resolution to control audio objects such as trying to control the amplitude of a sine wave with a “line” object instead of a “line~” one.
 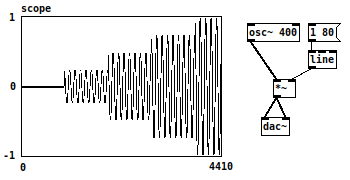 As you can see in the example on the right, the line object needs to interpolate between 0 and 1. The time resolution is of 20 milliseconds (ms), so when “line” is asked to interpolate between 0 and 1 over 80 ms, it starts with a value of 0 at 0ms; at 20ms the value jumps to 0.25; at 40ms, to 0.50; at 60ms, 0.75; and at 80ms, 1. As a result, we get four small pops which together produce a sensation of roughness.
When not intended, this zipper noise is perceived as an error, so in general, we will avoid it.
********************************
In this way we reach our first golden rule: ALWAYS use “line~” to control amplitude.