In this week’s class, Younian and I used the Veloster to make a sensor and use the Lilipad to control the circuit.
We followed the instruction of the linear potentiometer and made our own. Then we built the circuit and read the sensor value. In the beginning, the value was quite small and we found that we forgot to change the port of the sensor. We fixed it and then it worked.
Then we added the buzzer to the circuit. The connection of the cable was not very stable and we tried many times to build a connection. At last, we found that not only the cable but also the lilypad and the buzzer were all broken. So we changed all of them and we succeeded.
Code
//exercise 2 - Interactive Fashion-buzzer
int speakerPin = 9; //0 if you are using ATtiny
int sensorPin = A2; // Analog pin 3 if you are using ATtiny
int sensorValue = 0;
int minValue = 200; //adjuts this accordingly

void setup() {
  pinMode(speakerPin, OUTPUT);
  Serial.begin(9600); //Serial Comm doesn't work with ATtiny
}

void loop() {
  sensorValue = analogRead(sensorPin);
  if (sensorValue > minValue) {
    makeNoise(speakerPin, sensorValue * 3, 100);
  }
  Serial.println(sensorValue);  //Serial Comm doesn't work with ATtiny
}

void makeNoise(unsigned char pin, int frequencyInHertz, long timeInMilliseconds) {
  int x;
  long delayAmount = (long)(1000000 / frequencyInHertz);
  long loopTime = (long)((timeInMilliseconds * 1000) / (delayAmount * 2));
  for (x = 0; x < loopTime; x++)
  {
    digitalWrite(pin, HIGH);
    delayMicroseconds(delayAmount);
    digitalWrite(pin, LOW);
    delayMicroseconds(delayAmount);
  }
}
After that, we change the buzzer to Led and change the range of sensor value to make the control effect become visible.
Code
int LEDPin = 9; //0 if you are using ATtiny
int sensorPin = A2; // Analog pin 3 if you are using ATtiny
int sensorValue = 0;
int brightness;

void setup() {
  pinMode(LEDPin, OUTPUT);
  Serial.begin(9600); //Serial Comm doesn't work with ATtiny
}

void loop(){
  sensorValue = analogRead(sensorPin);
  if (sensorValue<300){
    sensorValue=300;
  }else{
    sensorValue = sensorValue;
  }
  brightness = map(sensorValue, 100, 400, 0 ,255);
  Serial.print(brightness);
  analogWrite(LEDPin, brightness);
}
Wearable Device — 0214
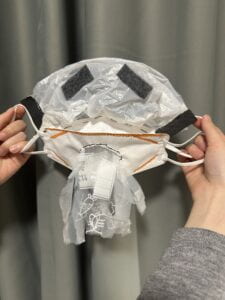
This wearable device is inspired by the daily life experience that people are hard to understand others’ expressions when they are wearing masks. There is a saying that the eyes are the window of the heart. However, when we look into the eyes of others, even with the help of eyebrows, our ability to understand the words and expressions of others is diminished.
So we choose the face mask as the main part of the device to show how a person’s mask may alter others’ views of communicating. In addition, we covered the speaker’s eyes with a piece of white plastic. It conveys a sense of vagueness about what the speaker is actually attempting to say. It is inspired by the daily life experience that wearing glasses and the mask at the same time, the air you exhale will blur your vision. To prove that it is the human species and not another, we added two pieces that resembled eyebrows. We cut a hole in the face mask at the device’s bottom. The plastic strip sticks out from the position of the mouth, and when the wearer speaks, the plastic strip shakes and makes noises, which shows that due to the lack of expression and mask cover when wearing a mask, people’s words become broken and it is difficult for those listening to them to understand what they are saying. At the same time, in order to make the work look as nice as possible with limited materials, we painted the splices, hoping to have a comic effect.