This week we work on making the acutator and mechanisms to prepare for our Project 2.
Tips:
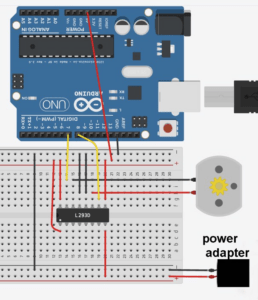
Different from the circuit sketch, we need to use the special pin that shows in the code. And the core wire is easy to break, so it is necessary to depress the sewing machine’s pedal very gently to make it work more slowly when winding.
Code:
int pin1 = 6;
int pin2 = 9;
int d = 500;

void setup() {
  // put your setup code here, to run once:
  Serial.begin(9600);
  pinMode(pin1, OUTPUT);
  pinMode(pin2, OUTPUT);
}

void loop() {
 //  put your main code here, to run repeatedly:
  digitalWrite(pin1, HIGH);
  digitalWrite(pin2, LOW);
  delay(d);
  digitalWrite(pin1, LOW);
  digitalWrite(pin2, HIGH);
  delay(d);
}
For the preparation of Project 2, we wanted to move the spine to show the difference between its orthostatic and non-orthostatic position. We envisioned several mechanisms of twisting and finally found that a wooden crocodile toy was the most feasible way to control its movement with a servo motor.
The effect of this tail curl mechanism is very obvious, but it works normally only one end is fixed, while we can not let it move to the left or right, only inward curl.
The actuator is too small to let the mechanism works normally so we choose to use the servo motor.
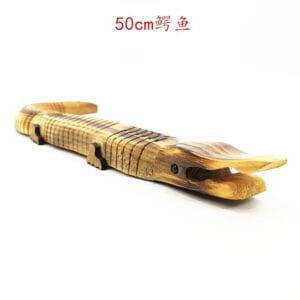
With the help of Marcela, we found this wooden crocodile toy, which we modeled later.
Considering that in the final project we need to make the whole spine move, perhaps we need a larger motor to achieve the same effect.