Envision Weekly Updates
On this page
- Update 1: Project Goals
- Update 2: Competitive Analysis
- Update 3: Cane Attachment Research
- Update 4: Prototyping
- Update 5: More Prototyping
- Update 6: Getting Feedback
- Update 7: More Prototyping with 3D Models
- Update 8: More Prototyping & Meeting with Lukas
- Update 9: Final Prototyping & Presentation
Weekly Update 9: 12/13/22 (Final Prototyping & Final Presentation)
Sheath Prototype V1
After our meeting with Lukas, we decided to continue developing our sheath prototype. Since the jeans fabric sheath prototype lacked a sturdy structure, we wanted to prototype the sheath out of a more firm material. We decided to repurpose the cane’s original case since it was made out of a soft yet sturdy material. The structured material of the sheath is also more waterproof compared to the previous fabric sheath prototype, which enables it to better weather various outdoor conditions. Since Lukas wanted us to recreate the security of the previous Twist prototype with the Snap magnets, we decided to place the Snap magnet sockets across the two legs of the harness, and oriented them so that you have to twist the sheath to detach it.
To repurpose the cane bag into the sheath design, we cut out the zipper and sewed the sides shut, making sure to leave a gap at the end to allow easy removal of the cane. We attached two Snaps like we did with the fabric prototype, and sewed a Fidlock magnet and metal nut at the top to act as a closure. We believed that this magnetic enclosure would be easy enough for the guide dog user to open while also being sturdy enough to prevent the cane from slipping out.

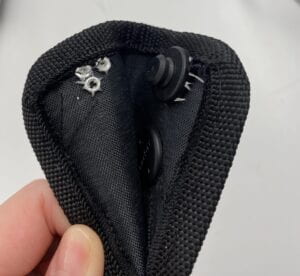
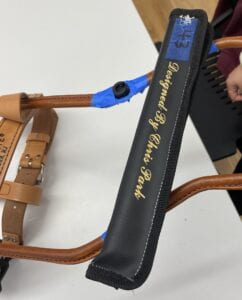
Final Sheath Prototype
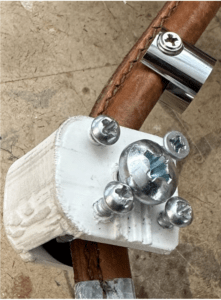
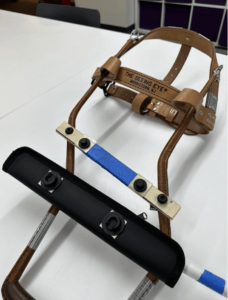
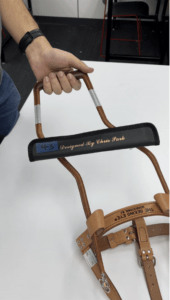
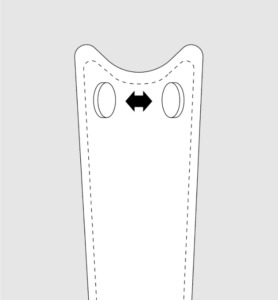
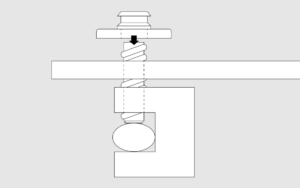
With the sheath design finished, we still needed a better way to attach the Fidlock Snap magnets onto the harness. The previous 3D clamp models that we printed didn’t fit properly and not flexible and strong enough for our design. At ITP’s junk shelf, we found plumbing clamps that fit our harnesses perfectly. We used them with the Snap magnets and wood pieces to make an interface between the sheath and harness. The clamps hold the wood with Snap plugs attached across the harness’s two legs. This version was much more stable than our 3D-printed clamps, which fit the harness well, but broke easily.
Unlike our previous designs, we attached the plugs to the harness instead of the sheath. This makes it easier to adjust the attachment’s position as needed, since the orientation of the plugs does not affect how they open, unlike the sockets, which must always face opposite directions to facilitate twisting.
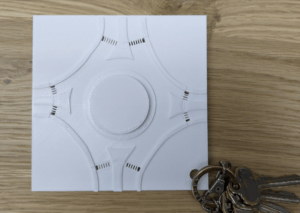
final 3D Roundabout Model
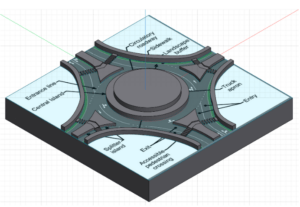
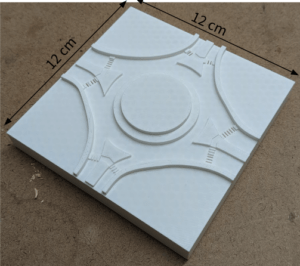
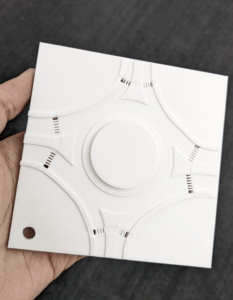
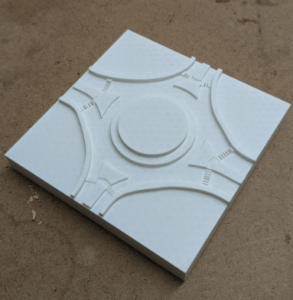
During our meeting with Lukas, he suggested that we include a depression where crosswalks begin, print the model slightly larger for greater resolution of its features, and add a hole in the corner so it can be attached like a keychain. In general, he loved the simplicity and portability of the 3D roundabout model and even showed our prototype to other orientation specialists at a conference. Taking in his feedback, our second roundabout model more closely resembled a real-life example. We used an image from Ohio’s Department of Transportation as a reference to replicate the gradual turns of the roundabout more accurately. The model was also portable, being only 12×12 cm wide and less than a cm in thickness.
Future Prototype and Next Steps
For the future, we would like to use a pair of regular magnets for the sheath closure, include another magnet within the sheath, and place the system lower so that it’s protected by the loops of the harness – suggestions Lukas felt could make the sheath even more secure. We will also implement longer headless screws so that they can fix both the clamp on the harness and the Snap plug on the clamp.
Final Presentation
Weekly Update 8: 12/6/22 (More Prototyping & Meeting with Lukas)
Updated Sheath Prototype
On Wednesday, we decided to make a better sheath prototype. Previously, our only sheath was made of cardboard, so we wanted to make one that was a bit closer to what the final product might look like. Using resources available in the ITP lab, we made the sheath out of jeans material and added internal circular cardboard reinforcements to give the sheath some rigidity and structure. We added 3 reinforcements – one at the top, one at the bottom, and one in the middle. We then added a flap and a jeans button in order to add a way to open/close the sheath. To attach the sheath to the harness, we added 2 Snaps, similar to our first prototype.
When testing the new sheath, we found that it sags down if the reinforcements are not attached to the Snaps. So, if we make another updated prototype, we will 3D print reinforcements that can attach to the Snaps. We will also add a better closure, such as a basic magnet, and use a more sturdy and long-lasting material, such as leather.
We are still not sure which prototype will be our final prototype, though some benefits of a sheath are that it does not need to be detached from the harness often and it is easier to put the cane back, instead of trying to find the Fidlock magnets on the harness like with the other prototypes.
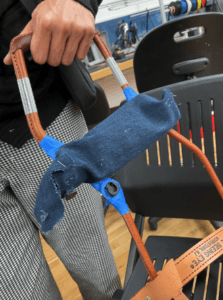
Fig. 8a: Fabric sheath on harness
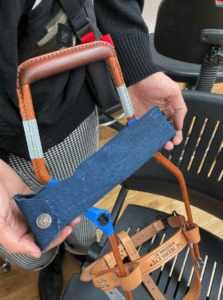
Fig. 8b: Fabric sheath attached across the harness
Snaps Clamp Update
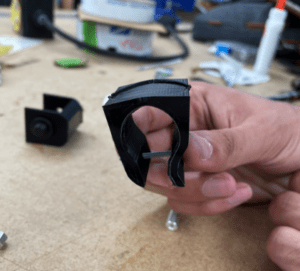
Also on Wednesday, we tested our 3D printed clamp for our Snaps prototype. The sizing was a bit off, so we were not able to fully test it out, but one thing we were able to notice is that the top of the cane clamp part bows out a bit when tightened with a screw. Once the sizing is adjusted, we hope this will not be a problem, but if it still is, we might have to make the print thicker. Once we 3D print new clamps, we will also have to find new screws and washers, since the ones we tested with were too small and difficult to handle.
One thing about the clamp that we did not note before is that the female and male parts are switched from our first prototype. This is because the male part will protrude out from the harness which might make it easier to reattach the cane.
In Person Meeting with Lukas (12/5)
On December 5, we met up with Lukas at the Ability Lab to show him our three prototypes and the 3D roundabout model. For the cane attachment, he mentioned that we should consider placing the cane attachment in the ears/loops of the harness, which would further protect the cane from being bumped off. Nonetheless, he worries about how placing the cane there might affect the mobility and functionality of the harness. For the Fidlock Twist, he mentioned that it may be a bit bulky with the clamp attachment. A design that he proposed was using the Fidlock Twist as the fixed base on the harness and attaching the small Snaps on the cane portion. We could potentially permanently or temporarily attach the small Snaps onto the cane with durable epoxy. We will also look into the Fidlock Tex Bases device, which is a fabric based device.
Lukas liked the fabric sheath attachment design the best because it protects the cane from external forces. Additionally, the whole sheath system can be easily detached from the harness if the user wants to remove it. Some next steps for the sheath design would be making the sheath more form fitted to the cane and including magnets in the interior of the sheath to provide extra security for the cane. We could potentially repurpose the cane bag or pencil cases to create a better sheath design.

Fig. 8d: Fabric Sheath on harness
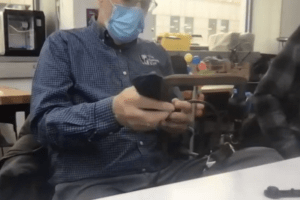
Fig. 8e: Lukas testing out fabric sheath prototype
Lukas was especially happy with the 3D roundabout design and expressed how the design was perfect in terms of size and portability for teaching and training purposes at the Seeing Eye. In terms of design, he mentioned that we could add a depression where the crosswalk is to emphasize the structure and make it easier to train students. He mentioned we could make the design half an inch larger and add some holes at the top to enable a string to be looped through for a necklace.
Weekly Update 7: 11/29/22 (More Prototyping with 3d Models)
Feedback/Set up meeting with Lukas
On November 21st, we emailed Lukas some videos of the Snaps prototype and Sheath prototype we made in order to get feedback from him. In this same email, we asked him if he would be able to visit us on campus December 1st, 2nd, or 5th, in order to see our prototypes in-person. In his reply, he provided various prototype changes we could try, such as changing the angle of the sheath and changing where the snaps connect to the harness. For example, he mentioned that we could install the Snaps on either side of the ears/flaps of the harness to minimize the possibility of the cane getting knocked off. Nonetheless, we noticed that the ears/loops are located on the lower end of the harness, which may make it difficult for the user to reach. We will try out this iteration this week to see if this is an issue. Lukas also said he could visit us on December 5th, which we are greatly looking forward to and will help us decide which prototype to move forward with.
clamps 3D modeling/printing
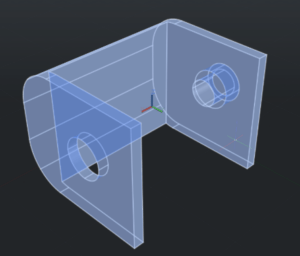
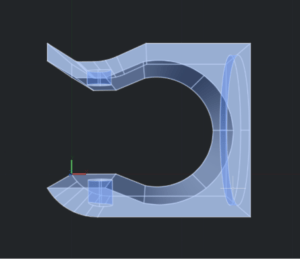
The 3D models for the clamps have been finished and will be printed before class on November 28, 2022. After printing the clamps, we will fit them to the harness and canes and perform more usability testing with the new prototypes for the Twist and Snap designs.
Below are the designs for clamps for the Snap prototype. Both are tightened by screws and nuts not shown in screenshots, and can use anti-slip pads that can secure the attachment.
Plans for this week
This week we will test out Lukas’ prototype suggestions and report back to him either via email or in-person on Monday what the results were. We will also create and complete our final presentation video.
Weekly Update 6: 11/22/22 (Getting Feedback)
Meeting with Lukas Recap
On November 16, 2022, we met with Lukas over zoom to discuss our progress so far to receive any feedback or commentary on our Fidlock Twist attachment prototypes. We also wanted to see if our 3D roundabout model design had all the necessary components to allow teachers to effectively train blind students.
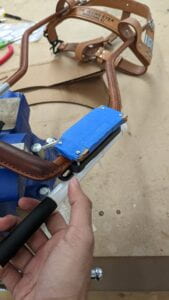
In response to the Fidlock Twist prototype, Lukas had an enthusiastic reaction to the clamp mechanism for attaching the Fidlock magnets onto the cane and harness. However, he did mention that this attachment prototype seemed a bit bulky at a first glance. When we mentioned that the Twist prototype could be knocked off at certain angles, he introduced the idea of creating an outer shell or sheath to protect the cane from being knocked off. As a result, we also decided to create a quick prototype for a sheath attachment.
Regarding the roundabout model, he mentioned that we should remove the bumps from the outer corners that aren’t part of the roundabout. He mentioned that these bumps may be distracting from the overall design of the roundabout. For the shape of the roundabout, he noticed that our design had more sharp turns for the road, but he wanted to emphasize that roundabouts are usually more smooth and widens as the driver goes up the roundabout. He also showed us a tactile map that they have created out of plywood to help users understand different street infrastructure (ie: sidewalk corners, ramps, etc.). From his design, he mentioned that it would be useful to include high contrast features for people with low-vision. To create a more accurate model, we will incorporate Lukas’ feedback in our next iteration.

Prototyping with Snaps
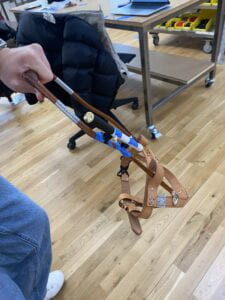
In response to the shortcomings of using the Twist: like stiffness while twisting and a clumsy first impression, we tried to attach the cane to the harness aligning two Fidlock Snaps with both openings facing upward. In this case, users don’t have to twist but gently pull towards them to easily detach the cane. The overall structure appears much more compact and prevents the cane from flipping off by any horizontal force applied. The adjustable placement of separate Snaps ensures a better fit for various harness handles and user habits.
Problems remain unsolved in this rapid prototype:
- Snaps are small, making it difficult to locate when putting the cane back.
- Although more customizable, it is not easy to let the spacing between Snaps on canes and harness remain the same in the adjustment process.
Prototyping with Sheath Idea
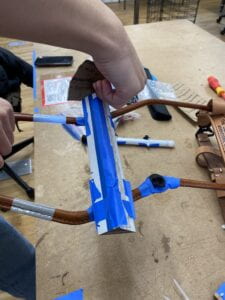
When prototyping the Fidlock Twist attachment, we noticed that it’s very easy to knock off the cane if there’s a collision from a certain angle, which could especially be a problem if the harness is removed or the guide dog is in a crowded area. We think that using a sheath could potentially resolve this issue by adding an additional step before releasing the cane.
In our prototype of the sheath, we attached the sheath to the harness using Fidlock Snaps, but we could also clamp it directly to the harness handles and instead use the magnets to secure the lid of the sheath, or stabilize the cane inside.
Initial Usability/Functionality Testing
In order to test the mechanical functionalities of the two Fidlock Prototypes (Twist and Snap), we had (non-blind) users detach and attach the canes for each prototype as if they were crossing the street. Here are the results from usability testing:
Prototype A: Fidlock Twist
Prototype B: Fidlock Snap
User 1:
-
- For both prototype A (Twist) and prototype B (Snap), attaching feels easier than detaching
- Between the two prototypes, the user found it easier to do the twist one because it’s easier to detach and attach
- For prototype A (Twist), they used their thumb against the base of the fidlock to detach the cane, which gives more tactile feedback about the position
- With prototype A (Twist), they said that they had a better idea of the orientation (ie: whether it’s facing up and down), which makes it easier to attach back onto the harness
- For prototype B (Snap), the user explained that the pulling motion towards themselves felt odd. Furthermore, they explained that they would need more room to pull the cane back
- The user is left handed, but they said it didn’t affect their use of the cane attachment
- In general, user 1 preferred prototype A (Twist) over prototype B (Snap)
User 2:
-
- For prototype A (Twist), the twisting motion wasn’t completely natural at the beginning, he thought it was a different rotating motion. However, once he realized the proper way of twisting the cane, he found it easier.
- He mentioned that sometimes the orientation of the magnet on the cane would get messed up, especially after you’ve deployed the cane and walked across the street
- He thought that it would be helpful to create some affordance on the handle that gives an indication of the orientation.
- He mentioned that it was especially hard to determine the orientation for prototype B (Snaps) because the two magnetic snaps on the cane aren’t connected by a strip like prototype A (Twist)
- Between the two prototypes, he thought that prototype A (Twist) seemed more intuitive compared to prototype B (Snaps). He mentioned that the pulling motion seemed awkward.
- For both prototypes, he mentioned the issue of height. For prototype A (Twist), he said that he had to hunch a bit to reach the underside of the cane attachment.
- Questions the user asked:
- How does the different dog heights/sizes affect user testing? Is there a way to better emulate having a guide dog while users are testing the cane attachment?
- In general, the user 2 preferred prototype A (Twist) over prototype B (Snap).
Weekly Update 5: 11/15/22 (More Prototyping)
Quick Prototyping with zip ties and legos
We’re working on designing the clamp system for a removable, yet stable magnet attachment on both the harness handle and cane. After buying a new clasp for the Fidlock Twist that makes it much easier to use, we’ve decided that it is the best version of the Fidlock series for creating the handle and cane attachment.
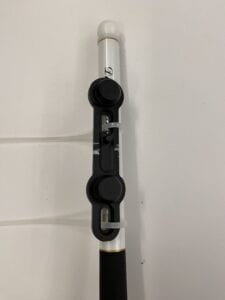
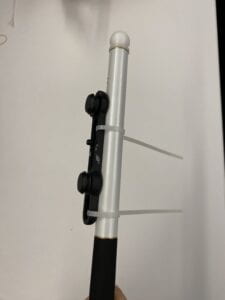
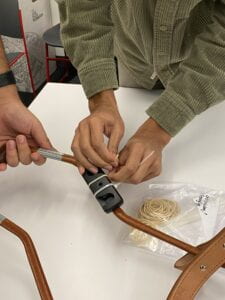
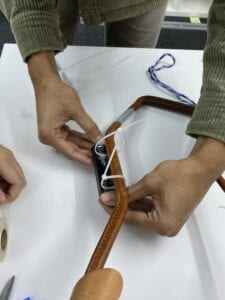
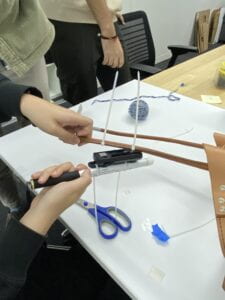
We built a simple model of the clasp using Lego blocks, tape, and zip ties. We initially tried to connect the Fidlock to the harness by adding some tape to the flat edge of the Fidlock socket. As expected, tape isn’t strong enough as an adhesive for frequent use, with the Fidlock quickly becoming detached from the harness. For the cane attachment, there were openings to the side of the magnet that allowed us to easily loop the zip tie to attach the Fidlock to the cane. However, zip ties were more difficult to wrap around the socket side of the Fidlock twist and can easily slip off the harness. When the cane and harness parts are connected with the Fidlock, it was difficult to detach because the zip ties would obstruct the magnetic parts.
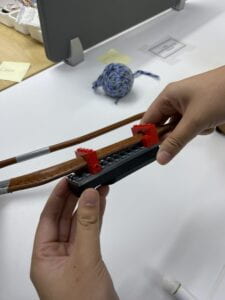
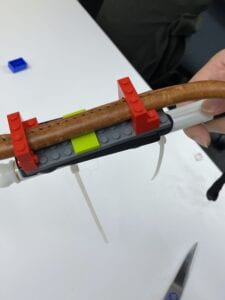
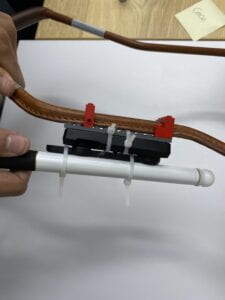
The Lego frame demonstrated that a clasp could be effective at holding the whole mechanism steady, even over the leather padding of the handle. We should confirm that this is also the case for a harness using older leather.
Quick Prototyping with wooden board attachment
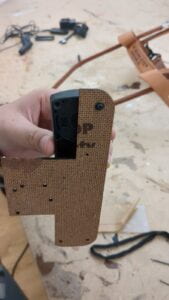
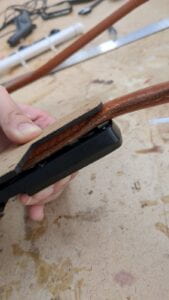
Finally, we noticed that we can create an even simpler prototype if we just screw the socket side of the Fidlock into a wood or plastic board on the other side of the handle. We would need M2.5 x 30mm screws to fix them securely.
Goals
- We plan on discussing these prototypes with Lukas on Wednesday 11/16 over zoom.
- After purchasing the M2.5 x 30mm screw, we will use it to securely attach the wooden board onto the Fidlock piece that connects to the harness.
- After trying out more lo-fidelity prototypes with wooden and plastic boards, we will move on to designing the 3D modeling attachment based on the feedback and details we acquired while prototyping.
Weekly Update 4: 11/8/22 (Initial Prototyping)
ITP Makerspace meeting
On November 4, 2022, our group met up at the ITP Makerspace with Yuxiang, who is an IMA student and ITP shop staff, to discuss ways to incorporate the Fidlock magnets and 3D model designs for the attachment.
We looked at the three Fidlock magnets (Fidlock Twist, Fidlock Slider, and Fidlock Snap) and discussed the different attachment methods. Since each of these Fidlock magnets come apart into two pieces, we decided to attach the larger pieces onto the harness itself and the smaller pieces onto the cane. For our first prototypes, we used painter’s tape to attach the Fidlock magnets onto the harness and cane:
Prototype I: Fidlock Twist
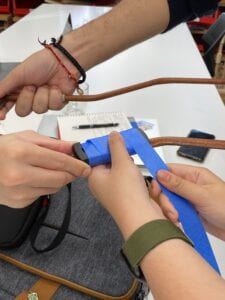
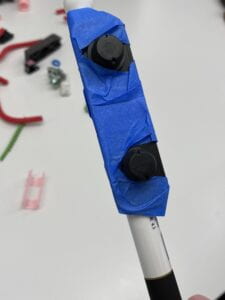
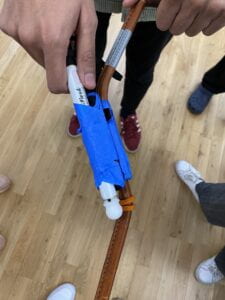
- We started off by taping the two parts of the Fidlock Twist onto the harness (left) and the cane (middle). After connecting the two pieces and trying to detach the cane, we experimented with different orientations and placements for the Fidlock Twist. We need to ensure that the cane attachment isn’t placed too close to the top of the harness in order to prevent the user from bumping into the cane.
- For example, in the first placement with the Fidlock magnet facing up at the top of the harness, the user would have to twist the cane clockwise to detach it from the harness. This detachment movement made the user’s wrist twist at an uncomfortable angle and overall was not intuitive for the user.
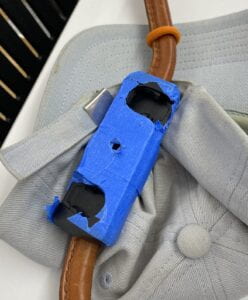
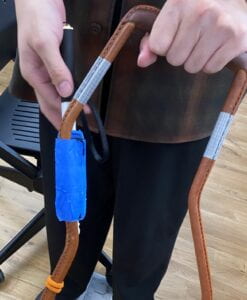
- To resolve this issue, we positioned the Fidlock magnet facing down, which allows the user to twist the cane counterclockwise at a more comfortable angle. Compared to the first position facing up, this position is more tucked in, preventing the cane from accidentally detaching when bumping into other people.
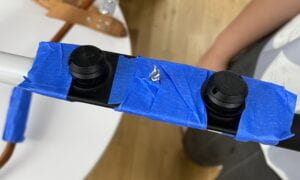
- Another issue that we encountered was the Fidlock Twist magnet was difficult to twist off because it didn’t twist off at the center of rotation. We noticed that the Fidlock Twist that Lukas gave us didn’t have the center piece poking out that the Fidlocks normally have, so we temporarily added a wire at the center to create a rotation point. This made the cane detachment much smoother. We have ordered a newer version of this Fidlock Twist with the center rotation point and will begin prototyping with it this week.
Prototype II: Fidlock Slider
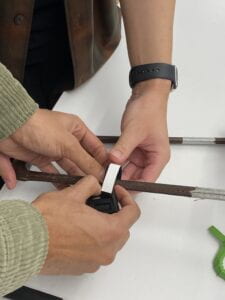
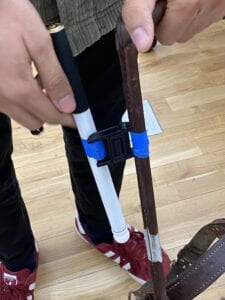
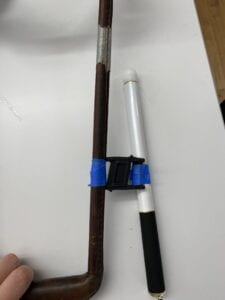
- For the second prototype, we tried a different Fidlock device that uses a sliding mechanism to detach the two pieces. We initially tried to velcro one of the pieces to the harness base, but it wasn’t tight enough to keep it together. As a result, we looped the painter’s tape into the side openings to attach each Fidlock piece onto the harness and cane.
- After testing out this prototype, we noticed immediately that the sliding mechanism was more difficult to attach back on, requiring the user to position the cane fidlock a certain way to snap back. Compared to the first prototype with the Fidlock Twist, the magnet mechanism in this prototype wasn’t as seamless and easy to detach and attach. Additionally, this attachment protrudes and dangles more on the side, which may inconvenience the user when navigating around.
Prototype III: Fidlock snap
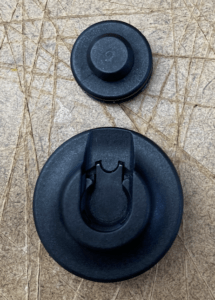
- We are planning to create a prototype using the Fidlock snap magnets; however, we only have one and do not think one would be enough to properly secure the cane onto the handle. We think we will need at least two, so we ordered more from https://www.aplusproducts.net/, which was recommended to use by Lukas. The products are decently priced and the warehouse is in New Jersey so we should get our shipment this week, though we were required to order in packs of 5, so we will be getting 5 new Fidlock snaps to prototype with.
- We are still deciding how we will attach the Snaps to both the cane and harness, though initially we are planning to just use tape and zip ties.
- One reason we decided to prototype with the Snaps is because the pieces can be reattached to each other in any orientation. A problem with the Slider is that it has to be reattached in a very precise way, which would likely not be easy for a visually impaired person to do quickly.
3D Modeling
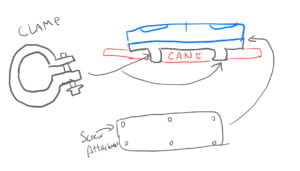
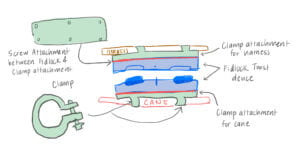
- In order to attach the base of the Fidlock Twist device onto the harness, we will be 3D modeling a clamp attachment that can clamp onto the harness or cane. The clamp attachment will be connected to the Fidlock Twist device by screwing the two pieces together. The clamp attachment mechanism allows for the user to tighten the clamp to fit multiple sizes of harnesses.
- Since the base of the Fidlock Twist has predrilled holes for screws, mounting the 3D printed base with the clamps will be quite simple without additional modification of the Fidlock mechanism.
- We plan to have a preliminary 3D prototype of these mounts by the week of 11/14.
- Vera and Gaurav will be splitting up the modeling, each working on one side of the Fidlock Twist (Top and Bottom).
Goals
- We plan on discussing these prototypes with Lukas during the week of 11/14.
- We will discuss how we can improve the design of the 3D model of the roundabout so that it meets the needs of the Seeing Eye instructors. We will receive some feedback from Amy.
- While we design the clamp attachment to the Fidlock twist, we’ll consider how we can adapt our other magnets as well. We were excited by how easily the Fidlock slide allowed us to remove the cane from the harness, but realized that it’s difficult to return it into place – how can we modify the slide magnet accordingly? We’ve also purchased individual Fidlock plugs and sockets that can be arranged to achieve the same effect as the Fidlock Twist. If our Fidlock Twist prototype proves to be successful, we can adapt the clamp mechanism to individual magnets, allowing more customized placements of the cane against the harness handle.
Weekly Update 3: 11/1/22 (Cane Attachment Research)
ITP Makerspace meeting
On October 26, 2022, our group met at the ITP Makerspace to brainstorm more about the cane attachment and the harness design. After speaking with Lukas the previous week, we decided to prioritize the cane attachment design over the harness design because the cane addressed the main issue of crossing the street. Since Lukas wanted us to incorporate the magnetic mechanism for the cane attachment, we looked more into the different magnetic Fidlock devices available on the website:
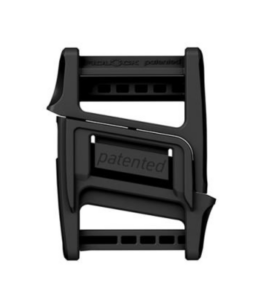
- This is a Fidlock Slider 25 device that Lukas provided us with. In order to separate the two parts in the middle, the user could easily slide the fastener laterally with one hand. This has been traditionally used for bags and satchels by fastening straps to the openings on either ends of the slider.
- From this design, we imagined having the cane connected to one of the two sliders and having the other slider attached to the leather harness part of the inner handle. In this way, the blind user could use their free hand to slide the attached cane towards themselves to detach the slider, allowing them to deploy the cane when they cross the street.
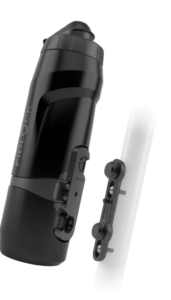
- Another Fidlock device that we considered for the cane attachment was the Fidlock TWIST Bottle 800, which was originally designed to attach water bottles to the base of bicycles. Since the device is twisted to detach from the base, we saw this as a potential mechanism for the cane attachment.
- Nonetheless, we discussed how the twisting mechanism might be difficult or uncomfortable to do when the attachment is placed on the inner lining of the handle. This twisting mechanism might also be difficult depending on the angle the user’s hand is reaching from.
Japanese Magnetic Twist Device
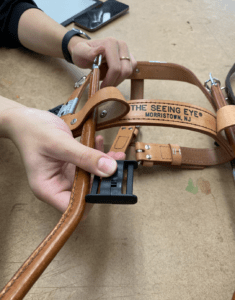
- Similar to the Fidlock TWIST Bottle device, this Japanese magnetic device utilizes a twist mechanism to detach the two parts. We saw the opportunity to attach one side to the cane and the other to the side of the handle for easy detachment. Compared to the TWIST bottle, this device is more compact and sturdy and easier to twist.
Fidlock Snap Female S Screw Cap

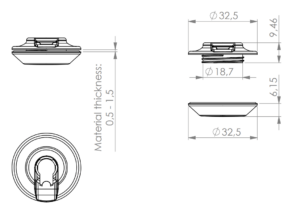
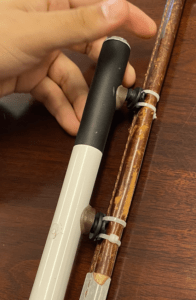
- Our community partner Lukas introduced us to this Fidlock Snap device, which allows for easy magnetic attachment and a lateral sliding motion to detach the smaller button. Since this requires an extra step of sliding the button laterally to detach, this could potentially work well with our cane attachment design. This device would prevent the cane from accidentally sliding off when bumping into other people and still be easier to detach than the twisting mechanism from the TWIST bottle device.
- Similar to Lukas’ prototype, we plan to have two of these magnetic snap devices on either ends of the cane to attach it more securely to the handle.
Since Fidlock is a German brand, it can be difficult to get here in the US. However, Lukas introduced us to A+ Products, a company based in New Jersey that sells Fidlock items and has them readily available, so we would not have to wait for them to ship from Germany. In addition, A+ has very reasonable prices, so if we need to order anything to prototype with, it will not cost a lot of money.
Method of Attachment
While we were at the ITP Makerspace, we also scheduled a meeting with Daniel to discuss the different ways we could attach and incorporate the magnetic mechanism. Some attachment ideas we discussed included:
- 3D printing the magnetic device to wrap around the handle
- Designing holes within the device to match with holes in the leather handle, which allow for a more seamless sew to attach the magnetic device
- Adding a rubbery or grippy material on the interior of the wrap to grip onto the handle better
- 3D print just the hook to attach to the magnetic device to then attach to the handle
- Look through Thingiverse for existing 3D models of attachment and grips we could potentially use
- Some more quick prototyping techniques for attachment include using zip ties, sewable ziplock, super glue, hot glue, and more
- Velcro – even though we know that it’s not the preferred material when working with fur, velcro is easy to use and prototype with.
Daniel suggested that out of the methods above, we look into creating a 3D model that could grip around the arm of the handle rather than try to sew something into the leather. One of the two harness samples we’ve received is covered in much older leather, meaning that its stitches are that much more likely to tear. As the leather ages, it also may not wrap around the harness rods as tightly as before. Relying on the leather wrapping to sustain whatever attachment we make means that the user will have to regularly treat the leather itself, or eventually even replace it.
We’ve received permission from Lukas to alter the harnesses as we needed, which means that we could also experiment with creating an attachment directly against the metal of the rod – rather than on the leather.
Goals
In the following week, we plan to start our initial prototypes and work with Yuxiang, an IMA student and ITP shop staff, to discuss more about 3D modeling and magnetic attachments like Fidlock. Yuxiang suggested we use the Fidlock Twist to attach the cane to the harness as it offers the most security, and offered to help us look into some 3D model designs to modify it. He pointed out that the Twist already has holes for screws – maybe we could create a fixture for it that can be fastened around the harness rods.
Weekly Update 2: 10/25/22 (Competitive Analysis)
Commercially Available Products or mechanisms
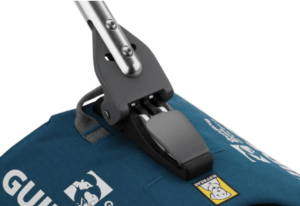

- The UniFly Harness is a guide dog harness that has a detachable handle made of a single rod with three adjustment points for length, hand position, and offset angle. To take off the handle, the user must press on the side tabs at the connection point.
- The ergonomic handle can rotate to accommodate different wrist angles in motion.
- Potential Modifications:
- This harness is made from fabric, so it gets dirty very easily – ours will be made out of a different material like leather so it can last longer and withstand the wear and tear.
- Since the UniFly handle is not restricted in movement, it can slip forward past the user’s range, making them lose control and grip of the handle. Our solution will include loops that will prevent the handle from going too forward.
- The UniFly handle only attaches at one point on the center of the harness, which restricts the amount of information the user can extract from the guide dog’s movement. To counter this, our solution will include two attachment points to the harness which connects at a center point for the handle attachment.
Easy Lock Dog Harness (Magnetic Clasp Harness)
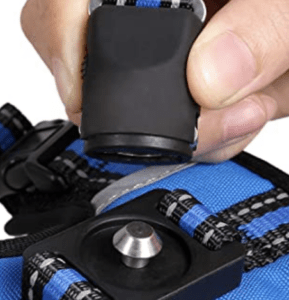
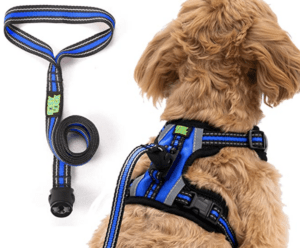
- The 360 degree magnetic component on the harness allows for easy attachment and detachment of the leash. The quick snap buckles make it easy to put on and take off the harness. Additionally, the reflective strips on the harness helps ensure dogs’ safety in public.
- Potential Modifications:
- The harness isn’t designed for guide dogs but has the magnet feature that we would like to use. This 360 degree magnetic clasp design may be useful for both the handle and cane attachment because users can easily connect and release the magnet by pressing the side tabs.
- Unlike this harness and leash design that connects straight out and perpendicular from the center of the dog’s back, our solution will have the magnetic clasp attach parallel to the harness.
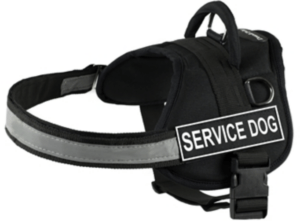
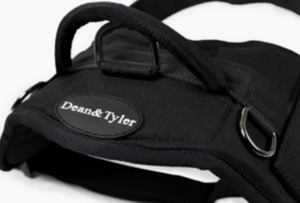
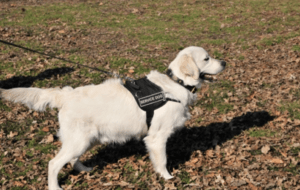
- DT Works is a service dog vest that has a hook and loop fasteners for easy attachment and detachment of the leash or handle. It’s made out of double-ply, neoprene nylon material that makes it more more durable for different weather and machine-washable. Along with an visible label “Service Dog”, there is a reflective strip along the chest part of the harness, which increases visibility under low light conditions.
- Potential Modifications:
- We wanted to incorporate a magnetic clasp component for the hook and loop fasteners. This would especially be useful to facilitate easy removal of the harness or handle attachment.
- Our Seeing Eye partner Lukas is interested in exploring how we might apply these fastening magnets to canes and harnesses.
- From the Fidlock website: “We take the best features of mechanical locks and combine them with magnetic force, revolutionizing fasteners. Perfectly balanced magnets guide our fastening components which lets them close automatically with an audible click – the mechanical engagement keeps them securely locked. On top of that, you can quickly open them with only one hand with simple movements such as rotating, sliding or tilting. This reverses the polarity of the magnets and guarantees for an easy, quick release.”
Literature Review
Traveling with a Guide Dog: Experiences of People with Vision Impairment
The paper focuses on blind people’s experiences with traveling with a guide dog on different modes of transportation during the holidays in the UK. Some barriers they encounter while using public transportation include difficulty hearing audio announcements, navigating crowded spaces, finding and getting on the correct bus or train, finding entrances, receiving updates about changes to services, and receiving adequate assistance. Additionally, people with guide dogs also experience service refusals, lack of dog services and relief areas, and inadequate staff training on guide dogs.
Pressure distribution under three different types of harnesses used for guide dogs
The design of the harness affects the pressure and force distribution on the guide dog, which also changes depending on the type of activity the blind person is engaging in. Since guide dogs work several hours every day, it’s important to design a harness that minimizes the load on the guide dogs. For traditional leather harness designs, the highest loads were located near the right sternum on the ventral side of the dog. The back regions of the guide dog were not heavily loaded because of the lifted handle position.
This study focuses on two types of common harnesses used with guide dogs, a Y harness and a Norwegian style harness and their function with straight and curved handles. As the cost of training and maintaining a guide dog is expensive, the return on investment and longevity should also be focused on the health of the dog. From this study, the stride lengths of the dog are reduced when used with a Y harness, however other factors that may affect the walking ability of the dog are the attachment method and angle of the handle.
Enhanced White Cane for Visually Impaired People
This is possibly not a good article to use because it gives the impossible statistic of “285 billion people in the world have visual impairment”, though this could have been a typo or translation error. Here it states that at least 2.2 billion people have a vision impairment, though this includes all types of vision impairment, not just blindness. There are articles that say around 285 million people in the world have a visual impairment, but this includes more than just people with near/complete blindness. If this article is trustworthy enough – it discusses a smart cane they have created that uses ultrasonic, light, and water sensors to produce vibrations. In addition, GPS technology is used to text location messages to a helper phone if a person gets lost and does not know where to go. It is designed to act as artificial vision and/or an alarm unit.
A Systematic Review of the Biomechanical Effects of Harness and Head-Collar use in Dogs
While head-collars are outside of what we intend to design, and the harnesses discussed are not limited to those used specifically for guide dogs, the paper’s investigation of the existing research on the effect these have on a dog’s gait should remind us that that before we decide to create a harness ourselves, we must have a way to ascertain its safety based on existing research or expert feedback. However, according to the paper, most research is imprecise about just how much certain harnesses can impact a dog’s range of motion, or lack the quantitative evidence to show it. This presents a major issue worth keeping in mind throughout our research – in the words of the authors, “This lack of understanding poses a dilemma for veterinarians and physiotherapists alike, especially in the context of evidence-based practice, who are forced to make judgements on what is best for a dog’s long-term welfare, with no reliable means of knowing potential outcomes.”
Reflection
What is the relationship between your proposed solution and the current technologies your partner uses?
Currently, instructors at the Seeing Eye don’t have access to a physical reference or model that can easily communicate details about roundabouts and other traffic designs to blind community members. We plan to create a few different 3D printed samples using publicly available models, and test how they can impact understanding of traffic.
As the students and graduates at The Seeing Eye are guide dog users, our solution would help them integrate an auxiliary tool to their daily routine, rather than replace what they already use. The most typical harness for the guide dog, at least in the US, uses a set of buckles to fix the harness over the dog’s head. Its handle is typically a U-shape and attaches to the dog’s shoulders, not unlike what is used for horses, in order to provide the user feedback from the dog’s movements. That said, we’ve learned that there is no universal model of harness, and that designs can differ greatly between countries. Meanwhile, canes can also take many shapes and sizes, but as the guide dog is the main device for navigation, the cane should be unobtrusive.
For example, our partner spoke about implementing a telescopic cane which can be deployed and retracted easily when crossing intersections. In our solution, we plan to create a magnetic attachment point for the telescopic cane on the handle of the harness that’s sturdy enough to prevent the cane from detaching because of random movement or collision.
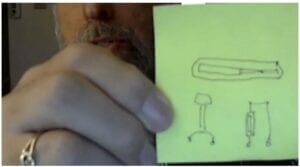
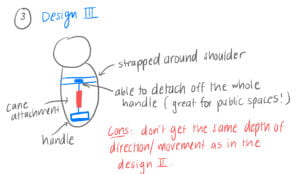
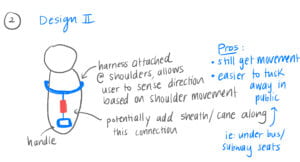
Here are some potential designs for the harness and cane attachment that we brainstormed with Lukas:
How will your group ensure that your solution won’t interfere with your partner’s current daily activities?
Through our research and conversations with our partner, we’ve learned about the need for a solution that would allow easier, safer travel in public spaces, such as a crowded subway car. To that end, we intend to design a solution that reduces the time needed to access a cane while using a guide dog. We also want to make it possible to remove attachments to the harness handle as needed.
We will use a material for the harness that’s easier to maintain — e.g., leather, rather than cloth. For the cane, we will make sure that we are using materials both light enough to carry comfortably, especially by the guide dog, and sturdy enough that they don’t break throughout everyday interactions.
Another important factor of harness design is ensuring that the blind user can extract enough information from the guide dog’s movement through the handle. After discussing with our community partner, we learned that such a design would require the handle to have two attachment points to the harness near the guide dog’s shoulders.
How will your group design a solution so it doesn’t interfere with other devices in your partner’s environment?
As discussed, given that our partner’s main tool of navigation is their guide dog, we want to make sure that whatever attachment we include or modification we make to the harness doesn’t create new challenges in their daily use (e.g., by adding too much weight, or by causing potential discomfort to the dog). We would also like to make sure our partner can access their phone or respond to other needs with their free hand while using their guide dog and having access to their cane.
Weekly Update 1: 10/18/22 (Goals)
Team Name: Envision
Our team name is Envision. When figuring out a team name, we did a quick brainstorming session to come up terms that relate to the Seeing Eye. Some terms and concepts that came up were “guide”, “lighthouse”, “navigators”, and more. We ultimately voted to decide and “Envision” was the winner! Envision means imagining future possibilities and bringing ideas to life, which is exactly what we plan to do with our project as a team!
Team Responsibilities
Laura Lachin is the main point of contact for communicating and scheduling meetings with our community partner Lukas.
Gaurav: prototyping (3D modeling/printing), wood/carpentry
Haonan: user research, prototyping (3D modeling)
Laura: communications (Lukas), prototyping (laser cutting, 3D printing, cardboard)
Mashi: communications, user research, interested in prototyping
Meera: user research, prototyping (cardboard, could learn 3D modeling)
Michelle: user research, prototyping (sketching, cardboard, could learn 3D modeling)
Vera: prototyping (laser cutting, 3D modeling/printing)
Schedule
We plan to meet at least once a week on Friday afternoons online or in person in order to update each other on research and new designs and go over objectives for the following week.
Description of the Project
After meeting with Lukas, we learned that there are several potential projects worth undertaking, with the ultimate goal of helping blind guide dog users navigate traffic more safely. We summarize these ideas below:
- Find a way to attach a cane to a dog harness
- Redesign the guide dog harness: A harness is constantly colliding with other objects, especially in crowded public spaces. Any attachment mechanism must be able to withstand constant movement.
- Redesign the cane and sheath: Canes must be lightweight, sturdy, and easy to deploy. In order to attach to the harness, a compact and retractable design is necessary.
- Create 3D printed models of roundabouts: Tactile representations of roundabouts and other traffic formations can be used as training materials to help blind people understand how to safely traverse them.
tools and expertise
We have several members with 3D prototyping experience. Some members have a great understanding of user-centered design, which will enable us to conduct user research and user testing. We will need to learn more about mechanical mechanisms that may be useful in constructing the harness and cane. These mechanisms will allow users to easily deploy the cane and create a more seamless navigation with a Seeing Eye guide dog. Other tools and techniques we may learn include milling (CNC Mill) and laser cutting. We hope to experiment with these and others in the Makerspace.
TimeLine
We plan to visit The Seeing Eye facilities before the end of October. At The Seeing Eye, we hope to chat with people to better understand the pain points that blind people encounter when navigating around with a Seeing Eye Dog. It may also be useful to talk with secondary users like Seeing Eye trainers. We also want to go over some research regarding the cane, sheath, and harness design. With everyone, we can have a brainstorming session with Lukas, our community partner, to generate a plethora of potential designs. After visiting the Seeing Eye, conducting more user research, and speaking with more blind users, we can generate sketches and low-fidelity prototypes to further improve on with the users and Lukas.
| Date | |
| 9/30/22 | First meeting with Lukas Franck on Zoom |
| 10/4/22 – 10/10/22 | Conduct background research on harness and cane designs |
| 10/11/22 | Group Meeting |
| 10/17/22 | Group Meeting |
| 10/21/22 | Trip to the Seeing Eye campus in Morristown, NJ |
| 10/26/22 | ITP Makerspace Meeting with Daniel |
| 11/8/22 | Initial Prototyping using Fidlock magnets for Twist and Slider |
| 11/15/22 | Prototyping for clamp attachment with legos and cardboard |
| 11/22/22 | Usability Testing Twist and Snaps prototypes, Printing Clamp Attachments & 3D Roundabout Model |
| 12/6/22 | Prototyping Sheath and in person meeting with Lukas at the Ability Lab |
| 12/9/22 | Prototyping Sheath with cane bag |
| 12/10/22 – 12/12/22 | Printing final 3D roundabout model & Prototyping clamp attachment |
| 12/13/22 | Final presentation |