Playful Robot Documentation
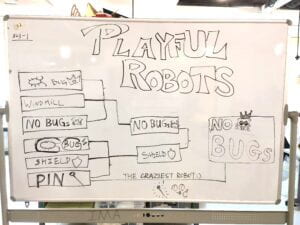
In this task, we made a robot that participated in a robotic balloon poking battle. We encountered many difficulties during the process but also had a lot of fun with it.
PART 1
The first part will focus on the sensor position and the algorithm that allows the mobile platform to perform several actions. Due to the stress related to the lockdown and not having adequate materials, Rudi gave us a free pass.
In the first part, we need to place the robot on a flat surface (the floor of the 823) that has a black line with a diameter of 2 meters. This line itself will be made of electrical tape (about 2.5 cm wide). Within this circle, we will place 3 cardboard boxes that are light and easy to push. Our robot should use infrared sensors to detect the line and stay within the circle without human “help”. Also, use ultrasonic sensors to detect and push the boxes outside the circle. This is to keep the robot inside the playing field in the final match and to rush toward other robots trying to push them out of the field.
We initially modified the ultrasonic sensor’s original program to make it spin slightly in the right direction and run toward the obstacle when it detects anything in front of it. After that, we added an IR sensor. At first, we used two small three pins IR sensors, but on Rudi’s advice, we switched to the TCRT5000, which has four pins: VCC, GND, D0, and A0. We referred to this website TCRT5000 Infrared Reflective Sensor – How It Works and Example Circuit With Code : 6 Steps – Instructables
However, inconsistent with the presentation, the digitalRead (A0) and the other digitalRead seem to have only two values: 1 and 0. Later, we learned that we should use other functions than the digitalRead to get the value of the analog read.
Originally, we also added code that allowed the car to make random turns when no line or obstacle was detected. Later, it was removed because it would cause more delay. The following are the two portions’ fundamental implementation codes.
#include <Servo.h>
#include <Metro.h>
#define front A0
#define digitaltal 8

Metro measureDistance = Metro(50);
Metro sweepServo = Metro(20);

int speedPin_M1 = 5;     //M1 Speed Control
int speedPin_M2 = 6;     //M2 Speed Control
int directionPin_M1 = 4;     //M1 Direction Control
int directionPin_M2 = 7;     //M2 Direction Control
unsigned long actualDistance = 0;

Servo myservo;  // create servo object to control a servo
int pos = 60;
int sweepFlag = 1;
int turn = 0;

int URPWM = 3; // PWM Output 0-25000US,Every 50US represent 1cmk
int URTRIG = 10; // PWM trigger pin
uint8_t EnPwmCmd[4] = {0x44, 0x02, 0xbb, 0x01}; // distance measure command

void setup(){                                 // Serial initialization
  myservo.attach(9);
  Serial.begin(9600);                         // Sets the baud rate to 9600
  SensorSetup();
  pinMode(front,INPUT);
  pinMode(digitaltal,INPUT);
  delay(1000);
}

void loop() {
  if (measureDistance.check() == 1) {
    actualDistance = MeasureDistance();
  }

  if (sweepServo.check() == 1) {
    servoSweep();
  }


//  lineCheck();


  if (actualDistance <= 20 && actualDistance > 4) {             //alter this value to change sensor's sensitivity
    myservo.write(90);
    if (pos >= 90) {
      carTurnLeft(150, 150);             //alter these values to change turn right speed
      delay(300);
      carAdvance(250, 250);
      delay(300);
      carAdvance(250, 250);
      Serial.println("carTurnLeft");
      delay(300);
    } else {
      carTurnRight(150, 150);             //alter these values to change turn right speed
      delay(300);
      carAdvance(250, 250);
      delay(300);
      carAdvance(250, 250);
      Serial.println("carTurnRight");
      delay(300);
    }
//  } else {
//    carAdvance(150, 150); //alter these values to change forward speed
////    turn = random(1,4);
//    delay(300);
//    Serial.println("carAdvance");
//    if (turn == 1){
//      carTurnLeft(250, 250);
//      delay(300);
//      carTurnLeft(250, 250);
//      delay(300);
//    }else if(turn == 2){
//      carTurnRight(250, 250);
//      delay(300);
//      carTurnRight(250, 250);
//      delay(300);
//    }else{
//      carAdvance(200,200);
//      delay(300);
//    }
  }
  if (digitalRead(front) == 1 && digitalRead(digitaltal) == 1){
    carBack(250,250);
    delay(300);
    carBack(250,250);
    delay(300);
    carBack(250,250);
    delay(300);
    Serial.print("carBack");
  }else{
    carAdvance(150,150);
    Serial.println("carAdvance");
  }
}


//void lineCheck(){
//  Serial.print(digitalRead(front));
//  Serial.println(digitalRead(digitaltal));
//}

void SensorSetup() {
  pinMode(URTRIG, OUTPUT);                    // A low pull on pin COMP/TRIG
  digitalWrite(URTRIG, HIGH);                 // Set to HIGH
  pinMode(URPWM, INPUT);                      // Sending Enable PWM mode command
  for (int i = 0; i < 4; i++) {
    Serial.write(EnPwmCmd[i]);
  }
}

int MeasureDistance() { // a low pull on pin COMP/TRIG  triggering a sensor reading
  digitalWrite(URTRIG, LOW);
  digitalWrite(URTRIG, HIGH);               // reading Pin PWM will output pulses
  unsigned long distance = pulseIn(URPWM, LOW);
  if (distance == 1000) {          // the reading is invalid.
    Serial.print("Invalid");
  } else {
    distance = distance / 50;       // every 50us low level stands for 1cm
  }
  return distance;
}

void carStop() {                //  Motor Stop
  digitalWrite(speedPin_M2, 0);
  digitalWrite(directionPin_M1, LOW);
  digitalWrite(speedPin_M1, 0);
  digitalWrite(directionPin_M2, LOW);
}

void carBack(int leftSpeed, int rightSpeed) {       //Move backward
  analogWrite (speedPin_M2, leftSpeed);             //PWM Speed Control
  digitalWrite(directionPin_M1, HIGH);              //set LOW to reverse or HIGH to advance
  analogWrite (speedPin_M1, rightSpeed);
  digitalWrite(directionPin_M2, HIGH);
}

void carAdvance(int leftSpeed, int rightSpeed) {     //Move forward
  analogWrite (speedPin_M2, leftSpeed);
  digitalWrite(directionPin_M1, LOW);
  analogWrite (speedPin_M1, rightSpeed);
  digitalWrite(directionPin_M2, LOW);
}

void carTurnLeft(int leftSpeed, int rightSpeed) {           //Turn Left
  analogWrite (speedPin_M2, leftSpeed);
  digitalWrite(directionPin_M1, LOW);
  analogWrite (speedPin_M1, rightSpeed);
  digitalWrite(directionPin_M2, HIGH);
}
void carTurnRight(int leftSpeed, int rightSpeed) {         //Turn Right
  analogWrite (speedPin_M2, leftSpeed);
  digitalWrite(directionPin_M1, HIGH);
  analogWrite (speedPin_M1, rightSpeed);
  digitalWrite(directionPin_M2, LOW);
}

void servoSweep() {
  if (sweepFlag) {
    if (pos >= 60 && pos <= 120) {
      pos = pos + 15;                              // in steps of 1 degree
      myservo.write(pos);                         // tell servo to go to position in variable 'pos'
    }
    if (pos > 119)  sweepFlag = false;                    // assign the variable again
  }
  else {
    if (pos >= 60 && pos <= 120) {
      pos = pos - 15;
      myservo.write(pos);
    }
    if (pos < 61)  sweepFlag = true;
  }
}
PART 2
The second part is focusing on the construction of an electro-mechanical actuator. The ultimate goal was to poke the balloons of the other groups as soon as possible. We sketched the drawing initially. We chose to use the platform of two servos after considering the robots of other groups and the structure of our group’s robots. The small servo at the tail of the robot has a 180° attack range. The larger one must be somewhat higher than the smaller one as well as the ultrasonic sensor. The larger servo was used to attack and defend the balloons that were positioned above since the attack range was set to 360 degrees.

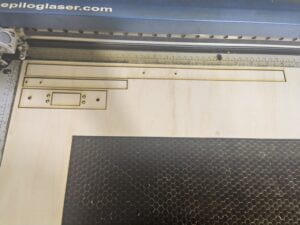
In this part, I was mainly in charge of the fabrication part and my partners, Callie and Linda, were in charge of the code part. Since we were required to use digital fabrication techniques and not use hot melt glue, I measured the dimensions of the servos, etc. and laser cut three rectangular plates.

One rectangular plate was used to attach the large servo to the heightened plastic post that came with the car kit. The other two plates are the attack arms. We wanted them to be as long as possible, so we chose a length of 40 cm in the front and 20 cm in the back. Initially, we planned to laser cut the spikes directly to the attack. callie and Linda suggested star shaped spikes, but I thought a vertical sharp enough angle to reduce the contact area would work. I took Rudy’s advice and decided to use a large-headed pin (which proved to be a crazy killer).
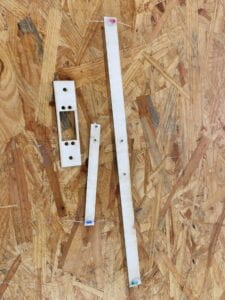
In the end, since the screw holes were prepped, I used screws to secure the servo motor to the designed part. The part is firmly attached and moves only where it is supposed to, without wobbling.
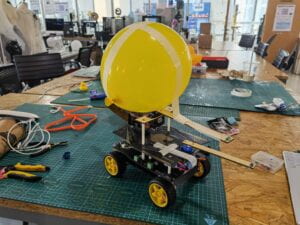
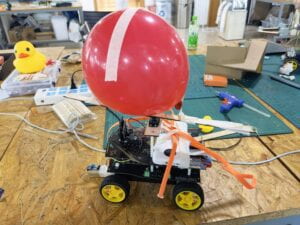
In the code experiments, we found at first that the servos do not rotate well. Especially it does not rotate even when other robots are backing up or turning. We believed that the delay was excessive and that pos1 would only be relevant as it advanced. We shortened a few delays and introduced the servo1Sweep() method to assist the servo rotating constantly. Here is the code.
            //alter these values to change turn right speed
      delay(300);
      carAdvance(250, 250);
      delay(300);
      Serial.println("carTurnRight");
    }
  }

}


void SensorSetup() {
  pinMode(URTRIG, OUTPUT);                    // A low pull on pin COMP/TRIG
  digitalWrite(URTRIG, HIGH);                 // Set to HIGH
  pinMode(URPWM, INPUT);                      // Sending Enable PWM mode command
  for (int i = 0; i < 4; i++) {
    Serial.write(EnPwmCmd[i]);
  }
}

int MeasureDistance() { // a low pull on pin COMP/TRIG  triggering a sensor reading
  digitalWrite(URTRIG, LOW);
  digitalWrite(URTRIG, HIGH);               // reading Pin PWM will output pulses
  unsigned long distance = pulseIn(URPWM, LOW);
  if (distance == 1000) {          // the reading is invalid.
    Serial.print("Invalid");
  } else {
    distance = distance / 50;       // every 50us low level stands for 1cm
  }
  return distance;
}

void carStop() {                //  Motor Stop
  digitalWrite(speedPin_M2, 0);
  digitalWrite(directionPin_M1, LOW);
  digitalWrite(speedPin_M1, 0);
  digitalWrite(directionPin_M2, LOW);
}

void carBack(int leftSpeed, int rightSpeed) {       //Move backward
  analogWrite (speedPin_M2, leftSpeed);             //PWM Speed Control
  digitalWrite(directionPin_M1, HIGH);              //set LOW to reverse or HIGH to advance
  analogWrite (speedPin_M1, rightSpeed);
  digitalWrite(directionPin_M2, HIGH);
}

void carAdvance(int leftSpeed, int rightSpeed) {     //Move forward
  analogWrite (speedPin_M2, leftSpeed);
  digitalWrite(directionPin_M1, LOW);
  analogWrite (speedPin_M1, rightSpeed);
  digitalWrite(directionPin_M2, LOW);
}

void carTurnLeft(int leftSpeed, int rightSpeed) {           //Turn Left
  analogWrite (speedPin_M2, leftSpeed);
  digitalWrite(directionPin_M1, LOW);
  analogWrite (speedPin_M1, rightSpeed);
  digitalWrite(directionPin_M2, HIGH);
}
void carTurnRight(int leftSpeed, int rightSpeed) {         //Turn Right
  analogWrite (speedPin_M2, leftSpeed);
  digitalWrite(directionPin_M1, HIGH);
  analogWrite (speedPin_M1, rightSpeed);
  digitalWrite(directionPin_M2, LOW);
}

void servoSweep() {
  if (sweepFlag) {
    if (pos >= 60 && pos <= 120) {
      pos = pos + 15;                              // in steps of 1 degree
      myservo.write(pos); // tell servo to go to position in variable 'pos'
    }
    if (pos > 119)  sweepFlag = false;                    // assign the variable again
  }
  else {
    if (pos >= 60 && pos <= 120) {
      pos = pos - 15;
      myservo.write(pos);
    }
    if (pos < 61)  sweepFlag = true;
  }
}

void servo1Sweep() {
  if (sweepFlag1) {
    if (pos1 >= 60 && pos1 <= 120) {
      pos1 = pos1 + 15;                              // in steps of 1 degree
      leftServo.write(pos1); // tell servo to go to position in variable 'pos'
    }
    if (pos1 > 119)  sweepFlag1 = false;                    // assign the variable again
  }
  else {
    if (pos1 >= 60 && pos1 <= 120) {
      pos1 = pos1 - 15;
      leftServo.write(pos1);
    }
    if (pos1 < 61)  sweepFlag1 = true;
  }
}

void servo2Sweep() {
  if (sweepFlag2) {
    if (pos2 >= 60 && pos2 <= 120) {
      pos2 = pos2 + 15;
      rightServo.write(pos2);
    }
    if (pos2 > 119)  sweepFlag2 = false;                    // assign the variable again
  }
  else {
    if (pos2 >= 60 && pos2 <= 120) {
      pos2 = pos2 - 15;
      rightServo.write(pos2);
    }
    if (pos2 < 61)  sweepFlag2 = true;
  }
}
However, on the morning of the competition, the code suddenly didn’t work, and Rudi noticed that it flashed red every time the robot was required to take an action (such as detecting a black line). Rudi thought that maybe the big motor was taking too much voltage away from the robot and it wasn’t working properly. We replaced the battery with a brand new one, but it still didn’t work out. I was very anxious and anxious, but after Rudi provided us with a rechargeable battery it worked miraculously and very fast.
(The longer video is too big to put in)
Although our robot was pushed out of the field in the group showdown, the pins were extremely effective in killing in the “Smash”. There was sadness and anxiety in the process, but I experienced a lot of joy! Thanks Rudi for organizing such a fun competition, and thanks to my partner Callie and Linda!
